Tabla de contenido
Publicidad
Idiomas disponibles
Idiomas disponibles
Enlaces rápidos
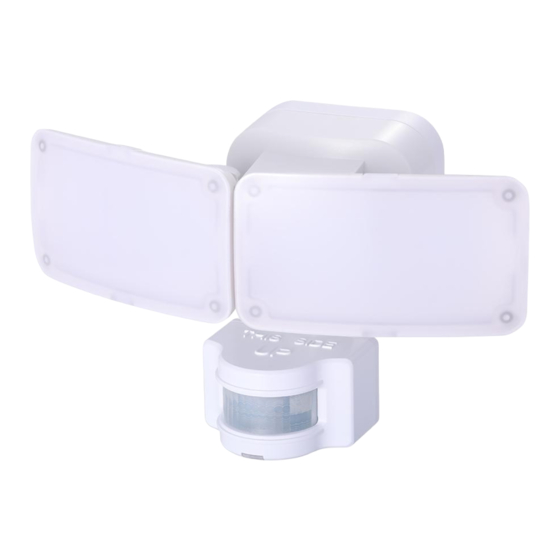
Item #1005 536 300
Model #DFI-0553-WH
USE AND CARE GUIDE
MOTION SECURITY LIGHT
Questions, problems, missing parts? Before returning to the store,
call Defiant Customer Service
8 a.m. - 7 p.m., EST, Monday - Friday, 9 a.m. - 6 p.m., EST, Saturday
1-866-308-3976
HOMEDEPOT.COM
THANK YOU
We appreciate the trust and confidence you have placed in Defiant through the purchase of this motion security light.
We strive to continually create quality products designed to enhance your home. Visit us online to see our full line of
products available for your home improvement needs. Thank you for choosing Defiant!
Publicidad
Capítulos
Tabla de contenido
Solución de problemas

Manuales relacionados para Defiant DFI-0553-WH


Resumen de contenidos para Defiant DFI-0553-WH
- Página 1 THANK YOU We appreciate the trust and confidence you have placed in Defiant through the purchase of this motion security light. We strive to continually create quality products designed to enhance your home. Visit us online to see our full line of...
-
Página 2: Tabla De Contenido
Table of Contents Mounting Location .........4 Safety Information ........2 Solar Panel ..........4 Precautions ..........2 Specifications ........5 FCC Notice ..........2 Tools Required ........5 Warranty ...........3 Hardware Included .........5 3-Year Limited Warranty ......3 Package Contents ........6 What Is Covered ........3 Installation ..........7 What Is Not Covered ......3 Operation..........10 Pre-Installation .........4... -
Página 3: Warranty
Warranty 3-YEAR LIMITED WARRANTY WHAT IS COVERED This product is guaranteed to be free of factory defective parts and workmanship for a period of 3 years from date of purchase. Purchase receipt is required for all warranty claims. WHAT IS NOT COVERED This guarantee does not include repair service, adjustment and calibration due to misuse, abuse or negligence. -
Página 4: Pre-Installation
Pre-Installation PLANNING INSTALLATION PRODUCT DESCRIPTION Before installing the light fixture, ensure that all This light operates with a battery charged from a solar parts are present. Compare parts with the Hardware panel. If the voltage of the Nickel-metal hydride (Ni- Included and Package Contents sections. -
Página 5: Specifications
Pre-Installation (continued) SPECIFICATIONS Up to 50 ft. (15 m) (Varies with surrounding temperature) Range Up to 180° Sensing angle Solar Power: 500 LM Lumens Solar panel and rechargeable Nickel-metal Hydride Batteries Power requirements Motion and Test Operating modes 30 to 90 seconds Time delay TOOLS REQUIRED Phillips... -
Página 6: Package Contents
Pre-Installation (continued) PACKAGE CONTENTS Part Description Quantity Lamp head Light fixture Motion sensor Power button Solar panel Solar panel cradle Extendable cord (pre-assembled to light fixture (B)) Extendable cord (pre-assembled to solar panel (E)) -
Página 7: Installation
Installation Determining the mounting Setting the sensor for wall or location eave mounting NOTE: The light fixture should be mounted approximately NOTE: Adjust the sensor angle to a coverage desired. 8 ft. (2.4 m) above the ground. NOTE: Ensure the fixture and the solar panel are located □... -
Página 8: Installing The Mounting Plate
Installation (continued) Installing the mounting plate Mounting the light fixture □ Slide the rear of the light fixture (B) onto the NOTE: Make sure there is enough vertical space above mounting plate (AA) from either the left or right the mounting plate to allow the light fixture to be mounted. side. - Página 9 Installation (continued) Mounting the solar panel RECOMMENDED: Caulk around the base and on top of the screw heads after installation Place the solar base (F) against the mounting surface and mark the mounting holes. □ Place the panel (E) into the base (F) and use the base screw (BB) to secure the panel (E) in place on the base (F).
-
Página 10: Operation
Operation Adjusting the lamp heads Using the OFF Control □ □ If needed, gently grasp the lamp heads (A) and Press the Power button (D) to turn the light (B) tilt them up or down or side-to-side to adjust the off and to conserve the battery life. - Página 11 Operation (continued) Testing the light NOTE: It is recommended that the light be tested before being placed in regular operation. Remember to set the switch from Test to Motion after testing the light. NOTE: Testing the unit indoors or lower than 7 ft. from the ground may not enable the light to work optimally when mounted into its final outdoor position.
- Página 12 Operation (continued) Reading the indicator light □ The indicator light is located below the motion sensor (C), and shows the basic status of the light. □ If the indicator light flashes RED twice, the sensor is detecting motion. This is an indication that the motion sensor is working, even if the LED light heads are not activating.
-
Página 13: Adjusting The Sensitivity
Operation (continued) Adjusting the sensitivity Adjusting the LUX NOTE: Adjust the setting of the environmental light NOTE: The SENS dial adjusts the sensitivity of the motion brightness to trigger the auto dusk-to-dawn photocell. sensor. □ To turn on the light in a very dark area, turn the □... -
Página 14: Maintenance
Maintenance When the pre-installed, rechargeable Nickel-metal Hydride (Ni-MH) batteries have reached the end of their useful life, they can be easily replaced. □ This unit requires three AA, 1200mAh Ni-MH replacement batteries, which can be purchased at The Home Depot. □... -
Página 15: Troubleshooting
Troubleshooting Problem Possible Cause Solution The light will not turn ON The Power button is in the Make sure the Power button is in the ON position. at night. OFF position. The batteries may be Check the connection between the light unit and the depleted. - Página 16 Questions, problems, missing parts? Before returning to the store, call Defiant Customer Service 8 a.m. - 7 p.m., EST, Monday-Friday, 9 a.m. - 6 p.m., EST, Saturday 1-866-308-3976 HOMEDEPOT.COM Retain this manual for future use.
-
Página 17: Lámpara De Seguridad Detectora De Movimiento
GRACIAS Agradecemos la confianza que ha depositado en Defiant a través de la compra de esta lámpara de seguridad con detección de movimiento. Nos esforzamos continuamente para crear productos de calidad diseñados para mejorar su hogar. Visítenos en línea para... -
Página 18: Información De Seguridad
Índice Ubicación de montaje ......4 Información de seguridad ......2 Panel solar ..........4 Precauciones .........2 Especificaciones ........5 Aviso de la FCC ........2 Herramientas requeridas .......5 Garantía.............3 Herraje incluido ........5 Garantía limitada por 3 años ....3 Contenido del paquete ......6 Qué es lo que cubre .......3 Instalación ..........7 Qué... -
Página 19: Garantía
Garantía GARANTÍA LIMITADA POR 3 AÑOS QUÉ SE CUBRE Este producto está garantizado contra piezas defectuosas de fábrica y mano de obra por un período de 3 años a partir de la fecha de compra. El recibo de compra es necesario para todos los reclamos de garantía. QUÉ... -
Página 20: Antes De La Instalación
Antes de la instalación PLANIFICACIÓN DE LA INSTALACIÓN DESCRIPCIÓN DEL PRODUCTO Antes de instalar la lámpara, asegúrese de que todas Esta lámpara funciona con una batería que se carga las piezas estén presentes. Verifique las piezas con a partir de un panel solar. Si el voltaje de las baterías las secciones de Herraje incluido y Contenido del de níquel-metal hidruro (Ni-MH) se reduce a 3 V, la paquete. -
Página 21: Especificaciones
Antes de la instalación (continuación) ESPECIFICACIONES Hasta 50 pies (15 m) (varía con la temperatura ambiente) Alcance Hasta 180° Ángulo de detección Energía solar: 500 LM Lúmenes Panel solar y baterías recargables de níquel-metal hidruro Requerimientos de alimentación Movimiento y Prueba Modos de funcionamiento 30 a 90 segundos Tiempo de demora... -
Página 22: Contenido Del Paquete
Antes de la instalación (continuación) CONTENIDO DEL PAQUETE Pieza Descripción Cantidad Cabeza de la lámpara Lámpara Sensor de movimiento Botón de encendido Panel solar Base del panel solar Cable de extensión (preensamblado a la lámpara (B)) Cable de extensión (preensamblado al panel solar (E)) -
Página 23: Instalación
Instalación Determinación de la ubicación Ajuste del sensor para montaje de montaje en la pared o el alero NOTA: La lámpara debe instalarse aproximadamente NOTA: Ajuste el ángulo del sensor a la cobertura a 8 pies (2.4 m) por encima del suelo. deseada. -
Página 24: Instalación De La Placa De Montaje
Instalación (continuación) Instalación de la placa de montaje Montaje de la lámpara □ Deslice la parte trasera de la lámpara (B) sobre NOTA: Asegúrese de que haya suficiente espacio vertical la placa de montaje (AA) desde el lado izquierdo por encima de la placa de montaje para que la lámpara se pueda montar. -
Página 25: Montaje Del Panel Solar
Instalación (continuación) Montaje del panel solar RECOMENDACIÓN: Enmasille alrededor de la base y encima de las cabezas de los tornillos después de la instalación Coloque el panel solar (F) contra la superficie de montaje y marque los orificios de montaje. □... -
Página 26: Funcionamiento
Funcionamiento Ajuste de las cabezas de las Utilización del control de lámparas apagado □ □ Si es necesario, agarre suavemente las cabezas Presione el botón de encendido (D) para apagar de la lámpara (A) e inclínelas hacia arriba o la lámpara (B) y conservar la carga de la batería. hacia abajo o de lado a lado para ajustar el área NOTA: Al presionar el botón hacia adentro se enciende de cobertura de la luz... -
Página 27: Prueba De La Lámpara
Funcionamiento (continuación) Prueba de la lámpara NOTA: Se recomienda hacer una prueba a la lámpara antes de colocarla para su funcionamiento regular. Recuerde colocar el interruptor de Test (Prueba) a Motion (Movimiento) después de probar la lámpara. NOTA: Probar la unidad en interiores o a menos de 7 pies del suelo puede no permitir que la lámpara funcione de manera óptima cuando se monta en su posición final en el exterior. -
Página 28: Lectura De La Luz Indicadora
Funcionamiento (continuación) Lectura de la luz indicadora □ La luz indicadora se encuentra debajo del sensor de movimiento (C) y muestra el estado básico de la luz. □ Si la luz indicadora parpadea en ROJO dos veces, el sensor está detectando movimiento. Esto es una indicación de que el sensor de movimiento está... -
Página 29: Ajuste De Lux
Funcionamiento (continuación) Ajuste de la sensibilidad Ajuste de LUX NOTA: Ajuste el valor de luminosidad de la luz ambiental NOTA: La perilla SENS ajusta la sensibilidad del sensor para que active la fotocélula automáticamente desde el crepúsculo hasta el amanecer. de movimiento. -
Página 30: Mantenimiento
Mantenimiento Cuando las baterías recargables preinstaladas de níquel-metal hidruro (Ni-MH) han llegado al final de su vida útil, pueden reemplazarse fácilmente. □ Esta unidad requiere tres baterías de repuesto AA, 1200 mAh Ni-MH, que se pueden comprar en The Home Depot. -
Página 31: Resolución De Fallas
Resolución de fallas Problema Causa posible Solución La lámpara no enciende El botón de encendido Asegúrese de que el botón de encendido esté en la en la noche. está en la posición de posición ON. apagado (OFF). Las baterías pueden estar Compruebe la conexión entre la unidad de iluminación agotadas. - Página 32 ¿Tiene preguntas o problemas, o le faltan piezas? Antes de devolver a la tienda, llame a Atención al Cliente de Defiant Lunes a viernes de 8:00 a.m. a 7:00 p.m., EST, y los sábados de 9:00 a.m. a 6:00 p.m., EST 1-866-308-3976 HOMEDEPOT.COM...