Tabla de contenido
Publicidad
Idiomas disponibles
Idiomas disponibles
Enlaces rápidos
Publicidad
Capítulos
Tabla de contenido

Manuales relacionados para Philips NORELCO S9000 Serie


Resumen de contenidos para Philips NORELCO S9000 Serie
- Página 1 Tripleheader shaver S9000 series...
- Página 4 empty page before TOC...
- Página 5 English 6 Español 44...
-
Página 6: Tabla De Contenido
English Contents IMPORTANT SAFETY INSTRUCTIONS______________________ General description_________________________________________ Introduction_________________________________________________ What do the icons on the display mean?___________________ What is my shaver telling me?______________________________ How do I charge my product?_______________________________ How do I use my product?__________________________________ How do I clean my shaver?_________________________________ How do I use the Quick Clean Pod?________________________ How do I connect my shaver and smartphone?____________ How do I replace the shaving heads?______________________... - Página 7 Children should be supervised to ensure that they do not play with the appliance. - Use this product only for its intended household use as described in this manual. Do not use attachments not recommended by Philips North America LLC.
- Página 8 English - Never operate this product if it has a damaged power cord, if it is not working properly, after it has been dropped or damaged, or after the product or power cord has been dropped into water. For assistance call 1-800-243-3050. - Keep the power cord away from heated surfaces.
- Página 9 - The batteries used in this product may present a fire or chemical burn hazard if mistreated. Do not disassemble, heat above 100 °C (212 °F) or incinerate. - Only use original Philips accessories or consumables. Only use detachable power cord HQ8505. - Charge, use and store the product at a temperature between 41 °F / 5 °C and 95 °F / 35 °C.
-
Página 10: Important
If irritation persists, get medical attention. - Keep out of reach of children. Electromagnetic fields (EMF) This Philips product complies with all applicable standards and regulations regarding exposure to electromagnetic fields. FCC Compliance - The frequency band in which the appliance operates is 2.4 GHz. - Página 11 English accept any interference received, including interference that may cause undesired operation. This equipment has been tested and found to comply with the limits for a Class B digital device, pursuant to Part 15 of the FCC Rules. These limits are designed to provide reasonable protection against harmful interference in a residential installation.
-
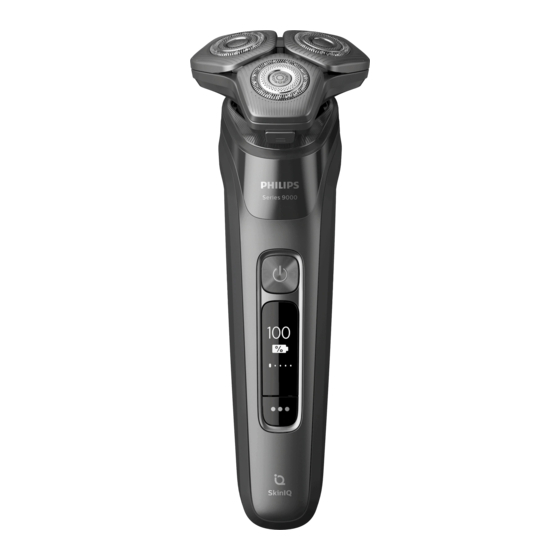
Página 12: General Description
English The Bluetooth® wordmark and logos are registered trademarks owned by Bluetooth SIG, Inc. and any use of such marks by Koninklijke Philips N.V. is under license. SAVE THESE INSTRUCTIONS General description 1 Pop-up trimmer 2 Trimmer release slide 3 Shaving unit... -
Página 13: Introduction
Introduction Congratulations on your purchase and welcome to Philips Norelco! To fully benefit from the support that Philips offers, register your product at www.philips.com/welcome or via the app. What do the icons on the display mean? - Página 14 English The display shows that your shaver is paired to your smartphone (see 'Pair the shaver and smartphone'). - Switching the shaver on Press the on/off button to switch on the shaver. Icon Meaning When you switch on the shaver, a short animation with these icons shows which pressure feedback setting you activated (see 'When your shaver is switched on').
-
Página 15: What Is My Shaver Telling Me
English You are using the wrong power cord (see 'How do I charge my product?'). Only use the power cord that is supplied with the shaver. - Cleaning the shaver Icon Meaning A reminder: clean your shaver in the quick cleaning pod (see 'How do I use the Quick Clean Pod?'). - Página 16 English on how much pressure you are exerting. These are the default settings: - When you don't apply enough pressure, the light ring lights up blue. - When you apply the correct amount of pressure, the light ring lights up green. - When you apply too much pressure, the light ring lights up orange.
- Página 17 English Partial pressure No feedback No feedback The light feedback ring lights up orange No pressure No feedback No feedback No feedback feedback Note: Pressure feedback is only available when the shaving head is attached to the handle. When the beard styler or cleansing brush is attached to the handle, the motion and pressure feedback is switched off automatically.
- Página 18 English - Motion Control sensor This menu item shows the motion feedback from your last shave. Travel lock - Travel lock From this menu item, you can lock and unlock your shaver by pressing and holding the menu button for 3 seconds. When you are going to travel, you can lock the shaver to prevent it from accidentally switching on.
- Página 19 English be synced later so you don't need to take your smartphone with you when you shave. Note: You can switch off Bluetooth on your shaver by activating the travel lock. Post-shave feedback (this feature can be activated via the app) Once this feature is activated via the app, you can see the post-shave feedback on pressure and motion from your shave on the handle...
-
Página 20: How Do I Charge My Product
English Perfect Routine feedback - When both the pressure and the motion applied during the shave is perfect, the Perfect Routine icon displays with a check mark. How do I charge my product? Note: This product is waterproof. It is suitable for use in the bath or shower and for cleaning under the tap. - Página 21 English 2 Insert the small plug into the product and put the power plug in the wall outlet. - While the product is charging, an animation appears on the display showing the progress. - When the product is fully charged, the battery percentage shows 100 % and the battery icon shows the battery being full.
-
Página 22: How Do I Use My Product
English - When the product is fully charged, the light ring lights up fully and stops rotating. 4 After charging, remove the power cord from the power outlet and pull the small plug out of the charging stand. How do I use my product? Always check the product and all accessories before using. - Página 23 English 1 Switch on the product. 2 Move the shaving heads over your skin in circular movements (see 'Main menu') to catch all hairs growing in different directions. Make sure each shaving head is fully in contact with the skin. Exert gentle pressure for a close, comfortable shave.
- Página 24 - Use your new shaver exclusively for 3 weeks to fully enjoy the closeness of a Philips Norelco shave. - At first you may not get as close a shave as you expect, or your face may even become slightly irritated.
-
Página 25: Cleaning Reminder
English Cleaning reminder When you switch off the product, the cleaning reminder flashes to remind you to clean the product (see 'How do I clean my shaver?'). - Clean the product (see 'How do I use the Quick Clean Pod?') and attachments after each use (see 'How do I clean my shaver?') to prevent clogging and damage. -
Página 26: How Do I Clean My Shaver
- Put the protection cap (if supplied) on the shaver to protect it from dirt accumulation. - Alternatively, store the shaver on the charging stand (if supplied) or in the Philips Quick Clean Pod (if supplied). How do I clean my shaver? Clean the product and the attachments after each use for optimal performance. - Página 27 English Cleaning the shaver under the tap Clean the shaver after each use to prevent clogging and damage. Never dry the shaving unit with a towel or tissue, as this may damage the shaving heads. While rinsing the shaving unit, water may drip out of the base of the shaver.
-
Página 28: Thorough Cleaning
English 7 Close the shaving unit. Thorough cleaning We advise you to clean the shaving heads thoroughly once a month or when the shaver does not shave as well as it used to. 1 Make sure that the product is switched off and disconnected from the power outlet. - Página 29 English 5 Clean the cutter and guard under the tap. 6 Shake off excess water. 7 Put the shaving heads back into the shaving head holder. For detailed instructions, see 'How do I replace the shaving heads?'. 8 Insert the hinge of the shaving head holder into the slot in the top of the shaving unit and close the shaving unit.
-
Página 30: How Do I Use The Quick Clean Pod
English Tip: For optimal performance, lubricate the teeth of the pop-up trimmer with a drop of mineral oil every six months (oil not included). How do I use the Quick Clean Pod? What does the icon on my Quick Clean Pod mean? Icon Behavior Meaning... - Página 31 English 4 Press the small circular piece on the handle of the Quick Clean Pod Cartridge to break the snap hook on the handle. 5 Place the Quick Clean Pod Cartridge into the Quick Clean Pod. 6 Put the top of the Quick Clean Pod back onto the base and turn it clockwise until you hear a click.
- Página 32 English 1 Place the shaver upside down into the Quick Clean Pod. While switched on, the shaver automatically detects that it is in the Quick Clean Pod. 2 Switch on the shaver to start the cleaning program. Each cleaning program takes approximately one minute.
-
Página 33: How Do I Connect My Shaver And Smartphone
4 Place a new Quick Clean Pod Cartridge into the Quick Clean Pod. Scan the QR code to the left or visit www.philips.com/cleaning-cartridge to order replacement Quick Clean Pod Cartridges. How do I connect my shaver and... - Página 34 - Personalized advice Pair the shaver and smartphone The app is compatible with a wide range of iPhone and Android™ smartphones. More information is available at www.philips.com/MyShaver9000-app-qr. 1 Download the app. 2 Make sure Bluetooth on your smartphone is switched on. S7920 3 Switch on the shaver to activate Bluetooth.
- Página 35 English when you shave or want to check your shave data at a later stage. When the data storage is almost full, you receive a notification reminding you to synchronize your shaves. To prevent data loss, synchronize the shaver with the app (see 'How do I connect my shaver and smartphone?').
-
Página 36: How Do I Replace The Shaving Heads
For maximum shaving performance, replace the shaving heads once a year. Replace damaged shaving heads immediately. Always replace the shaving heads with original Philips Norelco shaving heads (see 'Accessories'). Replacing the shaving heads 1 Switch off the shaver. 2 Press the release button on the shaving unit and pull the shaving head holder off the shaving unit. - Página 37 English 3 Turn the retaining rings counterclockwise and remove them. Place them aside in a safe place. 4 Remove the shaving heads from the shaving head holder. Discard the used shaving heads immediately to avoid mixing them with the new shaving heads. 5 Place new shaving heads in the holder.
-
Página 38: Accessories
The following accessories and spare parts are available: - SH91 Philips Norelco replacement shaving heads - CC12 Philips Norelco Quick Clean Pod Cartridge 2-pack Assistance For assistance, visit our website: www.philips.com/support or call toll free 1-800-243-3050. -
Página 39: Disposal
Full Two-Year Warranty Philips North America LLC warrants this new product (except shaving heads) against defects in materials or workmanship for a period of two years from the date of purchase, and agrees to repair or replace any defective product without charge. -
Página 40: 45-Day Money-Back Guarantee
*Read enclosed instructions carefully. 45-DAY MONEY-BACK GUARANTEE To enjoy the closest and most comfortable shave from your new Philips Norelco Men’s Shaver, the shaver should be used exclusively for 3 weeks. This allows your hair and skin... -
Página 41: Supplier's Declaration Of Conformity
English enough time to adapt to the Philips Norelco Shaving System. If, after that period of time, you are not fully satisfied with your Philips Norelco Men’s Shaver, send the product back along with dated sales receipt and we’ll refund you the full purchase price. -
Página 42: Trademarks
English We, PHILIPS CONSUMER LIFESTYLE B.V., hereby declare that the equipment bearing the model name specified below was tested conforming to the applicable FCC Rules under the most accurate measurement standards possible, and that all the necessary steps have been taken and are in force to assure that... - Página 43 English SIG, Inc. and any use of such marks by Philips Personal Care is under license.
-
Página 44: Instrucciones Importantes De Seguridad
Español Contenido INSTRUCCIONES IMPORTANTES DE SEGURIDAD_________ Información general_________________________________________ Introducción_________________________________________________ ¿Qué significan los íconos de la pantalla?__________________ ¿Qué indica la afeitadora?__________________________________ ¿Cómo se carga el producto?_______________________________ ¿Cómo se usa el producto?_________________________________ ¿Cómo se limpia la afeitadora?_____________________________ ¿Cómo uso el Quick Clean Pod?____________________________ ¿Cómo conecto la afeitadora con mi smartphone?________ ¿Cómo se reemplazan los cabezales de afeitado?_________ Accesorios___________________________________________________... - Página 45 Español PELIGRO Para reducir el riesgo de descarga eléctrica: - No intente recoger un producto o una base de carga cableados que hayan caído al agua. Desconéctelo inmediatamente del enchufe de la pared. - Mantenga el cable de alimentación seco. - No coloque ni guarde el producto la base de carga en un lugar desde donde pueda caerse a una bañera o un lavamanos.
- Página 46 - Use este producto solo para el uso doméstico previsto como se describe en este manual. No use accesorios que no estén recomendados por la corporación Philips North America LLC. - Nunca utilice este producto si el cable o el enchufe de carga están dañados, si no funciona correctamente, si se cayó, si...
- Página 47 100 °C (212 °F). - Use únicamente accesorios o productos consumibles originales de Philips. Use únicamente el cable de alimentación desmontable HQ8505. - Cargue, utilice y guarde el producto a una temperatura entre 41 °F / 5 °C y 95 °F / 35 °C.
-
Página 48: Importante
No corte el enchufe eléctrico para reemplazarlo con otro ya que esto puede producir una condición de peligro. Líquido para cartucho del Quick Clean Pod de Philips Norelco - No ingerir. - Evita el contacto con los ojos. En caso de que entre en contacto con los ojos, enjuaga bien con agua fría. - Página 49 Las modificaciones o los cambios que no hayan sido expresamente aprobados por Philips podrían anular la autorización del usuario para operar el equipo. Este dispositivo cumple con la Parte 15 de las reglas de la FCC. La operación del equipo está...
- Página 50 La marca denominativa y los logotipos de Bluetooth® son marcas comerciales registradas propiedad de Bluetooth SIG, Inc. y todo uso que hace Koninklijke Philips N.V. de dichas marcas es conforme a una licencia.
-
Página 51: Información General
8 Base de carga 9 Cable de alimentación 10 Enchufe pequeño 11 Funda 12 Cartucho del Quick Clean Pod de Philips 13 Quick Clean Pod 14 Cepillo de limpieza Los accesorios provistos pueden variar según el producto. La caja muestra los accesorios que han sido provistos con su producto. -
Página 52: Introducción
Español Introducción ¡Felicidades por tu compra y bienvenido a Philips Norelco! Para aprovechar al máximo la asistencia que te ofrece Philips, registra tu producto en www.philips.com/welcome o a través de la aplicación. ¿Qué significan los íconos de la pantalla? - Menú principal Puedes alternar entre los elementos del menú... - Página 53 Español Para encender la afeitadora, pulsa el botón de encendido/apagado. Ícono Significado Cuando enciendas la afeitadora, aparecerá una breve animación con estos íconos en la que se indicará qué ajuste de retroalimentación de presión activaste (ver 'Cuando la afeitadora está encendida'). Puedes alternar entre los ajustes de retroalimentación de presión si presionas el botón del menú.
-
Página 54: Qué Indica La Afeitadora
Español - Limpieza de la afeitadora Ícono Significado Recuerda: limpia la afeitadora en el dispositivo de limpieza rápida (ver '¿Cómo uso el Quick Clean Pod?'). Recuerda: limpia la afeitadora (ver '¿Cómo se limpia la afeitadora?'). El proceso de limpieza está en curso y en la pantalla se muestra el tiempo de limpieza restante en segundos, o bien como un reloj si presionas el botón del menú. - Página 55 Español indicarte cuánta presión estás ejerciendo. Esta es la configuración predeterminada: - Cuando no aplicas suficiente presión, el anillo de luz se ilumina en azul. - Cuando aplicas la cantidad correcta de presión, el anillo de luz se ilumina en verde.
- Página 56 Español Retroalimentación de presión encenderá encenderá encenderá completa el anillo de el anillo de el anillo de luz en color luz en color luz en color azul. verde. naranja. Retroalimentación No hay No hay de presión parcial retroaliment retroaliment encenderá ación.
- Página 57 Español - Carga de batería disponible Este elemento del menú muestra la carga restante de la batería. Sensor de control de movimiento - Sensor de control de movimiento Este elemento del menú muestra la retroalimentación de movimiento de tu última afeitada. Bloqueo para viajes - Bloqueo para viajes Desde este elemento del menú, puedes...
- Página 58 Español Nota: Asegúrate de que tu teléfono inteligente esté equipado con Bluetooth® 4.2 o superior. Esta afeitadora cuenta con Bluetooth® 4.2 y versiones superiores para conectarse a la aplicación. Cuando haya apareado la afeitadora y su smartphone, el Bluetooth de la afeitadora se enciende automáticamente, incluso cuando está...
-
Página 59: Cómo Se Carga El Producto
Español - La presión que aplicaste durante la afeitada fue demasiado baja. Retroalimentación del sensor de control de movimiento - Si se puede mejorar el movimiento de afeitado, aparece el ícono del sensor de control de movimiento con un signo de exclamación. - Página 60 Español - Carga rápida: Después de cargarla durante alrededor de cinco minutos, la batería tendrá suficiente energía para una afeitada completa. Si la batería está cargada al 10 %, puedes completar una afeitada. - Cuando el producto está totalmente cargado, posee una autonomía de funcionamiento de hasta 60 minutos sin cable.
- Página 61 Español Símbolo de "Desconectar para usar" El símbolo de "Desconectar para usar" parpadea para recordarle que debe desconectar el cable de corriente del tomacorriente y retirar la clavija pequeña del producto antes de que pueda encenderlo. Carga en la base de carga 1 Asegúrese de que el producto esté...
-
Página 62: Cómo Se Usa El Producto
Español ¿Cómo se usa el producto? Siempre revise el producto y todos los accesorios antes de usarlo. No use el producto ni ningún accesorio si está dañado, ya que esto puede causar alguna lesión. Siempre reemplace una pieza dañada con una del tipo original. Nota: Este producto es a prueba de agua. - Página 63 Español 2 Mueve los cabezales de afeitado sobre la piel con movimientos (ver 'Menú principal') circulares para llegar a todos los vellos que crecen en diferentes direcciones. Asegúrate de que cada unidad de afeitado esté siempre en contacto total con la piel. Ejerza una suave presión para una afeitada al ras y cómoda.
- Página 64 Invierta 3 semanas y pronto podrá disfrutar al máximo de su nueva afeitadora. - Sea perseverante. Si alterna entre métodos de afeitado durante el período de adaptación, será más difícil acostumbrarse al sistema de afeitado de Philips Norelco.
-
Página 65: Recordatorio De Limpieza
Español - Si después de 21 días todavía no está satisfecho con los resultados, Philips Norelco le reembolsará el precio total de la compra, siempre que la solicitud de reembolso se reciba dentro de los 45 días posteriores a la compra. -
Página 66: Almacenamiento
Español 3 Sostenga la cortadora perpendicular a la piel y muévala hacia abajo ejerciendo una presión suave. 4 También puedes usar el recortador para afeitar el área debajo de la nariz. 5 Apague el producto y limpie la cortadora después de cada uso para evitar que se obstruya o se dañe (ver '¿Cómo se limpia la afeitadora?'). -
Página 67: Cómo Se Limpia La Afeitadora
- Como alternativa, guarda la afeitadora en el soporte de carga (si se incluye) o en el Quick Clean Pod de Philips (si se incluye). ¿Cómo se limpia la afeitadora? Para un óptimo desempeño, limpie el producto y los accesorios después de cada uso. -
Página 68: Limpieza A Fondo
Español 3 Apague la afeitadora. Presione el botón de liberación para abrir la unidad de afeitado. 4 Enjuague la cámara de acumulación de vello bajo agua tibia de la llave. 5 Enjuague el sostenedor del cabezal de afeitado con agua caliente de la llave. 6 Elimine cuidadosamente el exceso de agua y deje que el soporte del cabezal de afeitado se seque al aire completamente. -
Página 69: Limpieza De La Cortadora Emergente
Español 3 Enjuague la unidad de afeitado y el sostén del cabezal de afeitado en el grifo. 4 Retire los cabezales de afeitado. Para consultar instrucciones detalladas, vea "¿Cómo se reemplazan los cabezales de afeitado?" Nota: No limpie más de un cortador y protector a la vez, ya que todos son pares. -
Página 70: Cómo Uso El Quick Clean Pod
Español 1 Asegúrate de que la afeitadora esté apagada y de que la hayas desconectado del enchufe de pared. 2 Empuje hacia abajo el botón deslizante de liberación de la cortadora emergente para abrirla. 3 Enciende la afeitadora y enjuaga la cortadora emergente con agua tibia. - Página 71 Español Preparación del Quick Clean Pod para el uso 1 Gire y retire la parte superior del Quick Clean Pod. 2 Gire la tapa del cartucho del Quick Clean Pod para quitarla. 3 Levante la lengüeta del sello y jálela de la esquina para retirar el sello del cartucho del Quick Clean Pod.
- Página 72 Español No incline el Quick Clean Pod para evitar derrames. Uso del Quick Clean Pod Nota: Si utiliza la afeitadora con espuma de afeitar, gel de afeitar o productos para antes de afeitar, enjuague bien los cabezales de afeitado antes de usar el Quick Clean Pod (ver '¿Cómo se limpia la afeitadora?').
- Página 73 Español Reemplazo del cartucho del Quick Clean Pod Reemplace el cartucho del Quick Clean Pod inmediatamente cuando el ícono de reemplazo del cartucho del Quick Clean Pod se vuelva visible, o bien, siga las indicaciones que se muestran en la siguiente tabla. Frecuencia de uso Ciclos Cuándo reemplazar el...
-
Página 74: Cómo Conecto La Afeitadora Con Mi Smartphone
4 Coloque un nuevo cartucho del Quick Clean Pod en el Quick Clean Pod. Escanea el código QR que se encuentra a la izquierda o visita www.philips.com/cleaning-cartridge para pedir cartuchos de repuesto del Quick Clean Pod. ¿Cómo conecto la afeitadora con mi smartphone? Beneficios de conectar la afeitadora a la aplicación... -
Página 75: Empareja La Afeitadora Y El Teléfono Inteligente
Empareja la afeitadora y el teléfono inteligente La aplicación es compatible con una amplia gama de teléfonos inteligentes iPhone y Android™. Hay más información disponible en www.philips.com/MyShaver9000-app-qr. 1 Descarga la aplicación. 2 Asegúrate de que el Bluetooth esté encendido en tu teléfono inteligente. S7920 3 Enciende la afeitadora para activar el Bluetooth. -
Página 76: Desempareja La Afeitadora Y El Teléfono Inteligente
Español afeitado. Para evitar que se pierdan datos, sincroniza la afeitadora con la aplicación (ver '¿Cómo conecto la afeitadora con mi smartphone?'). 1 Asegúrate de que el teléfono inteligente esté cerca de la afeitadora y abre la aplicación. 2 La aplicación se conecta automáticamente y sincroniza sus últimas afeitadas. -
Página 77: Cómo Se Reemplazan Los Cabezales De Afeitado
Reemplace los cabezales de afeitado dañados inmediatamente. Siempre reemplace los cabezales de afeitado con cabezales originales de Philips Norelco (ver 'Accesorios'). Reemplazo de los cabezales de afeitado 1 Apague la afeitadora. - Página 78 Español 2 Presiona los botones de liberación de la unidad de afeitado y tira del soporte de cabezales de afeitado para quitarlo de la unidad de afeitado. 3 Gire los anillos de retención a la izquierda y retírelos. Colóquelos aparte en un lugar seguro.
-
Página 79: Accesorios
Están disponibles los siguientes accesorios y piezas sueltas: - Cabezales de afeitado de repuesto Philips Norelco SH91. - Paquete de 2 cartuchos del Quick Clean Pod de Philips Norelco CC12 Asistencia Para asistencia, visite nuestro sitio web: www.philips.com/support o llame al número... -
Página 80: Orientación Adicional
1-800-822-8837 o visitar www.call2recycle.org para las ubicaciones donde se pueden desechar las baterías. - Para recibir asistencia, visite nuestro sitio Web www.philips.com/support o comuníquese gratuitamente al 1-800-243-3050. - Su producto está diseñado y fabricado con materiales y componentes de alta calidad, que pueden ser reciclados y reusados. -
Página 81: Garantía Total De Dos Años
Cualquier daño que ocurra durante el envío no será cubierto por esta garantía. NOTA: Philips North America LLC. no extiende ninguna otra garantía, ni escrita ni oral. Esta garantía le proporciona derechos legales específicos; asimismo, es posible que goce de... -
Página 82: Garantía De Devolución De Su Dinero Por
GARANTÍA DE DEVOLUCIÓN DE SU DINERO POR 45 DÍAS Para disfrutar de una afeitada cómoda y al ras con su nueva afeitadora para hombres Philips Norelco, la afeitadora se debe usar únicamente por 3 semanas. Esto permite que su cabello y su piel tengan tiempo suficiente para adaptarse al Sistema de afeitado Philips Norelco. -
Página 83: Declaración De Conformidad Del Proveedor
El paquete del producto debe contar con matasellos que no supere los 45 días a partir de la fecha de compra. Philips se reserva el derecho a verificar el precio de compra del producto y limita los reembolsos al precio de venta minorista sugerido. -
Página 84: Marcas Registradas
Inc. Google Play y el logotipo de Google Play son marcas comerciales de Google Inc. La marca denominativa y los logotipos de Bluetooth® son marcas comerciales registradas propiedad de Bluetooth SIG, Inc. y todo uso que hace Philips Personal Care de dichas marcas es conforme a una licencia. - Página 85 Empty page before back cover...
- Página 86 P.O. Box 10313, Stamford, CT 06904 This symbol on the product’s nameplate means it is listed by Underwriters’ Laboratories, Inc. Norelco and Tripleheader are registered trademarks of Philips North America LLC. PHILIPS and Philips shield are registered trademarks of Koninklijke Philips N.V.