Tabla de contenido
Publicidad
Idiomas disponibles
Idiomas disponibles
Enlaces rápidos
B Y
Zoeller
®
is a registered trademark of Zoeller
Co. All Rights Reserved.
BasementSentry.com
ATTACH YOUR RECEIPT HERE
Purchase Date
Questions, problems, missing parts? Before returning to your retailer, call our customer
service department at 1-800-584-8089, 7:30 a.m. - 5:00 p.m., EST, Monday - Friday.
AUTOMATIC EMERGENCY
BACKUP SUMP PUMP
1
© 2020. All rights reserved.
SYSTEM
MODEL #STBB200
Español p. 25
PN 156407 A SW1511 A
Publicidad
Tabla de contenido

Manuales relacionados para Zoeller STBB200


Resumen de contenidos para Zoeller STBB200
- Página 1 AUTOMATIC EMERGENCY BACKUP SUMP PUMP SYSTEM MODEL #STBB200 Zoeller ® is a registered trademark of Zoeller Co. All Rights Reserved. Español p. 25 BasementSentry.com ATTACH YOUR RECEIPT HERE Purchase Date Questions, problems, missing parts? Before returning to your retailer, call our customer service department at 1-800-584-8089, 7:30 a.m.
-
Página 2: Package Contents
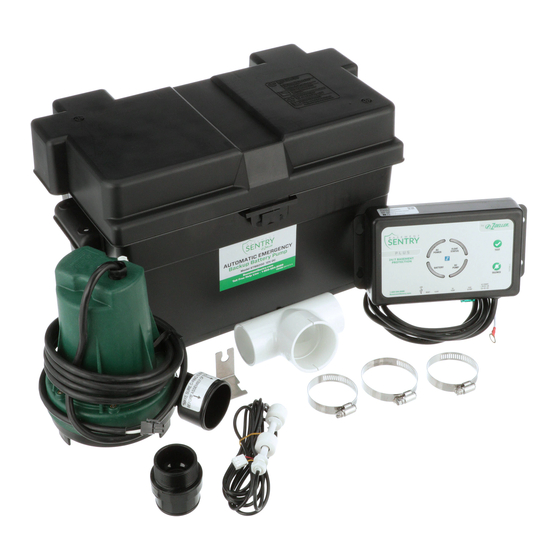
PACKAGE CONTENTS DESCRIPTION QUANTITY 12V Pump with o-ring Controller Battery Charger Dual Float Check Valve with o-ring Tee Fitting Pipe Clamps Battery Box SAFETY INFORMATION Please read and understand this entire manual before attempting to assemble, operate, or install the product. - Página 3 SAFETY INFORMATION WARNING • ELECTRICAL SHOCK ALERT. Do not disassemble the motor housing. The motor has NO repairable internal parts and disassembly may cause dangerous electrical wiring issues. • ELECTRICAL SHOCK ALERT. Before installing this product, have the electrical circuit checked by an electrician to ensure proper grounding.
- Página 4 0 FT. 5 FT. 10 FT. 28 FT. STBB200 Shut Off GENERAL PUMP INFORMATION This system features built-in WiFi to provide mobile monitoring and alerts. The system includes a high-capacity 12V pump, controller, 1.6 amp battery charger, dual float, check valve, battery box, tee and pipe clamps.
-
Página 5: Installation Instructions
115 V GFCI outlet INSTALLATION INSTRUCTIONS NOTE: Install the battery backup system when the primary pump is not needed. Read instructions and prepare all supplies before beginning installation. 1. Disconnect power to primary sump and remove from sump pit. 2. Be sure the o-ring is on the discharge of the backup pump and slip the included stainless steel clamp over the pump discharge. - Página 6 INSTALLATION INSTRUCTIONS 4. Slide the included stainless steel clamp over the check valve and slide the tee (slit end down) over the check valve. Be sure the o-ring is Backup completely covered. Tighten clamp over the tee Pump to secure the check valve. Clamp O-Ring Check valve...
- Página 7 INSTALLATION INSTRUCTIONS 7. Use the included anchors to install the Anchors controller. For best cooling, attach to wall. The controller must be installed at least 3 ft. above FLOAT POWER STATUS the sump basin. TEST 24/7 BASEMENT PROTECTION BATTERY PUMP SILENCE DC POWER 1-800-584-8089...
- Página 8 INSTALLATION INSTRUCTIONS 10.Plug the controller into a GFCI-protected 115V GFCI Outlet outlet. NOTE: The primary pump and controller should FLOAT POWER STATUS TEST 24/7 BASEMENT PROTECTION BATTERY PUMP SILENCE DC POWER be on separate circuits. 1-800-584-8089 FUSE + 15V DC 1.6A BasementSentry.com RESET FLOAT...
- Página 9 BASEMENT SENTRY CONTROLLER FUNCTIONS There are two buttons on the front of the controller. 1. Silence/Reset - Can be pressed to silence current alarms for 24 hours. Can be held for 3+ seconds to reset (or clear) alarms and LEDs. Flashing LEDs for conditions such as bad/ P L U S FLOAT POWER...
- Página 10 CONNECTING THE CONTROLLER TO Z CONTROL ® By connecting the controller to the Z Control There are two ways to connect the Basement ® Cloud using the built-in WiFi, the user can set up Sentry controller to the Z Control cloud.
- Página 11 CONNECTING THE CONTROLLER TO Z CONTROL ® Use the Mobile App (iOS and Android) (Continued) 2. Open your profile to set up any additional phone numbers or email addresses where notifications should be sent. 3. Once you’re logged in to your account, create locations by touching the “+ “...
- Página 12 CONNECTING THE CONTROLLER TO Z CONTROL ® Use the Mobile App (iOS and Android) (Continued) Click to manually input SSID SSID input field 5. The app will ask you to scan the data matrix QR code on the controller. You can also bypass this step and manually input the SSID of the controller, which is found on the controller label.
- Página 13 CONNECTING THE CONTROLLER TO Z CONTROL ® Use the Mobile App (iOS and Android) (Continued) 8. Open the Basement Sentry app to explore current status, configuration settings, and commands available, such as Pump Test, Buzzer Test, Silence, etc. Perform these test to be sure everything works as expected.
- Página 14 CONNECTING THE CONTROLLER TO Z CONTROL ® Connecting with your mobile device or computer (Continued) Apply AC power to the controller. The Z Control LED will blink and then turn off, ® indicating the controller is in AP Mode* and is transmitting an SSID. P L U S FLOAT POWER...
- Página 15 CONNECTING THE CONTROLLER TO Z CONTROL ® Connecting with your mobile device or computer (Continued) 3. On the setup screen, press the WiFi Scan button, scroll down to see the list of WiFi signals found, and choose the WiFi you want the Basement Sentry controller to use for internet connectivity.
-
Página 16: Start-Up And Operation
CONNECTING THE CONTROLLER TO Z CONTROL ® 5. Choose the Add New Device button next to the location you want the controller. Follow the directions to add your controller by either auto-detect or entering the Device I.D. When successful, a Basement Sentry product tile will appear in your account. - Página 17 START-UP AND OPERATION GFCI Outlet 1. WARNING: Disconnect the primary pump from the 115V outlet before touching any component FLOAT POWER STATUS TEST 24/7 BASEMENT PROTECTION BATTERY PUMP in the sump basin. SILENCE DC POWER 1-800-584-8089 FUSE + 15V DC 1.6A BasementSentry.com RESET FLOAT...
- Página 18 START-UP AND OPERATION 4. Once the battery is fully charged, the four lights will turn green. To clear any other lights or alarms, press and hold the ‘Silence’ button for three seconds. Solid green light when charged The following LED functions provide a visual cue to the proper function of the DC pump: •...
- Página 19 START-UP AND OPERATION 7. Complete the final test of the installation. Be Unplug sure the primary pump is still disconnected from controller to test power. Unplug the controller from the 115V FLOAT POWER STATUS TEST 24/7 BASEMENT PROTECTION BATTERY PUMP outlet.
-
Página 20: Care And Maintenance
START-UP AND OPERATION 10. The four circle LED’s will be blue when charging the battery. The battery LED will flash slowly. Once charging is complete, all four Solid green light when charged circle LED’s will turn green. P L U S FLOAT Press to POWER... - Página 21 BATTERY This backup system requires a good quality, 12V battery in order to provide maximum pumping time when needed. A Basement Sentry brand battery is recommended. Otherwise, use an AGM deep-cycle 12 volt 105 amp-hour marine battery or larger. Wet cell batteries contain acid and precautions must be taken when handling.
-
Página 22: Possible Cause
TROUBLESHOOTING DANGER RISK OF ELECTRIC SHOCK. Always disconnect power source before attempting to install, service, or maintain the pump. Never handle a pump with wet hands or when standing on wet or damp surface or in water. Fatal electrical shock could occur. PROBLEM POSSIBLE CAUSE CORRECTIVE ACTION... - Página 23 WARRANTY This product is warranted for three years from the date of purchase. Subject to the conditions hereinafter set forth, the manufacturer will repair or replace to the original consumer any portion of the product which proves defective due to defective materials or workmanship. To obtain warranty service, contact the dealer from whom the product was purchased.
- Página 24 © 2020. All rights reserved.
-
Página 25: Sumidero De Reserva
EMERGENCIA AUTOMÁTICA SISTEMA DE BOMBA DE SUMIDERO DE RESERVA MODELO #STBB200 Zoeller® es una marca registrada de Zoeller Co. Todos derechos reservados. BasementSentry.com ADJUNTE SU RECIBO AQUÍ Fecha de compra ¿Preguntas, problemas, partes faltantes? Antes de acudir al minorista, llame a nuestro departamento de servicio al cliente al 1-800-584-8089, de lunes a viernes de 7:30 a.m. -
Página 26: Contenido Del Paquete
CONTENIDO DEL PAQUETE DESCRIPCIÓN CANTIDAD Bomba de 12 V con junta tórica Controlador Cargador de batería Flotador doble Válvula de retención con junta tórica Conector en T Abrazaderas para tubería Caja de batería INFORMACIÓN DE SEGURIDAD Lea y comprenda completamente este manual antes de intentar ensamblar, usar o instalar el producto. PELIGRO •... - Página 27 INFORMACIÓN DE SEGURIDAD • ALERTA DE DESCARGA ELÉCTRICA. Antes de instalar este producto, haga que un electricista revise su circuito para asegurarse de que la puesta a tierra sea adecuada. Todas las instalaciones eléctricas deben cumplir con el Código Nacional de Electricidad (NEC, por sus siglas en inglés) y con todos los códigos locales.
-
Página 28: Preparación
1,52 m 3,04 m 4,57 m 8,53 m STBB200 Cierre INFORMACIÓN GENERAL DE LA BOMBA Este sistema cuenta con WiFi incorporado para proporcionar monitoreo y alertas móviles. El sistema incluye una bomba de 12 V de alta capacidad, controlador, cargador de batería de 1.6 A, doble flotador, válvula de retención, caja de batería, abrazaderas para tubería y T. - Página 29 115 V GFCI outlet INSTRUCCIONES DE INSTALACIÓN NOTA: instale el sistema de reserva a batería cuando no se necesite la bomba principal. Lea las instrucciones y prepare todos los materiales antes de comenzar la instalación. 1. Desconecte la alimentación al sumidero principal y retírelo de la fosa del sumidero..
-
Página 30: Soporte De Montaje
INSTRUCCIONES DE INSTALACIÓN 4. Deslice la abrazadera de acero inoxidable incluida sobre la válvula de retención y deslice la T (extremo de hendidura hacia abajo) sobre la válvula de Bomba retención. Asegúrese de que la junta tórica esté de reserva completamente cubierta. -
Página 31: Tabla De Contenido
INSTRUCCIONES DE INSTALACIÓN 7. Use los anclajes incluidos para instalar el Anclajes controlador. Para un mejor enfriamiento, adhiéralo a la pared. El controlador debe instalarse al menos a 2.7 m (3 pies) por encima de la fosa del sumidero. FLOAT POWER STATUS TEST... - Página 32 INSTRUCCIONES DE INSTALACIÓN 10.Enchufe el controlador en una toma de corriente de Toma de corriente GFCI 115 V protegida por GFCI. NOTA: la bomba principal y el controlador deben FLOAT POWER STATUS TEST 24/7 BASEMENT PROTECTION BATTERY PUMP estar en circuitos separados. SILENCE 1-800-584-8089 DC POWER...
-
Página 33: Funciones Del Controlador Basement Sentry
FUNCIONES DEL CONTROLADOR BASEMENT SENTRY Hay dos botones en la parte frontal del controlador. 1. Silencio/Restablecer - Se puede presionar para silenciar las alarmas actuales por 24 horas. Se puede mantener presionado durante más de 3 segundos para restablecer (o desactivar) las alarmas y P L U S los LED. -
Página 34: Antes De Comenzar
CONECTAR EL CONTROLADOR AL Z CONTROL® Al conectar el controlador a la nube del Z Control® Internet y a través de las interfaces de la aplicación. mediante el WiFi integrado, el usuario puede Hay dos formas de conectar el controlador Basement configurar mensajes de alerta gratuitos por correo Sentry a la nube del Z Control®. - Página 35 CONECTAR EL CONTROLADOR AL Z CONTROL® Utilizar la aplicación móvil (iOS y Android) (continuación) 2. Abra su perfil para configurar números de teléfono o direcciones de correo electrónico adicionales donde se deberían enviar las notificaciones. 3. Una vez que haya iniciado sesión en su cuenta, cree ubicaciones tocando el signo “+”...
- Página 36 CONECTAR EL CONTROLADOR AL Z CONTROL® Utilizar la aplicación móvil (iOS y Android) (continuación) Haga clic para ingresar manualmente el SSID Campo de 5. La aplicación le pedirá que escanee el código QR de entrada SSID la matriz de datos en el controlador. Puede omitir este paso e ingresar manualmente el SSID del controlador, que se encuentra en la etiqueta del controlador.
- Página 37 CONECTAR EL CONTROLADOR AL Z CONTROL® Utilizar la aplicación móvil (iOS y Android) (continuación) 8. Abra la aplicación Basement Sentry para explorar el estado actual, los ajustes de configuración y los comandos disponibles, como ser Prueba de la bomba, Prueba del timbre, Silenciar, etc. Realice estas pruebas para garantizar que todo funciona como es debido.
-
Página 38: P L U S
CONECTAR EL CONTROLADOR AL Z CONTROL® Conectarse con su dispositivo móvil o computadora (continuación) Conecte el controlador a la alimentación de CA. El LED del Z Control® parpadeará y luego se apagará, indicando que el controlador está en modo AP* y está P L U S FLOAT transmitiendo el SSID. - Página 39 CONECTAR EL CONTROLADOR AL Z CONTROL® Conectarse con su dispositivo móvil o computadora (continuación) 3. En la pantalla de configuración, presione el botón “WiFi Scan” (Escanear WiFi), deslícese hacia abajo para ver la lista de señales de WiFi encontradas y elija el WiFi que quiere usar para que el controlador Basement Sentry tenga conexión a Internet.
-
Página 40: Arranque Inicial Y Funcionamiento
CONECTAR EL CONTROLADOR AL Z CONTROL® Conectarse con su dispositivo móvil o computadora (continuación) 5. Elija el botón “Add New Device” (Agregar dispositivo nuevo) junto a la ubicación donde quiere al controlador (ver figura D). Siga las instrucciones para agregar su controlador, ya sea a través de la detección automática o el ingreso del ID del dispositivo. -
Página 41: Float Status Test
ARRANQUE INICIAL Y FUNCIONAMIENTO GFCI Outlet 1. ADVERTENCIA: desconecte la bomba principal de la toma de corriente de 115 V antes de tocar FLOAT POWER STATUS TEST 24/7 BASEMENT PROTECTION cualquier componente en el contenedor para agua BATTERY PUMP SILENCE DC POWER 1-800-584-8089 FUSE... - Página 42 ARRANQUE INICIAL Y FUNCIONAMIENTO 4. Una vez que la batería esté completamente cargada, las cuatro luces se volverán verdes. Para borrar cualquier otra luz o alarma, mantenga presionado el botón de Silencio Luz verde fija durante tres segundos. cuando está cargada Las siguientes funciones LED proporcionan una señal visual del funcionamiento correcto de la bomba de CC: •...
- Página 43 ARRANQUE INICIAL Y FUNCIONAMIENTO 7. Complete la prueba final de la instalación. Asegúrese Desenchufe el de que la bomba principal aún esté desconectada controlador para probar de la alimentación. Desenchufe el controlador de FLOAT POWER STATUS TEST 24/7 BASEMENT PROTECTION la toma de corriente de 115 V.
-
Página 44: Cuidado Y Mantenimiento
ARRANQUE INICIAL Y FUNCIONAMIENTO 10. Los cuatro LED del círculo estarán azules cuando la batería se esté cargando. El LED de la batería parpadeará lentamente. Una vez que se completa Luz verde fija la carga, los cuatro LED del círculo se volverán cuando está... - Página 45 BATERÍA Este sistema de reserva requiere una batería de 12 V de buena calidad para proporcionar el máximo tiempo de bombeo cuando sea necesario. Se recomienda una batería de la marca Basement Sentry. De lo contrario, use una batería marina AGM de ciclo profundo de 12 voltios y 105 amperios o más.
-
Página 46: Solución De Problemas
SOLUCIÓN DE PROBLEMAS PELIGRO RIESGO DE DESCARGA ELÉCTRICA. Siempre desconecte la fuente de alimentación antes de intentar instalar, reparar o mantener la bomba. Nunca manipule una bomba con las manos mojadas o cuando esté parado sobre una superficie mojada o húmeda o en el agua. -
Página 47: Garantía
GARANTÍA Este producto se garantiza por un período de tres años a partir de la fecha de compra. Sujeto a las condiciones indicadas a continuación, el fabricante se compromete a reparar o reemplazar al consumidor original cualquier parte del producto que resulte defectuosa debido a defectos de materiales o mano de obra. Para obtener el servicio de garantía, póngase en contacto con el distribuidor al que le compró...