Tabla de contenido
Publicidad
Idiomas disponibles
Idiomas disponibles
Enlaces rápidos
3M Personal Safety Division
3M Center
St. Paul, MN 55144-1000
FOR MORE INFORMATION
In United States, contact:
www.3M.com/PELTOR
Technical Assistance: 1-800-665-2942
PELTOR.comms@mmm.com
In Canada, contact:
1-855-484-3093
PELTOR.comms.canada@mmm.com
For other 3M products:
1-800-3M-HELPS or 1-651-737-6501
© 3M 2020. All rights reserved.
3M, Skull Screw, UltraFit and ComTac
are trademarks of 3M Company, used
under license in Canada. PELTOR is
a trademark of 3M Svenska AB,used
under license in Canada.
3M PSD products are for occupational
use only.
Patent: www.3M.com/patent
Please recycle.
3M Personal Safety Division
3M Canada Company
P.O. Box 5757, London, Ontario N6A 4T1
Division de la protection
individuelle - 3M Company Canada
3M Canada , C.P. 5757
London (Ontario) N6A 4T1
FOR MORE INFORMATION/POUR
OBTENIR DE PLUS AMPLES
RENSEIGNEMENTS
In Canada, contact/Au Canada,
communiquer avec :
Internet : www.3M.ca/safety
Technical Assistance/Assistance
technique : 1 800 267-4414
Centre d'aide à la clientèle/Customer
Care Center : 1 800 364-3577
© 3M 2020. Tous droits réservés. 3M, Skull Screw,
UltraFit et ComTac sont des marques de commerce
de la compagnie 3M, utilisées sous licence au
Canada. PELTOR est une marque de commerce de
3M Svenska AB, utilisée sous licence au Canada.
Les produits de la DPI de 3M sont destinés à une
utilisation professionnelle seulement.
www.3M.com/patent
Veuillez recycler.
TM
PARA OBTENER MÁS INFORMACIÓN
en los Estados Unidos:
Internet: www.3M.com/PELTOR
Información técnica: 1-800-665-2942
© 3M 2020. Todos los derechos reservados.
3M, Skull Screw, UltraFit y ComTac son marcas
registradas de la compañía 3M, utilizadas
bajo licencia en Canadá. PELTOR es una
marca registrada de 3M Svenska AB,
utilizada bajo licencia en Canadá.
Los productos de la División de Protección
Personal (PSD, por su sigla en inglés) de 3M
son solo para uso profesional.
Patentes: www.3M.com/patent
Por favor recicla.
34-8725-0201-7
FP3873REVA
Publicidad
Tabla de contenido
Solución de problemas

Resumen de contenidos para 3M PELTOR TEP-300
- Página 1 3M PSD products are for occupational Canada. PELTOR est une marque de commerce de use only. 3M Svenska AB, utilisée sous licence au Canada. Patent: www.3M.com/patent Les produits de la DPI de 3M sont destinés à une Please recycle. utilisation professionnelle seulement. www.3M.com/patent Veuillez recycler.
- Página 2 Tactical Earplug, TEP-300 Bouchon d’oreille tactique, TEP-300 Protector de oídos táctico, TEP-300...
- Página 3 LABORATORY ATTENUATION U.S. EPA specifies the NRR as the measure of hearing protector noise reduction. However, 3M makes no warranties as to the suitability of the NRR for this purpose. 3M strongly recommends personal fit testing of hearing protectors. Research suggests that users may receive less noise reduction than indicated by the attenuation label value(s) on the packaging due to variation in fit, fitting skill, and motivation of the user.
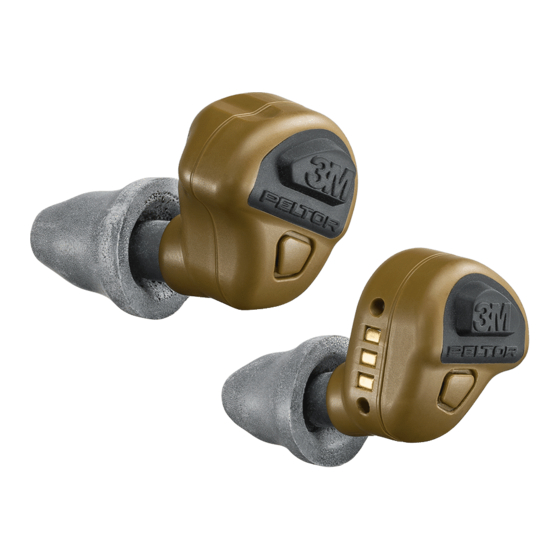
- Página 5 3M™ PELTOR™ TEP-300 EARPLUGS BOUCHONS D’OREILLE 3M™ PELTOR™ TEP-300 PROTECTORES DE OÍDOS 3M™ PELTOR™ TEP-300 1-11 12-23 24-35...
- Página 6 For correct use, consult supervisor and User Instructions, or call 3M Technical Services. If your hearing seems dulled or you hear a ringing or buzzing during or after any noise exposure (including gunfire), or for any other reason you suspect a hearing problem, leave the noisy environment immediately and consult a medical professional and/or your supervisor.
- Página 7 • Only use approved and compatible 3M™ PELTOR™ Communications Eartips. • If the requirements above are not adhered to, the protection afforded by the earplugs will be severely impaired. 2.2. CAUTION Example: 1. The environmental noise level as measured at the ear is •...
-
Página 8: Explanation Of Symbols
OVERVIEW K Eartip Stem A Battery lid L Windscreen/Microphone Cover B Latch M Eartip - 3M Skull Screw Communication Eartips C Indication LED N Eartip - 3M UltraFit Communication Eartips D Test/Status button CCC-GRM-25 Communication Eartips O Eartip - 3M PELTOR... - Página 9 7. Gently press and snap the earpiece into the receptable. above 113°F/45°C or below 32°F/0°C. Note: The earpiece will start to charge automatically. The 3M™ PELTOR™ TEP-300 Earplugs should be charged 8. Repeat for the second earpiece. before first use. The product will indicate low battery status with an audio message “low battery”, when less than one hour...
- Página 10 Adapter into the center openings of the springs. The packaging includes 3 sizes of 3M UltraFit Communication Eartips (1 pair of each size), 1 pair of 3M Skull Screw 4. Push back on the adapter to compress the upper springs.
- Página 11 8.2. ATTACHING THE EARTIPS AND 2. Locate the earplug microphone. OPTIONAL RETENTION CORD 1. Place one end of the retention cord onto one of the eartip stems. 3. Carefully center the disposable windscreen over the microphone port and press the adhesive backed windscreen to the microphone port.
-
Página 12: Instructions For Operation
Note: If you cannot obtain a good fit, try a different eartip type or size. CAUTION: For greater comfort and safety when removing the 3M UltraFit Communication Eartips, use a slow twisting motion to gradually break the seal. 8.5. MICROPHONE The TEP-300 features an in ear speech microphone and thus eliminates the need for a traditional boom microphone. -
Página 13: Low Battery
If previously connected with the SCU-300, the TEP-300 will connect automatically when within range of the SCU-300. The earplugs indicate that the product is connected to the SCU-300 with 2 short beeps. For more information refer to user instructions for 3M PELTOR Tactical Modular Audio System. -
Página 14: Troubleshooting
10. TROUBLESHOOTING Problem Solution The TEP-300 will not Place the earpieces in the charging case and perform a battery status check. Charge the earpieces if power on. needed. Refer to “7.2. Charging”. Ensure you are pressing the Power Button for a minimum of three seconds. Refer to “9.2. To power on/ off the product”. -
Página 15: Storage And Disposal
11. STORAGE AND DISPOSAL 12.1.4. TO CLEAN THE 3M SKULL SCREW AND 3M PELTOR CCC-GRM-25 COMMUNICATOIN EARTIPS 11.1. STORAGE • Clean by wiping with a clean, dry cloth. • Always store ear plugs in the charging case. • Replace the eartip if the eartip is damaged. -
Página 16: Warranty And Limitation Of Liability
New Zealand. Consumers should rely on their statutory rights. 14.1. WARRANTY In the event any 3M Personal Safety Division product is found to be defective in material, workmanship, or not in conformity with any express warranty for a specific purpose, 3M’s only obligation and your exclusive remedy shall be at 3M’s option,... -
Página 17: Atténuation En Laboratoire
ATTÉNUATION EN LABORATOIRE L'EPA des É.-U. spécifie que l'IRB constitue la mesure de réduction des bruits du protecteur auditif. Par contre, 3M n'offre aucune garantie quant à l'adaptation de l'IRB pour cette fonction. 3M recommande fortement d’effectuer un essai d’ajustement personnel du protecteur d’oreille. - Página 18 Pour une utilisation appropriée, consultez un superviseur et les directives de l’utilisateur, ou appelez le service technique de 3M. Si votre ouïe vous semble affaiblie ou si vous entendez un tintement ou un vrombissement pendant ou après l’exposition à...
- Página 19 • Utilisez uniquement des embouts de communication approuvés et compatibles à 3M™ PELTOR™. • Si les exigences susmentionnées ne sont pas respectées, la protection offerte par les bouchons d’oreille sera sérieusement compromise. 2.2. ATTENTION Exemple : 1. Le niveau de bruit environnemental comme mesuré à l’oreille •...
-
Página 20: Explication Des Symboles
K Tige de l'embout B Loquet/fermoir L Pare-vent/Couvercle du microphone C Voyant DEL M Embouts de communication 3M™ Skull Screw™ D Bouton de test/état N Embouts de communication 3M™ UltraFit™ O Embouts de communication 3M™ PELTOR™ CCC-GRM-25 E Bride de chargement P Contacts de recharge de l’écouteur... - Página 21 Remarque : L'écouteur commencera automatiquement à se 32 °F/0 °C. recharger. Les bouchons d’oreille 3M™ PELTOR™ TEP-300 devraient être chargés avant leur première utilisation. Le produit indiquera une 8. Répétez pour le second écouteur. faible charge de la pile avec un message audio « pile faible », 9.
-
Página 22: Embouts De Communication
L'emballage comprend 3 tailles d'embouts de communication sur l'adaptateur dans l'ouverture au centre du ressort. 3M™ UltraFit™ (1 paire pour chaque taille), 1 paire d'embouts de communication 3M™ Skull Screws™, et 1 paire d'embouts de communication 3M™ PELTOR™ CCC-GRM-25. Une corde de rétention facultative est également fournie. - Página 23 8.2. ATTACHER LES EMBOUTS ET LE 2. Localisez le microphone du bouchon d’oreille tactique. CORDON DE RÉTENTION OPTIONNEL 1. Placez une des extrémités du cordon de rétention sur les tiges de l’embout. 3. Centrez avec précautions le pare-vent jetable par-dessus le port du microphone et appuyez l’endos adhésif du pare-vent au port du microphone.
- Página 24 ATTENTION : Pour le plus grand confort et la sécurité lorsque vous enlevez les embouts de communication 3M UltraFit à trois collerettes, retirez lentement à l'aide d'un mouvement de torsion pour briser graduellement le joint d'étanchéité.
-
Página 25: Pile Faible
à portée du SCU-300. Les bouchons d’oreille indiquent que le produit est branché au SCU-300 avec 2 courts « bip » sonores. Pour obtenir de plus amples renseignements veuillez vous référer aux directives des utilisateurs pour le Système audio modulaire tactique 3M™ PELTOR™. -
Página 26: Dépannage
10. DÉPANNAGE Problème Solution Le TEP-300 ne s’allume Placez les écouteurs dans le Boîtier de recharge et effectuez un contrôle de l'état des piles. pas. Chargez les écouteurs, le cas échéant. Veuillez vous référer à “7.2. Recharge”. Veillez à appuyer sur le bouton d'alimentation pendant au moins trois secondes. Veuillez vous référer à... - Página 27 Services techniques de 3M. Veuillez vous référer aux • Nettoyez les contacts de charge avec un tampon de coton. coordonnées qui se trouvent à la dernière page de ce manuel.
-
Página 28: Garantie Et Limitation De Responsabilité
à une quelconque garantie expresse pour quelque usage que ce soit, la seule obligation de 3M et votre recours exclusif, à la discrétion de 3M, sera la réparation, le remplacement, ou le remboursement du prix d’achat de ces pièces ou de ces produits... -
Página 29: Atenuación En El Laboratorio
La Agencia de Protección Ambiental de EE. UU. especifica el NRR como la medición de reducción de ruido para protectores auditivos. Sin embargo, 3M no ofrece garantía alguna respecto a la idoneidad del NRR para este propósito. 3M recomienda encarecidamente hacer pruebas de ajuste personal de los protectores auditivos. -
Página 30: Introducción
Para aprender el uso correcto, consulte a su supervisor y el instructivo de uso, o llame al Servicio Técnico de 3M. Si su audición parece disminuida o si escucha un timbre o zumbido durante o después de cualquier exposición a ruidos (incluyendo detonaciones... -
Página 31: Información De La Fcc E Ic
• Use solamente tapones compatibles y aprobados de comunicación PELTOR™ de 3M™. • De no cumplirse los requisitos anteriores, la protección que ofrecen los protectores de oídos se verá muy reducida. -
Página 32: Información General
K Tallo del tapón de oídos B Seguro L Protector de viento/Cubierta del micrófono C LED indicador M Tapones de oídos para comunicación 3M™ Skull Screw™ D Botón de prueba/estado N Tapones de oídos para comunicación 3M™ UltraFit™ O Tapones de oídos para comunicación E Receptáculo de carga... -
Página 33: Carga Con Baterías Aa O Aaa
7. Oprima suavemente el auricular en el receptáculo hasta superiores a 113°F/45°C o inferiores a 32°F/0°C. que encaje. Los protectores de oídos 3M™ PELTOR™ TEP-300 deben Nota: El auricular empezará a cargarse automáticamente. cargarse antes de usarlos por primera vez. El producto indicará... -
Página 34: Para Seleccionar El Tamaño Correcto Del Tapón De Oídos
3M™ UltraFit™ (1 par de cada tamaño), 1 par adaptador con la abertura central del resorte. de tapones de oídos de comunicación 3M™ Skull Screws™ y 1 par de tapones de oídos de comunicación 3M™ PELTOR™, CCC-GRM-25. También se incluye un cordón de retención para uso opcional. -
Página 35: Cómo Sujetar Los Tapones De Oídosy El Cordón De Retención Opcional
8.2. CÓMO SUJETAR LOS TAPONES DE OÍDOS 2. Localice el micrófono del protector de oídos. Y EL CORDÓN DE RETENCIÓN OPCIONAL 1. Coloque un extremo del cordón de retención en el tallo de un tapón de oídos. 3. Centre cuidadosamente el protector desechable sobre el micrófono y presione el respaldo adhesivo del protector sobre él. - Página 36 Nota: Si no puede obtener un buen ajuste, pruebe un tapón de diferente tipo o tamaño. PRECAUCIÓN: Para más comodidad y seguridad al quitar los tapones de oídos para comunicación 3M™ UltraFit™, use un movimiento de giro lento para romper el sello gradualmente. 8.5. MICRÓFONO El TEP-300 cuenta con un micrófono dentro del oído, por lo...
-
Página 37: Para Ajustar El Volumen De Escucha Del Medio Ambiente O Entorno
SCU-300. Los protectores de oídos indican que el producto está conectado al SCU-300 con 2 pitidos cortos. Para obtener más información, consulte el instructivo de uso del Sistema de Audio Táctico Modular PELTOR™ de 3M™. -
Página 38: Solución De Problemas
10. SOLUCIÓN DE PROBLEMAS Problema Solución El TEP-300 Coloque los auriculares en el estuche de carga y revise el estado de la batería. Cargue los auriculares no se enciende. si es necesario. Consulte “7.2. Carga”. Asegúrese de oprimir el botón de encendido al menos tres segundos. Consulte “9.2. Para encender y apagar el producto”. -
Página 39: Almacenamiento Y Desecho
Para obtener más información sobre refacciones y accesorios, • Asegúrese de que la cubierta del puerto de carga USB-C comuníquese con Servicios Técnicos de 3M. Use la esté cerrada durante la limpieza. información de contacto que aparece en la última página de este manual. -
Página 40: Garantía Y Limitación De Responsabilidad
14.1. GARANTÍA En caso de que cualquier producto de la División de Seguridad Personal de 3M tenga defectos en materiales o mano de obra o no cumpla con cualquier garantía explícita para un propósito específico, la única obligación de 3M y su remedio exclusivo será, a elección de 3M, reparar, reemplazar o reembolsar el...