Tabla de contenido
Publicidad
Idiomas disponibles
Idiomas disponibles
Enlaces rápidos
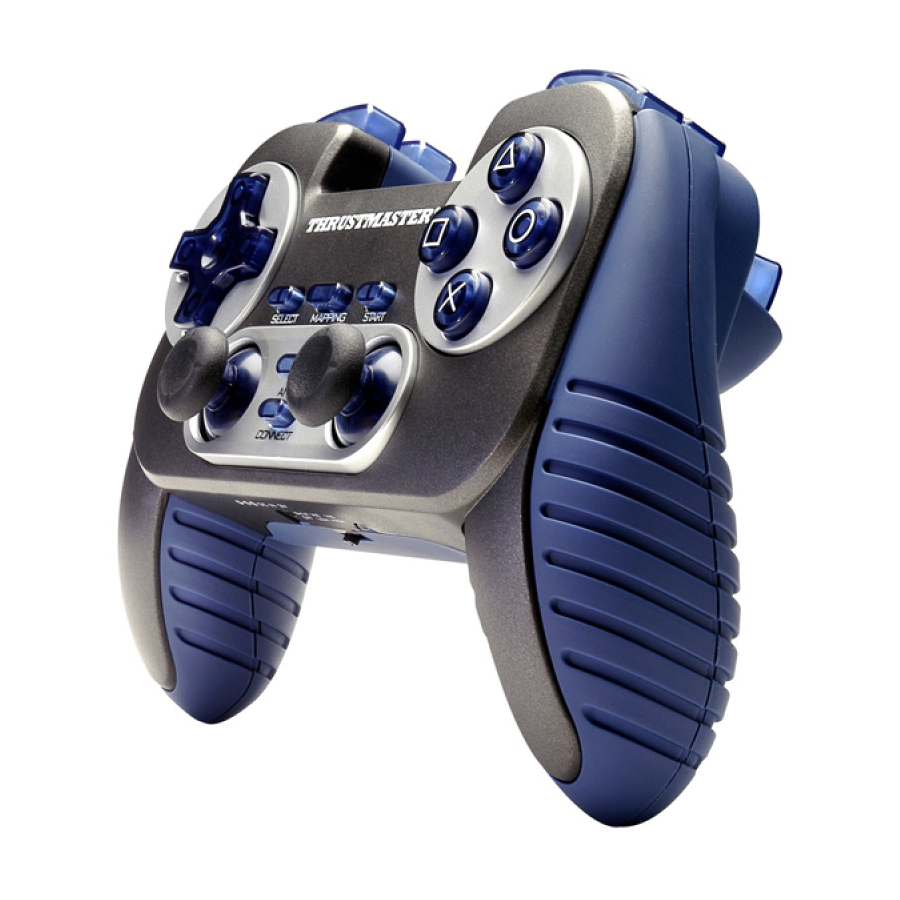
TECHNICAL FEATURES
1. Programmable and progressive triggers
2. 8 analog action buttons
3. START + SELECT buttons
4. 2 analog mini-sticks + 2 digital action buttons
5. D-Pad (Point Of View)
6. Switch (Gamepad OFF / Vibration Low/High)
SAFETY NOTICE
• Do not twist or pull on the cable.
• Do not spill liquid on the cable and/or connectors.
• In the event of malfunction during use due to electrostatic emission, please exit the game and unplug
the device from the console. Resume normal game play by plugging the device back in and restarting
the game.
7.
MODE button (Analog / Digital)
8.
MAPPING button (for
programming trigger functions)
9.
CONNECT button
10. 2 built-in independent motors
11. Gameport receiver
1/4
User Manual
Publicidad
Tabla de contenido

Manuales relacionados para Thrustmaster ADVANCE WIRELESS DUAL TRIGGER


Resumen de contenidos para Thrustmaster ADVANCE WIRELESS DUAL TRIGGER
- Página 1 User Manual TECHNICAL FEATURES 1. Programmable and progressive triggers MODE button (Analog / Digital) MAPPING button (for 2. 8 analog action buttons 3. START + SELECT buttons programming trigger functions) 4. 2 analog mini-sticks + 2 digital action buttons CONNECT button 5.
-
Página 2: Sleep Mode
INSTALLATION 1. Remove the gamepad’s battery compartment cover. 2. Insert rechargeable batteries, then replace the cover. 3. Plug the gameport receiver (11) into a controller port on your console. 4. Turn on the gamepad using the switch (6). 5. Turn on your console and start up your game. You are now ready to play! ADVANCED FUNCTIONS •... - Página 3 • MAPPING button (8) (used to map left and right triggers): - Press and release the MAPPING button (LED flashes slowly). - Press and release the button or direction you want to assign to the trigger (LED flashes quickly). - Press and release the trigger assigned to this function (LED turns off). •...
-
Página 4: Technical Support
Where authorized by applicable law, the full liability of Guillemot and its subsidiaries (including for indirect damages) is limited to the repair or replacement of the Thrustmaster product. The consumer’s legal rights with respect to legislation applicable to the sale of consumer goods are not affected by this warranty. -
Página 5: Caracteristiques Techniques
Manuel de l'utilisateur CARACTERISTIQUES TECHNIQUES 1. Gâchettes programmables à action progressive Bouton MODE (analogique / numérique) 2. 8 boutons d'action analogiques 3. Boutons START + SELECT Bouton MAPPING (pour 4. 2 sticks analogiques / 2 boutons d'action digitaux programmation des gâchettes) 5. -
Página 6: Mode Veille
INSTALLATION 1. Retirez le couvercle du compartiment à piles de la manette. 2. Insérez les piles rechargeables, puis remettez en place le couvercle. 3. Branchez le récepteur gameport (11) sur un port contrôleur de votre console. 4. Allumez la manette à l'aide de l'interrupteur (6). 5. - Página 7 • Bouton MAPPING (8) (pour programmer les gâchettes gauche et droite) : - Pressez et relâchez le bouton MAPPING (le voyant clignote lentement). - Pressez et relâchez le bouton ou la direction à affecter à la gâchette (le voyant clignote rapidement). - Pressez et relâchez la gâchette affectée à...
-
Página 8: Support Technique
Dans le monde entier, Guillemot Corporation S.A. (« Guillemot ») garantit au consommateur que le présent produit Thrustmaster est exempt de défauts matériels et de vices de fabrication, et ce, pour une période de deux (2) ans à compter de la date d’achat d’origine. Si, au cours de la période de garantie, le produit semble défectueux, contactez immédiatement le Support Technique qui vous indiquera la procédure à... -
Página 9: Technische Daten
Benutzerhandbuch TECHNISCHE DATEN 1. Programmierbare, progressive Trigger MODE Button (Analog / Digital) 2. 8 analoge Action-Buttons MAPPING Button (zur Trigger- 3. START + SELECT Buttons Programmierung) 4. 2 analoge Mini-Sticks + 2 digitale Action-Buttons CONNECT Button 5. D-Pad (Sichtwahl) 10. 2 eingebaute Motoren 6. -
Página 10: Aufladen Der Akkus
INSTALLATION 1. Entfernen Sie den Batteriefachdeckel. 2. Legen Sie die wiederaufladbaren Batterien ein, dann setzen Sie den Deckel wieder ein. 3. Stecken Sie den Gameport Empfänger (11) in einen Controller-Anschluß Ihrer Konsole. 4. Schalten Sie das Gamepad mit dem Schalter (6) an. 5. - Página 11 • MAPPING (8) Button (zum belegen des rechten und linken Triggers): - Drücken Sie kurz den MAPPING Button (LED blinkt langsam). - Drücken Sie kurz den Button oder die Richtung mit welcher Sie den Trigger belegen wollen (LED blinkt schnell). - Bedienen Sie kurz den Trigger, den Sie mit dieser Funktion belegen wollen (LED geht aus).
-
Página 12: Technischer Support
TECHNISCHER SUPPORT Sollten Sie mit Ihrem Produkt ein Problem haben, besuchen Sie bitte die Seite http://ts.thrustmaster.com und klicken Sie auf Technischer Support. Von dort aus können Sie auf verschiedene Instrumente zugreifen (Fragen und Antworten (FAQ), die neuesten Versionen von Treibern und Software), die Ihnen bei der Lösung Ihres Problems helfen könnten. -
Página 13: Technische Kenmerken
Handleiding TECHNISCHE KENMERKEN 1. Programmeerbare, progressief reagerende triggers MODE knop (analoog / digitaal) MAPPING knop (voor het 2. 8 analoge actieknoppen 3. START + SELECT knoppen programmeren triggerfuncties) 4. 2 analoge minijoysticks + 2 digitale actieknoppen CONNECT knop 5. D-Pad (Point Of View) 10. -
Página 14: Installatie
INSTALLATIE 1. Verwijder het deksel van de batterijruimte. 2. Plaats de oplaadbare batterijen en doe het deksel dicht. 3. Steek de gameportontvanger (11) in een controller port van de console. 4. Zet de gamepad aan met schakelaar (6). 5. Zet de console aan en start de game. Nu kan er gespeeld worden! GEAVANCEERDE FUNCTIES •... - Página 15 • MAPPING knop (8) (gebruikt voor het mappen van de linker en rechtertriggers): - Druk de knop MAPPING in en laat deze weer los (LED knippert langzaam). - Druk de knop (of de richting) in welke toegekend moet worden aan de trigger en laat deze weer los (LED knippert snel).
-
Página 16: Garantie Informatie
TECHNICAL SUPPORT Als u problemen hebt met uw product, gaat u naar http://ts.thrustmaster.com en klikt u op Technical Support. Vanaf hier hebt u toegang tot verschillende onderwerpen zoals hulpprogramma’s, de FAQ (veelgestelde vragen) en de meest recente drivers en software die u helpen bij het vinden van oplossingen. Als het probleem zich blijft voordoen, neem dan contact op met de Thrustmaster product technical support service (“Technical Support”):... -
Página 17: Caratteristiche Tecniche
Manuale d’uso CARATTERISTICHE TECNICHE 1. Triggers programmabili e progressivi Pulsante MODE (Analogico / Digitale) 2. 8 pulsanti d'azione analogici 3. Pulsanti START + SELECT Pulsante MAPPING (per 4. 2 mini-sticks analogici + 2 pulsanti d'azione digitali programare funzioni dei trigger) 5. -
Página 18: Caricare Le Batterie Ricaricabili
INSTALLAZIONE 1. Rimuovere la copertura del compartimento per le batterie del gamepad. 2. Inserire le batterie ricaricabili e risistemare la copertura. 3. Collegare il ricevitore della porta di gioco (11) in una porta controller della console. 4. Accendere il gamepad usando l'interruttore (6). 5. - Página 19 • Pulsante MAPPING (8) (usato per impostare i trigger destro e sinistro): - Premere e rilasciare il pulsante MAPPING (il LED lampeggia lentamente). - Premere e rilasciare il pulsante o la direzione che si vuole assegnare al trigger (il LED lampeggia velocemente).
-
Página 20: Assistenza Tecnica
Internazionalmente, Guillemot Corporation S.A. (“Guillemot”) garantisce l’acquirente che questo prodotto Thrustmaster è privo di vizi produttivi o difetti di materiale per un periodo di due (2) anni dalla data di acquisto. Nel caso il prodotto si riveli difettoso durante il periodo di garanzia, contattare immediatamente l’Assistenza Tecnica, che indicherà... -
Página 21: Características Técnicas
Manual del usuario CARACTERÍSTICAS TÉCNICAS 1. Gatillos programables y progresivos Botón MODE (Analógico/Digital) Botón MAPPING (para 2. 8 botones de acción analógicos 3. Botones START + SELECT programar funciones de gatillo) 4. 2 mini-sticks analógicos + 2 botones de acción Botón CONNECT digitales 10. -
Página 22: Instalación
INSTALACIÓN 1. Quita la tapa del compartimiento de las pilas del gamepad. 2. Inserta las pilas recargables, y vuelve a colocar la tapa. 3. Enchufa el receptor del puerto de juego (11) en un puerto de mando en tu consola. 4. -
Página 23: Comportamiento De Los Gatillos
• Botón MAPPING (8) (utilizado para mapear los gatillos Izquierdo y Derecho): - Pulsa y suelta el botón MAPPING (el LED parpadea lentamente). - Pulsa y suelta el botón o dirección que quieras asignar al gatillo (el LED parpadea rápidamente). - Pulsa y suelta el gatillo asignado a esta función (el LED se apaga). -
Página 24: Soporte Técnico
En todo el mundo, Guillemot Corporation S.A. (“Guillemot”) garantiza al consumidor que este producto de Thrustmaster estará libre de defectos materiales y fallos de fabricación por un periodo de dos (2) años a partir de la fecha de compra original. Si el producto pareciera estar defectuoso durante el periodo de garantía, contacte inmediatamente con el Soporte Técnico, que le indicará... - Página 25 Manual do utilizador CARACTERÍSTICAS TÉCNICAS 1. Gatilhos programáveis e progressivos Botão MODE (Analog / Digital) Botão MAPPING (para 2. 8 botões de acção analógicos 3. Botões START + SELECT programar funções dos gatilhos) 4. 2 minialavancas analógicas + 2 botões de acção digitais Botão CONNECT 5.
-
Página 26: Funções Avançadas
INSTALAÇÃO 1. Remova a tampa do compartimento das pilhas do gamepad. 2. Insira as pilhas recarregáveis e volte a colocar a tampa. 3. Conecte o receptor da porta de jogos (11) a uma das portas do controlador na sua consola. 4. - Página 27 • Botão MAPPING (8) (usado para mapear os gatilhos esquerdo & direito): - Prima e solte o botão MAPPING (o LED pisca lentamente). - Prima e solte o botão ou a direcção que quer atribuir ao gatilho (o LED pisca rapidamente). - Prima e pressione o gatilho atribuído a esta função (o LED apaga-se).
-
Página 28: Suporte Técnico
A Guillemot Corporation S.A. (“Guillemot”) garante ao consumidor, a nível mundial, que este produto Thrustmaster está isento de defeitos de material e de fabrico durante um período de dois (2) anos a partir da data de compra original. No caso de o produto apresentar algum defeito durante o período da garantia, contacte imediatamente o Suporte Técnico, que indicará...