VWR VisiScope 400 Serie Manual De Instrucciones
Ocultar thumbs
Ver también para VisiScope 400 Serie:
- Manual de instrucciones (60 páginas) ,
- Manual de instrucciones (60 páginas)

Manuales relacionados para VWR VisiScope 400 Serie


Resumen de contenidos para VWR VisiScope 400 Serie
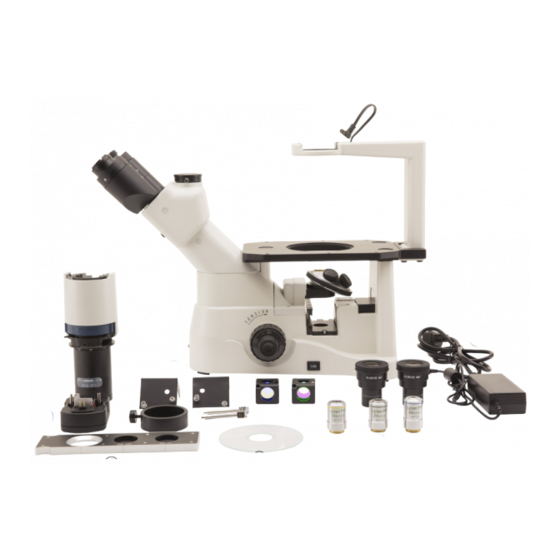
- Página 1 Microscope series 400 INSTRUCTION MANUAL Model European Catalogue Number IT415PH 630-2729 Version: Issued: 16, 02, 2017...
-
Página 2: Tabla De Contenido
Legal Address of Manufacturer Europe VWR International bvba Researchpark Haasrode 2020 Geldenaaksebaan 464 B-3001 Leuven + 32 16 385011 http://be.vwr.com Country of origin: ITALY Table of Contents Warning Safety information Package contents Unpacking Intended use Symbols and conventions Product specifications... -
Página 3: Safety Information
Warning This microscope is a scientific precision instrument designed to last for many years with a minimum of main- tenance. It is built to high optical and mechanical standards and to withstand daily use. We remind you that this manual contains important information on safety and maintenance, and that it must therefore be made accessible to the instrument users. -
Página 4: Unpacking
Unpacking The microscope is housed in a moulded Styrofoam container. Remove the tape from the edge of the contain- er and lift the top half of the container. Take care to ensure that the optical items (objectives and eyepieces) do not fall out and get damaged. Using both hands (one around the neck and one around the base), lift the microscope from the container and put it on a stable desk. -
Página 5: Overview
Overview HOUSING EYEPIECE TRINOCULAR VIEWING TUBE (FIXED) FILTER HOLDER PHASE CONTRAST SLIDER CONDENSER DIOPTRIC ADJUSTMENT RING GLASS STAGE INSERT STAGE LIGHT PATH SELECTOR LEVER OBJECTIVE MICROSCOPE BODY TENSION FINE FOCUS KNOB ADJUSTMENT COLLAR COARSE FOCUS KNOB... - Página 6 Installing the objectives ② ① 1. Turning the coarse focusing knob till the nosepiece reaches its lowest position. ► For a safe transport, the nosepiece is placed in the lowest position and the ① ② tension adjustment collar is adjusted to the appropriate tension when the Fig.1 microscope leaves the factory.
- Página 7 Installing the stage insert 1. When using the glass stage, make sure that the insert is horizontal. 2. Install the stage insert in the stage Fig.6 opening. (Fig.6) Installing the eyepieces Insert both eyepieces into the tubes of the Fig.7 optical head.
- Página 8 Connecting the power cord Turn the main switch ① to “O”(off) before connecting the power cord. (Fig.13) Insert the cable into the power socket of the microscope. (Fig.14) ① Plug the power cord into the mains sock- Fig.13 et. Check for a safe connection. ►...
- Página 9 Using the microscope INITIAL SETUP Turning on the LED ① Fig.16 Connect the power, turn on the main switch ①. (Fig.16) Adjusting the brightness Turn the brightness adjustment knob ② to increase and decrease the brightness. (Fig.17) ② Fig.17 Adjusting the tension ►...
- Página 10 VIEWING TUBE ① Dioptric adjustment Look into the right eyepiece with your right eye only, and focus on the specimen. Look into the left eyepiece with your left eye only. If the image is not sharp, use the dioptric adjustment ring ① to compensate. (Fig.19) ►...
- Página 11 ILLUMINATION UNIT Using color filters Selecting the appropriate color filters according your need. (Fig.22) You can stack a group of color filters in the filter Fig.22 holder, if you ensure that they are level and that the whole thickness is less than 11mm. 70-80% Using the aperture diaphragm ①...
- Página 12 Centering the ring ► Usually this operation is not needed. If necessary, please proceed with the following steps: Place a specimen on the stage and focus Take out the eyepiece from the tube without the dioptric adjustment, and replace it with Fig.26 the centering telescope (CT).
- Página 13 MICROPHOTOGRAPHY Installing the photography adapter 1. To activate the video port, pull the light path selector lever to “In” position. (Fig.29) 2. Loosen the locking bolt ① on the trinocular viewing tube, and take out the dust cap ②. 3. Install the photography adapter into the trinocular port according to its instructions, and screw down the locking bolt ①.
-
Página 14: Troubleshooting
Troubleshooting Review the information in the table below to troubleshoot operating problems. PROBLEM CAUSE SOLUTION I. Optical Section: 1. The illumination is open, but The plug of the LED holder Connect them the field of view is dark. is not connected to the il- lumination set The brightness is too low Adjust to a proper setting... - Página 15 6. One side of the image is out of The nosepiece is not in the Turn the nosepiece to a click stop focus. center of the light path The specimen is out of place Place the specimen flat on the stage. (tilted) The optical performance of Use a cover glass of better quality...
-
Página 16: Repair And Maintenance
Do not disassemble objectives or eyepieces in an attempt to clean them. For the best results, use the VWR cleaning kit (see catalogue number below). If you need to send the microscope to manufacturer for maintenance, please use the packaging if possible . - Página 17 List of accessories and spare parts CAT. NO. DESCRIPTION EYP780 Eyepiece EWF10x/22mm. EYP781 Eyepiece micrometer EWF10x/22mm. VWR005 26x76 mm micrometric slide. Range 1 mm, div. 0,01 mm. OBJ782 Objective IOS LWD PLAN Achromatic 4x/0.10 (w.d. 22mm). OBJ782.1 Objective IOS LWD PLAN Achromatic for phase contrast 4x/0.13 (w.d. 16.9mm). OBJ783 Objective IOS LWD PLAN Achromatic for phase contrast 10x/0,25 (w.d.
-
Página 18: Technical Service
VWR International warrants that this product will be free from defects in material and workmanship for a period of five (5) years from date of delivery. If a defect is present, VWR will, at its option and cost, repair, replace, or refund the purchase price of this product to the customer, provided it is returned during the war- ranty period. -
Página 19: Disposal
Disposal This equipment is marked with the crossed out wheeled bin symbol to indicate that this equipment must not be disposed of with unsorted waste. Instead it is your responsibility to correctly dispose of your equipment the end of its life cycle by handling it over to an authorized facility for separate collection and recycling. -
Página 20: Vwr International Bvba
E-mail: info@nl.vwr.com Email: info@pro-lab.com.tr Transformervej 8 New Zealand 2730 Herlev Tel.: 43 86 87 88 Global Science - A VWR Company VWR International Ltd Fax: 43 86 87 90 241 Bush Road Customer Service Centre E-mail: info@dk.vwr.com Albany 0632, Auckland Hunter Boulevard - Magna Park Tel.: 0800 734 100... - Página 21 Microscopio serie 400 MANUALE D’ISTRUZIONI Modello European Catalogue Number IT415PH 630-2729 Versione: 1 Emesso il: 16, 01, 2017...
-
Página 22: Researchpark Haasrode 2020 Geldenaaksebaan 464 B-3001 Leuven + 32 16 385011
Indirizzo legale del produttore Europa VWR International bvba Researchpark Haasrode 2020 Geldenaaksebaan 464 B-3001 Leuven + 32 16 385011 http://be.vwr.com Origine della merce: ITALIA Indice Contenuti Avvertenze Informazioni sulla sicurezza Contenuto della confezione Utilizzo previsto Simboli e convenzioni Apertura della confezione Procedura d’installazione... - Página 23 Avvertenza Questo microscopio è uno strumento scientifico di alta precisione, progettato per durare a lungo con una minima ma- nutenzione; la realizzazione è secondo i migliori standar ottici e meccanici, per poter essere utilizzato quotidianamen- te. Vi ricordiamo che questo manuale contiene informazioni importanti per la sicurezza e per la manutenzione dello strumento, e deve quindi essere messo a disposizione di coloro che lo utilizzeranno.
- Página 24 Disimballagio Il microscopio è riposto in un imballo di polistirolo espanso. Rimuovere il nastro adesivo dal collo ed aprire la parte superiore dell’imballo. Fare attenzione a non far cadere le parti ottiche (obiettivi e oculari) nell’estrarre il microscopio dalla scatola per evitare che vengano danneggiati. Utilizzare entrambe le mani (una intorno allo stativo e una alla base), sfilare il microscopio dal contenitore e appoggiarlo su un piano stabile.
- Página 25 Descrizione dello strumento ALLOGGIAMENTO OCULARI TUBO DI USCITA TRINOCULARE PORTA-FILTRI SLIDER PER CONTRASTO DI FASE CONDENSATORE ANELLO DI REGOLAZIONE INSERTO DIOTTRICA PORTAPREPARATI IN VETRO TAVOLINO SELEZIONATORE PERCORSO LUMINOSO OBIETTIVI BASE DEL MICROSCOPIO ANELLO DI REGOLAZIONE MANOPOLA DI DELLA TENSIONE REGOLAZIONE DELLA MESSA A MANOPOLA DI REGOLAZIONE FUOCO...
- Página 26 Installazione degli obiettivi ② 1. Ruotare la manopola di regolazione macro- ① metrica finché la torretta portaobiettivi si trova nella posizione più bassa. ► Per garantire la sicurezza durante il tra- sporto, prima della spedizione la tor- ① retta viene messa nella posizione più bassa e si sistema l’anello di regolazi- Fig.1 ②...
- Página 27 Installazione dell’inserto in vetro 1. Assicurarsi che il piano portapreparati sia perfettamente orizzontale quando si usa il piano in vetro. 2. Inserire l’inserto in vetro nell’apertura del piano. (Fig.6) Fig.6 Installazione degli oculari Togliere il tappo ai tubi portaoculari, inserire gli oculari nei tubi.
- Página 28 Collegamento del cavo di alimentazione Mettere l’interruttore ① su “O”(off) prima di collegare il cavo di alimentazione. (Fig.13) Inserire il cavo nella presa jack (2) del ① microscopio. (Fig.14) Fig.13 Inserire il cavo di alimentazione nella presa di rete. Attenzione alla sicurezza del collegamento.
- Página 29 Istruzioni per l’uso SETUP INIZIALE Accensione dell’illuminazione ① Fig.16 Collegare l’alimentazione, quindi accendere l’interruttore ①. (Fig.16) Regolazione della luminosità Ruotare l’apposita manopola per aumentare o diminuire la luminosità ②. (Fig.17) Regolazione della tensione ② ► La manopola di regolazione macro- Fig.17 metrica ①...
- Página 30 OCULARI ① Compensazione diottrica Osservare e mettere a fuoco il preparato guardando con l’occhio destro attraverso l’oculare destro. Ora guardare attraverso l’oculare sinis- tro con l’occhio sinistro. Se l’immagine non è nitida, agire sulla compensazione diottrica utilizzando l’apposito anello ①. (Fig.19) Fig.19 ►...
- Página 31 GRUPPO ILLUMINATORE Utilizzo filtri cromatici Scegliere i filtri cromatici a seconda delle proprie esigenze. (Fig.22) Nel portafiltri si possono ammucchiare una Fig.22 serie di filtri purché siano disposti piani e lo spessore totale sia inferiore a 11mm. Utilizzo del diaframma di apertura 70-80% ①...
- Página 32 ALLINEAMENTO DEI DIAFRAMMI ► Solitamente non è necessario effettuare questa operazione. Nel caso lo fosse, seguire procedura descritta seguito: Posizionare un preparato sul piano e metterlo a fuoco. Fig.26 Estrarre l’oculare tubo senza compensazione diottrica e sostituirlo con il telescopio di centratura (CT). (Fig.26) Verificare che l’anello di fase e l’obiettivo corrispondano e che entrambi siano fissi in posizione di blocco.
- Página 33 MICROFOTOGRAFIA Installazione dell’adattatore fotografico 1. Per attivare l’acquisizione video, tirare verso l’esterno la levetta di selezione del percorso luminoso. (Fig.29) 2. Svitare il bullone di bloccaggio ① sul tubo Fig.29 trinoculare e rimuovere il tappo antipolvere ②. 3. Installare l’adattatore foto nella porta trinoculare seguendo le istruzioni, quindi riavvitate il bullone di bloccaggio ①.
- Página 34 Risoluzione problemi Consultare le informazioni riportate nella tabella sottostante per risolvere eventuali problemi operativi. PROBLEM CAUSE SOLUTION I. I. Problemi ottici: 1. L’illuminatore è acceso, ma il cam- La spina dell’alloggiamento Collegare l’alloggiamento LED al gruppo po visivo è scuro LED non è...
- Página 35 6. Un lato dell’immagine non è a Il revolver non è al centro del Ruotare il revolver finché non si blocca con fuoco percorso luminoso un click Il preparato non si trova nella Posizionare il preparato orizzontalmente posizione corretta (es. inclinato) sul piano La qualità...
- Página 36 Riparazione e manutenzione Ambiente d’utilizzo Si consiglia d’utilizzare questo microscopio in un ambiente pulito, asciutto e non soggetto ad urti, ad una temperatura tra 0° e 40°C ed con un’umidità relativa massima dell’ 85 % ( in assenza di condensazione). Se necessario, utilizzare un deumidificatore.
- Página 37 Elenco accessori e parti di ricambio CAT. NO. DESCRIZIONE EYP780 Oculare EWF10x/22mm. EYP781 Oculare micrometrico EWF10x/22mm. VWR005 Vetrino micrometrico per calibrazione software, 1mm/10um, 10mm/100um OBJ782 Obiettivo IOS LWD PLAN Acromatico 4x/0,10 (w.d. 22mm). OBJ782.1 Obiettivo IOS LWD PLAN Acromatico per contrasto di fase 4x/0.13 (w.d. 16.9mm). OBJ783 Obiettivo IOS LWD PLAN Acromatico per contrasto di fase 10x/0,25 (w.d.
- Página 38 VWR International garantisce per questo prodotto l’assenza da difetti nei materiali e di fabbricazione per un periodo di cinque (5) anni dalla data di consegna. In caso contrario, VWR provvederà, a sua discrezione e a proprie spese, alla riparazione, sostituzione o al rimborso del prezzo di acquisto del prodotto al cliente, pur- ché...
- Página 39 Smaltimento Questo strumento riporta il simbolo del bidone con ruote con una croce sopra. Questo indica che lo strumento non può essere smaltito nei rifiuti indifferenziati. E’ responsabilità dell’utente smaltirlo correttamente ,consegnandolo ad una struttura autorizzata per lo smistamento ed il riciclo dei rifiuti. Inoltre, è responsabilità dell’utente provvedere alla decontaminazione dello strumento da eventuali contaminazioni con materiale biologico, chimico e/o radioattivo, al fine di proteggere le persone coinvolte nel processo di riciclo dello strumento da eventuali pericoli per la salute.
- Página 40 E-mail: info@nl.vwr.com Email: info@pro-lab.com.tr Transformervej 8 New Zealand 2730 Herlev Tel.: 43 86 87 88 Global Science - A VWR Company VWR International Ltd Fax: 43 86 87 90 241 Bush Road Customer Service Centre E-mail: info@dk.vwr.com Albany 0632, Auckland Hunter Boulevard - Magna Park Tel.: 0800 734 100...
- Página 41 Microscopio serie 400 MANUAL DE INSTRUCCIONES Modelo European Catalogue Number IT415PH 630-2729 Versión: Publicado: 16, 01, 2017...
- Página 42 Dirección legal del fabricante Europa VWR International bvba Researchpark Haasrode 2020 Geldenaaksebaan 464 B-3001 Leuven + 32 16 385011 http://be.vwr.com País de origen: ITALIA Cuadro de contenidos Advertencia Información de seguridad Contenido del embalaje Utilización Desembalaje Montaje Instalación Especificaciones técnicas Visión de conjunto...
- Página 43 Advertencia Este microscopio es un instrumento científico de precisión. Su utilización está pensada para una larga duración con un mínimo nivel de mantenimiento. Para su fabricación se han utilizado elementos ópticos y mecánicos de elevada calidad que lo convierten en el instrumento ideal para la utilización diaria en las aulas y el laboratorio. Informamos que esta guía contiene importantes informaciones sobre la seguridad y el mantenimiento del producto y por lo tanto debe ser accesible a todos aquellos que utilizan dicho instrumento.
- Página 44 Desembalaje El microscopio esta embalado dentro de una caja de porexpan. Quitar el precinto que hay alrededor de la caja y abrirla. Tenga cuidado al abrir la caja ya que algunos accesorios ópticos como objetivos y oculares podrían caerse o dañarse. Con las dos manos (una sujetando el brazo y la otra la base) extraer el microsco- pio de dentro la caja de porexpan y poner sobre la mesa, procurando que ésta sea fuerte y estable.
- Página 45 Vista general SOPORTE OCULARES TUBO DE ENFOQUE TRINOCULAR (FIJO) SOPORTE PARA FILTRO SOPORTE PARA CONTRASTE DE FASE CONDENSADOR ANILLO DE REGULACIÓN DIÓPTRICA DISCO DE VIDRIO PLATINA PALANCA DE SELECCIÓN DEL RECORRIDO LUMINOSO OBJETIVOS BASE DEL MICROSCOPIO ANILLO DE MANDO DE REGULACIÓN REGULACIÓN DE DEL ENFOQUE LA TENSIÓN...
- Página 46 Instalación de los objetivos ② 1. Girar el mando de regulación macrométri- ① hasta que el revólver porta-objetivos se situé en su posición más baja. ► Para garantizar la seguridad durante el transporte, antes del envío, el revólver ① se coloca en la posición más baja y el ②...
- Página 47 Instalación del disco de vidrio 1. Asegurarse que la platina portaprepara- dos esté perfectamente horizontal cuando se usa el soporte de vidrio. 2. Introducir el soporte de vidrio en el orificio Fig.6 de la platina. (Fig.6) Instalación de los oculares Introducir los oculares en los tubos.
- Página 48 Conexión del cable de alimentación Colocar el interruptor ① en “O” (off) an- tes de conectar el cable de alimentación. (Fig.13) Introducir el enchufe en la toma jack del ① microscopio. (Fig.14) Fig.13 Introducir el cable de alimentación en la toma de red.
- Página 49 Instalación INITIAL SETUP Puesta en marcha de la iluminación ① Fig.16 Conectar el enchufe a la corriente y, a continu- ación, encender el interruptor ①. (Fig.16) Regulación de la luminosidad Girar el correspondiente mando ② para aumentar y para disminuir la luminosidad. (Fig.17) ②...
- Página 50 OCULARES ① Compensación dióptrica Observar y enfocar el preparado mirando con el ojo derecho a través del ocular derecho. A continuación, mirar a través del ocular izquierdo con el ojo izquierdo. Si la ima- gen no es nítida, regular la compensación dióptrica utilizando el correspondiente anillo ①.
- Página 51 SISTEMA DE ILUMINACIÓN Utilización de filtros cromáticos Elegir los filtros cromáticos en función de las propias exigencias. (Fig.22) En el portafiltros se pueden colocar varios Fig.22 filtros con tal de que estén planos y el espesor total sea inferior a 11mm. Utilización del diafragma de apertura 70-80% ①...
- Página 52 Centrado del círculo luminoso ► Normalmente no es necesario realizar esta operación. Si fuera necesario, seguir el proceso que se describe a continuación: Situar un preparado en la platina y enfocarlo. Fig.26 Extraer el ocular del tubo sin compensación dióptrica y sustituirlo por el telescopio de centrado (CT).
- Página 53 MICROFOTOGRAFÍA Instalación del adaptador para foto 1. Para activar la adquisición de video, tirar la palanca de selección del recorrido luminoso hacia el exterior. (Fig.29) 2. Destornillar el tornillo de bloqueo ① del tubo trinocular y extraer el tapón antipolvo ②.
- Página 54 Résolution des problèmes Revisar la información en la tabla a continuación para solucionar problemas de funcionamiento. PROBLEMA CAUSA SOLUCION I. Section Optique: El iluminador está El enchufe del LED soporte no Conectar el LED soporte al sistema de encendido, pero el campo está...
- Página 55 Un lado de la imagen El revólver no está en el centro Girar el revólver hasta que no se bloquee no está enfocado del recorrido luminoso con un click El preparado no está en la Situar el preparado horizontal al plano posición correcta (ej.
- Página 56 No frotar la superficie de ningún componente óptico con las manos. Las huellas digitales pueden dañar las ópticas. No desmontar los objetivos o los oculares para intentar limpiarlos. Para obtener mejores resultados, utilice el kit de limpieza VWR (ver código debajo). Si fuera necesario enviar el microscopio al fabricante para su mantenimiento, se ruega utilizar el...
- Página 57 Lista de accesorios y repuestos CAT. NO. DESCRIPCIÓN EYP780 Ocular EWF10x/22mm. EYP781 Ocular micrométrico EWF10x/22mm. VWR005 Preparación micrométrica, 1mm/10um, 10mm/100um para la calibración del software OBJ782 Objetivo LWD PLAN Acromático IOS 4x/0,10 (w.d. 22mm). OBJ782.1 Objetivo IOS LWD PLAN Acromático de Contraste de Fases 4x/0.13 (w.d. 16.9mm). OBJ783 Objetivo LWD de Contraste de Fases PLAN Acromático IOS 10x/0,25 (w.d.
- Página 58 VWR International garantiza que este producto estará libre de defectos de material y fabricación durante un periodo de 5 años a partir de la fecha de entrega. En el caso de que exista algún defecto, VWR elegirá, a su elección y corriendo con los gastos, reparar, cambiar o rembolsar el importe de este producto al cliente, siempre y cuando se devuelva durante el periodo de la garantía.
- Página 60 E-mail: info@nl.vwr.com Email: info@pro-lab.com.tr Transformervej 8 New Zealand 2730 Herlev Tel.: 43 86 87 88 Global Science - A VWR Company VWR International Ltd Fax: 43 86 87 90 241 Bush Road Customer Service Centre E-mail: info@dk.vwr.com Albany 0632, Auckland Hunter Boulevard - Magna Park Tel.: 0800 734 100...