Publicidad
Idiomas disponibles
Idiomas disponibles
Enlaces rápidos
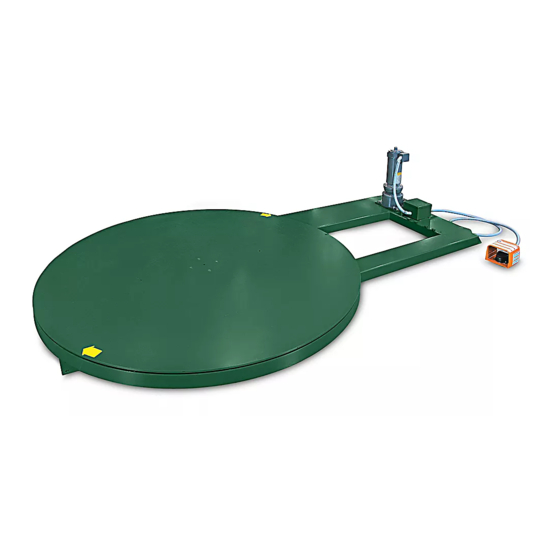
H-1287
STRETCH WRAP
LOW PROFILE
TURNTABLE
IMPORTANT! Read instructions thoroughly
and familiarize yourself with ALL controls and
operating features.
NOTE: Check the machine for damage.
If damage is found, contact Uline customer
service at 1-800-295-5510.
CAUTION! When servicing drive and controllers,
exposed components with housings or
protrusions may be at or above line potential.
Extreme care should be taken to protect
against shock.
IMPORTANT! Both the ramp and the machine
should be lagged to floor before use.
TECHNICAL DATA
Length
Width
Height
Turntable Height from Floor
Maximum Pallet Size
Operation Space
Shipping Weight
PAGE 1 OF 15
1-800-295-5510
uline.com
SAFETY
SPECIFICATIONS
101"
65"
15"
3.2"
52" x 52
105" L x 75" W
1,000 lbs
Pour le français, consulter les pages 11-15.
• User is responsible for conforming to all applicable
code requirements with respect to grounding all
requirements.
• Do not use extension cords to operate the
equipment.
• Disconnect AC input power before checking
components, performing maintenance, cleaning,
and when machine is not in use. Do NOT connect
or disconnect wires and connectors while power is
applied to circuit.
• Wiring work should be carried out only by qualified
personnel to avoid electrical shock or fire.
• Loose clothing must not be worn while the machine
is in operation. Stay clear of moving parts while the
machine is running.
ELECTRICAL
• 120 VAC, 60 Hz, Single-phase, 15 AMP
TURNTABLE
• 1/2 HP 3-phase AC motor
• 1/2 HP AC frequency drive with acceleration and
deceleration control
• 12 RPM turntable maximum speed
• 4,000 lbs turntable maximum load capacity
Para Español, vea páginas 6-10.
0223 IH-1287
Publicidad

Manuales relacionados para Uline H-1287


Resumen de contenidos para Uline H-1287
- Página 1 NOTE: Check the machine for damage. • Do not use extension cords to operate the If damage is found, contact Uline customer equipment. service at 1-800-295-5510. • Disconnect AC input power before checking CAUTION! When servicing drive and controllers,...
- Página 2 SPECIFICATIONS CONTINUED Turntable Speed Pot ø65" 3.2" 100.4" SET-UP MACHINE PLACEMENT MACHINE SET-UP Place turntable at desired location. Ensure there is Place skidded machine close to the designated sufficient room to load/unload the machine. Wire and wrap area. Remove all shipping fasteners holding that you do not stretch the wiring cable.
- Página 3 SET-UP CONTINUED POWER AND CONTROL WIRING CHECKS 2. Plug the power cord into a 120VAC outlet. Power should be applied to the frequency drive and foot 1. Using a voltage meter, check the AC voltage switch. coming to the system to insure proper voltage is present.
- Página 4 MAINTENANCE CONTINUED TURNTABLE BELT ADJUSTMENTS MAINTENANCE SCHEDULE TABLE Loosen the four reducer plate bolts. Adjust the position PART SCHEDULE of the reducer to the desired belt tension using the rear Turntable Belt Drive Tension Check and adjust every three tensioning bolt. Retighten the four reducer plate bolts. (For Predator Low Profile Only) months.
- Página 5 The frequency drive is not connected properly Locate the turntable motor, and use a voltmeter to check to the motor. continuity of all motor wires. Tighten or replace wiring as necessary. Replace the turntable frequency drive. 1-800-295-5510 uline.com PAGE 5 OF 15 0223 IH-1287...
- Página 6 • Desconecte de la electricidad de entrada de encuentra alguno, comuníquese a Servicio a CA antes de verificar los componentes, realizar Clientes de Uline al 800-295-5510. mantenimiento, limpieza y cuando la máquina no ¡CUIDADO! El equipo de control del motor y los esté...
- Página 7 CONTINUACION DE ESPECIFICACIONES Potenciómetro de velocidad del plato giratorio 1.6 m (ø65") 8.1 cm (3.2") 2.5 m (101") CONFIGURACIÓN DEL SISTEMA UBICACIÓN DE LA MÁQUINA CONFIGURACIÓN DE LA MÁQUINA Coloque la Plataforma Giratoria de Perfil Alto cerca Coloque la máquina entarimada cerca de la zona de la zona en la que vaya a envolver las cargas sobre destinada al empaque.
- Página 8 CONTINUACIÓN DE CONFIGURACIÓN REVISIÓN DEL CABLEADO DE CONTROL Y 2. Enchufe el cable eléctrico a un tomacorriente de 120 VAC. El impulsor de frecuencia y el interruptor ELECTRICIDAD de pie deberían recibir electricidad. 1. Usando un medidor de voltaje, compruebe el voltaje AC que recibe el sistema para asegurarse de que es el voltaje correcto.
- Página 9 CONTINUACIÓN DE MANTENIMIENTO AJUSTE DE LA CORREA DE LA TABLA DEL PROGRAMA DE MANTENIMIENTO PLATAFORMA GIRATORIA PARTE PROGRAMA Afloje los cuatro pernos del reductor de placa. Ajuste la posición del reductor a la tensión de la correa Tension de la correa de transmision Comprobar y ajustar cada de la plataforma giratoria tres meses.
- Página 10 Localice el motor de la plataforma giratoria y use un conectado al motor. voltímetro para comprobar la continuidad de todos los cables del motor. Ajuste o reemplace el cableado según sea necesario. Reemplace el impulsor de frecuencia de la plataforma giratoria. 800-295-5510 uline.mx PAGE 10 OF 15 0223 IH-1287...
- Página 11 Si vous constatez des dommages, contactez le service à la clientèle • Débrancher l'alimentation d'entrée en c.a. avant de Uline au 1 800 295-5510. de vérifier les composants, d'effectuer l'entretien et le nettoyage ou lorsque la machine n'est pas MISE EN GARDE! La commande du moteur en service.
- Página 12 SPÉCIFICATIONS SUITE Potentiomètre de vitesse 1.6 m (ø65") 8.1 cm (3.2") 2.5 m (100.4") INSTALLATION DU SYSTÈME INSTALLATION DE LA MACHINE POSITIONNEMENT DE LA MACHINE Placez la plaque tournante à profil bas pour film Placez la machine sur patins près de la zone prévue étirable près d'une zone où...
- Página 13 INSTALLATION DU SYSTÈME SUITE VÉRIFICATIONS DU CÂBLAGE D'ALIMENTATION ET 2. Branchez le cordon d'alimentation à une prise de 120 V c.a. L'alimentation doit être appliquée au DES COMMANDES variateur de fréquence et à l'interrupteur au pied. 1. À l'aide d'un voltmètre, vérifiez la tension alternative qui provient du système pour vous assurer que la tension adéquate est présente.
- Página 14 ENTRETIEN RÉGLAGE DE LA COURROIE DE LA PLAQUE TABLEAU DE SUIVI D'ENTRETIEN TOURNANTE PIÈCE SUIVI Desserrez les quatre boulons de la plaque du réducteur. Tension de la courroie de Vérifiez et réglez tous les trois Ajustez la position du réducteur à la tension de courroie transmission de la plaque mois.
- Página 15 Repérez le moteur de la plaque tournante et utilisez un adéquatement au moteur. voltmètre pour vérifier la continuité de tous les fils du moteur. Serrez ou remplacez le câblage au besoin. Remplacez le variateur de fréquence de la plaque tournante. 1-800-295-5510 uline.ca PAGE 15 OF 15 0223 IH-1287...