Tabla de contenido
Publicidad
Idiomas disponibles
Idiomas disponibles
Enlaces rápidos
Publicidad
Tabla de contenido

Manuales relacionados para 3M PELTOR TEP-100


Resumen de contenidos para 3M PELTOR TEP-100
- Página 1 PELTOR PELTOR Tactical Earplug, TEP-100 Protector de oídos táctico PELTOR , TEP-100 de 3M Bouchon d’oreille tactique PELTOR , TEP-100 User Instructions Instrucciones de uso Guide de l’usager...
- Página 2 • For greater comfort and safety when using the three-flange 3M UltraFit Eartips, remove the eartip slowly with twisting motion to gradually break the seal. • Only use compatible 3M™ PELTOR™ Eartips. Do not insert the earplug directly into the ear without a correctly attached 3M PELTOR eartip.
- Página 3 3M recommends reducing the NRR by 50% or in accordance with applicable regulations. Improper fit or inconsistent use of this device will reduce its effectiveness in attenuating noise.
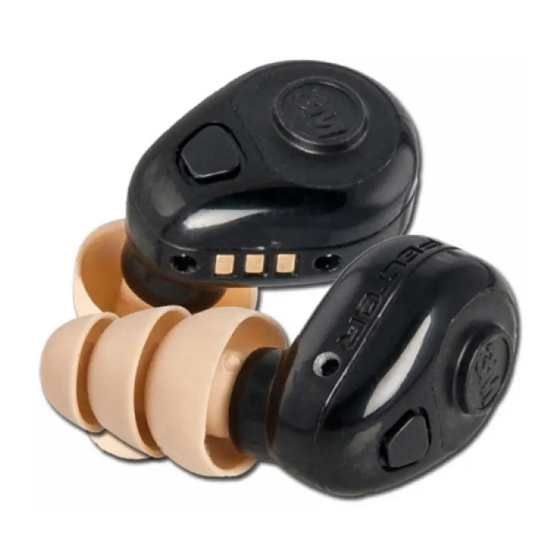
- Página 4 7. Latch (Fig. B:7) Charging The 3M™ PELTOR™ Tactical Earplug, TEP-100 should be charged before first use. The 3M PELTOR Tactical Earplugs, Fig. B TEP-100 are charged inside the charging case using 3 AA batteries or Micro B USB cord (not provided). Charging takes approximately 90 minutes, regardless of charging method.
- Página 5 Three 3M™ UltraFit™ Eartip sizes (small: 7-12mm; medium: 8-13mm; and large: 9-16mm) are provided as well as a single size of the 3M™ PELTOR™ CCC-GRM-25 Eartips. To choose the appropriate 3M UltraFit eartip size as well as a single size 3M PELTOR CCC-GRM-25 Eartips, begin with the medium size.
- Página 6 Attaching Eartips and Optional Retention Cord Use only 3M™ PELTOR™ Eartips designed for use with this product. Do not insert the earpiece (Fig. A:4) directly into the ear without a correctly attached 3M PELTOR eartip. 1. To attach the optional retention cord, place one end of the retention cord onto the eartip stem (Fig.
- Página 7 3. Automatic shutoff: To conserve battery power, the device has an automatic shutoff timer. The 3M PELTOR Tactical Earplug, TEP-100 will automatically shutoff when the Power/Volume button has not been pressed for 2 hours. During the last 60 seconds before shutoff, a warning tone will sound every 10 seconds indicating the automatic shutoff timer.
- Página 8 Wash eartips with warm water and soap as needed. Look for tears or cracks under any of the flanges. Replace as needed. 3M Skull Screws Eartips and 3M CCC-GRM-25 Eartips Clean by wiping with a clean, dry cloth. Replace if the eartip is damaged, detached from the...
- Página 9 The power supply shall have a rated output of 5Vdc, 200mA (minimum). Reorder: Product and Accessories Replacement eartips are available from 3M. Navigate to 3M.com/PELTOR for additional ordering information. To reorder additional eartips, use 3M ID/product codes. 3M Stock Number...
-
Página 10: Warranty And Limitation Of Liability
Note: The following statements do not apply in Australia and New Zealand. Consumers should rely on their statutory rights. WARRANTY: In the event any 3M Personal Safety Division product is found to be defective in material, workmanship, or not in conformity with any express warranty for a specific purpose, 3M’s only obligation and your exclusive remedy shall be at 3M’s option, to repair, replace or... - Página 11 être éteint avant de l’utiliser. n Attention! • Pour plus de confort et de sécurité en utilisant les embouts 3M UltraFit à trois collerettes, retirez lentement l’embout d’un mouvement de torsion pour briser graduellement le sceau. • Utilisez uniquement des embouts compatibles 3M™ PELTOR™. Ne pas insérer le bouchon d’oreille directement dans l’oreille sans y fixer correctement un embout 3M PELTOR.
-
Página 12: Atténuation En Laboratoire
3M recommande de réduire la mesure de réduction du bruit de 50 % ou en con- formité avec les règlements applicables. Un mauvais ajustement ou une utilisation changeante de ce dispositif réduira son efficacité... - Página 13 6. Port de recharge micro B USB (B:6). 7. Fermoir (B:7). Recharge Le bouchon d’oreille tactique PELTOR™ 3M™, TEP-100 devrait être chargé avant la première utilisation. Le bouchon d’oreille tactique PELTOR 3M, TEP-100 est chargé dans le boîtier de recharge à...
- Página 14 à des températures sous -20 °C (-4 °F) et au-delà de 50 °C (122 °F). Sélection de l’embout Trois tailles d’embouts de 3M™ UltraFit™ (petit : 7-12 mm; moyen : 8-13 mm; et large : 9-16 mm) sont fournies, de même qu’une taille unique des embouts de 3M™ PELTOR™...
- Página 15 Si vous ne pouvez pas obtenir un bon ajustement, essayez un type ou une taille d’embout différent. ATTENTION! Pour plus de confort et de sécurité en utilisant les embouts 3M UltraFit à trois collerettes, retirez lentement l’embout d’un mouvement de torsion pour briser graduellement le sceau.
- Página 16 Utiliser le bouchon d’oreille tactique PELTOR 3M, TEP-100 1. Allumer : appuyez et maintenez le bouton d’allumage/ volume (Fig. A:1) pendant deux secondes. Vous pouvez relâcher le bouton lorsqu’une tonalité se fait entendre. L’écouteur devrait maintenant être allumé à un réglage normal du volume.
- Página 17 Lavez les embouts avec un savon doux et de l’eau tiède, au besoin. Vérifiez s’il y a des déchirures ou des fissures sous l’une ou l’autre des trois collerettes. Remplacez si nécessaire. Embouts 3M Skull Screws et embouts 3M CCC-GRM-25 Nettoyez en essuyant avec un chiffon sec et propre. Remplacez l’embout s’il est endommagé,...
- Página 18 5 V CC, 200 mA (minimum). Pour commander de nouveau : produit et accessoires Des embouts de rechange sont disponibles auprès de 3M. Rendez-vous au 3m.com/PELTOR pour plus d’information sur les commandes. Pour commander des embouts supplémentaires, utilisez les codes de produits/ID de 3M.
- Página 19 Afin de disposer/recycler correctement les piles, respectez toujours les réglementations locales d’élimination des déchets. De plus, au Canada et aux États-Unis, la compagnie 3M en partenariat avec Appel à Recycler (Société de recyclage des piles rechargeables) vous offre un service de recyclage visant à...
- Página 20 Nouvelle-Zélande. Les consommateurs devraient se référer à leurs droits prévus par la loi. GARANTIE : dans l’éventualité où tout produit de la Division de la sécurité personnelle de 3M présentait des défauts de matériel, de fabrication, ou n’était pas conforme à toute garantie expresse destinée à...
-
Página 21: Introducción
¡Precaución! • Para más comodidad y seguridad al usar los tapones de tres pestañas UltraFit de 3M, quite el tapón lentamente con un movimiento de giro para romper el sello gradualmente. • Use solamente tapones compatibles PELTOR™ de 3M™. No inserte el protector directamente en el oído sin que tenga colocada correctamente una cubierta PELTOR de 3M. -
Página 22: Atenuación En El Laboratorio
3M recomienda reducir el NRR en un 50 % o de acuerdo con las regulaciones aplicables. El ajuste inapropiado o el uso inconstante de este dispositivo reducirá... - Página 23 Fig. B Carga El protector de oídos táctico PELTOR™, TEP-100 de 3M™ debe cargarse antes de usarlo por primera vez. Los protectores auditivos tácticos PELTOR, TEP-100 de 3M se cargan dentro de su estuche utilizando 3 baterías AA o un cable micro-USB B (no incluido). La carga toma...
- Página 24 Carga con baterías 1. Para insertar las 3 baterías AA en el compartimiento de baterías (Fig.B:1), abra el estuche de carga levantando firmemente el pasador (Fig.B:7). 2. Abra con suavidad la puerta del compartimiento de baterías en el interior del estuche de carga. 3.
- Página 25 Con los Skull Screws de 3M (no incluidos) y con los tapones CCC-GRM-25 de 3M, el mismo tamaño debe quedarle bien a la mayoría de las personas.
- Página 26 ¡PRECAUCIÓN! Para más comodidad y seguridad al usar los tapones de tres pestañas UltraFit de 3M, quite el tapón lentamente con un movimiento de giro para romper el sello gradualmente. Fig. F:1 Fig. F:2 Fig. F:3 Operación del protector de oídos táctico PELTOR, TEP-100 de 3M 1.
-
Página 27: Limpieza Y Mantenimiento Estuche De Carga
B debe estar cerrada. Protector de oídos táctico PELTOR, TEP-100 de 3M El protector de oídos táctico se puede limpiar con un paño ligeramente húmedo. Podría ser necesario usar un hisopo de algodón para limpiar los contactos de carga si hay residuos... -
Página 28: Descripción
Tapones de oídos Skull Screws de 3M y tapones de oídos CCC-GRM-25 de 3M Límpielos con un paño limpio y seco. Reemplace los tapones si están dañados, separados del tallo o si ya no están suaves y moldeables. Mantenimiento y uso: Importante 1. - Página 29 Para reciclar o desechar correctamente la batería, siembre cumpla con las regulaciones locales de desechos sólidos. Adicionalmente, en los Estados Unidos y Canadá, 3M se ha asociado con Call2Recycle (RBRC) para proporcionar el servicio de reciclaje y ayudar a asegurarse de que las baterías recargables de nuestros productos se reciclen apropiadamente.
-
Página 30: Garantía Y Limitación De Responsabilidad
única obligación de 3M y su remedio exclusivo será, a elec- ción de 3M, reparar, reemplazar o reembolsar el precio de compra de las partes o productos después que usted notifique el problema de manera oportuna y se confirme que el producto... - Página 32 Canada. PELTOR is a trademark of des marques de commerce de 3M en Canadá. 3M Svenska AB, used under license in Canada. Company utilisées sous licence au Refer to AS/NZS 1269.3 for guidance Canada. PELTOR est une marque de Patent: www.3M.com/patent...