
Manuales relacionados para Sony PMC-20L


Resumen de contenidos para Sony PMC-20L
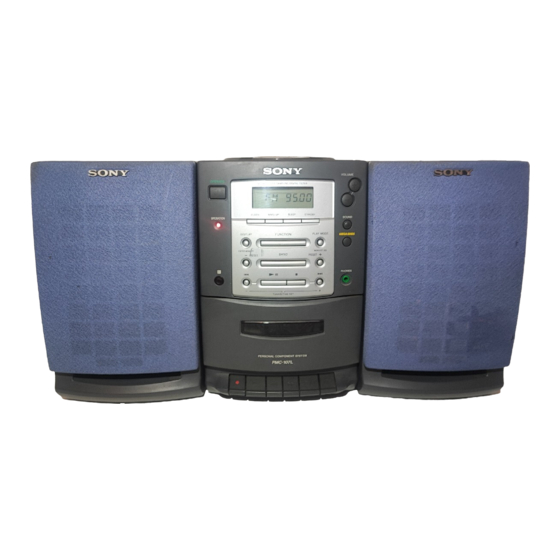
- Página 1 3-862-981-13 (1) Personal Component System Operating Instructions page 2 Manual de instrucciones página 2 PMC-20L PMC-107L ©1998 by Sony Corporation...
- Página 2 If the plug supplied with this equipment has a detachable fuse cover, be sure to attach the fuse cover after you change the fuse. Never use the plug without the fuse cover. If you should lose the fuse cover, please contact your nearest Sony service station. Introduction...
-
Página 3: Tabla De Contenido
Table of contents Basic Operations 4 Playing a CD 6 Listening to the radio 8 Playing a tape 10 Recording on a tape The CD Player Setting Up 12 Using the display 23 Hooking up the system 13 Locating a specific track 25 Selecting the audio emphasis (Sound Mode/MEGA BASS) 14 Playing tracks repeatedly... -
Página 4: Basic Operations
Basic Operations Playing a CD For hookup instructions, see pages 23 - 24. PUSH Press 6PUSH OPEN/CLOSE OPEN/CLOSE down to open the CD compartment and place the CD on the CD compartment. With the label side up PUSH Close the lid of the CD OPEN/CLOSE compartment. - Página 5 Use these buttons for additional operations OPERATE 6PUSH OPEN/CLOSE (or POWER) VOLUME +, – Press Next time you want to adjust the volume VOLUME +, – (VOL +, – listen to a CD, just press ^. The player turns on on the remote) automatically and starts stop playback...
-
Página 6: Listening To The Radio
Listening to the radio For hookup instructions, see pages 23 - 24. Display Press BAND until the band you BAND PRESET PRESET want appears in the display (direct power-on). Hold down TUNING/TIME SET Indicates an FM stereo + or – until the frequency digits broadcast. - Página 7 Use these buttons for additional operations PLAY MODE MONO/ST ISS OPERATE VOLUME + , – (or POWER) Tips Press • If the FM broadcast is adjust the volume VOLUME +, – (VOL +, – on noisy, press PLAY MODE•MONO/ST ISS the remote) until “Mono”...
-
Página 8: Playing A Tape
Playing a tape For hookup instructions, see pages 23 - 24. Press p6 to open the tape With the side you want to play facing you compartment and insert a recorded tape. Use TYPE I (normal) tape only. Close the compartment. - Página 9 Use these buttons for additional operations OPERATE (or POWER) VOLUME +, – 0, ) Press Next time you want to adjust the volume VOLUME +, – (VOL +, – listen to a tape, just press (. The player on the remote) turns on automatically stop playback and starts playing the...
-
Página 10: Recording On A Tape
Recording on a tape For hookup instructions, see pages 23 - 24. Press p6 to open the tape With the side you want to record on facing you compartment and insert a blank tape. Use TYPE I (normal) tape only. Select the program source you want to record. - Página 11 Press r to start recording. (( is depressed automatically.) Use these buttons for additional operations PLAY MODE OPERATE (or POWER) MONO/ST ISS Tips • Adjusting the volume or Press the audio emphasis (see stop recording page 25) will not affect the recording level.
-
Página 12: The Cd Player
The CD Player Using the display DISPLAY ENTER MEMORY You can check information about the CD using the display. Checking the total track numbers and playing time Check the display in stop mode. If the CD has more than 10 tracks, “OVER 10” appears in the display. -
Página 13: Locating A Specific Track
Locating a specific track You can quickly locate any track using the number buttons. You can also find a Number specific point in a track while playing a buttons =, + Note To locate Press You cannot locate a a specific track directly the number button of the specific track if “SHUF track... -
Página 14: Playing Tracks Repeatedly
Playing tracks repeatedly (Repeat Play) Number You can play tracks repeatedly in buttons normal, shuffle or program play modes (see page 15). MODE LOOP Press p. Press and hold LOOP “Cd” appears in the display. on the remote during play to repeat a Press MODE (PLAY MODE•MONO/ST ISS on the selected part of a CD. -
Página 15: Creating Your Own Program
Creating your own program (Program Play) Number You can arrange the playing order of up buttons to 20 tracks on a CD. MODE On the player Press p. 1 Press p. “Cd” appears in the display. 2 Press PLAY MODE• MONO/ST ISS until Press MODE until “PGM”... - Página 16 Creating your own program (Program Play) (continued) To cancel Program Play Press MODE until “PGM” disappears from the display. To check the order of tracks before play Press DISPLAY•ENTER MEMORY on the player. Every time you press the button, the track number appears in the programed order.
-
Página 17: The Radio
The Radio Presetting radio stations BAND DISPLAY ENTER MEMORY PRESET +, – You can store radio stations into the player’s memory. You can preset up to 30 radio stations, 10 for each band. Press BAND until the band you want appears in the display. -
Página 18: Playing Preset Radio Stations
Playing preset radio stations Once you've preset the stations, use the number buttons on the remote or the Number PRESET +/– to tune in your favorite buttons stations. BAND On the player Press BAND to select the band. 1 Press BAND to select Press the number buttons to tune in the stored the band. -
Página 19: The Timer
The Timer Setting the clock DISPLAY TUNING/ ENTER MEMORY TIME SET +, – “0:00” indication flashes in the display CLOCK until you set the clock. Before you begin, hook up the system (see pages 23 - The time display 24). system: 24-hour system Press CLOCK for 2 seconds until the hour digit... -
Página 20: Waking Up To Music
Waking up to DISPLAY STANDBY music ENTER MEMORY TUNING/ TIME SET +, – WAKE UP You can wake up to music or a radio program at a preset time. Make sure you have set the clock (“Setting the clock” on page 19). - Página 21 Press TUNING/TIME SET + or – to set the volume, then DISPLAY•ENTER MEMORY. Press STANDBY. You can have the The t indication lights up and the power goes off. player go on the next day at the same time. At the preset time, the power will go on, and the Just press STANDBY music will play.
-
Página 22: Falling Asleep To Music
Falling asleep to SLEEP music You can set the player to turn off automatically after 10, 20, 30, 60, 90, and 120 minutes, allowing you to fall asleep while listening to music. Tips Play the music source you want. • When you are playing Press SLEEP to display “SLEEP.”... -
Página 23: Setting Up
Setting Up Hooking up the MW/LW loop system MW/LW aerial terminal aerial FM aerial Make sure you turn off the power before making any connections. Right speaker Speaker terminals Left speaker To a wall outlet Speaker cord 1 Hooking up the speakers Note Connect the supplied Connect the black wire to (–) minus and the red wires... -
Página 24: Connecting The Ac Power Cord
Hooking up the system (continued) 2 Hooking up the aerials MW/LW loop aerial (supplied)* FM aerial** M W / L W *Reorient the aerial to improve broadcast reception. **Keep the aerial as horizontal as possible. Setting up the MW/LW loop aerial 3 Connecting the AC power cord Connect the AC power cord to the wall outlet. -
Página 25: Selecting The Audio Emphasis
Selecting the SOUND MEGA BASS audio emphasis (Sound Mode/MEGA BASS) You can adjust the audio emphasis of the sound you are listening to. Selecting the sound characteristic Press SOUND to select the audio emphasis you want. Choose To get ROCK powerful, clean sounds, emphasizing low and high range audio VOCAL... -
Página 26: Additional Information
If you have any questions or problems • Do not place the player on an inclined concerning your player, please consult or unstable place. your nearest Sony dealer. Additional Information... - Página 27 Notes on CDs Notes on cassettes • Before playing, clean the CD with a • Break off the cassette tab from side A cleaning cloth. Wipe the CD from the or B to prevent accidental recording. If center out. you want to reuse the tape for recording, cover the broken tab with adhesive tape.
-
Página 28: Troubleshooting
Troubleshooting Symptom Remedy The power is not on. • Connect the AC power cord to a wall outlet securely. There is no audio. • Make sure that the speakers are connected correctly. • Make sure the function you want to use appears in the display. - Página 29 After trying the above remedies, if you still have problems, unplug the AC power cord. After all the indications in the display disappear, plug the power cord. If the problem persists, please consult your nearest Sony dealer. Additional Information...
-
Página 30: Maintenance
Maintenance Cleaning the lens Demagnetizing the tape heads If the lens becomes dirty, it may cause a After 20 to 30 hours of use, enough skipping of sound during CD operation. residual magnetism will have built up Clean with a commercially available on the tape heads to begin to cause loss blower. -
Página 31: Specifications
Compact disc digital audio system 4-track 2 channel stereo Laser diode properties Fast winding time Material: GaAlAs Approx. 120 s (sec.) with Sony cassette C-60 Wave length: 780 nm Frequency response Emission duration: Continuous TYPE I (normal): 70 - 10,000 Hz Laser output: Less than 44.6 µW... -
Página 32: Index
Index Audio emphasis 25 Listening to the radio 6 Selecting Locating a specific track 13 audio emphasis 25 LOOP 14 tracks 5 Setting the clock 19 Batteries Setting up 23 M, N, O for remote 24 SOUND 25 MEGA BASS 25 P, Q CD player 12 Timer... -
Página 33: Additional Information
Additional Information... -
Página 34: Información
Nota El nombre del interruptor para encender y apagar este reproductor se indica de la siguiente forma: PMC-20L: “OPERATE”: Todos países PMC-107L: “OPERATE”: Países europeos (Europa Central y del Este, excluida) “POWER”: Otros países... - Página 35 Indice Procedimientos básicos Reproducción de un CD Radiorecepción Reproducción de cintas Grabación en una cinta Reproductor de discos Preparativos compactos (CD) 23 Conexión del sistema 12 Utilización del visor 25 Selección del énfasis de audio 13 Localización de una canción (Modo de sonido/MEGA BASS) específica 14 Reproducción repetida de las...
- Página 36 Procedimientos básicos Reproducción de un CD 3 1,2 Para obtener instrucciones sobre conexiones, consulte las páginas 23 - 24. Pulse 6PUSH OPEN/CLOSE PUSH para abrir el compartimiento de OPEN/CLOSE discos y coloque el CD. Con la superficie de la etiqueta hacia arriba Cierre la tapa del compartimiento PUSH de discos.
- Página 37 Utilice estas teclas para realizar procedimientos adicionales OPERATE (o POWER) 6PUSH OPEN/CLOSE VOLUME +, – Consejo Para Presione La próxima vez que ajustar el volumen VOLUME +, – (VOL +, – desee escuchar un CD, basta con pulsar ^. El en el mando a distancia) reproductor se enciende cesar la reproducción...
-
Página 38: Radiorecepción
Radiorecepción Para obtener instrucciones sobre conexiones, consulte las páginas 23 - 24. Visor Pulse BAND hasta que la banda BAND PRESET PRESET que desee aparezca en el visor (activación directa). Indica una emisión Mantenga pulsando TUNING/ estéreo de FM. TIME SET + o – hasta que los dígitos de frecuencia comiencen a TUNING/TIME SET cambiar en el visor. - Página 39 Utilice estas teclas para realizar procedimientos adicionales PLAY MODE MONO/ST ISS OPERATE (o POWER) VOLUME +, – Consejos Para Pulse • Si la emisión en FM ajustar el volumen VOLUME +, – (VOL +, – en presenta ruido, pulse PLAY MODE•MONO/ el mando a distancia) ST ISS hasta que encender/apagar la radio...
-
Página 40: Reproducción De Cintas
Reproducción de cintas Para obtener instrucciones sobre conexiones, consulte las páginas 23 - 24. Con la cara que desea Pulse p6 para abrir el reproducir hacia fuera compartimiento de cintas e inserte una cinta grabada. Emplee sólo cintas TYPE I (normal). Cierre el compartimiento. - Página 41 Utilice estos botones para realizar procedimientos adicionales OPERATE (o POWER) VOLUME +, – 0, ) Consejo Para Pulse La próxima vez que ajustar el volumen VOLUME +, – (VOL +, – desee escuchar una cinta, basta con pulsar en el mando a distancia) (.
-
Página 42: Grabación En Una Cinta
Grabación en una cinta Para obtener instrucciones sobre conexiones, consulte las páginas 23 - 24. Con la cara que desea Pulse p6 para abrir el grabar hacia fuera compartimiento de cintas e inserte una cinta virgen. Emplee sólo cintas TYPE I (normal). Seleccione la fuente de programa que desee grabar. - Página 43 Pulse r para iniciar la grabación. (( se pulsa automáticamente.) Utilice estos botones para realizar operaciones adicionales OPERATE PLAY MODE (o POWER) MONO/ST ISS Consejos • Los ajustes del volumen o del énfasis de sonido Para Pulse no afectarán al nivel de grabación (consulte la cesar la grabación página 25).
-
Página 44: Utilización Del Visor
Reproductor de discos compactos (CD) Utilización del DISPLAY visor ENTER MEMORY Puede comprobar la información sobre el disco en el visor. Comprobación del número total de canciones y del tiempo de reproducción Compruebe el visor en modo de parada. Si el disco contiene más de 10 canciones, la indicación “OVER 10”... -
Página 45: Localización De Una Canción Específica
Localización de una canción específica Botones Puede localizar rápidamente cualquier numéricos canción mediante los botones numéricos, así como encontrar un punto específico de una canción mientras se reproduce el disco. =, + Nota Para localizar Pulse No es posible localizar directamente una canción el botón numérico de la una canción específica... -
Página 46: Reproducción Repetida De Las Canciones
Reproducción repetida de las canciones (Reproducción repetida) Botones numéricos Puede reproducir las canciones repetidamente en los modos de reproducción normal, aleatoria o MODE programada (consulte la página 15). LOOP Consejo Pulse p. Pulse y mantenga La indicación “Cd” aparece en el visor. pulsado LOOP en el mando a distancia Pulse MODE (PLAY MODE•MONO/ST ISS en el... -
Página 47: Creación De Su Propio Programa
Creación de su propio programa (Reproducción programada) Botones Es posible programar el orden de numéricos reproducción de hasta 20 canciones de un CD. MODE En el reproductor Pulse p. 1 Pulse p. La indicación “Cd” aparece en el visor. 2 Pulse PLAY MODE•MONO/ST Pulse MODE hasta que la indicación “PGM”... -
Página 48: Creación De Su Propio Programa (Reproducción Programada)
Creación de su propio programa (Reproducción programada) (continuación) Para cancelar la reproducción programada Pulse MODE hasta que “PGM” desaparezca del visor. Para comprobar el orden de las canciones antes de la reproducción Pulse DISPLAY•ENTER MEMORY en el reproductor. Cada vez que pulse el botón, el número de canción aparece en el orden programado. -
Página 49: Memorización De Emisoras De Radiodifusión
Radio Memorización de BAND emisoras de DISPLAY radiodifusión ENTER MEMORY PRESET +, – Es posible almacenar emisoras de radio en la memoria del reproductor. Es posible predefinir hasta 30 emisoras de radio, 10 de cada banda. Pulse BAND hasta que la banda que desea predefinir aparezca en el visor. -
Página 50: Sintonía De Emisoras Almacenadas
Sintonía de emisoras almacenadas Botones Tras programar las emisoras, utilice los numéricos botones numéricas del mando a distancia o PRESET +/– para sintonizar sus emisoras favoritas. BAND En el reproductor Pulse BAND para seleccionar la banda. 1 Pulse BAND para Pulse los botones numéricos para sintonizar una seleccionar la banda. -
Página 51: Ajuste Del Reloj
Temporizador Ajuste del reloj DISPLAY TUNING/ ENTER MEMORY TIME SET +, – La indicación “0:00” parpadea en el visor CLOCK hasta que ajuste el reloj. Consejo Antes de comenzar, conecte el sistema (consulte las páginas 23 - 24). Sistema de visualización de la hora: Sistema de 24 horas... -
Página 52: Activación Automática De La Unidad
Activación DISPLAY STANDBY automática de la ENTER MEMORY TUNING/ unidad WAKE UP TIME SET +, – Puede programar la hora de activación de la unidad para despertarse con música. Asegúrese de haber ajustado el reloj (consulte “Ajuste del reloj” en la página 19). - Página 53 Pulse TUNING/TIME SET + o – para ajustar el volumen y, a continuación, DISPLAY•ENTER MEMORY. Consejo Pulse STANDBY. Es posible hacer que el La indicación t se ilumina y la alimentación se reproductor se active al desactiva. siguiente día a la misma hora.
-
Página 54: Desactivación Automática De La Unidad
Desactivación SLEEP automática de la unidad Es posible definir el reproductor para que se desactive automáticamente transcurridos 10, 20, 30, 60, 90 o 120 minutos, de forma que pueda quedarse dormido mientras escucha música. Consejos Reproduzca la fuente musical que desee. •... -
Página 55: Conexión Del Sistema
Preparativos Conexión del Terminal de sistema antena de Antena de FM Antena MW/LW cerrada de MW/LW Compruebe que ha desconectado la alimentación antes de realizar cualquier conexión. Altavoz derecho Terminales de los altavoces Altavoz izquierdo A una toma mural Cable de altavoz 1 Conexión de los altavoces Nota Conecte los altavoces... -
Página 56: Conexión De Las Antenas
Conexión del sistema (continuación) 2 Conexión de las antenas Antena cerrada de MW/ LW (suministrada)* Antena de FM** M W / L W * Reoriente la antena para mejorar la recepción de la emisión. ** Mantenga la antena en posición horizontal en la medida de lo posible. -
Página 57: Selección Del Énfasis De Audio
Selección del SOUND MEGA BASS énfasis de audio (Modo de sonido/MEGA BASS) Puede ajustar el énfasis de audio del sonido que esté escuchando. Selección de las características de sonido Pulse SOUND para seleccionar el énfasis de audio que desee. Elija Para obtener ROCK sonidos potentes y limpios con... - Página 58 Información complementaria Precauciones Seguridad Colocación • No desmonte el aparato, ya que el haz • No deje el reproductor en un lugar láser utilizado en la sección del cercano a fuentes térmicas ni expuesto reproductor de discos compactos es a la luz solar directa, al polvo excesivo perjudicial para los ojos.
- Página 59 Si desea volver a utilizar reproductor, póngase en contacto con el la cinta para realizar grabaciones, proveedor Sony más próximo. cubra el orificio de la lengüeta rota con cinta adhesiva. Notas sobre discos compactos Cara A •...
-
Página 60: Solución De Problemas
Solución de problemas Síntoma Solución La alimentación no se activa. • Conecte el cable de alimentación de CA a una toma mural con firmeza. Carencia de sonido. • Asegúrese de conectar correctamente los altavoces. • Compruebe que la función que desee emplear aparezca en el visualizador. - Página 61 Si una vez realizadas estas sugerencias continúa teniendo problemas, desenchufe el cable de alimentación de CA. Cuando desaparezcan todas las indicaciones del visor, vuelva a enchufar el cable de alimentación. Si continúa teniendo problemas, consulte a su proveedor Sony más cercano.
-
Página 62: Mantenimiento
Mantenimiento Limpieza de la lente Desmagnetización de las cabezas de cinta Si la lente se ensucia, pueden producirse pérdidas de sonido durante la Tras 20 a 30 horas de uso, se concentra reproducción del CD. Límpiela con un suficiente cantidad de magnetismo soplador disponible en las tiendas del residual en las cabezas de cinta para ramo. -
Página 63: Especificaciones
Sistema de grabación 4 pistas, 2 canales estéreo Sistema Tiempo de bobinado rápido Sistema audiodigital de discos compactos 120 s (seg.) aprox. con cassettes Sony C-60 Prodiedades del diodo láser Respuesta de frecuencia Material: GaAlAs TYPE I (normal): 70 - 10.000 Hz Longitud de onda: 780 nm Duración de emisión: Continua... - Página 64 Reproductor de CD 12 Limpieza cabezas y recorrido de cinta 30 exterior 30 Selección lente 30 canciones 5 Localización de una canción énfasis de audio 25 específica 13 Solución de problemas 28 LOOP 14 SOUND 25 Sony Corporation Información complementaria...