
Manuales relacionados para Graco Swivi Seat


Resumen de contenidos para Graco Swivi Seat
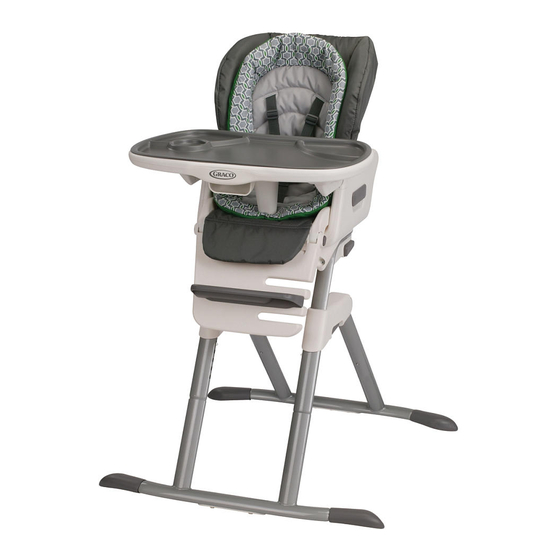
- Página 1 Owners Manual • Manual del propietario ©2014 Graco PD279579C 10/14...
- Página 2 The tray is not designed to hold your child in the product. It is • USE ONLY Swivi Seat™ recommended that the product highchair accessories with this be used in the upright position product.
- Página 3 • ALWAYS SECURE CHILD IN THE RESTRAINT UNTIL CHILD IS ABLE to get in and out of the feeding booster without help (about 2 1/2 years old), the child should be secured in the feeding booster seat at all times by the restraining system.
-
Página 4: Peligro Estrangulación
Si no se obedecen estas advertencias y se siguen las instrucciones de montaje, podría resultar en lesiones graves o la muerte. • POR FAVOR, CONSERVE EL • EVITE SERIAS LESIONES MANUAL DEL CAUSADAS POR CAÍDAS PROPIETARIO PARA O DESPLAZAMIENTOS. UTILIZARLO EN EL FUTURO. Use siempre el cinturón de seguridad. -
Página 5: Siga Las Instrucciones
GRAVES O LA MUERTE. No la puntos en la posición reclinada use en vehículos de automotor. más baja. • NO AJUSTE la reclinación del producto cuando el niño está sentado. • USE SOLAMENTE accesorios para silla alta Swivi Seat™ con este producto. - Página 6 Parts list • Lista de las piezas This model may not include Este modelo podría no incluir algunas some features shown below. de las características que se indican a Check that you have all the continuación. Verifique que tiene parts for this model BEFORE todas las piezas de este modelo assembling your product.
- Página 7 To Attach Feet • Para sujetar los pies Attach foot to leg as shown. Repeat on other leg. Instale el pie en la pata como se indica. Repita el procedimiento en la otra pata. SNAP! SNAP! ¡RUIDO! ¡RUIDO!
- Página 8 To Attach Legs • Colocación de las patas Insert base legs into foot tubes as shown. Inserte las patas de la base en los tubos del pie como se indi- SNAP! ¡RUIDO! SNAP! ¡RUIDO!
- Página 9 Insert foot tubes into base legs as shown. Inserte los tubos del pie en las patas de la base como se indi- SNAP! ¡RUIDO! SNAP! ¡RUIDO!
- Página 10 To Ajust Frame Legs • Colocación de las patas Press buttons in on both sides of frame and open legs. Oprima los botones en ambos costados del armazón y abra las patas.
- Página 11 Open Seat • Cómo abrir el asiento Pull calf support away from back of seat as shown. Note: Make sure all harness straps are visible and not trapped under the calf support before starting to install the seat pad Tire el soporte de las pantorrillas lejos del respaldo del asiento como se indica.
- Página 12 Seat Pad •Coussin du siège • Almohadilla del asiento Note: Make sure all harness straps are visible and not trapped under the calf support before starting to install the seat pad Nota: Asegúrese de que todas las correas del arnés estén visibles y no estén enganchadas debajo del soporte de las pantorrillas antes de comenzar a instalar la almohadilla del asiento...
- Página 13 Pull shoulder straps and crotch strap through openings in seat pad. Pase la correa de la entrepierna y de los hombros a través de la abertura en la almohadilla del asiento. Wrap seat pad over the top of the infant seat. Pase la almohadilla del asiento por arriba del asiento para bebé.
- Página 14 Body Support • Soporte del cuerpo Always use body support and 5 point harness in lowest recline position. Place body support on top of the seat pad. Pull waist straps through openings in body support. Use siempre el soporte del cuerpo y el arnés de cinco puntos en la posición reclinada más baja.
- Página 15 Attaching Seat to Frame • Instalación del asiento en el armazón WARNING DO NOT sit on frame when the seat is not attached. DO NOT USE frame as a foot stool. ADVERTENCIA NO se siente en el armazón cuando el asiento no está sujetado. NO USE el armazón como una escalerita.
- Página 16 Calf Support • Soporte de las pantorrillas Press buttons on both sides of calf support and rotate down as shown. Oprima los botones en ambos costados del soporte de las pantorrillas y gírelo hacia abajo como se indica.
- Página 17 Foot Rest Apoyapié Slide foot rest in the desired slot. Deslice el apoyapié hasta la ranura deseada.
- Página 18 To Assemble Tray • Para armar la bandeja Hold tray arms so they are pointing away from the tray adjust handle and line up slots with tabs. Agarre los brazos de la bandeja de manera tal que miren en la dirección opuesta a la manija de ajuste de la bandeja y alinee las ranuras con las lengüetas.
- Página 19 To Use Tray • Para usar la bandeja Squeeze tray adjust handle at front of tray and slide tray arms into armrest holes. Oprima la manija de ajuste de la bandeja que está adelante de la bandeja y deslice los brazos de la bandeja en los agujeros del apoyabrazo.
- Página 20 Tray Cover • Tapa de la bandeja Dishwasher safe. Se puede lavar en el lavaplatos. Attach tray cover by pushing it down on the tray. Instale la tapa de la bandeja empujándola hacia abajo sobre la SNAP! ¡RUIDO! bandeja. To remove pull up on the back of the tray.
- Página 21 Adjust Height • Ajuste de la altura Press buttons on each side of frame and lift or lower to desired height. Oprima los botones en ambos costa- dos del armazón y levántelo o bájelo hasta alcanzar la altura deseada.
- Página 22 To Rotate Seat • Para girar el asiento Either pull handles on side of seat or press in handle on back of seat to rotate seat. Tire las manijas del costado del asiento u oprima la manija de atrás del asiento para girar el asiento.
- Página 23 To Recline Seat • Para recliner el asiento WARNING • DO NOT adjust the seat recline with the child in it. • Only use in lowest recline position with newborns that cannot push with their legs. • Always use body support and 5 point harness in lowest recline position.
- Página 24 To Secure Child • Para asegurar al niño WARNING Falling Hazard: Always use the seat belt. ADVERTENCIA Peligro de caída : Use siempre el cinturón de seguridad. 5 Point Harness • Arnés de 5 puntos Use slide adjuster at shoulder and waist for tighter adjustment.
- Página 25 3 Point Buckle • Hebilla de 3 puntos To convert to 3-pt harness. Para convertirlo en un arnés de 3 puntos. Use slide adjuster at waist for further adjustment. Use el ajuste deslizable en la cintura para hacer ajustes adicionales.
- Página 26 When changing harness strap slots, MAKE SURE harness straps are going through same slots in seat pad and seat back. The harness straps must go into slot that is even with or slightly above the shoulders. Avoid twisting straps. Cuando cambia las ranuras de la correa del arnés, ASEGÚRESE de que las correas del arnés pasan por las mismas ranuras en la...
-
Página 27: Care And Maintenance
Cambie o repare las piezas según sea necesario. Use solamente las piezas de repuesto Graco. • PARA LIMPIAR EL BASTIDOR DE SU SILLA ALTA utilice únicamente jabón y agua tibia. NO UTILICE BLANQUEADOR o detergente doméstico. - Página 28 1-800-345-4109 Product Registration (USA) Registro del producto (EE.UU.) To register your Graco product from within the U.S.A. visit us online at www.gracobaby.com/productregistration or return registration card provided with your product. We currently do not accept product registrations from those living outside the United States of America.