Tabla de contenido
Publicidad
Enlaces rápidos
Read all instructions BEFORE assembly and USE of product.
KEEP INSTRUCTIONS FOR FUTURE USE.
Lea todas las instrucciones ANTES de armar
GUARDE LAS INSTRUCCIONES PARA USAR EN EL FUTURO.
See back page for quick set up guide.
Vea la última página para la guía de instalación rápida.
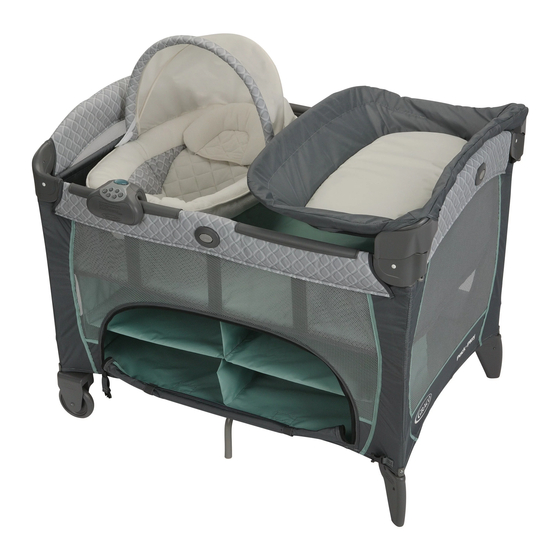
Pack 'n Play
Surround™ Technology Playard
Pack 'n Play
Surround™ tecnología Corralito
y USAR el producto.
Newborn Seat with Soothe
®
Everest™
Newborn Seat with Soothe
®
©2019 Graco PD348808L 11/19
Publicidad
Tabla de contenido

Manuales relacionados para Graco Pack 'n Play Newborn Seat with Soothe Surround Technology Playard


Resumen de contenidos para Graco Pack 'n Play Newborn Seat with Soothe Surround Technology Playard
- Página 1 See back page for quick set up guide. Vea la última página para la guía de instalación rápida. Pack ‘n Play Newborn Seat with Soothe ® Surround™ Technology Playard Everest™ Pack ‘n Play Newborn Seat with Soothe ® Surround™ tecnología Corralito ©2019 Graco PD348808L 11/19...
-
Página 2: Setting Up The Playard
• Never use this product if there are any loose or missing fasteners, loose joints, broken parts or torn mesh. Check before assembly and periodically during use. Contact Graco at 1-800-345-4109 for replacement parts and instructions if needed. Never substitute parts. -
Página 3: Al Instalar El Corralito
• Nunca use este producto si hay sujetadores sueltos o que faltan, uniones flojas, piezas o rejillas rotas. Verifique antes del armado y periódicamente durante el uso. De ser necesario, comuníquese con Graco al 1-800-345-4109 para obtener piezas de repuesto e instrucciones. Nunca sustituya las piezas. Al usar el corralito •... -
Página 4: Para Evitar El Riesgo De Sofocación
• En ropa de cama blanda. NUNCA agregue un colchón, almohada, edredón o almohadillas. Use SOLAMENTE el colchón proporcionado por Graco. • Para reducir el riesgo del SMIS, los pediatras recomiendan que los bebés con buena salud sean puestos a dormir boca arriba, a menos que su médico le indique lo contrario. - Página 5 Parts list • Lista de las piezas This model may not include some Este modelo podría no incluir features shown below. Check algunas de las características que se indican a continuación. that you have all the parts for this Verifique que tenga todas las model BEFORE assembling your piezas de este modelo ANTES de product.
- Página 6 Setup • Installar DO NOT push center down yet. NO empuje todavía el centro hacia abajo. SNAP! ¡CLIC!
- Página 7 SNAP! ¡CLIC! • When setting up, lock rails BEFORE lowering center. Be sure top rails have become rigid. If not, pull up again until they are rigid. If top rails do not latch, lift the center of the floor higher. •...
- Página 8 Pull strap through bottom of playard and wrap around SNAP! tube and refasten ¡CLIC! snap. Repeat on other corners. Tire la correa a través del fondo del corralito, pásela alrededor del tubo y vuelva a trabarla. Repita el procedimiento en las otras esquinas.
- Página 9 To Fold • Para plegar Release the straps. Libere las cintas. DO NOT unlock top rails yet. Center of floor must be halfway up before top rails will unlock. NO destrabe todavía los rieles superiores. El centro del piso debe estar arriba, al menos hasta la mitad, cuando pliegue los laterales.
- Página 10 Do not force. If unit will not fold, look for a partially latched top rail. Squeeze the latch button to release the rail. No lo fuerce. Si el corralito no se pliega totalmente, fíjese si los laterales están parcialmente doblados. Apriete el botón y pliegue el lateral.
- Página 11 • If a sheet is used with the pad use only the one provided by Graco or one specifically designed to fit the dimensions of the bassinet.
- Página 12 • Si usa una sábana con la almohadilla, use solamente la provista por Graco o una específicamente diseñada según la dimensión de la cuna. • Nunca ponga al niño en la cuna si el asiento está instalado.
- Página 13 Holes for changing table. Ranuras para el cambiador. Wheels Ruedas Fasten 4 clips onto top rail of playard as shown. Sujete las 4 trabas a la baranda superior del corralito como se indica. Attach 4 clips on the bassinet to the ends of the playard as shown.
- Página 14 Open the battery compartment lid by inserting a screwdriver the slot. Insert one D-(LR20) cell battery (not included). Replace lid. Abra la tapa del compartimiento de las pilas insertando un destornillador en la ranura. Coloque una pila D-(LR20) (no se incluye). Vuelva a poner la tapa.
- Página 15 Remove battery door and insert 3 AA (LR06) batteries (not included). Replace door and screws. Saque la puerta para las pilas e inserte 3 pilas tamaño AA (LR06) (no se incluyen). Vuelva a poner la puerta y los tornillos. SNAP! ¡RUIDO! Always use mattress/pad soft side up.
- Página 16 For Safe Battery Use • Para el uso seguro de las pilas Keep the batteries out of children’s reach. Any battery may leak battery acid if mixed with a different battery type, if inserted incorrectly (put in backwards) or if all batteries are not replaced or recharged at the same time.
- Página 17 Changes or modifications not expressly approved by the party responsible for compliance could void the user’s authority to operate the equipment. This device complies with part 15 of the FCC Rules. Operation is subject to the following two conditions: (1) This device may not cause harmful interference, and (2) this device must accept any interference received, including interference that may cause undesired operation.
-
Página 18: Problemas Y Soluciones
Mantenga las pilas fuera del alcance de los niños. Cualquier pila puede sufrir una fuga de electrolito si se combina con otro tipo de pila, si se coloca incorrectamente (al revés) o si todas las pilas no se remplazan o recargan al mismo tiempo. No mezcle pilas viejas con nuevas. - Página 19 ADVERTENCIA ADVERTENCIA Los cambios o modificaciones no expresamente aprobados por la parte responsable del cumplimiento podrían anular la autoridad del usuario para usar el equipo. Este dispositivo cumple con la parte 15 de las Normas de la Comisión Federal de Comunicaciones (FCC por sus siglas en inglés). El funcionamiento está...
- Página 20 Using Electronics Module • Cómo usar el módulo electrónico The vibration unit may ONLY be La unidad de vibración used with the bassinet or seat. SOLAMENTE puede ser usada con la cuna o el seat. WARNING ADVERTENCIA You must remove the module Debe quitar el módulo from the unit when your child electrónico cuando su niño...
- Página 21 STROLLER RIDE HEART BEAT LULLABY ENVIRONMENT ENVIRONMENT ENVIRONMENT CAR RIDE PLAYFUL ENVIRONMENT ENVIRONMENT VOLUME LIGHT BUTTON BUTTON VIBE BUTTONS TIMER BUTTON POWER BUTTON POWER BUTTON— Press once to turn all functions off. BOTÓN DE ENCENDIDO— Oprímalo una vez para apagar todas las funciones. TIMER BUTTON—...
-
Página 22: Botón De Vibración
LIGHT BUTTON— Press once for light, twice to increased brighness, and three times to increase brightness again. Press a fourth time to turn light off. BOTÓN DE LA LUZ—Oprímalo una vez para encender la luz, dos veces para aumentar la inten- sidad y tres veces para volver a aumentar la intensi- dad. -
Página 23: Ambiente Del Paseo Cochecito
FOR ALL ENVIRONMENT BUTTONS— To turn vibe off, but keep sound, press vibe off button. To turn sound off and keep vibe on, press volume down until it is off. PARA TODOS LOS BOTONES DE AMBIENTE—Para apagar la vibración, pero mantener el sonido, oprima el botón para apagar la vibración. - Página 24 Always remove the changing table when your child is in the playard. • Use only the pad provided by Graco. • Do not use changing table if it is damaged or broken. Strangulation Hazard: Child can lift changing table and get neck trapped between changing table and playard frame.
- Página 25 Siempre retire el mudador cuando su bebé permanezca en el corralito. • Use solamente el colchón proporcionado por Graco. • No use la mesa para cambiar al bebé si está dañada o rota.
- Página 26 Tubes should appear exactly as shown. Los tubos deberán aparecer exactamente como se indica. SNAP! ¡CLIC! Snap leg tubes together as shown. Trabe los tubos de las patas como se indica. Attach short tubes into changing table mounts. Conecte los tubos cortos en los montajes de la mesa para cambiar al bebé.
- Página 27 WARNING • Always keep objects out of child's reach. • Do not place more than 5 lb (2.27 kg) in organizer. • Always attach organizer straps to playard when using product. ADVERTENCIA • Siempre mantenga los objetos fuera del alcance del niño. •...
- Página 28 Newborn Seat • Asiento para recién nacidos WARNING Prevent serious injury or death: follow these warnings and the instructions. • You are responsible to provide adult supervision when using your seat. • Seat must be properly attached to bassinet before use. FALL HAZARD: To prevent falls, stop using the product when infant: •...
-
Página 29: Peligro De Caída
ADVERTENCIA Prevenga las lesiones serias o la muerte: use estas advertencias y las instrucciones. • Usted es responsable por proporcionar la supervisión de un adulto cuando usa su asiento. • El asiento debe estar instalado correctamente en la cuna antes de su uso. - Página 30 WARNING ADVERTENCIA To prevent serious injury or Para prevenir serias lesiones o la death, DO NOT REMOVE muerte, NO SAQUE LA ESPUMA. FOAM. On certain models En ciertos modelos NOTE: Seat should always be attached opposite the changing table. NOTA: El asiento debe estar instalado siempre en el lado opuesto a la mesa para cambiar al bebé.
- Página 31 Remove mattress pad from bassinet. Saque la almohadilla del colchón de la cuna. Unfasten the webbing strap holding the vibration in the bassinet. Desabroche la correa para la cincha que contiene la unidad de vibración en el moisés. Unplug the vibration unit and remove from bassinet.
- Página 32 Place seat upside down on a flat surface with the vibration unit pocket facing up. Ponga el asiento dado vuelta sobre una superficie plana con el bolsillo para la unidad de vibración mirando hacia arriba. Locate the vibration unit pocket on the underside of the seat.
- Página 33 Insert vibration unit into pocket. Ponga la unidad de vibración en el bolsillo. Close pocket by re-attaching hook and loop tape as shown. Cierre el bolsillo volviendo al enganchar la cinta de nudos y ganchos como se indica After closing the pocket make sure the short cord is sticking out as shown.
- Página 34 Insert tube with plastic end into channel opening . Snap buttons should be down as shown Pase el tubo con el extremo de plástico por la abertura del canal . Trabe los botones como se indica en NOTE: DO NOT connect tubes until step 22.
- Página 35 Place seat inside of bassinet with head support at either end as shown. Ponga el asiento en el interior de la cuna con el apoyacabezas en cualquier extremo como se indica. Insert tube into channel on inside of bassinet as shown. Pull open channel for easy insertion.
- Página 36 Insert metal tube into plastic tube. Ponga el tubo de metal en el tubo de plástico. SNAP! ¡CLIC! Make sure the button clicks into place as shown. Asegúrese de que el botón se trabe en su lugar como se indica. Insert opposite metal tube into plastic tube.
- Página 37 Find short cord connected to vibration unit under seat pad. El cordón corto que se conecta a la unidad de vibración se encuentra debajo de la almohadilla del asiento. Plug in the short cord coming out of the seat pocket into the electronic module attached to the playard.
- Página 38 To Remove Seat • Cómo sacar el Asiento Press buttons on both sides of seat to release metal tubes from plastic tubes. Oprima los botones en ambos costados del asiento para liberar los tubos de metal de los tubos de plástico.
- Página 39 Canopy • Capota Canopy • Capota WARNING • Always attach all provided fasteners (strings, straps, clamps, etc.) tightly to playard according to these instructions. Check frequently. • Do not add additional strings or straps to attach to any other crib or playpen. ADVERTENCIA •...
-
Página 40: Care And Maintenance
Care and Maintenance FROM TIME TO TIME CHECK YOUR PLAYARD for worn parts, torn material or stitching. Replace or repair the parts as needed. Use only Graco replacement parts. ® IF PLAYARD IS USED AT THE BEACH, you MUST clean sand off your playard, including the feet, before packing it into cover. -
Página 41: Cuidado Y Mantenimiento
DE VEZ EN CUANDO REVISE SU EL CORRALITO por si existieran partes gastadas, material roto o descosido. Reemplace o repare las partes que lo necesiten. Use sólo repuestos Graco ® SI SU EL CORRALITO ES USADO EN LA PLAYA, debe limpiarlo y sacarle muy bien la arena, incluyendo las patas, antes de meterlo en el bolso cobertor. - Página 42 1-800-345-4109 Product Registration (USA) Registro del producto (EE.UU.) To register your Graco product from within the U.S.A. visit us online at www.gracobaby.com/productregistration or return registration card provided with your product. We currently do not accept product registrations from those living outside the United States of America.
- Página 43 Quick Fold Guide Guía Quick Fold 1. Pull red tab up to unlock. Stop when you hear it click. (See page 9) 1. Tire de lengüeta roja hacia arriba para desbloquear. Deténgase cuando oiga un clic. (Consulte la página 9) 2.
- Página 44 Quick Set Up Guide Guía de configuración rápida SNAP! SNAP! SNAP! ENCLENCHEZ! ENCLENCHEZ! ENCLENCHEZ! ¡CRAC! ¡CRAC! ¡CRAC! SNAP! ENCLENCHEZ! ¡CRAC! 1. Pull up on all 4 sides 1. Tire hacia arriba de and snap into place. los 4 costados y Do not push center of trábelos en su lugar.