Stihl FSE 60 Manual De Instrucciones
Ocultar thumbs
Ver también para FSE 60:
- Manual de instrucciones (364 páginas) ,
- Instrucciones de servicio (18 páginas) ,
- Manual de instrucciones (20 páginas)
Tabla de contenido
Publicidad
Idiomas disponibles
Idiomas disponibles
Enlaces rápidos
STIHL FSE 60
STIH)
Instruction Manual
Manual de instrucciones
Warning!
For safe operation follow all safety
precautions in Instruction Manual - improper
use can cause serious injury.
Advertencia!
Para su seguridad durante el manejo de este
producto, siga siempre las precauciones de
seguridad dadas en el manual de
instrucciones - el uso indebido puede causar
lesiones graves.
Publicidad
Capítulos
Tabla de contenido

Manuales relacionados para Stihl FSE 60


Resumen de contenidos para Stihl FSE 60
- Página 1 STIH) STIHL FSE 60 Instruction Manual Manual de instrucciones Warning! For safe operation follow all safety precautions in Instruction Manual - improper use can cause serious injury. Advertencia! Para su seguridad durante el manejo de este producto, siga siempre las precauciones de...
-
Página 2: Tabla De Contenido
3, before Mounting Cutting Tools ....17 using your trimmer. Fitting the Harness ......19 Contact your STIHL dealer or the STIHL Starting ........... 19 distributor for your area if you do not Storing the Machine ......20 understand any of the instructions in this Main Parts and Control .... -
Página 3: Guide To Using This Manual
Engineering improvements individual components. in different ways: STIHL’s philosophy is to continually A bullet marks a step or procedure Note or hint which is not essential improve all of its products. As a result, without direct reference to an... -
Página 4: Important Safety Instructions
8 = Warning: To reduce the risk of equipment or form your STIHL dealer. 2 = Don't Use In Rain. electric shock, use only with an 3 = Keep Children Away -All visitors... -
Página 5: Strain Relief
Insert unit's plug (1) into extension the appliance from the power supply opening (4). cord coupling (2). when not in use, before servicing, Slip the loop over the hook (5) and when changing accessories such as pull it tight. blades, and the like. FSE 60... -
Página 6: Replacement Parts
When servicing use only identical replacement parts. Replace damaged cords or have them repaired by authorized STIHL Servicing dealer only. To reduce the risk of electric shock, this equipment has a polarized plug (one blade is wider than the other). This plug will fit in a polarized outlet one way. -
Página 7: Safety Precautions
Most of these safety precautions and Because your trimmer is a Do not lend or rent your trimmer without warnings apply to the use of all STIHL high-speed, fast-cutting the owner's manual. Be sure that electric trimmers. Different models may... - Página 8 Warning! finger disease are not known, but cold Physical Condition weather, smoking and diseases or According to STIHL´s current You must be in good physical condition physical conditions that affect blood knowledge, the electric motor of this unit and mental health and not under the vessels and blood transport, as well as should not interfere with a pacemaker.
- Página 9 Secure hair so it is above shoulder Warning! with the STIHL electric trimmer, their use level. Trimmer noise may may, in fact, be extremely dangerous. Good footing is most damage your hearing.
- Página 10 If the plug still does not fit, contact a qualified electrician to install the proper wall outlet. Do not change the trimmer plug, extension cord receptacle, or extension cord plug in any way. FSE 60...
- Página 11 Be sure switch is off when plugging the unit into the power supply in order to reduce the risk of fire or electrical shock from arcing and the risk of injury from contact with a revolving cutting tool. FSE 60...
- Página 12 Warning! Inspect the power supply cord plug, and extension cord before and after each use for signs of damage or aging. FSE 60...
- Página 13 Keep your hands in this position to have your trimmer under control at all times. Make sure that your trimmer handles and grip are in good condition and that they and your hands are clean and free of moisture, pitch, oil or grease. FSE 60...
- Página 14 Use of except that for which it is intended. mediately, and check the nut securing non - STIHL parts may cause serious or the tool for tightness and the cutting fatal injury. Do not force trimmer. It will do the job tool for cracks and damage.
- Página 15 If the tool continues to loosen, see your STIHL dealer. FSE 60...
-
Página 16: Mounting The Drive Tube
Pieces of wire could break off and be thrown at high speed toward the operator or bystanders. STIHL Autocut 5-2 mowing head Nylon cutting cord advances auto- matically when tapped against the ground. -
Página 17: Mounting The Loop Handle
12" (30 cm) in front of the control handle (2). Make sure the holes line up. Insert the hex nut (3) in the loop Insert and tighten down screw (4). handle and fit screw (4) with washer (5) from the other side. Tighten down firmly. FSE 60... -
Página 18: Mounting Cutting Tools
English / USA Mounting Cutting Tools Preparations Mounting the STIHL AutoCut 5-2 Mounting the Mowing Head Push the mowing head (2) over the Switch off the motor. shaft (5) and engage the hex recess Assembling the Mowing Head Lay your trimmer on its back with (7) on the external hexagon (6). -
Página 19: Adjusting Nylon Line
English / USA Mounting STIHL AutoCut C 5-2 Adjusting Nylon Line Screw the spool (5) clockwise until Mowing Head the two arrow points are in STIHL AutoCut alignment – secure the spool in this Slide the mowing head (1) over the Hold the rotating mowing head position. -
Página 20: Fitting The Harness
100 150 Wire size (AWG) 18 230 V version Minimum cross sectional area of wires: Cord lengths of 6.5 ft (2 m) or more: 1.5 mm², type H07 RN-F Connect trimmer´s plug (1) to extension cord coupling (2). FSE 60... -
Página 21: Switching On/Off
Do not rest the mowing head on the ground. Press down the starting lockout lever (1) and squeeze the trigger switch (2). To switch off, release the trigger switch and starting lockout lever. FSE 60... -
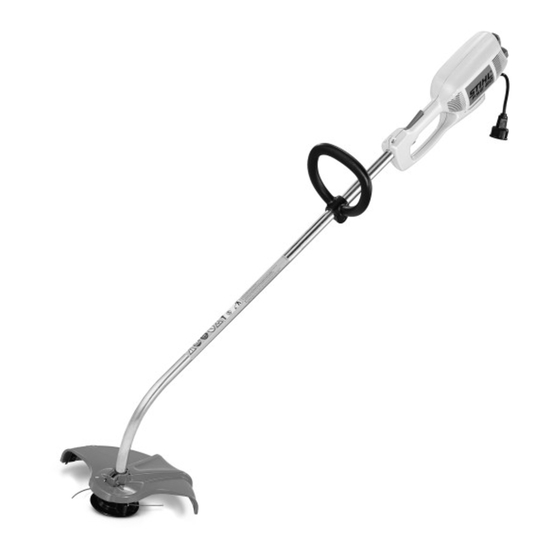
Página 22: Main Parts And Control
English / USA Main Parts and Control 1 Power supply cord 2 Trigger switch 3 Starting lockout lever 4 Carrying loop 5 Loop handle 6 Drive tube 7 Mowing head 8 Line length limiter blade 9 Deflector 10 Strain relief FSE 60... - Página 23 Device to connect the engine with the gearbox. 7 = Mowing head. The mowing head is intended to supplement a lawn mower. 8 = Line length limiter blade. Metal piece in the deflector for cutting off excess nylon line. FSE 60...
-
Página 24: Specifications
120 V 230 V Length: 60.2 in (1530 mm) in this manual. Other repair work may be Frequency: 60 Hz 50 Hz performed only by authorized STIHL service shops. Rating current: 2,6 A Cutting Tool Rating: 600 W 600 W... -
Página 25: Addresses
English / USA Addresses STIHL Inc. 536 Viking Drive P.O. Box 2015 Virginia Beach VA 23452-2015 FSE 60... - Página 26 MEDIDAS DE SEGURIDAD ... 30 Para obtener el rendimiento y satisfac- Montaje del tubo de mando .... 39 ción máximos de la orilladora STIHL, es Montaje del mango tórico ....40 importante leer y comprender las ins- Montaje del deflector ...... 40...
-
Página 27: Guía Para El Uso De Este Manual
Mejoramientos técnicos a una ilustración. Nota o sugerencia que no es La filosofía de STIHL es mejorar esencial para el uso de la máquina, continuamente todos su productos. Una descripción de un paso o pero puede ayudar al operador a Como resultado de ello, periódicamente... -
Página 28: Instrucciones Importantes De Seguridad
En caso de duda, utilice el calibre inmediata- mente más grueso. Cuanto menor el número de calibre, tanto más grueso el cordón. FSE 60... - Página 29 No maneje el aparato cuando extensión. está fatigado. 16= Desconecte el aparato - Desco- necte el aparato del suministro de energía eléctrica cuando no esté en uso, antes de darle mantenimiento y al cambiar accesorios tales como cuchillas y piezas similares. FSE 60...
-
Página 30: Repuestos
Al darle mantenimiento a la máquina, utilice únicamente repuestos genuinos. Reemplace los cordones dañados o solicite al concesionario autorizado STIHL que los repare. Para reducir el riesgo de sacudidas eléctricas, este equipo tiene un enchufe polarizado (una clavija es más ancha que la otra). -
Página 31: Medidas De Seguridad
Advertencia nes graves e incluso mortales. Pida a su concesionario STIHL que le enseñe el Nunca permita a los niños que usen una manejo de la orilladora eléctrica. Res- orilladora eléctrica. No se debe permitir... - Página 32 Rayn- Condición física aud, pero el clima frío, el fumar y las Según los datos obtenidos por STIHL en Usted debe estar en buenas condicio- enfermedades o condiciones físicas que la actualidad, el motor eléctrico de esta nes físicas y psíquicas y no encontrarse...
- Página 33 Use pantalones largos hechos de un sobre las gafas o anteojos de seguridad. específicos de orilladoras eléctricas de material grueso para protegerse las STIHL. Si bien es posible conectar a la piernas. No use pantalones cortos, san- Advertencia orilladora eléctrica de STIHL ciertos dalias o pies descalzos.
- Página 34 (pies) 100 150 ción. Si el enchufe no puede conectarse Calibre de alam- al tomacorriente, inviértalo. Si todavía bre (AWG) no puede conectarse, solicite a un elec- tricista calificado que instale un tomaco- FSE 60...
- Página 35 FSE 60...
- Página 36 FSE 60...
- Página 37 Asegúrese que los mangos de la orilla- dora y el mango de arranque estén en buenas condiciones y que éstos y las manos estén sin humedad, resina, aceite o grasa. FSE 60...
- Página 38 No fuerce la orilladora. Funciona mejor y daños en la herramienta de corte. Susti- STIHL para el mantenimiento y repara- con menos riesgo de lesiones si se usa ción. El uso de piezas no fabricadas por tuya las herramientas de corte inmedia- al ritmo para el cual fue diseñado.
- Página 39 únicamente Esto puede causar el desprendimiento en el taller de servicio de STIHL. de alguna pieza de la herramienta de corte y producir lesiones graves o mor- El cordón eléctrico sólo debe ser susti- ¡GUARDE ESTAS INSTRUC-...
-
Página 40: Montaje Del Tubo De Mando
Apriete el tornillo (3) en la caja. Uso de las cabezas segadoras La cabeza segadora Autocut de STIHL produce una terminación limpia y orde- nada. Se usa solamente en las orillado- ras equipadas con una cuchilla limita-... -
Página 41: Montaje Del Mango Tórico
(2). Asegúrese que los agujeros estén alineados. Inserte la tuerca hexagonal (3) en el mango tórico y coloque el tornillo (4) Inserte el tornillo (4) y apriételo. con la arandela (5) desde el otro lado. Apriete firmemente. FSE 60... -
Página 42: Montaje De Las Herramientas De Corte
Guarde la hoja de instrucciones de la Enrolle los hilos de nilón (3) en el carrete (4). cabeza segadora en un lugar seguro. Pase las puntas de los hilos de nilón a través de los manguitos y coloque el carrete en la cabeza. FSE 60... - Página 43 / EE.UU Montaje de la cabeza segadora Ajuste del hilo de nilón Enrosque el carrete (5) en sentido AutoCut C 5-2 de STIHL horario hasta que las dos flechas STIHL AutoCut queden alineadas entre sí - fije el Deslice la cabeza segadora (1) por Sujete la cabeza segadora en carrete en esta posición.
-
Página 44: Colocación Del Arnés
STIHL AutoCut Vea el capítulo "Sustitución del hilo de Calibre mínimo de alambres para cor- nilón". dones de extensión de aparatos de 120 V que consumen 0-6 A. Largo del cordón (pies) 100 150 Calibre de alam- bre (AWG) FSE 60... -
Página 45: Alivio De Esfuerzos
No apoye la cabeza segadora en el suelo. Oprima la palanca de bloqueo de arranque (1) y oprima el gatillo (2). Para apagar la máquina, suelte el gatillo y la palanca de bloqueo de arranque. FSE 60... -
Página 46: Almacenamiento De La Máquina
útil del hilo de nilón si se guarda el carrete en un baño de agua. Guarde la máquina en un lugar seco y elevado, o bajo llave - fuera del alcance de los niños y de otras per- sonas no autorizadas. FSE 60... -
Página 47: Piezas Principales Y Control
1 Cordón eléctrico 2 Gatillo 3 Palanca de bloqueo de arranque 4 Aro de transporte 5 Mango tórico 6 Tubo de mando 7 Cabeza segadora 8 Cuchilla limitadora del largo del hilo 9 Deflector 10 Alivio de esfuerzos FSE 60... -
Página 48: Definiciones
Peso cortacésped. 8 = Cuchilla limitadora del largo del Completa con hilo. deflector y cabeza Pieza de metal en el deflector para segadora 8,8 lb (4,0 kg) cortar el hilo de nilón sobrante. FSE 60... -
Página 49: Dimensiones
P.O. Box 2015 (1530 mm) manual. Solamente los talleres autoriza- Virginia Beach dos por STIHL deben llevar a cabo los VA 23452-2015 demás trabajos de reparación. Herramienta de corte Los reclamos de garantía presentados STIHL-AutoCut 5-2 después de realizadas las reparaciones... - Página 50 0458 238 8621 englisch / English USA / spanisch / español EE.UU...