Tabla de contenido
Publicidad
Idiomas disponibles
Idiomas disponibles
Enlaces rápidos
Ford F-150 2009-2014
KIT FEATURES
• ISO DDIN radio provision
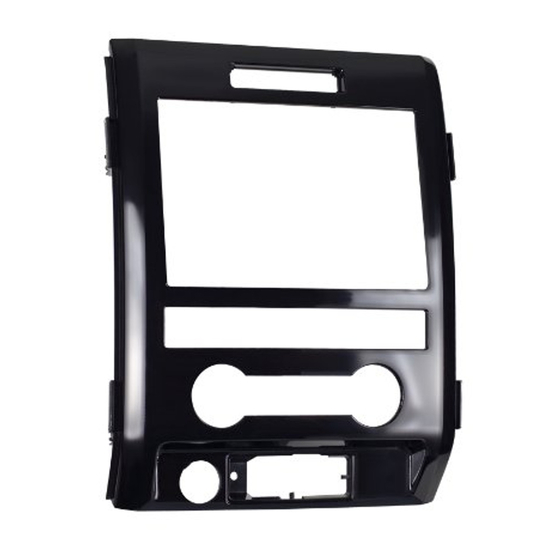
KIT COMPONENTS
• A) ISO DDIN radio housing • B) Radio/climate trim panel • C) Radio brackets • D) (6) "U" style panel clips
B
A
APPLICATIONS
FORD
F-150 (with CD player without color screen)
F-150 XL (with CD player)
F-150 XLT (with single row of 3 buttons, without NAV)
METRA. The World's best kits.
Installation instructions for part 95-5820
95-5820
C
D
2013-2014
2009-2013
2009-2012
™
metraonline.com
WIRING & ANTENNA CONNECTIONS (sold separately)
Wiring Harness:
• Please see www.metraonline.com for specific
interface harness
Antenna Adapter:
• 40-CR10
TOOLS REQUIRED
• Cutting tool • Phillips screwdriver • Socket wrench
• Torx driver • Panel removal tool
CAUTION!
Metra recommends disconnecting the negative bat -
tery terminal before beginning any installation, unless the vehicle
manufacturer recommends against so. Please check with your local
Dealership for more information. All accessories, switches, climate
controls panels, and especially air bag indicator lights must be con -
nected before reconnecting the battery or cycling the ignition. Also,
do not remove the factory radio with the key in the on position, or the
vehicle running. It would be best to remove the key from the ignition
and then wait a few seconds before removing the factory radio.
© COPYRIGHT 2004-2015 METRA ELECTRONICS CORPORATION
Publicidad
Tabla de contenido

Manuales relacionados para Metra 95-5820


Resumen de contenidos para Metra 95-5820
- Página 1 • A) ISO DDIN radio housing • B) Radio/climate trim panel • C) Radio brackets • D) (6) “U” style panel clips CAUTION! Metra recommends disconnecting the negative bat - tery terminal before beginning any installation, unless the vehicle manufacturer recommends against so. Please check with your local APPLICATIONS Dealership for more information.
- Página 2 95-5820 Table of Contents Dash Disassembly Dash Disassembly ....................3 1. Unclip and remove the switch panel to the right of the cigarette Kit Preparation ......................4 lighter then remove the (1) 9/32” screw exposed. (Figure A) Kit Assembly 2. Remove the rubber pad at the top –...
-
Página 3: Dash Disassembly
95-5820 Dash Disassembly 3. Unclip and pull the side panels containing the a/c vents 6. Unclip and remove the cigarette lighter socket from the away from the radio trim panel. (Figure C) radio trim panel. (Figure F) Note: It is not necessary to remove the panels completely. -
Página 4: Kit Preparation
95-5820 Kit Preparation 1. Clip the hazard/airbag switch assembly into the radio housing in the same 4. Attach the (6) “U” style panel clips to the radio housing in the same location as location as the factory radio trim panel. (Figure A) the factory radio trim panel. -
Página 5: Kit Assembly
(Figure C) 4. Locate the factory wiring harness and antenna connector in the dash. Metra recommends using the proper mating adapter from Metra or AXXESS. Reconnect the negative battery terminal and test the radio for proper operation. 5. Reassemble the dash in reverse order of disassembly. - Página 6 95-5820 Notes...
- Página 7 95-5820 Notes...
-
Página 8: Important
Installation instructions for part 95-5820 IMPORTANT If you are having difficulties with the installation of this product, please call our Tech Support line at 1-800-253-TECH. Before doing so, look over the instructions a second time, and make sure the installation was performed exactly as the instructions are stated. -
Página 9: Herramientas Requeridas
Instrucciones de instalación para la pieza 95-5820 Ford F-150 2009-2014 CABLEADO Y CONEXIONES DE ANTENA 95-5820 (se venden por separado) Arnés de cableado: • Visite www.metraonline.com para ver arneses específicos para la interfase CARACTERÍSTICAS DEL KIT Adaptador de antena: • Provisión de radio ISO DDIN •... - Página 10 95-5820 Indice Desmontaje del tablero Desmontaje del tablero ..................3 1. Desenganche y quite el panel de interruptores a la derecha del Preparación del kit ....................4 encendedor de cigarrillos y luego quite el tornillo de 9/32” que Ensamble del kit queda a la vista. (Figura A) –...
-
Página 11: Desmontaje Del Tablero
95-5820 Desmontaje del tablero 3. Desenganche y jale los paneles laterales que contienen 6. Desenganche y quite la cavidad del encendedor de las rejillas del aire acondicionado, retirándolas del panel cigarrillos del panel de moldura del radio. (Figura F) de la moldura del radio. (Figura C) 7. -
Página 12: Preparación Del Kit
95-5820 Preparación del kit 1. Enganche el ensamble del interruptor de las luces intermitentes/bolsa de aire 3. Asegure el control de clima a la carcasa del radio usando la tornillería de en la carcasa del radio, en el mismo lugar que el panel de la moldura del radio fábrica en el mismo lugar que el panel de la moldura del radio de fábrica. -
Página 13: Ensamble Del Kit
Metra recomienda que use adaptadores adecuados de acoplamiento de Metra y/o de AXXESS. Vuelva a conectar la terminal negativa de la batería y pruebe el radio para verificar que funcione correctamente 5. - Página 14 95-5820 Notas...
- Página 15 95-5820 Notas...
-
Página 16: Importante
Instrucciones de instalación para la pieza 95-5820 IMPORTANTE Si tiene dificultades con la instalación de este producto, llame a nuestra línea de soporte técnico al 1-800-253-TECH. Antes de hacerlo, revise las instrucciones por segunda vez y asegúrese de que la instalación se haya realizado exactamente...