Tabla de contenido
Publicidad
Idiomas disponibles
Idiomas disponibles
Enlaces rápidos
LIMITED WARRANTY
True Innovations seating products are warranted against defects in material and workmanship
while owned by the "Original Purchaser". The term "Original Purchaser" is defined as that party or
entity which purchases True Innovations furniture from an authorized True Innovations retailer as
or iginal sales r eceipt
shown by the
. This warranty does not apply to "as is" or previously
owned seating products.
True Innovations warrants its products to be free from defects in materials and workmanship
(normal wear and tear, fading an d stretching excepted), for one year from the date of purchase,
except as provided below under the limited warranty.
The exceptions or exclusions to this warranty are as follows:
1. Any warranty claim that is submitted after the limited warranty period, or without proper pro of
of purchase will not include the cost of parts, labor, or delivery.
2. This warranty shall not apply to the True Innovations products which have been subjected to
misuse, neglect, alteration, modification, or attachments, either caused by the original
purchaser, shipping, storage, accident, fire, flood, or acts of God.
In the event of a defect in material or workmanship covered by this warranty, True Innovations will
repair or replace, at their discretion, without charge the warranted furniture within a reasonable
amount of time. We reserve the right to require damaged parts to be returned to us upon
request. Natural markings such as scars, brands, grain variations, wrinkles, color variations, etc.
will be considered n ormal characteristics and not construed as defects. We cannot warrant
leather against scratching or scuffing, as all leather is subject to blemishes with use.
For claims or questions concerning this warranty, please contact True Innovations Customer
Service department on the web at
www.trueinnovations.com
name, address, daytime phone number, the model and purchase order number of the product,
date of purchase, and the store where it was purchased. True Innovations requires that the
original sale s receipt be submitted with all requests to confirm that you are the original purchaser
according to our written warranty.
This warranty gives you specific rights, and you may also have other rights, which vary from state
to state.
All warranties are limited to the original purchaser for normal use which is defined as a standard
work week of forty hours by a person weighing less than 350 lbs.
Should you prefer to speak with a service representative, you may call toll free: 1-800-379-9773,
or fax 714-544-5118.
Manufactured by:
LF Products Pte. Ltd.
No.148, Xiazhuang Lane, Changhe Street Scene, Binjiang District, Hangzhou, Zhejiang, China, 310052
Printed in China
. Be prepared to provide your
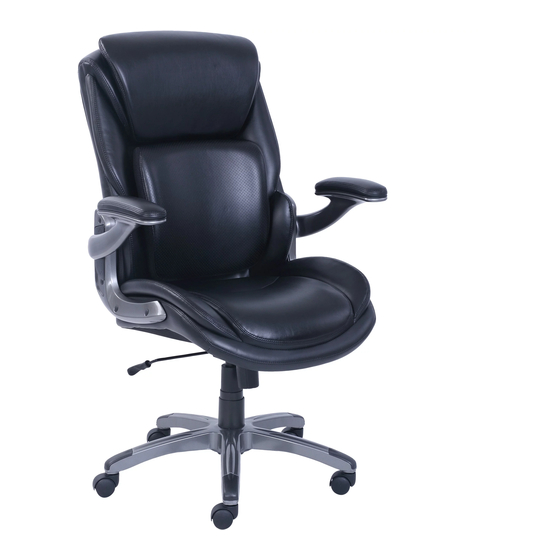
Big & Tall 3D Chair
Assembly Instructions
THIS INSTRUCTION BOOKLET CONTAINS IMPORTANT SAFETY INFORMATION.
PLEASE READ AND KEEP FOR FUTURE REFERENCE.
Customer Service Support: 1-800-379-9773
Lot Number :
Date of purchase :
Model: 49320
Publicidad
Tabla de contenido

Manuales relacionados para Serta 49320


Resumen de contenidos para Serta 49320
- Página 1 All warranties are limited to the original purchaser for normal use which is defined as a standard work week of forty hours by a person weighing less than 350 lbs. Model: 49320 Should you prefer to speak with a service representative, you may call toll free: 1-800-379-9773, or fax 714-544-5118.
-
Página 2: Care And Maintenance
Operating Instructions Care and Maintenance Thank you for selecting one of True Innovations seating solutions. It’s True...Fast, Friendly Customer Service Leather and Vinyl Coverings: Occasionally dust the leather or vinyl surface with a soft, clean cloth. For mild stains, combine water and a soft cloth. Wet the cloth and rub gently At True Innovations, we are committed to excellence. -
Página 3: Parts List
Parts list Function Instruction ADJUSTING TO 360 MOTION SUP- Casters (5) Base (1) PORT While seated, the 3D lumbar can dynamically provide continuous support by connecting with your body's natural movement. The 3D lumbar conforms to the curve of your spinal cord and is intended to relieve your back from stress. -
Página 4: Included Parts
Operating Instructions Included Parts Function Instruction TO ADJUST TILT TENSION Reach under the front center of chair seat and grasp the round black knob. To loosen the tilt Big Bolts (1-3/4”) (2) mechanism, turn the knob clockwise. This Big Bolts (1”) (2) lessens the effort required to rock back and forth. - Página 5 Assembly Instructions Function Instruction Turn the Star Base (2) upside down. Press the Casters (1) into holes at the end Step 1 of each leg. Turn the Star Base (2) upright and insert Gas Lift with Telescoping Cover (3) into the center hole of Star Base (2). TO ADJUST SEAT HEIGHT While seated, lean forward, lifting your body weight from the seat.
- Página 6 Assembly Instructions Align Seat Plate (4) over pre-drilled holes on the underside of the Seat Cushion Press the Plastic Caps (B) into the Armrest holes to cover bolts. Step 2 Step 7 (6) with black tension knob facing the front of the seat. Attach the Seat Plate (4) NOTE 1:Before using your Executive Chair, ensure that all the bolts are to Seat Cushion (6) using 2 Bolts (A1) in the front holes of Seat Plate (4) and 2 tightened fully for safety.
- Página 7 Assembly Instructions Gently pivot the Back Cushion (7) to an upright position. Secure the remaining Turn assembled seat upright and locate central hole of Seat Plate (4) over Gas Step 6 Step 3 Bolts (A3) to the Armrests (5A & 5B) and tighten all the bolts fully with Allen Key Lift (3).
- Página 8 Assembly Instructions Attach Armrests (5A & 5B) to the assembled Seat Cushion (6) using 4 Bolts (A3), Step 4 Step 5 Place the back cushion between arms. Adjust the arms to their highest position securing the lower two holes on the bottom of Armrests (5A & 5B) to each side. to reveal lower screw holes by: 1.
-
Página 9: Garantía Limitada
Todas las garantías están limitadas al comprador original y al uso normal, el que se define como Modelo: 49320 una semana estándar de trabajo de cuarenta horas por una persona que pese menos de 350 libras. -
Página 10: Cuidado Y Mantenimiento
Instrucciones de uso Cuidado Y Mantenimiento Gracias por elegir los productos de True Innovations. Revestimientos de cuero y vinilo: Limpie ocasionalmente el polvo de la superficie de cuero o vinilo con un paño suave y limpio. Para los casos de manchas leves, combine Nuestro servicio al cliente es real...amigable y rápido agua y un paño suave. -
Página 11: Lista De Partes
Lista de partes Instrucciones de las funciones AJUSTANDO AL SOPORTE Ruedas (5) Base (1) CON MOVIMIENTO DE 360 DE- GRADOS Mientras este sentado, el lumbar 3D dinámica- mente pueden proporcionar apoyo continuo por respondiendo al movimiento natural de su cuerpo. La lumbar 3D se ajustan a la curva de su columna vertebral para aliviar la tensión de su espalda. -
Página 12: Partes Incluidas
Instrucciones de uso Partes incluidas Instrucciones de las funciones AJUSTE DE LA TENSION EN EL MECANISMO PARA INCLINAR LA SILLA Pernos grandes (44.5mm) (2) Pernos grandes (25.4mm) (2) Busque debajo del asiento de la silla, en la parte central del frente y sujete la perilla negra redonda. Para aflojar el mecanismo de inclinación, de vuelta a la perilla en el sentido de las manecillas del reloj. - Página 13 Instrucciones de uso Instrucciones de las funciones Ponga la base en forma de estrella (2) con la parte inferior hacia arriba. Inserte Paso 1 las ruedas (1) en los agujeros en el extremo de cada pata. Enderece la base en forma de estrella (2) e inserte el elevador de gas con cubierta (3) en el agujero central de la base en forma de estrella (2).
- Página 14 Instrucciones de uso Alinee la placa del asiento (4) sobre los hoyos preperforados situados en la Presione las tapas de plástico (B) introduciéndolas en los orificios de los brazos Paso 2 Paso 7 parte inferior del cojín del asiento (6) con la perilla negra para la tensión hacia para cubrir los pernos.
- Página 15 Instrucciones de uso Levante despacio el cojín del respaldo (7) hasta que quede en posición vertical. Ponga la silla ensamblada en posición vertical y sitúe el agujero central de la Paso 6 Paso 3 Inserte los pernos restantes (A3) en los brazos (5A y 5B) y apriete todos los placa del asiento (4) sobre el elevador de gas (3).
- Página 16 Instrucciones de uso Sujete los brazos (5A y 5B) a cada lado del cojín del asiento ensamblado (6) Paso 4 Paso 5 Coloque el cojín lumbar entre los brazos. Ajuste los brazos en su posición atornillando cuatro pernos (A3) en los dos agujeros de la parte inferior de los más alta para revelar los orificios de los tornillos inferiores de la siguiente brazos (5A y 5B).