Publicidad
CONTACT US FIRST
CONTACT US FIRST
sauder.com
sauder.com
sauder.com
BEFORE MAKING ANY RETURNS TO THE STORE.
BEFORE MAKING ANY RETURNS TO THE STORE.
sauder.com/service
Visit
Prefer the phone? Give us a ring at
Customer Service is available Monday-Friday - 9 a.m. to 5:30 p.m. EST (except holidays)
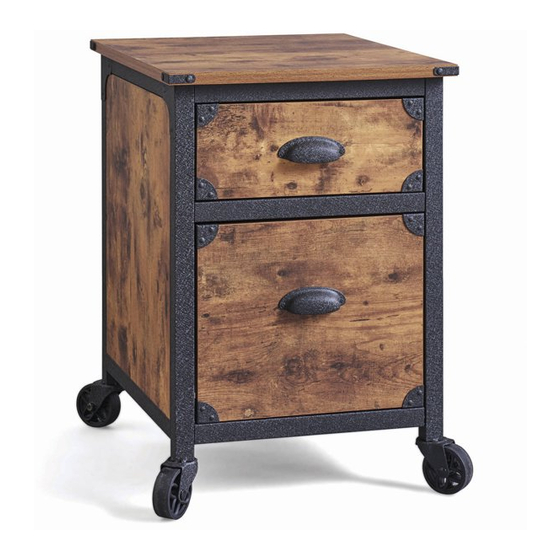
File Cabinet
Model 420406
Share your journey!
to order replacement parts, view video assembly tips, or chat with a live rep.
1-800-445-1527
.
Get all organized
and stuff .
NOTE: THIS INSTRUCTION
BOOKLET CONTAINS IMPORTANT
SAFETY INFORMATION.
PLEASE READ AND KEEP FOR
FUTURE REFERENCE.
English pg 1-18
Français pg 19-21
Español pg 22-24
Lot # 531682
Purchased: __________________
07/17/19
Publicidad
Tabla de contenido

Manuales relacionados para Sauder 420406


Resumen de contenidos para Sauder 420406
- Página 1 Customer Service is available Monday-Friday - 9 a.m. to 5:30 p.m. EST (except holidays) Get all organized and stuff . File Cabinet NOTE: THIS INSTRUCTION BOOKLET CONTAINS IMPORTANT SAFETY INFORMATION. Model 420406 PLEASE READ AND KEEP FOR FUTURE REFERENCE. English pg 1-18 Français pg 19-21 Español pg 22-24 Share your journey!
- Página 2 Table of Contents Assembly Tools Required Part Identifi cation No. 2 Phillips Screwdriver Tip Shown Actual Size Hardware Identifi cation Assembly Steps 5-18 Français 19-21 Skip the power trip. Español 22-24 This time. Safety 25-26 Warranty Page 2 www.sauder.com 420406...
-
Página 3: Part Identifi Cation
SMALL LEFT DRAWER SIDE (1) LEFT LEG FRAME (1) SMALL DRAWER FRONT (1) LARGE RIGHT DRAWER SIDE (1) TOP (1) LARGE DRAWER FRONT (1) LARGE LEFT DRAWER SIDE (1) BACK (1) SMALL DRAWER BACK (1) DRAWER BOTTOM (2) 420406 www.sauder.com Page 3... - Página 4 BLACK 1" FLAT HEAD SCREW - 8 BLACK 1" PAN HEAD SCREW - 8 BLACK 1/2" MACHINE SCREW - 6 BLACK 1/2" FLAT HEAD SCREW - 16 BLACK 1/2" PAN HEAD SCREW - 12 SMALL BLACK 1/2" MACHINE SCREW - 4 Page 4 www.sauder.com 420406...
- Página 5 NOTE: Do not overtighten the screws. å These large holes must be here. BLACK 1" PAN HEAD SCREW (8 used in this step) These edges must be even. These large holes must be here. These edges must be even. 420406 www.sauder.com Page 5...
- Página 6 Extension Rail and Slide separated Use these holes. BLACK 1/2" FLAT HEAD SCREW (8 used for the RAILS) Roller end Open end Open end Roller end BLACK 1/2" PAN HEAD SCREW (6 used for the METAL BRACKETS) Page 6 www.sauder.com 420406...
- Página 7 SCREWS (19) through the LEFT LEG FRAME as shown. Flange These holes must be here. BLACK 1/2" PAN HEAD SCREW (3 used for the METAL BRACKETS) BLACK 1-3/4" PAN HEAD SCREW (3 used for the LEFT LEG FRAME) 420406 www.sauder.com Page 7...
- Página 8 PAN HEAD SCREWS (19) through the RIGHT LEG FRAME as shown. Flange These holes must be here. BLACK 1/2" PAN HEAD SCREW (3 used for the METAL BRACKETS) BLACK 1-3/4" PAN HEAD SCREW (3 used for the RIGHT LEG FRAME) Page 8 www.sauder.com 420406...
- Página 9 Use three BLACK 1/2" MACHINE SCREWS (23). point toward the edge of the board. Short edge with holes BLACK 1/2" MACHINE SCREW The hole should be off set to the (3 used for the BRACES) right side for all three braces. 420406 www.sauder.com Page 9...
- Página 10 Fasten the BRACES (H and I) to the RIGHT LEG FRAME (C). å The arrow must Use three BLACK 1/2" MACHINE SCREWS (23). point toward the edge of the board. BLACK 1/2" MACHINE SCREW (3 used for the BRACES) Page 10 www.sauder.com 420406...
- Página 11 Step 7 Fasten the WHEELS (13) to the LEG FRAMES (C and D). å With the TOOL (17), tighten four WHEEL BOLTS (18) and Side Step: Make four NUTS (12). nachos. (Optional, but recommended.) 420406 www.sauder.com Page 11...
- Página 12 The arrow must point toward the Fasten the TOP (E) to the UPPER BRACE (H). Use two å edge of the board. BLACK 1-9/16" FLAT HEAD SCREWS (20). BLACK 1-9/16" FLAT HEAD SCREW (2 used in this step) Page 12 www.sauder.com 420406...
- Página 13 LARGE DRAWER SIDES (P and Q) and LARGE DRAWER BACK (M). Use these holes. Open end BLACK 1/2" FLAT HEAD SCREW (4 used for the SLIDES) Open end Open end Groove BLACK 1" FLAT HEAD SCREW (4 used for the DRAWER BACK) Groove 420406 www.sauder.com Page 13...
- Página 14 LARGE DRAWER LEFT SIDE (Q). Notch Be sure the DRAWER BOTTOM (R) inserts into the groove in the LARGE DRAWER FRONT (K). SMALL BLACK 1/2" MACHINE SCREW (2 used for the PULL) Page 14 www.sauder.com 420406...
- Página 15 HEAD SCREWS (21). Slide the DRAWER BOTTOM (R) into the grooves in å the SMALL DRAWER SIDES (N and O) and SMALL DRAWER BACK (L). BLACK 1" FLAT HEAD SCREW (4 used for the DRAWER BACK) Groove Groove 420406 www.sauder.com Page 15...
- Página 16 Use two SMALL BLACK 1/2" MACHINE SCREWS (26). point toward the edge of the board. Be sure the DRAWER BOTTOM (R) inserts into the groove in the SMALL DRAWER FRONT (J). SMALL BLACK 1/2" MACHINE SCREW (2 used for the PULL) Page 16 www.sauder.com 420406...
- Página 17 SMALL DRAWER LEFT SIDE (O). Use four BLACK 1/2" FLAT HEAD SCREWS (24) through the 3rd and 8th holes from the front of the RAILS. BLACK 1/2" FLAT HEAD SCREW (4 used for the RAILS) Use this hole. 420406 www.sauder.com Page 17...
- Página 18 This completes assembly. Clean with a damp cloth. Wipe dry. å And to celebrate, why not share your success story at Walmart.com or 50 lbs. 15 lbs. 30 lbs. Place the roller on the SLIDE behing the roller on the RAIL. Page 18 www.sauder.com 420406...
-
Página 19: Liste De Pièces
Modèle 420406 Classeur Utilisez les instructions d’ a ssemblage en français avec les NOUS SOMMES LA POUR VOUS AIDER! schémas étape par étape du manuel d’instruction en anglais. Nous faisons de notre mieux pour nous assurer que votre meuble Chaque étape en français correspond à la même étape arrive dans d’excellentes conditions. - Página 20 CONSOLES EN MÉTAL et trois VIS TÊTE GOUTTE DE SUIF 44,5 mm NOIRES (19) à travers le CADRE DE PIED DROIT Fixer le DESSUS (E) à l'ENTRETOISE SUPÉRIEURE (H). Utiliser comme l'indique le schéma. deux VIS TÊTE PLATE 40 mm NOIRES (20). Page 20 www.sauder.com 420406...
- Página 21 PETIT TIROIR (N et O) et de l'ARRIÈRE DE PETIT TIROIR (L). REMARQUE : Prière de lire les informations importantes sur la sécurité fi gurant sur les pages arrière du manuel d’instructions. Ceci complète l'assemblage. Nettoyer avec un tissu humide. Essuyer. 420406 www.sauder.com Page 21...
-
Página 22: Lista De Partes
CORREDERA DE EXTENSIÓN ......2 EXTREMO IZQUIERDO ..........1 necesita ponerse en RIEL DERECHO DE GABINETE ......1 contacto con Sauder en MARCO DE LA PATA DERECHA ......1 RIEL IZQUIERDO DE GABINETE ......1 cuanto a esta unidad, MARCO DE LA PATA IZQUIERDA ....1 CORREDERA DERECHA DE CAJÓN ....1... - Página 23 TORNILLOS NEGROS DE CABEZA PERDIDA de 40 mm (20). REDONDA de 13 mm (25) a través de los SOPORTES DE METAL y tres TORNILLOS NEGROS DE CABEZA REDONDA de 44,5 mm (19) a través del MARCO DE LA PATA DERECHA como se muestra. 420406 www.sauder.com Page 23...
- Página 24 LADOS DE CAJÓN PEQUEÑO (N y O) y del DORSO DE NOTA: Por favor, lea las páginas de atrás del folleto de CAJÓN PEQUEÑO (L). instrucciones en cuanto a importante información de seguridad. Esto completa el ensamblaje. Limpiar con un trapo húmedo. Seque con un paño. Page 24 www.sauder.com 420406...
- Página 25 Les téléviseurs peuvent être très un téléviseur. téléviseur. lourds. De plus, le poids et l’emplacement du tube image ont tendance à rendre les téléviseurs instables et enclins à tomber vers l’ a vant. 420406 www.sauder.com Page 25...
- Página 26 Además, soportar un televisor. diseñadas para soportar un televisor. el peso y la ubicación del tubo de imagen tienden a causar la inestabilidad de televisores y son propensos a inclinarse hacia adelante. Page 26 www.sauder.com 420406...
-
Página 27: Garantía Limitada De 1 Año
à compter de la date d'achat la première fois et qui sont signalés à Sauder dans les limites de couverture de la contre tout défaut de matériaux ou de fabrication des composantes de mobilier Sauder. -
Página 28: If You Need Assistance
Walmart.com in the product detail page. General Conformity Certifi cate 1. This certifi cate applies to the Sauder Global Sourcing Product identifi ed by this Instruction Book. 2. This certifi cate applies to compliance of this product with the CPSC Ban on Lead-Containing Paint (16 CFR 1303).