Tabla de contenido
Publicidad
Enlaces rápidos
CONTACT US FIRST
CONTACT US FIRST
sauder.com
sauder.com
sauder.com
BEFORE MAKING ANY RETURNS TO THE STORE.
BEFORE MAKING ANY RETURNS TO THE STORE.
sauder.com/service
Visit
Prefer the phone? Give us a ring at
Customer Service is available Monday-Friday - 9 a.m. to 5:30 p.m. EST (except holidays)
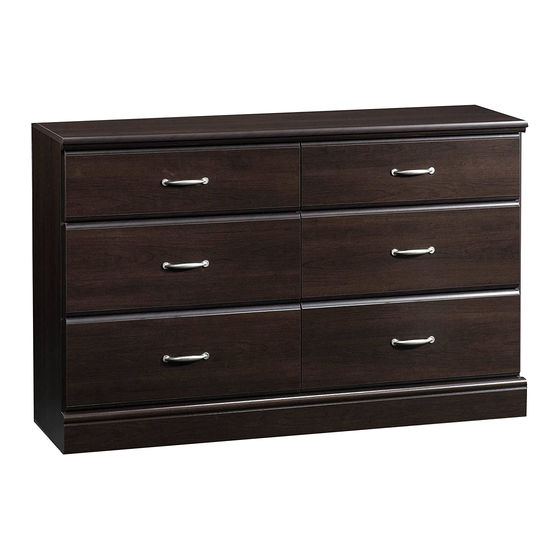
Dresser
Model 420449
Share your journey!
to order replacement parts, view video assembly tips, or chat with a live rep.
1-800-523-3987
.
WARNING
CHOKING HAZARD - Small Parts
Not for children under 3 years.
Adult assembly required.
NOTE: THIS INSTRUCTION
BOOKLET CONTAINS IMPORTANT
SAFETY INFORMATION.
PLEASE READ AND KEEP FOR
FUTURE REFERENCE.
English pg 1-20
Français pg 21-24
Español pg 25-28
Lot # 527089
Purchased: __________________
03/22/19
Publicidad
Tabla de contenido

Manuales relacionados para Sauder 420449


Resumen de contenidos para Sauder 420449
- Página 1 CHOKING HAZARD - Small Parts Not for children under 3 years. Adult assembly required. Dresser NOTE: THIS INSTRUCTION BOOKLET CONTAINS IMPORTANT SAFETY INFORMATION. Model 420449 PLEASE READ AND KEEP FOR FUTURE REFERENCE. English pg 1-20 Français pg 21-24 Español pg 25-28 Share your journey!
- Página 2 Assembly Tools Required Part Identifi cation No. 2 Phillips Screwdriver Tip Shown Actual Size Hardware Identifi cation Assembly Steps 5-20 Hammer Not actual size Français 21-24 Español 25-28 Skip the power trip. Safety 29-20 This time. Warranty Page 2 420449 www.sauder.com/service...
-
Página 3: Part Identifi Cation
DRAWER BRACE (6) D166 SMALL DRAWER BACK (2) BASE (1) (Hidden part using recycled D167 DRAWER BACK (4) material. Color may vary.) BRACE (4) D245 SMALL RIGHT DRAWER SIDE (2) D245 D166 D703 D271 D262 D167 D703 D257 www.sauder.com/service 420449 Page 3... -
Página 4: Tabla De Contenido
3S GOLD 5/16" FLAT HEAD SCREW - 48 BLACK 9/16" LARGE HEAD SCREW - 38 12S BROWN 1" FLAT HEAD SCREW - 4 15S SILVER 5/8" MACHINE SCREW - 12 30S BLACK 1-9/16" FLAT HEAD SCREW - 30 Page 4 420449 www.sauder.com/service... - Página 5 Then, insert the metal end of a CAM DOWEL (2F) into each HIDDEN CAM. Do not tighten the HIDDEN CAMS in this step. Arrow (20 used) Arrow Insert the metal end of the CAM DOWEL into the HIDDEN CAM. www.sauder.com/service 420449 Page 5...
- Página 6 ENDS (A and B). Use twelve GOLD 5/16" FLAT HEAD SCREWS (3S) through holes #1 and #3. *patent pending glide system å GOLD 5/16" FLAT HEAD SCREW (12 used for the RAILS) Glide end Finished edge Glide end Finished edge Page 6 420449 www.sauder.com/service...
- Página 7 UPRIGHT (C). Use twelve GOLD 5/16" FLAT HEAD SCREWS (3S) through holes #1 and #3. *patent pending glide system å GOLD 5/16" FLAT HEAD SCREW (12 used for the RAILS) Finished edge Glide end www.sauder.com/service 420449 Page 7...
-
Página 8: Black 9/16" Large Head Screw
9/16" LARGE HEAD SCREWS (1S). NOTE: Be sure the edges of the METAL BRACKETS are even å with the edges of the ENDS, UPRIGHT, and BRACES. BLACK 9/16" LARGE HEAD SCREW (7 used for the BRACKETS) Edge with CAM DOWELS Page 8 420449 www.sauder.com/service... - Página 9 Tighten Risk of damage or Arrow injury. HIDDEN CAMS must be completely Arrow Maximum tightened. HIDDEN 210 degrees CAMS that are not completely tightened may loosen, and parts may separate. To Minimum completely tighten: 190 degrees www.sauder.com/service 420449 Page 9...
- Página 10 S u r D E N H I D i t h f a c S u r D E N H I D i t h f a c S u r Page 10 420449 www.sauder.com/service...
- Página 11 Step 7 Fasten the ENDS (A and B) to the TOP (D) and BRACES (F). å Tighten eight HIDDEN CAMS. Maximum Arrow 210 degrees Minimum 190 degrees Finished edge Finished edge www.sauder.com/service 420449 Page 11...
- Página 12 Fasten the BASE (E) to the ENDS (A and B), UPRIGHT (C), å and BRACES (F). Use seven BLACK 9/16" LARGE HEAD SCREWS (1S) through the METAL BRACKETS and into the BASE. Rounded edge BLACK 9/16" LARGE HEAD SCREW (7 used for the BASE) Page 12 420449 www.sauder.com/service...
-
Página 13: Brown 1" Flat Head Screw
Step 9 Fasten the TOP MOLDING (J) to the TOP (D). Use four å BROWN 1" FLAT HEAD SCREWS (12S). BROWN 1" FLAT HEAD SCREW (4 used for the MOLDING) Finished surface Rounded edge www.sauder.com/service 420449 Page 13... - Página 14 Step 10 Using your hammer, gently tap six TACK GLIDES (13E) into å the edges of the ENDS (A and B), UPRIGHT (C), and BASE (E). Page 14 420449 www.sauder.com/service...
- Página 15 NOTE: Be sure to tap NAILS into the holes that line up over å (45 used for the BACK) the UPRIGHT (C). This perforated hole needs to be at the top of the unit. These holes must line up over the UPRIGHT (C). www.sauder.com/service 420449 Page 15...
-
Página 16: Bracket
SIDES (D257 and D262) and DRAWER BRACE (M64). Use FRONT (G). Tighten one HIDDEN CAM. fi ve BLACK 1-9/16" FLAT HEAD SCREWS (30S). Repeat Step 12 for the remaining drawers. The SMALL drawers will use parts 8G, H, D166, D245, D271, D703, and M64. Page 16 420449 www.sauder.com/service... - Página 17 NOTE: The glides are not intended to rotate. å Repeat this step for the remaining drawers. å Glide end D257 Glide end D262 (4 screws per drawer) GOLD 5/16" FLAT HEAD SCREW (24 used for the SLIDES) www.sauder.com/service 420449 Page 17...
- Página 18 Step 14 Fasten a PULL (2K) to the DRAWER FRONT (G). Use two å SILVER 5/8" MACHINE SCREWS (15S). Repeat this step for the remaining drawers. å SILVER 5/8" MACHINE SCREW (12 used for the PULLS) Page 18 420449 www.sauder.com/service...
- Página 19 NOTE: Before moving your unit to a diff erent location, unscrew the SAFETY DRYWALL ANCHOR from your wall. The å nylon sheath will remain behind your wall. Washer Safety drywall anchor Safety strap BLACK 9/16" LARGE HEAD SCREW (1 used for the SAFETY STRAP) www.sauder.com/service 420449 Page 19...
- Página 20 • Ne r re -o ve eli m at a of tip no t Us e bu t ce , re du -o ve of tip 20 lbs. 20 lbs. 35 lbs. each Page 20 420449 www.sauder.com/service...
-
Página 21: Liste De Pièces
Modèle 420449 Commode Utilisez les instructions d’ a ssemblage en français avec les NOUS SOMMES LA POUR VOUS AIDER! schémas étape par étape du manuel d’instruction en anglais. Nous faisons de notre mieux pour nous assurer que votre meuble Chaque étape en français correspond à la même étape arrive dans d’excellentes conditions. - Página 22 MONTANT (C) et aux deux ENTRETOISES (F). Utiliser sept VIS TÊTE LARGE 14 mm NOIRES (1S). REMARQUE : S'assurer que les chants des CONSOLES EN MÉTAL sont à fl eur des chants des EXTRÉMITÉS, du MONTANT et des ENTRETOISES. Page 22 420449 www.sauder.com/service...
- Página 23 MONTANT (C). Répéter cette étape pour les autres tiroirs. ÉTAPE 14 Fixer une POIGNÉE (2K) sur le DEVANT DE TIROIR (G). Utiliser deux VIS À MÉTAUX 16 mm ARGENTÉES (15S). Répéter cette étape pour les autres tiroirs. www.sauder.com/service 420449 Page 23...
- Página 24 5. Continuer de tourner jusqu’à ce que la vis commence à pivoter librement. REMARQUE : Avant de déplacer l’unité vers un emplacement diff érent, dévisser le DISPOSITIF DE SÉCURITÉ POUR PLACOPLÂTRE du mur. La gaine en nylon restera derrière le mur. Page 24 420449 www.sauder.com/service...
-
Página 25: Lista De Partes
35AC CAJÓN DERECHO .............6 su referencia futura. Si EXTREMO IZQUIERDO ..........1 necesita ponerse en 35AD CAJÓN IZQUIERDO ..........6 PARAL ...................1 contacto con Sauder en 13E TACHUELA DESLIZANTE ........6 PANEL SUPERIOR ............1 cuanto a esta unidad, EXCÉNTRICO ESCONDIDO ......20 refi érase al número D166 DORSO DE CAJÓN PEQUEÑO .......2... - Página 26 PARAL (C) y a dos de las RIOSTRAS (F). Utilice siete TORNILLOS NEGROS DE CABEZA GRANDE de 14 mm (1S). NOTA: Asegúrese que los bordes de los SOPORTES DE METAL estén nivelados con los bordes de los EXTREMOS, el PARAL y las RIOSTRAS. Page 26 420449 www.sauder.com/service...
- Página 27 Repita este paso para los cajones que quedan. PASO 14 Fije un TIRADOR (2K) a la CARA DE CAJÓN (G). Utilice dos TORNILLOS PLATEADOS PARA METAL de 16 mm (15S). Repita este paso para los cajones que quedan. www.sauder.com/service 420449 Page 27...
- Página 28 5. Continúe girando hasta que el tornillo comience a rotar libremente. NOTA: Antes de trasladar la unidad a otra ubicación, desatornille el ANCLAJE DE SEGURIDAD PARA EL DRYWALL de su pared. La cubierta de nailon permanecerá detrás de su pared. Page 28 420449 www.sauder.com/service...
- Página 29 TOUJOURS décharger les tablettes et les tiroirs, en commençant par les surface supérieures, avant de déplacer le meuble. NE JAMAIS pousser ou tirer un meuble sur de la moquette. Demander à une autre personne de le soulever correctement pour le déplacer et/ou le repositionner. www.sauder.com/service 420449 Page 29...
- Página 30 SIEMPRE descargue los estantes y cajones, empezando con las superfi cies superiores, antes de moverlo. NUNCA empuje ni tire de los muebles sobre una alfombra. Obtenga que un amigo le ayude a levantarlo correctamente para moverlo y/o reposicionarlo. Page 30 420449 www.sauder.com/service...
-
Página 31: Garantie Limitée De 5 Ans
à compter de la date d'achat la première fois et qui sont signalés à Sauder dans les limites de couverture de la contre tout défaut de matériaux ou de fabrication des composantes de mobilier Sauder. -
Página 32: If You Need Assistance
Walmart.com in the product detail page. General Conformity Certifi cate 1. This certifi cate applies to the Sauder Woodworking Product identifi ed by this Instruction Book. 2. This certifi cate applies to compliance of this product with the CPSC Ban on Lead-Containing Paint (16 CFR 1303).