Tabla de contenido
Publicidad
Idiomas disponibles
Idiomas disponibles
Enlaces rápidos
H-10066
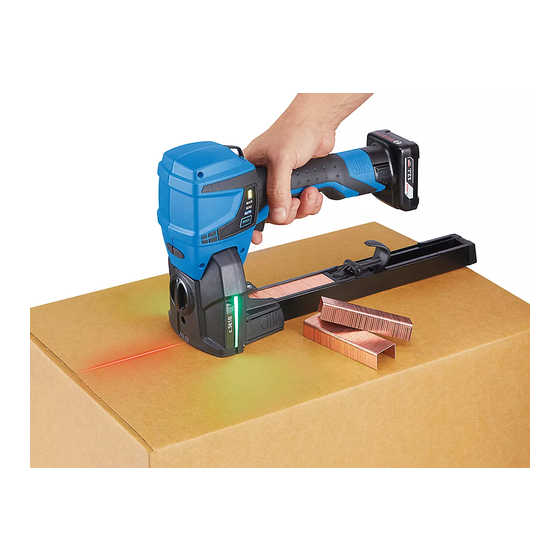
KIHLBERG BATTERY-POWERED
CARTON STAPLER
CONTROL PANEL
13
12
11
10
16
PAGE 1 OF 42
OVERVIEW OF CONTROLS
14
15
3
5
6
7
8
17
18
9
Bottom View
1-800-295-5510
uline.com
1
2
4
17
16
Para Español, vea páginas 14-28.
Pour le français, consulter les pages 29-41.
#
DESCRIPTION
1
Battery
2
Battery Release
3
Magazine Pusher
4
Magazine with Staple Type Indicator
5
Staples
6
Safety Latch
7
Trigger
8
Magazine Quick Snap System
9
Tool Status Indicator
10
Screw for Staple Length Adjustment
11
Penetration Depth Setting Knob
12
Staple Clinch Adjusting Nut
13
Mode Button
14
Suspension Hanging Port
15
Battery Charge Status Indicator
16
Clinchers
17
Box Detection Indicator
Locking Screw for Staple Length
18
Adjustment
1022 IH-10066
Publicidad
Tabla de contenido
Solución de problemas

Manuales relacionados para Uline H-10066


Resumen de contenidos para Uline H-10066
- Página 1 Para Español, vea páginas 14-28. Pour le français, consulter les pages 29-41. H-10066 1-800-295-5510 uline.com KIHLBERG BATTERY-POWERED CARTON STAPLER OVERVIEW OF CONTROLS CONTROL PANEL DESCRIPTION Battery Battery Release Magazine Pusher Magazine with Staple Type Indicator Staples Safety Latch Trigger Magazine Quick Snap System...
- Página 2 SAFETY NOTE: These tools are manufactured without • These instructions must always be available at any chemical substances that could be the place of operation of the stapler. They must dangerous to health. Potential health damage be read and observed by all persons working may occur from battery liquid if batteries with, or in the vicinity of, the stapler.
- Página 3 SAFETY CONTINUED • Do not abuse the cord. Never use the cord for • Disconnect battery pack from the stapler carrying, pulling or unplugging the stapler. Keep before making any adjustments, changing the cord away from heat, oil, sharp edges or accessories or storing.
- Página 4 CAUTION! To prevent damage to the tool: CAUTION! The following dangers can result in minor or moderate injury: • Use only original Kihlberg stick staples (Uline model # S-10720 or S-10721). NOISE EXPOSURE • Using non-original staples may impair • Wearing hearing protection is recommended.
-
Página 5: User Interface
SETUP USER INTERFACE FUNCTION Battery Charge Status The stapling tool is positioned on carton to be closed Figure 1 display. (See Figure 1) (box detection sensors activated). (See Figure 3) 2. Mode Indicators: • Actuating the trigger starts the stapling process. MAN, SEMI and AUTO •... -
Página 6: Charging Battery
SETUP CONTINUED TRANSPORTING THE STAPLER CHARGING BATTERY To prevent accidental triggering while carrying the tool, WARNING! Only use batteries and charger ensure handle is gripped by hand and index finger is supplied with unit. Use of other batteries or behind the shoulder. (See Figure 4) chargers can result in injury or fire. -
Página 7: Operating Modes
SETUP CONTINUED INSERTING/REMOVING BATTERY MAN (MANUAL STAPLING) Individual staples are inserted. A cycle is initiated after Insert the charged battery into the stapler. Insert fully the stapler is placed on the carton and the trigger is until the unlock buttons engage in the stapler. actuated manually. - Página 8 OPERATION LOADING THE STAPLER OPERATING STAPLER ACTIVATING STAPLER FROM SLEEP MODE NOTE: There is a reloading arrow (1) To avoid unnecessary battery discharge, the tool on both sides of switches to energy-saving mode (sleep mode) after magazine. a short period of inactivity. (See Figure 11) If there are few staples left •...
- Página 9 OPERATION CONTINUED CHECKING STAPLE CLINCH ADJUSTING STAPLE LEG LENGTH WARNING! Danger of injury. Never transport The stapler can be adjusted to a 5/8" or 3/4" staple or move packaged goods with improperly leg length. performed stapling. Perform staple check after Remove battery from tool.
-
Página 10: Preventive Maintenance Schedule
MAINTENANCE REMOVING/INSTALLING THE MAGAZINE WARNING! Unintended actuation of trigger and safety latch during maintenance work REMOVING could lead to injuries. Always remove battery before performing cleaning or preventive and Remove battery from stapler. corrective maintenance work. 2. Press quick release buttons (1) on left and right side PREVENTIVE MAINTENANCE SCHEDULE of stapler and pull magazine (2) backward then downward. - Página 11 MAINTENANCE CONTINUED CLEANING/REPLACING DRIVER BLADE CLEANING/REPLACING CLINCHERS REQUIRED PARTS MFG. PART # REQUIRED PARTS MFG. PART # c.561B / c.561B22 Driver Blade (wear part) 164175 c.561B / a.560B Clinchers (wear part) 134340 M4 Torx Cylinder Screw (1) 946876 M4 Torx Cylinder Screw, Housing (1) 946876 DISMANTLING DRIVER BLADE DISMANTLING CLINCHERS...
- Página 12 TROUBLESHOOTING OPERATING ISSUE CAUSES RECOMMENDATIONS Battery display remains Battery faulty/fully discharged. Charge/replace battery. dark. Inserted battery not permitted Insert correct battery. (wrong battery). Battery not properly inserted. Check whether battery is completely inserted and unlocking device engaged. User interface and tool Sleep mode is activated.
-
Página 13: Technical Data
Carton too thick. Use other carton thickness. Loose staple clinch. Clinch setting too loose. Adjust staple clinch (tighten); see page 9. If the troubleshooting section does not resolve your problem, contact Uline Customer Service at 1-800-295-5510. TECHNICAL DATA STAPLER SPECIFICATION Operation modes... -
Página 14: Kihlberg Engrapadora De Batería Para Cajas
H-10066 800-295-5510 uline.mx KIHLBERG ENGRAPADORA DE BATERÍA PARA CAJAS RESUMEN DE LOS CONTROLES PANEL DE CONTROL DESCRIPCIÓN Batería Botón de Liberación de Batería Cargador del Émbolo Cargador con Indicador de Tipo de Grapa Grapas Pestillo de Seguridad Gatillo Sistema de Conexión Rápida para... -
Página 15: Seguridad
SEGURIDAD NOTA: Estas herramientas están fabricadas • Nunca dirija el láser guía a otras personas. sin usar sustancias químicas que puedan ser • Mantenga estas instrucciones siempre peligrosas para la salud. Si se manejan de disponibles en el lugar de operación de la forma inadecuada, el líquido de las baterías engrapadora. -
Página 16: Continuación De Seguridad
CONTINUACIÓN DE SEGURIDAD • Evite el contacto físico con superficies con • No se incline demasiado. Mantenga una conexión a tierra como tuberías, radiadores, posición firme y el equilibrio en todo momento. estufas y refrigeradores. Puede ocurrir un mayor Esto permite mejor control de la herramienta riesgo de descarga eléctrica si el cuerpo tiene eléctrica en situaciones inesperadas. -
Página 17: Exposición Al Ruido
CONTINUACIÓN DE SEGURIDAD • Recargue solo con el cargador indicado por el • Daños debido a la humedad. No limpie la fabricante. Un cargador adecuado para un tipo engrapadora con agua o vapor. Cuando la de paquete de batería podría crear un riesgo use en exteriores, protéjala de la lluvia. -
Página 18: Configuración
• Utilice solamente grapas en tiras Kihlberg originales (modelo Uline #S-10720 o S-10721). • Utilizar grapas no originales podría mermar la seguridad operacional y anulará la garantía y cualquier responsabilidad. -
Página 19: Continuación De Configuración
CONTINUACIÓN DE CONFIGURACIÓN FUNCIÓN TRANSPORTAR LA ENGRAPADORA Para evitar la activación accidental, asegúrese de La engrapadora está posicionada en la caja que se agarrar el asa con la mano y que el dedo índice esté va a cerrar (sensores de detección de cajas activadas). detrás del hombro. -
Página 20: Cargar La Batería
CONTINUACIÓN DE CONFIGURACIÓN CARGAR LA BATERÍA INSERTAR/RETIRAR LA BATERÍA ¡ADVERTENCIA! Utilice solamente la batería y Inserte la batería cargada en la engrapadora. cargador suministrados con la unidad. El uso Inserte completamente hasta que los botones de de otras baterías o cargadores puede resultar desbloqueo se activen en la engrapadora. -
Página 21: Cargar La Engrapadora
CONTINUACIÓN DE CONFIGURACIÓN MAN (ENGRAPADO MANUAL) Se insertan las grapas de forma individual. Un ciclo se inicia después de colocar la engrapadora en la caja y activar el gatillo manualmente. NOTA: Se recomienda para mercancías empacadas variadas (suaves, duras). SEMI (ENGRAPADO SEMIAUTOMÁTICO) Diagrama 10 Sostenga el Gatillo Se pueden insertar varias grapas. -
Página 22: Operar La Engrapadora
CONTINUACIÓN DE CONFIGURACIÓN OPERAR LA ENGRAPADORA 4. Mueva la engrapadora y repita hasta terminar de engrapar. ACTIVAR LA ENGRAPADORA DEL MODO 5. Inspeccione visualmente el cierre de la grapa. DE DESCANSO VERIFICAR EL CIERRE DE LA GRAPA Para evitar que la batería se descargue de forma innecesaria, la herramienta cambia a un modo de ¡ADVERTENCIA! Peligro de lesión. -
Página 23: Mantenimiento
CONTINUACIÓN DE CONFIGURACIÓN AJUSTAR EL LARGO DE LA PATA DE GRAPA AJUSTAR EL REMACHE DE GRAPAS La engrapadora se puede ajustar a un largo de pata NOTA: Se recomienda ajustar el cierre de de grapa de 5/8" o 3/4". grapas (cuán firmemente se cierran las grapas). - Página 24 CONTINUACIÓN DE MANTENIMIENTO RETIRAR GRAPAS ATASCADAS LIMPIAR/REMPLAZAR LA NAVAJA IMPULSORA Retire la batería de la engrapadora. NO. DE PARTE DEL 2. Retire el cargador. PARTES REQUERIDAS FABRICANTE 3. De ser necesario, retire el cuerpo posterior y/o la c.561B / c.561B22 Navaja Impulsora 164175 placa de protección.
-
Página 25: Limpiar/Reemplazar Los Cierres
CONTINUACIÓN DE MANTENIMIENTO LIMPIAR/REEMPLAZAR LOS CIERRES 5. Jale el cuerpo posterior (2) hacia abajo y retírelo. 6. Retire dos tornillos de cilindro Torx (3) y retire los NO. DE PARTE DEL PARTES REQUERIDAS cierres (4). FABRICANTE Siempre cambie ambos cierres al mismo tiempo. c.561B / a.560B Cierres 134340 (parte de desgaste) -
Página 26: Solución De Problemas
SOLUCIÓN DE PROBLEMAS PROBLEMA DE CAUSAS RECOMENDACIONES FUNCIONAMIENTO La pantalla de la Batería defectuosa/completamente Cargue/reemplace la batería. batería permanece descargada. oscura. Inserte la batería correcta. Batería insertada no permitida (batería equivocada). Verifique si la batería está completamente Batería no insertada insertada y el dispositivo de desbloqueo adecuadamente. -
Página 27: Continuación De Solución De Problemas
Configuración de remache Ajuste el remache de grapas (apriete); vea flojo. demasiado floja. página 22. Si la sección de solución de problemas no lo resuelve, póngase en contacto con Servicio a Clientes Uline al 800-295-5510. DATOS TÉCNICOS ENGRAPADORA ESPECIFICACIÓN Manual/Semi-Automatic (Semiautomático)/ Modos de operación... -
Página 28: Continuación De Datos Técnicos
EE.UU.: 115 V (230 V) Batería Bosch de Iones de Litio 12 V, 4.0 Ah Tiempo de carga (80-100%) EE.UU.: Aprox. 120-160 min. (Aprox. 60-80 min.) Disparos por carga de batería Hasta 6,000 800-295-5510 uline.mx PAGE 28 OF 42 1022 IH-10066... -
Página 29: Aperçu Des Commandes
H-10066 1-800-295-5510 uline.ca KIHLBERG – AGRAFEUSE POUR CARTON ALIMENTÉE PAR BATTERIE APERÇU DES COMMANDES PANNEAU DE COMMANDE DESCRIPTION Batterie Bouton de dégagement de la batterie Poussoir de magasin Magasin avec indicateur de type d'agrafe Agrafes Loquet de sécurité Détente Système d'enclenchement rapide du magasin Indicateur d'état de l'outil... - Página 30 SÉCURITÉ REMARQUE : Ces outils sont fabriqués sans • N'utilisez jamais l'agrafeuse pour fixer des câbles aucune substance chimique qui pourrait électriques. être dangereuse pour la santé. Le liquide • Ne modifiez pas l'agrafeuse sans autorisation des piles peut causer des dommages à la préalable.
- Página 31 SÉCURITÉ SUITE • Les fiches des outils électriques doivent des outils avec l'interrupteur positionné sur correspondre à la prise de courant. Ne modifiez marche favorise les accidents. jamais la fiche de quelque façon que ce • Retirez toute clé de réglage ou clé à molette soit.
-
Página 32: Exposition Au Bruit
SÉCURITÉ SUITE • Gardez les outils de coupe affûtés et propres. le joint fait par l'agrafe. Ne transportez jamais Des outils de coupe correctement entretenus et de marchandises emballées si les charges aux bords tranchants sont moins susceptibles de semblent déséquilibrées ou mal effectuées. se bloquer et sont plus faciles à... - Página 33 • Si l'appareil a besoin d'être réparé ou a besoin de pièces de rechange, contactez le service clientèle de Uline au 1 800 • Étant donné que les capteurs de détection de 295-5510.
-
Página 34: Système Laser De Guidage De Position
INSTALLATION SUITE • Lors du mouvement descendant de la lame de TRANSPORT DE L'AGRAFEUSE poussée (1), une agrafe (2) est détachée de la Pour éviter tout déclenchement accidentel lors du bande d'agrafes. transport de l'outil, assurez-vous que la poignée est •... -
Página 35: Insertion/Retrait De La Batterie
INSTALLATION SUITE INSERTION/RETRAIT DE LA BATTERIE Branchez le chargeur sur la prise de courant. REMARQUE : Lorsque le voyant à DEL vert Insérez la batterie chargée dans l'agrafeuse. Insérez s'allume, le chargeur est prêt à l'emploi. à fond jusqu'à ce que les boutons de déverrouillage s'engagent dans l'agrafeuse. - Página 36 INSTALLATION SUITE MAN (AGRAFAGE MANUEL) AUTO (AGRAFAGE AUTOMATIQUE) Des agrafes individuelles sont insérées. Un cycle est Plusieurs agrafes peuvent être insérées sur un intervalle lancé après avoir positionné l'agrafeuse sur le carton et prédéfini. Dès que l'agrafeuse est placée sur un carton après avoir actionné...
-
Página 37: Utilisation De L'agrafeuse
FONCTIONNEMENT UTILISATION DE L'AGRAFEUSE VÉRIFICATION DU DEGRÉ DE FERMETURE DES AGRAFES ACTIVATION DE L'AGRAFEUSE À PARTIR DU MODE VEILLE AVERTISSEMENT! Risque de blessure. Ne transportez ou ne déplacez jamais des Pour éviter de décharger inutilement la batterie, l'outil marchandises emballées dont l'agrafage n'a passe en mode d'économie d'énergie (mode veille) pas été... -
Página 38: Programme D'entretien Préventif
FONCTIONNEMENT SUITE RÉGLAGE DE LA LONGUEUR DE PATTE DE REMARQUE : Pour obtenir une longueur de patte d'agrafe de 7/8 po, utilisez le réglage de L'AGRAFE 3/4 po. L'agrafeuse peut être réglée pour une longueur de RÉGLAGE DU DEGRÉ DE FERMETURE DE L'AGRAFE patte d'agrafe de 5/8 po ou 3/4 po. - Página 39 ENTRETIEN SUITE ENTRETIEN RETRAIT/INSTALLATION DU MAGASIN NETTOYAGE/REMPLACEMENT DE LA LAME DE POUSSÉE RETRAIT RÉF. DU Retirez la batterie de l'agrafeuse. PIÈCES REQUISES FABRICANT 2. Appuyez sur les boutons de dégagement rapide (1) Lame de poussée c.561B/c.561B22 164175 sur les côtés gauche et droit de l'agrafeuse et tirez (pièce d'usure) le magasin (2) vers l'arrière, puis vers le bas.
- Página 40 ENTRETIEN SUITE ENTRETIEN NETTOYAGE/REMPLACEMENT DES PINCES 5. Tirez le boîtier arrière (2) vers le bas, puis retirez-le. 6. Retirez les deux vis cylindriques Torx (3) et retirez les RÉF. DU PIÈCES REQUISES pinces (4). FABRICANT Pinces c.561B/a.560B (pièce d'usure) 134340 Changez toujours les deux pinces en même temps.
- Página 41 DÉPANNAGE PROBLÈME CAUSES RECOMMANDATIONS L'indicateur d'état L'agrafe rencontre un obstacle. Assurez-vous qu'il n'y a pas d'obstacles. de l'outil émet des La pince ne parvient pas à Agrafez uniquement des matériaux ondulés pulsations rapides. traverser le carton (trop dur). courants. Aucun agrafage Le dispositif de détection du carton Placez l'outil sur le carton.
-
Página 42: Dépannage (Suite)
Le réglage de fermeture est trop Réglez le degré de fermeture des agrafes lâche. (resserrez); voir page 37. Si la section de dépannage ne peut résoudre le problème, contactez le service à la clientèle de Uline au 1 800 295-5510. DONNÉES TECHNIQUES AGRAFEUSE SPÉCIFICATIONS...