
Manuales relacionados para Electrolux KODDP76K


Resumen de contenidos para Electrolux KODDP76K
- Página 1 KODDP76K KODDP76W Oven User Manual Four Notice d'utilisation Backofen Benutzerinformation Forno Istruzioni per l’uso Horno Manual de instrucciones...
- Página 2 WE’RE THINKING OF YOU Thank you for purchasing an Electrolux appliance. You’ve chosen a product that brings with it decades of professional experience and innovation. Ingenious and stylish, it has been designed with you in mind. So whenever you use it, you can be safe in the knowledge that you’ll get great results every time.
- Página 3 SAFETY INFORMATION 7. DAILY USE..........13 12. CARE AND CLEANING......29 7.1 How to set: Heating functions..14 12.1 Notes on cleaning......29 7.2 Heating functions......14 12.2 How to clean: Cavity 7.3 Notes on: Moist Fan Baking...16 embossment........30 7.4 How to set: Assisted Cooking..16 12.3 How to remove: Shelf supports ...30 7.5 Assisted Cooking......
- Página 4 SAFETY INFORMATION Children should be supervised to ensure that they do not • play with the appliance. Keep all packaging away from children and dispose of it • appropriately. WARNING: The appliance and its accessible parts become • hot during use. Keep children and pets away from the appliance when in use and when cooling down.
- Página 5 SAFETY INSTRUCTIONS Always use oven gloves to remove or insert accessories or • ovenware. To remove the shelf supports first pull the front of the shelf • support and then the rear end away from the side walls. Install the shelf supports in the opposite sequence. Do not use a steam cleaner to clean the appliance.
- Página 6 SAFETY INSTRUCTIONS Width of the back of the appliance 559 mm Depth of the appliance 569 mm Built in depth of the appliance 548 mm Depth with open door 1022 mm Ventilation opening minimum size. Opening placed 560x20 mm on the bottom rear side Mains supply cable length.
- Página 7 SAFETY INSTRUCTIONS Cable types applicable for installation or replacement for Europe: H07 RN-F, H05 RN-F, H05 RRF, H05 VV-F, H05 V2V2-F (T90), H05 BB-F For the section of the cable refer to the total power on the rating plate. You can also refer to the table: Total power (W) Section of the cable (mm²)
- Página 8 SAFETY INSTRUCTIONS • Discoloration of the enamel or stainless steel has no effect on the performance of the appliance. • Use a deep pan for moist cakes. Fruit juices cause stains that can be permanent. • Always cook with the appliance door closed. •...
- Página 9 • Cut off the mains electrical cable close to the appliance and dispose of it. • Remove the door catch to prevent children or pets from becoming trapped in the appliance. 3. INSTALLATION WARNING! Refer to Safety chapters. 3.1 Building in www.youtube.com/electrolux www.youtube.com/aeg How to install your AEG/Electrolux Oven - Column installation 9/200...
- Página 10 INSTALLATION (*mm) min. 550 min. 560 ±1 (*mm) min. 550 min. 560 ±1 3.2 Securing the oven to the cabinet 10/200...
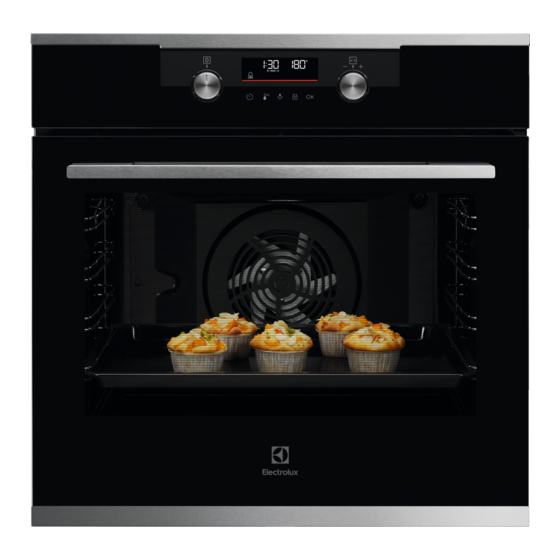
- Página 11 PRODUCT DESCRIPTION 4. PRODUCT DESCRIPTION 4.1 General overview Control panel Knob for the heating functions Display Control knob Heating element Lamp Cavity embossment Shelf support, removable Shelf positions 4.2 Accessories • Wire shelf For cookware, cake tins, roasts. • Baking tray For cakes and biscuits.
- Página 12 HOW TO TURN OVEN ON AND OFF 5.2 Control panel Control panel sensor fields Press Turn the knob Fast Heat Timer Light Lock Select a heating function to turn on the oven. Turn the knob for the heating functions to the off position to turn the oven off. When the knob for the heating functions is in the off position, the display goes to standby.
- Página 13 BEFORE FIRST USE Steam cooking indicator 6. BEFORE FIRST USE WARNING! Refer to Safety chapters. 6.1 Initial cleaning Before the first use clean the empty oven and set the time: 00:00 Set the time. Press 6.2 Initial preheating Preheat the empty oven before the first use. Step 1 Remove all accessories and removable shelf supports from the oven.
- Página 14 DAILY USE 7.1 How to set: Heating functions Start cooking Step 1 Step 2 Set a heating function. Set the temperature. Steam cooking Make sure that the oven is cold. Step 1 Step 2 Step 3 Step 4 Preheat the empty oven for 10 min to create humidity.
- Página 15 DAILY USE Standard heating functions Heating function Application To bake on up to three shelf positions at the same time and to dry food. Set the temperature 20 - 40 °C lower than for Conventional Cooking. True Fan Cooking To bake and roast food on one shelf position. Conventional Cooking To add humidity during the cooking.
- Página 16 DAILY USE Heating function Application To enter the Menu: Assisted Cooking, Cleaning, Settings. Menu 7.3 Notes on: Moist Fan Baking This function was used to comply with the energy efficiency class and ecodesign requirements according to EU 65/2014 and EU 66/2014. Tests according to EN 60350-1. The oven door should be closed during cooking so that the function is not interrupted and the oven operates with the highest energy efficiency possible.
- Página 17 DAILY USE Legend Shelf level. When the function ends check if the food is ready. Dish Weight Shelf level / Accessory Duration time Beef Roast Beef, 40 min rare 1 - 1,5 kg; 4 2; baking tray Roast Beef, - 5 cm thick 50 min Fry the meat for a few minutes on a hot medium...
- Página 18 DAILY USE Dish Weight Shelf level / Accessory Duration time Fillet, rare 75 min (slow cooking) 2; baking tray 0,5 - 1,5 kg; Use your favourite spices or simply salt Fillet, medium 5 - 6 cm 90 min and fresh grounded pepper. Fry the meat (slow cooking) thick pieces for a few minutes on a hot pan.
- Página 19 DAILY USE Dish Weight Shelf level / Accessory Duration time Poultry Whole chick‐ 1 - 1,5 kg; 60 min 200 ml; casserole dish on fresh baking tray Use your favourite spices. Turn the chicken after half of the cooking time to get an even browning.
- Página 20 DAILY USE Dish Weight Shelf level / Accessory Duration time Fish fillet 20 min 3; casserole dish on wire shelf Use your favourite spices. Sweet baking / desserts Cheesecake 90 min 28 cm springform tin on wire shelf Apple cake 60 min 100 - 150 ml;...
- Página 21 DAILY USE Dish Weight Shelf level / Accessory Duration time Croquets, fro‐ 0,5 kg 25 min 3; baking tray Pommes, fro‐ 0,75 kg 25 min 3; baking tray Gratins, bread and pizza Meat / vegeta‐ 1 - 1,5 kg 45 min 2;...
- Página 22 CLOCK FUNCTIONS 8. CLOCK FUNCTIONS 8.1 Clock functions Clock Function Application Minute minder. When the timer ends, the signal sounds. Cooking time. When the timer ends, the signal sounds and the heating function stops. Time Delay. To postpone the start and / or end of cooking. Uptimer.
- Página 23 HOW TO USE: ACCESSORIES How to set: Cooking time Step 1 Step 2 Step 3 Step 4 The display shows: 0:00 Choose a heating Press repeated‐ Set the cooking function and set Press: time. the temperature. Timer starts counting down immediately. How to set: Time Delay Step 1 Step 2...
- Página 24 ADDITIONAL FUNCTIONS Wire shelf: Push the shelf between the guide bars of the shelf support and make sure that the feet point down. Baking tray / Deep pan: Push the tray between the guide bars of the shelf support. Wire shelf, Baking tray / Deep pan: Push the tray between the guide bars of the shelf support and the wire shelf on the guide bars above.
- Página 25 HINTS AND TIPS This function prevents an accidental change of the oven function. - press and hold to turn on - press and hold to turn it off. the function. A signal sounds. - flashes when the lock is turned on. 10.2 Automatic switch-off For safety reasons the oven turns off after some time, if a heating function works and you do not change any settings.
- Página 26 HINTS AND TIPS (°C) (min) Rolls, 9 pieces baking tray or dripping 30 - 40 Pizza, frozen, wire shelf 10 - 15 0.35 kg Swiss Roll baking tray or dripping 25 - 35 Brownie baking tray or dripping 25 - 30 Soufflè, 6 pieces ceramic ramekins on 25 - 30...
- Página 27 HINTS AND TIPS (°C) (min) Savory pastry, 20 baking tray or dripping 25 - 30 pieces Short crust bis‐ baking tray or dripping 25 - 35 cuits, 20 pieces Tartlets, 8 pieces baking tray or dripping 20 - 30 Vegetables, baking tray or dripping 35 - 45 poached, 0.4 kg...
- Página 28 HINTS AND TIPS (°C) (min) Small Conven‐ Baking 20 - 30 cakes, tional tray 20 per Cooking tray Small True Fan Baking 150 - 20 - 35 cakes, Cooking tray 20 per tray Small True Fan Baking 2 and 4 150 - 20 - 35 cakes,...
- Página 29 CARE AND CLEANING (°C) (min) Short True Fan Baking 140 - 20 - 40 bread Cooking tray Short True Fan Baking 2 and 4 140 - 25 - 45 bread Cooking tray Short Conven‐ Baking 140 - 25 - 45 bread tional tray...
- Página 30 CARE AND CLEANING Clean the cavity after each use. Fat accumulation or other residue may cause fire. Moisture can condense in the oven or on the door glass panels. To decrease the condensation, let the oven work for 10 minutes before cooking. Do not store the food in the oven for longer than 20 minutes.
- Página 31 CARE AND CLEANING Step 3 Pull the rear end of the shelf support away from the side wall and remove it. Step 4 Install the shelf supports in the opposite sequence. The retaining pins on the tele‐ scopic runners must point to the front.
- Página 32 CARE AND CLEANING Pyrolytic Cleaning During the cleaning the oven lamp is off. When the oven is at the set temperature, the door locks. Until the door unlocks the display shows: When the cleaning ends: Turn off the oven and wait Clean the cavity with a soft Remove the residue from the until it is cold.
- Página 33 CARE AND CLEANING Step 3 Find the hinge to the left side of the door. Step 4 Lift and turn the lever fully on the left hinge. Step 5 Close the oven door halfway to the first opening position. Then lift and pull forward and remove the door from its seat.
- Página 34 CARE AND CLEANING Make sure that you put the glass panels (A and B) back in the correct sequence. Check for the symbol / printing on the side of the glass panel, each of the glass panels looks different to make the disassembly and as‐ sembly easier.
- Página 35 TROUBLESHOOTING 13. TROUBLESHOOTING WARNING! Refer to Safety chapters. 13.1 What to do if... In any cases not included in this table please contact with an Authorised Service Centre. The oven does not turn on or does not heat up Problem Check if...
- Página 36 ......... Serial number (S.N.) ......... 14. ENERGY EFFICIENCY 14.1 Product Information and Product Information Sheet* Supplier's name Electrolux KODDP76K 949499655 Model identification KODDP76W 949499654 Energy Efficiency Index 81.2 Energy efficiency class Energy consumption with a standard load, conventional 0.93 kWh/cycle...
- Página 37 Heat source Electricity Volume 72 l Type of oven Built-In Oven KODDP76K 31.9 kg Mass KODDP76W 31.9 kg * For European Union according to EU Regulations 65/2014 and 66/2014. For Republic of Belarus according to STB 2478-2017, Appendix G; STB 2477-2017, Annexes A and B.
- Página 38 MENU STRUCTURE Moist Fan Baking Function designed to save energy during cooking. When you use this function the lamp automatically turns off after 30 sec. You may turn on the lamp again but this action will reduce the expected energy savings. 15.
- Página 39 MENU STRUCTURE 16. ENVIRONMENTAL CONCERNS Recycle materials with the symbol . Put the packaging in relevant containers to recycle it. Help protect the environment and human health by recycling waste of electrical and electronic appliances. Do not dispose of appliances marked with the symbol with the household waste.
- Página 40 TABLE DES MATIÈRES NOUS PENSONS À VOUS Merci d’avoir choisi un appareil Electrolux. Vous avez choisi un produit qui bénéficie de décennies d'expérience professionnelle et d'innovation. Ingénieux et élégant, il a été pensé pour vous. C'est la raison pour laquelle vous pouvez avoir la certitude d'obtenir d'excellents résultats à...
- Página 41 INFORMATION SUR LA SÉCURITÉ 5. COMMENT ALLUMER ET ÉTEINDRE LE 11.2 Circulation d'air humide - FOUR............. 50 accessoires recommandés....67 11.3 Tableaux de cuisson pour les 5.1 Manettes rétractables....50 instituts de tests........67 5.2 Bandeau de commande....51 12. ENTRETIEN ET NETTOYAGE....69 6.
- Página 42 INFORMATION SUR LA SÉCURITÉ 1.1 Sécurité des enfants et des personnes vulnérables Cet appareil peut être utilisé par des enfants âgés d'au • moins 8 ans et par des personnes ayant des capacités physiques, sensorielles ou mentales réduites ou dénuées d’expérience ou de connaissance, s'ils sont correctement surveillés ou si des instructions relatives à...
- Página 43 CONSIGNES DE SÉCURITÉ Cet appareil doit être installé et le câble remplacé • uniquement par un professionnel qualifié. N'utilisez pas l'appareil avant de l'avoir installé dans la • structure encastrée. Débranchez l'appareil de l'alimentation électrique avant • toute opération d'entretien. Si le câble d’alimentation secteur est endommagé, son •...
- Página 44 CONSIGNES DE SÉCURITÉ • Soyez toujours vigilants lorsque vous déplacez l'appareil car il est lourd. Utilisez toujours des gants de sécurité et des chaussures fermées. • Ne tirez jamais l'appareil par la poignée. • Installez l'appareil dans un lieu sûr et adapté répondant aux exigences d'installation. •...
- Página 45 CONSIGNES DE SÉCURITÉ • Utilisez toujours une prise de courant de sécurité correctement installée. • N'utilisez pas d'adaptateurs multiprise et de rallonges. • Veillez à ne pas endommager la fiche secteur ni le câble d'alimentation. Le remplacement du câble d’alimentation de l’appareil doit être effectué par notre service après-vente agréé. •...
- Página 46 CONSIGNES DE SÉCURITÉ • Éteignez l'appareil après chaque utilisation. • Soyez prudent lors de l'ouverture de la porte de l'appareil lorsque celui-ci fonctionne. De l'air chaud peut se dégager. • N'utilisez pas l'appareil avec des mains mouillées ou en contact avec de l'eau. •...
- Página 47 CONSIGNES DE SÉCURITÉ • Si vous utilisez un spray pour four, suivez les consignes de sécurité figurant sur son emballage. 2.5 Nettoyage par pyrolyse AVERTISSEMENT! Risque de blessures, d'incendie, d'émissions chimiques (fumées) en mode pyrolyse. • Avant d'utiliser la fonction de nettoyage par pyrolyse ou la fonction Première utilisation, retirez de la cavité...
- Página 48 • Retirez le dispositif de verrouillage du hublot pour empêcher les jeunes et les animaux de s'enfermer dans l'appareil. 3. INSTALLATION AVERTISSEMENT! Reportez-vous aux chapitres concernant la sécurité. 3.1 Encastrement www.youtube.com/electrolux www.youtube.com/aeg How to install your AEG/Electrolux Oven - Column installation (*mm) min. 550 min. 560 ±1 48/200...
- Página 49 INSTALLATION (*mm) min. 550 min. 560 ±1 3.2 Fixation du four au meuble 49/200...
- Página 50 DESCRIPTION DE L'APPAREIL 4. DESCRIPTION DE L'APPAREIL 4.1 Vue d’ensemble Bandeau de commande Manette de sélection des modes de cuisson Affichage Manette de commande Résistance Éclairage Chaleur tournante Bac de la cavité Support de grille, amovible Niveaux de la grille 4.2 Accessoires •...
- Página 51 COMMENT ALLUMER ET ÉTEINDRE LE FOUR 5.2 Bandeau de commande Appuyez sur la Tournez la ma‐ Touches tactiles du bandeau de commande touche nette Préchauf‐ Eclai‐ Touches Minuteur fage rapi‐ rage Verrouil four Sélectionnez un mode de cuisson pour allumer le four. Tournez la manette des modes de cuisson sur la position Arrêt pour éteindre le four.
- Página 52 AVANT LA PREMIÈRE UTILISATION Voyant de cuisson à la vapeur 6. AVANT LA PREMIÈRE UTILISATION AVERTISSEMENT! Reportez-vous aux chapitres concernant la sécurité. 6.1 Nettoyage initial Avant la première utilisation, nettoyez le four à vide et réglez la durée : 0:00. Réglez l’heure.
- Página 53 UTILISATION QUOTIDIENNE 7.1 Comment régler : Modes de cuisson Pour lancer la cuisson Étape 1 Étape 2 Sélectionnez un mode de cuisson. Réglez la température. Cuisson à la vapeur Assurez-vous que le four est froid. Étape 1 Étape 2 Étape 3 Étape 4 Préchauffez le four à...
- Página 54 UTILISATION QUOTIDIENNE Modes de cuisson standard Mode de cuisson Application Pour faire cuire sur 3 niveaux en même temps et pour sécher des ali‐ ments. Diminuez les températures de 20 à 40 °C par rapport à la Chauffa‐ ge Haut/Bas. Chaleur tournante Pour cuire et rôtir des aliments sur un seul niveau.
- Página 55 UTILISATION QUOTIDIENNE Mode de cuisson Application Pour accéder au menu : Cuisson assistée, Nettoyage, Configurations. Menu 7.3 Remarques sur : Circulation d'air humide Cette fonction était utilisée pour se conformer à la classe d'efficacité énergétique et aux exigences Ecodesign selon les normes EU 65/2014 et UE 66/2014. Tests conformément à la norme EN 60350-1.
- Página 56 UTILISATION QUOTIDIENNE 7.5 Cuisson assistée Légende Poids automatique disponible. La quantité d’eau pour la fonction vapeur. Préchauffez le four avant de commencer la cuisson. Niveau de grille. Lorsque la fonction se termine, vérifiez si les aliments sont prêts. Plat Poids Niveau/Accessoire Durée Bœuf...
- Página 57 UTILISATION QUOTIDIENNE Plat Poids Niveau/Accessoire Durée Rôti de bœuf, saignant 75 min (cuisson basse température) 2 ; plateau de cuisson Rôti de bœuf, Servez-vous de vos épices préférées ou 1 - 1,5 kg ; 4 à point (cuis‐ simplement du sel et du poivre fraîche‐ - 5 cm 85 min son basse...
- Página 58 UTILISATION QUOTIDIENNE Plat Poids Niveau/Accessoire Durée Longe, fraî‐ 1 - 1,5 kg ; 5 55 min 2 ; plat à rôtir sur grille métallique - 6 cm Utilisez vos épices préférées. d’épaisseur Travers 2 - 3 kg ; 90 min 3 plat profond crus, 2 - Ajoutez du liquide pour recouvrir le fond...
- Página 59 UTILISATION QUOTIDIENNE Plat Poids Niveau/Accessoire Durée Oie entière 4 - 5 kg 110 min 2 ; plat profond Utilisez vos épices préférées. Placez la viande sur un plateau de cuisson pro‐ fond. Retournez l’oie à la moitié du temps de cuisson. Autres Rôti haché...
- Página 60 UTILISATION QUOTIDIENNE Plat Poids Niveau/Accessoire Durée Quatre-quarts 50 min 2 ; moule quatre-quarts sur grille mé‐ tallique Légumes/Garnitures Pommes de 1 kg 50 min 2 ; plateau de cuisson terre au four Placez les pommes de terre entières avec la peau sur un plateau de cuisson. Quartiers 1 kg 35 min...
- Página 61 FONCTIONS DE L'HORLOGE Plat Poids Niveau/Accessoire Durée Pizza fraîche, 25 min 2 ; plateau de cuisson recouvert épaisse de papier sulfurisé Quiche 45 min 2 ; plat de cuisson sur grille métalli‐ Baguette/ 0,8 kg 30 min 150 ml ; plateau de cuis‐ Ciabatta/Pain son recouvert de papier sulfurisé...
- Página 62 FONCTIONS DE L'HORLOGE Comment régler Heure actuelle Pour modifier l'heure actuelle, accédez au menu et sélectionnez Configurations, Heu‐ Réglez l’horloge. Appuyez sur re actuelle. Comment régler Minuteur Étape 1 Étape 2 Étape 3 L’affichage indique : 0:00 Réglez la Minuteur Appuyez sur : Appuyez sur Le minuteur commence son décompte immédiatement.
- Página 63 CONSEILS D'UTILISATION : ACCESSOIRES Comment régler Départ différé Étape 1 Étape 2 Étape 3 Étape 4 Étape 5 Étape 6 L'affi‐ chage L’affi‐ indi‐ chage que : indique : l'heure --:-- actuelle Sélec‐ AR‐ Appuyez à Réglez DÉ‐ tionnez Réglez RÊTER plusieurs Appuyez...
- Página 64 FONCTIONS SUPPLÉMENTAIRES Plateau de cuisson / Plat à rôtir: Poussez la plaque entre les rails du sup‐ port de grille. Grille métallique, Plateau de cuisson / Plat à rôtir: Poussez la plaque entre les rails du sup‐ port de grille et glissez la grille métallique entre les rails se trouvant juste au-dessus.
- Página 65 CONSEILS (°C) 30 - 115 12.5 120 - 195 200 - 245 250 -maximum L'arrêt automatique ne fonctionne pas avec les fonctions : Eclairage four, Départ différé. 10.3 Ventilateur de refroidissement Lorsque le four fonctionne, le ventilateur de refroidissement se met automatiquement en marche pour refroidir les surfaces du four.
- Página 66 CONSEILS (°C) (min) Fond de tarte en moule à tarte sur une 15 - 25 génoise grille métallique Gâteau à étages Plat de cuisson sur la 40 - 50 grille métallique Poisson poché, Plateau de cuisson ou 20 - 25 0,3 kg plat à...
- Página 67 CONSEILS (°C) (min) Omelette végéta‐ plaque à pizza sur la gril‐ 25 - 30 rienne le métallique Légumes médi‐ Plateau de cuisson ou 25 - 30 terranéens, 0,7 plat à rôtir 11.2 Circulation d'air humide - accessoires recommandés Utilisez les moules et récipients foncés et non réfléchissants. Ils offrent une meilleure absorption de la chaleur que les plats réfléchissants de couleur claire.
- Página 68 CONSEILS (°C) (min) Petits Chaleur Plateau 150 - 20 - 35 gâteaux, tournante de cuis‐ 20 par plateau Petits Chaleur Plateau 2 et 4 150 - 20 - 35 gâteaux, tournante de cuis‐ 20 par plateau Tarte Chauffage Grille mé‐ 70 - 90 Haut/Bas tallique...
- Página 69 ENTRETIEN ET NETTOYAGE (°C) (min) Sablé Chaleur Plateau 140 - 20 - 40 tournante de cuis‐ Sablé Chaleur Plateau 2 et 4 140 - 25 - 45 tournante de cuis‐ Sablé Chauffage Plateau 140 - 25 - 45 Haut/Bas de cuis‐ Pain Gril Grille mé‐...
- Página 70 ENTRETIEN ET NETTOYAGE 12.1 Remarques concernant l'entretien Nettoyez la façade du four avec un chiffon doux, de l’eau tiède et un détergent doux. Utilisez une solution de nettoyage pour nettoyer les surfaces métalliques. Agents net‐ Nettoyez les taches avec un détergent doux. toyants Nettoyez la cavité...
- Página 71 ENTRETIEN ET NETTOYAGE Étape 1 Éteignez le four et attendez qu’il soit froid. Étape 2 Écartez l'avant du support de grille de la paroi latérale. Étape 3 Écartez l'arrière du support de grille de la paroi latérale et reti‐ rez-le. Étape 4 Installez les supports de grille dans l'ordre inverse.
- Página 72 ENTRETIEN ET NETTOYAGE Nettoyage par pyrolyse C3 - Nettoyage complet 2 h 30 min Étape 2 - appuyez pour définir le programme de nettoyage. Étape 3 - appuyez pour démarrer le nettoyage. Étape 4 Après le nettoyage, tournez la manette des modes de cuisson sur la position Arrêt.
- Página 73 ENTRETIEN ET NETTOYAGE Étape 1 Ouvrez la porte en grand et identifiez la charnière située à droite de la por‐ Étape 2 Servez-vous d'un tournevis pour sou‐ lever et faire pivoter le levier de la charnière droite. Étape 3 Identifiez la charnière à gauche de la porte.
- Página 74 ENTRETIEN ET NETTOYAGE Éta‐ Nettoyez les panneaux de verre avec pe 10 de l'eau savonneuse. Séchez soi‐ gneusement les panneaux de verre. Ne nettoyez pas les panneaux de ver‐ re au lave-vaisselle. Éta‐ Après le nettoyage, installez les pan‐ pe 11 neaux de verre et la porte du four.
- Página 75 DÉPANNAGE Lampe arrière Étape 1 Tournez le diffuseur en verre pour le retirer. Étape 2 Nettoyez le diffuseur en verre. Étape 3 Remplacez l’ampoule par une ampoule adéquate résistant à une température de 300 °C. Étape 4 Installez le diffuseur en verre. 13.
- Página 76 DÉPANNAGE Codes d'erreur L’affichage indique… Vérifiez si... Err C3 La porte du four est fermée ou le verrouillage de la porte n’est pas cassé. Err F102 La porte du four est fermée. Err F102 Le verrouillage de la porte n’est pas cassé. 00:00 Une coupure de courant s’est produite.
- Página 77 RENDEMENT ÉNERGÉTIQUE 14. RENDEMENT ÉNERGÉTIQUE 14.1 Informations produit et fiche d’informations produit* Nom du fournisseur Electrolux KODDP76K 949499655 Identification du modèle KODDP76W 949499654 Indice d’efficacité énergétique 81.2 Classe d’efficacité énergétique Consommation d’énergie avec charge standard, en mode 0.93 kWh/cycle conventionnel Consommation d’énergie avec charge standard, en mode...
- Página 78 STRUCTURE DES MENUS Lorsque le four est en marche, assurez-vous que la porte est bien fermée. Évitez d'ouvrir la porte trop souvent pendant la cuisson. Nettoyez régulièrement le joint de porte et assurez-vous qu’il est bien en place. Utilisez des plats en métal pour accroître les économies d'énergie. Dans la mesure du possible, ne préchauffez pas le four avant la cuisson.
- Página 79 STRUCTURE DES MENUS Ajustez la valeur Sélectionnez le Confirmez la Sélectionnez la Confirmez la et appuyez sur Menu , Configu‐ configuration. configuration. configuration. rations. Configurations Heure actuelle Modifier Affichage Luminosi‐ 1 - 5 té Son touches 1 - Bip Volume alarme 1 - 4 2 - Clic 3 - Son dés‐...
- Página 80 INHALTSVERZEICHNIS WIR DENKEN AN SIE Vielen Dank für Ihren Kauf eines Electrolux-Geräts. Sie haben ein Produkt gewählt, das jahrzehntelange professionelle Erfahrung und Innovation mit sich bringt. Das ausgeklügelte und stilvolle Produkt wurde für Sie entwickelt. So können Sie jedes Mal, wenn Sie das Produkt verwenden, sicher sein, dass Sie großartige Ergebnisse erzielen werden.
- Página 81 SICHERHEITSHINWEISE 5. EIN- UND AUSSCHALTEN DES 11.2 Feuchte Umluft - BACKOFENS..........90 Empfohlenes Zubehör....... 107 11.3 Gartabellen für Prüfinstitute..107 5.1 Versenkbare Knöpfe...... 90 5.2 Bedienfeld........91 12. REINIGUNG UND PFLEGE....109 6. VOR DER ERSTEN VERWENDUNG..92 12.1 Hinweise zur Reinigung..... 109 12.2 Reinigung: Garraumvertiefung...110 6.1 Erste Reinigung......
- Página 82 SICHERHEITSHINWEISE Wissen benutzt werden, wenn sie durch eine für ihre Sicherheit zuständige Person beaufsichtigt werden oder von dieser Person Anweisungen erhalten haben, wie das Gerät sicher zu bedienen ist und welche Gefahren bei nicht ordnungsgemäßer Bedienung bestehen. Kinder unter 8 Jahren und Personen mit schweren Behinderungen oder Mehrfachbehinderung sollten vom Gerät ferngehalten werden, wenn sie nicht ständig beaufsichtigt werden.
- Página 83 SICHERHEITSANWEISUNGEN Vor Wartungsarbeiten ist das Gerät von der elektrischen • Stromversorgung zu trennen. Wenn das Netzkabel beschädigt ist, muss es vom • Hersteller, seinem autorisierten Kundenservice oder einer gleichermaßen qualifizierten Person ausgetauscht werden, um Gefahren durch elektrischen Strom zu vermeiden. WARNUNG: Vergewissern Sie sich, dass das Gerät •...
- Página 84 SICHERHEITSANWEISUNGEN • Ziehen Sie das Gerät nicht am Griff. • Montieren Sie das Gerät an einem sicheren und geeigneten Ort, der den Montageanforderungen entspricht. • Die Mindestabstände zu anderen Geräten und Küchenmöbeln sind einzuhalten. • Überprüfen Sie vor der Montage des Gerätes, ob sich die Ofentür ohne Kraftanwendung öffnen lässt.
- Página 85 SICHERHEITSANWEISUNGEN • Schließen Sie das Gerät nur an eine ordnungsgemäß installierte Schutzkontaktsteckdose • Verwenden Sie keine Mehrfachsteckdosen oder Verlängerungskabel. • Achten Sie darauf, Netzstecker und Netzkabel nicht zu beschädigen. Falls das Netzkabel des Geräts ersetzt werden muss, lassen Sie diese Arbeit durch unseren autorisierten Kundendienst durchführen.
- Página 86 SICHERHEITSANWEISUNGEN • Vergewissern Sie sich, dass die Lüftungsöffnungen nicht blockiert sind. • Lassen Sie das Gerät während des Betriebs nicht unbeaufsichtigt. • Schalten Sie das Gerät nach jedem Gebrauch aus. • Gehen Sie beim Öffnen der Tür vorsichtig vor, wenn das Gerät in Betrieb ist. Es kann heiße Luft freigesetzt werden.
- Página 87 SICHERHEITSANWEISUNGEN • Reinigen Sie das Geräts mit einem weichen, feuchten Tuch. Verwenden Sie ausschließlich Neutralreiniger. Benutzen Sie keine Scheuermittel, scheuernde Reinigungsschwämmchen, Lösungsmittel oder Metallgegenstände. • Falls Sie ein Backofenspray verwenden, befolgen Sie die Sicherheitsanweisungen auf seiner Verpackung. 2.5 Pyrolysereinigung WARNUNG! Im Pyrolyse-Modus besteht Verletzungs- und Brandgefahr und es können chemische Emissionen (Dämpfe) austreten.
- Página 88 • Entfernen Sie das Türschloss, um zu verhindern, dass sich Kinder, oder Haustiere im Gerät einschließen. 3. MONTAGE WARNUNG! Siehe Kapitel Sicherheitshinweise. 3.1 Montage www.youtube.com/electrolux www.youtube.com/aeg How to install your AEG/Electrolux Oven - Column installation (*mm) min. 550 min. 560 ±1 88/200...
- Página 89 MONTAGE (*mm) min. 550 min. 560 ±1 3.2 Befestigung des Ofens am Möbel 89/200...
- Página 90 GERÄTEBESCHREIBUNG 4. GERÄTEBESCHREIBUNG 4.1 Gesamtansicht Bedienfeld Einstellknopf für die Ofenfunktionen Display Einstellknopf Heizelement Lampe Ventilator Garraumvertiefung Einschubschienen, herausnehmbar Einschubebenen 4.2 Zubehör • Kombirost Für Kochgeschirr, Kuchenformen, Braten. • Backblech Für Kuchen und Plätzchen. • Brat- und Fettpfanne Zum Backen und Braten oder als Pfanne zum Aufsammeln von Fett. •...
- Página 91 EIN- UND AUSSCHALTEN DES BACKOFENS 5.2 Bedienfeld Drehen Sie Sensorfelder des Bedienfelds Drücken Sie den Knopf Back‐ Schnell‐ ofen‐ Kurzzeit‐ aufhei‐ be‐ Verriegelung wecker zung leuch‐ tung Wählen Sie eine Ofenfunktion, um den Backofen einzuschalten. Drehen Sie den Knopf für die Ofenfunktionen in die Aus-Position, um den Backofen auszuschal‐ ten.
- Página 92 VOR DER ERSTEN VERWENDUNG Fortschrittsbalken - für Temperatur oder Zeit. Dampfgaranzeige 6. VOR DER ERSTEN VERWENDUNG WARNUNG! Siehe Kapitel Sicherheitshinweise. 6.1 Erste Reinigung Reinigen Sie den leeren Backofen vor der ersten Inbetriebnahme und stellen Sie die Uhrzeit ein: 00:00 Stellen Sie die Zeit ein. Drücken Sie 6.2 Erstes Vorheizen Heizen Sie den leeren Ofen vor der ersten Inbetriebnahme vor.
- Página 93 TÄGLICHER GEBRAUCH 7.1 Einstellung: Ofenfunktionen Beginnen Sie mit dem Kochen Schritt 1 Schritt 2 Stellen Sie eine Backofenfunktion ein. Stellen Sie die Temperatur ein. Garen mit Dampf Vergewissern Sie sich, dass der Ofen abgekühlt ist. Schritt 1 Schritt 2 Schritt 3 Schritt 4 Heizen Sie den leeren Backofen 10...
- Página 94 TÄGLICHER GEBRAUCH Standard-Ofenfunktionen Ofenfunktion Gerät Zum Backen auf bis zu drei Einschubebenen gleichzeitig und zum Dörren von Lebensmitteln. Stellen Sie eine 20 - 40 °C niedrigere Backofentempe‐ ratur als bei Ober-/Unterhitze ein. Heißluft Zum Backen und Braten von Speisen auf einer Einschubebene. Ober-/Unterhitze Zum Hinzufügen von Feuchtigkeit beim Garen.
- Página 95 TÄGLICHER GEBRAUCH Ofenfunktion Gerät Aufrufen des Menüs: Koch-Assistent, Reinigung, Einstellungen. Menü 7.3 Hinweise zu: Feuchte Umluft Diese Funktion wurde zur Bestimmung der Energieeffizienzklasse und den Anforderungen an die umweltgerechte Gestaltung EU 65/2014 und EU 66/2014 verwendet. Tests nach EN 60350-1. Die Backofentür sollte während des Garvorgangs geschlossen bleiben, damit die Funktion nicht unterbrochen wird.
- Página 96 TÄGLICHER GEBRAUCH 7.5 Koch-Assistent Legende Gewichtsautomatik verfügbar. Die Wassermenge für die Dampffunktion. Heizen Sie den Backofen vor, bevor Sie mit dem Kochen beginnen. Einschubebene. Wenn die Funktion beendet ist, prüfen Sie, ob das Gericht fertig ist. Speise Gewicht Einschubebene / Zubehör Dauer Rindfleisch Roastbeef,...
- Página 97 TÄGLICHER GEBRAUCH Speise Gewicht Einschubebene / Zubehör Dauer Roastbeef, blutig (Nieder‐ 75 Min. temperatur- Garen) 2; Backblech Verwenden Sie Ihre Lieblingsgewürze Roastbeef, ro‐ 1 - 1,5 kg; 4 oder einfach Salz und frisch gemahlenen sa (Niedertem‐ - 5 cm dicke 85 Min.
- Página 98 TÄGLICHER GEBRAUCH Speise Gewicht Einschubebene / Zubehör Dauer Lende, frisch 1 - 1,5 kg; 5 55 Min. 2; Bräter auf Kombirost - 6 cm dicke Verwenden Sie Ihre Lieblingsgewürze. Stücke Rippchen 2 - 3 kg; ver‐ 90 Min. 3; tiefe Pfanne wenden Sie Flüssigkeit hinzufügen, um den Boden rohe, 2 - 3...
- Página 99 TÄGLICHER GEBRAUCH Speise Gewicht Einschubebene / Zubehör Dauer Ente, ganz 2 - 3 kg 100 Min. 2; Bräter auf Kombirost Verwenden Sie Ihre Lieblingsgewürze. Legen Sie das Fleisch in den Bräter. Die Ente nach der Hälfte der Garzeit wen‐ den. Gans, ganz 4 - 5 kg 110 Min.
- Página 100 TÄGLICHER GEBRAUCH Speise Gewicht Einschubebene / Zubehör Dauer Schokoladen‐ 30 Min. 100 - 150 ml; Muffin-Blech auf muffins Kombirost Brotkuchen 50 Min. 2; Brotpfanne auf Kombirost Gemüse / Beilagen Ofenkartof‐ 1 kg 50 Min. 2; Backblech feln Die ganzen Kartoffeln mit der Haut auf das Backblech geben.
- Página 101 UHRFUNKTIONEN Speise Gewicht Einschubebene / Zubehör Dauer Pizza frisch, 25 Min. 2; Backblech mit Backpapier aus‐ dick gekleidet Quiche 45 Min. 2; Backform auf Kombirost Baguette/ 0,8 kg 30 Min. 150 ml; Backblech mit Ciabatta/ Backpapier ausgekleidet Weißbrot Für Weißbrot mehr Zeit nötig. Alle Getreide/ 1 kg 45 Min.
- Página 102 UHRFUNKTIONEN Einstellung: Uhrzeit Um die Uhrzeit zu ändern, rufen Sie das Stellen Sie die Uhrzeit Menü auf und wählen Sie Einstellungen, Drücken Sie: ein. Tageszeit. Einstellung: Kurzzeit-Wecker Schritt 1 Schritt 2 Schritt 3 Im Display wird Folgen‐ des ange‐ zeigt: 0:00 ange‐...
- Página 103 VERWENDUNG: ZUBEHÖR Einstellung: Zeitvorwahl Schritt Schritt 2 Schritt 3 Schritt 4 Schritt 5 Schritt 6 Im Dis‐ play wird Display Folgen‐ zeigt des an‐ die Uhr‐ gezeigt: zeit an --:-- Wählen Drücken Stellen Stellen Sie die START Sie wie‐ Drücken Drücken Sie die Sie die...
- Página 104 ZUSATZFUNKTIONEN Backblech / Auflaufpfanne: Schieben Sie das Backblech zwischen die Führungsstäbe der Einhängegitter. Kombirost, Backblech / Auflaufpfanne: Schieben Sie das Backblech zwischen die Führungsstäbe der Einhängegitter und dem Kombirost auf die Führungsstäbe da‐ rüber. 10. ZUSATZFUNKTIONEN 10.1 Verriegelung Diese Funktion verhindert ein versehentliches Verstellen der Ofenfunktion. Einschalten, wenn der Backofen in Betrieb ist –...
- Página 105 TIPPS UND HINWEISE (°C) (Std.) 30 - 115 12.5 120 - 195 200 - 245 250 - max. Die Abschaltautomatik funktioniert nicht mit den Funktionen: Backofenbeleuchtung, Zeitvorwahl. 10.3 Kühlgebläse Wenn der Backofen in Betrieb ist, wird das Kühlgebläse automatisch eingeschaltet, um die Ofenoberflächen zu kühlen.
- Página 106 TIPPS UND HINWEISE (°C) (Min.) Biskuitboden Biskuitform auf Kombi‐ 15 - 25 rost Englischer Sand‐ Backform auf Kombirost 40 - 50 wichkuchen à la Victoria Fisch, pochiert, Backblech oder tiefes 20 - 25 0,3 kg Blech Fisch, ganz, 0,2 Backblech oder tiefes 25 - 35 Blech Fischfilet, 0,3 kg...
- Página 107 TIPPS UND HINWEISE (°C) (Min.) Vegetarisches Pizzapfanne auf Kombi‐ 25 - 30 Omelett rost Mediterranes Ge‐ Backblech oder tiefes 25 - 30 müse, 0,7 kg Blech 11.2 Feuchte Umluft - Empfohlenes Zubehör Verwenden Sie die dunklen und nicht reflektierenden Formen und Behälter. Sie haben eine bessere Wärmeabsorption als helle Farbe und reflektierende Schüsseln.
- Página 108 TIPPS UND HINWEISE (°C) (Min.) Tört‐ Heißluft Back‐ 2 und 4 150 - 20 - 35 chen, 20 blech Blech Apfelku‐ Ober-/ Kombirost 70 - 90 chen, 2 Unterhitze Formen à Ø 20 Apfelku‐ Heißluft Kombirost 70 - 90 chen, 2 Formen à...
- Página 109 REINIGUNG UND PFLEGE (°C) (Min.) Toast, 4 Grill Kombirost Max. 2 - 3 Mi‐ Backofen 3 Minu‐ nuten auf ten vorheizen. Stück der ers‐ ten Seite, 2 - 3 Mi‐ nuten auf der zwei‐ ten Seite Hambur‐ Grill Kombirost Max. 20 - 30 Kombirost in die ger aus...
- Página 110 REINIGUNG UND PFLEGE Reinigen Sie den Garraum nach jedem Gebrauch. Fettansammlungen oder an‐ dere Speisereste könnten einen Brand verursachen. Es kann sich Feuchtigkeit im Ofen oder an den Glasscheiben der Tür nieder‐ schlagen. Um die Kondensation zu reduzieren, schalten Sie den Backofen im‐ mer 10 Minuten vor dem Garen ein.
- Página 111 REINIGUNG UND PFLEGE Schritt Ziehen Sie das Einhängegitter hinten von der Seitenwand weg und nehmen Sie es heraus. Schritt Setzen Sie die Einhängegitter in umgekehrter Reihenfolge ein. Die Haltestifte an den Telesko‐ pläufern müssen nach vorne zeigen. 12.4 Benutzung: Pyrolytische Reinigung Reinigen Sie den Backofen mit Pyrolytische Reinigung.
- Página 112 REINIGUNG UND PFLEGE Pyrolytische Reinigung Schritt 4 Drehen Sie nach der Reinigung den Knopf für die Backofenfunktio‐ nen in die Aus-Position. Während der Reinigung ist die Backofenlampe ausgeschaltet. Sobald der Backofen die eingestellte Temperatur erreicht hat, wird die Tür verriegelt. Bis die Tür entriegelt wird, zeigt das Display Folgendes an: Nach Abschluss der Reinigung: Schalten Sie den Back‐...
- Página 113 REINIGUNG UND PFLEGE Schritt Fassen Sie das Scharnier auf der lin‐ ken Seite der Tür an. Schritt Heben und drehen Sie den Hebel am linken Scharnier vollständig. Schritt Schließen Sie die Backofentür halb bis zur ersten Raststellung. Anschlie‐ ßend heben und ziehen Sie die Tür nach vorn aus der Aufnahme heraus.
- Página 114 REINIGUNG UND PFLEGE Achten Sie beim Wiedereinsetzen der Glas‐ scheiben (A und B) auf die richtige Reihenfol‐ ge. Überprüfen Sie das Symbol/den Aufdruck auf der Seite der Glasscheibe. Jede Glas‐ scheibe sieht anders aus, um den Aus- und Einbau zu erleichtern.. Bei korrektem Einbau macht die Türabde‐...
- Página 115 FEHLERSUCHE Schritt Ersetzen Sie die Lampe durch eine geeignete, bis 300 °C hitzebeständige Lampe. Schritt Bringen Sie die Glasabdeckung an. 13. FEHLERSUCHE WARNUNG! Siehe Kapitel Sicherheitshinweise. 13.1 Was zu tun ist, wenn … In allen Fällen, die nicht in dieser Tabelle aufgeführt sind, wenden Sie sich bitte an einen autorisierten Kundendienst.
- Página 116 FEHLERSUCHE Fehlercodes Err C3 Die Backofen-Tür ist geschlossen und die Tür‐ verriegelung ist nicht beschädigt. Err F102 Die Backofen-Tür ist geschlossen. Err F102 Die Türverriegelung nicht defekt ist. 00:00 angezeigt. Es gab einen Stromausfall. Stellen Sie die Uhr‐ zeit ein. Wenn das Display einen Fehlercode anzeigt, der nicht in dieser Tabelle enthalten ist, schalten Sie die Haussicherung aus und wieder ein, um den Ofen neu zu starten.
- Página 117 ENERGIEEFFIZIENZ 14. ENERGIEEFFIZIENZ 14.1 Produktinformationen und Produktinformationsblatt* Name des Lieferanten Electrolux KODDP76K 949499655 Modellbezeichnung KODDP76W 949499654 Energieeffizienzindex 81.2 Energieeffizienzklasse Energieverbrauch mit einer Standardbeladung, konventi‐ 0.93 kWh/Programm oneller Modus Energieverbrauch mit einer Standardbeladung, Umluft- 0.69 kWh/Programm Modus Anzahl der Garräume Wärmequelle...
- Página 118 MENÜSTRUKTUR Achten Sie darauf, dass die Backofentür während des Ofenbetriebs geschlossen ist. Die Backofentür darf während des Garvorgangs nicht zu oft geöffnet werden. Halten Sie die Türdichtung sauber und stellen Sie sicher, dass sie sich fest in der richtigen Position befindet. Verwenden Sie Kochgeschirr aus Metall, um mehr Energie zu sparen.
- Página 119 MENÜSTRUKTUR O1 - O11 Stellen Sie den Wählen Sie Me‐ Bestätigen Sie Wählen Sie die Bestätigen Sie Wert ein und nü, Einstellun‐ die Einstellung. Einstellung. die Einstellung. gen. drücken Sie Einstellungen Uhrzeit Ändern Helligkeit 1 - 5 Tastentöne 1 - Signalton Lautstärke 1 - 4 2 - Klicken...
- Página 120 INDICE PENSIAMO A TE Grazie per aver acquistato un elettrodomestico Electrolux. Hai scelto un prodotto che ha alle spalle decenni di esperienza professionale e innovazione. Ingegnoso ed elegante, è stato progettato pensando a te. Quindi, in qualsiasi momento lo utilizzi, avrai la certezza di ottenere sempre i migliori risultati.
- Página 121 INFORMAZIONI DI SICUREZZA 5. COME ACCENDERE E SPEGNERE IL 11.2 Cottura ventilata umida - FORNO............130 accessori consigliati......146 11.3 Tabelle di cottura per gli istituti 5.1 Manopola incassabile....130 di test..........147 5.2 Pannello dei comandi....131 12. PULIZIA E CURA........148 6.
- Página 122 INFORMAZIONI DI SICUREZZA conoscenza sull’uso dell’apparecchiatura, solamente se sorvegliati o se istruiti relativamente all’utilizzo in sicurezza dell’apparecchiatura e se hanno compreso i rischi coinvolti. I bambini che hanno meno di 8 anni e le persone con disabilità diffuse e complesse vanno tenuti lontani dall’elettrodomestico, a meno che non vi sia una supervisione continua.
- Página 123 ISTRUZIONI DI SICUREZZA Prima di ogni operazione di manutenzione, scollegare • l’apparecchiatura dall’alimentazione elettrica. Se il cavo di alimentazione è danneggiato, deve essere • sostituito dal produttore, da un centro di assistenza tecnica autorizzato o da una persona qualificata per evitare situazioni di pericolo elettrico.
- Página 124 ISTRUZIONI DI SICUREZZA • È necessario rispettare la distanza minima dalle altre apparecchiature. • Prima di montare l'apparecchiatura controllare che la porta del forno si apra senza limitazioni. • L'apparecchiatura è dotata di un sistema di raffreddamento elettrico. Quest’ultimo funziona a corrente elettrica.
- Página 125 ISTRUZIONI DI SICUREZZA • Accertarsi di non danneggiare la spina e il cavo. Qualora il cavo elettrico debba essere sostituito, l’intervento dovrà essere effettuato dal nostro Centro di Assistenza autorizzato. • Evitare che i cavi entrino a contatto o si trovino vicino alla porta dell'apparecchiatura o sulla nicchia sotto all'apparecchiatura, in particolare quando il dispositivo è...
- Página 126 ISTRUZIONI DI SICUREZZA • Spegnere l'elettrodomestico dopo ogni utilizzo. • Prestare attenzione in fase di apertura dello sportello dell'elettrodomestico, quando quest'ultimo è in funzione. Può esservi un rilascio di aria calda. • Non accendere l’elettrodomestico con le mani bagnate o quando è a contatto con l'acqua. •...
- Página 127 ISTRUZIONI DI SICUREZZA • Se si utilizza uno spray per il forno, seguire attentamente le istruzioni di sicurezza sulla confezione. 2.5 Pulizia pirolitica AVVERTENZA! Rischio di lesioni/Incendi/Emissioni chimiche (Fumi) in Modalità Pirolitica. • Prima di eseguire una funzione di pulizia automatica per Pirolisi o prima del Primo Utilizzo, rimuovere dalla cavità...
- Página 128 • Togliere il blocco porta per evitare che bambini, o animali restino intrappolati nell'apparecchiatura. 3. INSTALLAZIONE AVVERTENZA! Fare riferimento ai capitoli sulla sicurezza. 3.1 Incasso www.youtube.com/electrolux www.youtube.com/aeg How to install your AEG/Electrolux Oven - Column installation (*mm) min. 550 min. 560 ±1 128/200...
- Página 129 INSTALLAZIONE (*mm) min. 550 min. 560 ±1 3.2 Fissaggio nel mobile 129/200...
- Página 130 DESCRIZIONE DEL PRODOTTO 4. DESCRIZIONE DEL PRODOTTO 4.1 Panoramica generale Pannello dei comandi Manopola di regolazione delle funzioni cottura Display Manopola di regolazione Resistenza Lampadina Ventola Goffratura cavità Supporto ripiano, rimovibile Posizioni ripiano 4.2 Accessori • Ripiano a filo Per stoviglie, stampi per dolci, arrosti. •...
- Página 131 COME ACCENDERE E SPEGNERE IL FORNO 5.2 Pannello dei comandi Ruotare la ma‐ Tasti sensore pannello dei comandi Premere nopola Riscalda‐ Luce Timer mento ra‐ Blocco forno pido Selezionare una funzione cottura per accendere il forno. Per spegnere il forno, ruotare la manopola delle funzioni di riscaldamento fino a portarla in posi‐ zione off.
- Página 132 PRIMA DEL PRIMO UTILIZZO Indicatore di cottura a vapore 6. PRIMA DEL PRIMO UTILIZZO AVVERTENZA! Fare riferimento ai capitoli sulla sicurezza. 6.1 Pulizia iniziale Prima della messa in uso, pulire il forno vuoto e impostare l'ora: 00:00 Impostare l’ora. Premere 6.2 Preriscaldamento iniziale Preriscaldare il forno vuoto prima di utilizzarlo per la prima volta.
- Página 133 UTILIZZO QUOTIDIANO 7.1 Come impostare: Funzioni cottura Avviare la cottura Passaggio 1 Fase 2 Imposta una funzione di cottura. Impostare la temperatura. Cottura a vapore Accertarsi che il forno sia freddo. Fase 1 Passaggio 2 Passaggio 3 Passaggio 4 Preriscaldare il for‐ no vuoto per 10 mi‐...
- Página 134 UTILIZZO QUOTIDIANO Funzioni cottura standard Funzione cottura Applicazione Per cuocere su massimo tre posizioni della griglia contemporaneamente ed essiccare i cibi. Impostare la temperatura di 20 - 40°C inferiore rispetto a Cottura convenzionale. . Cottura ventilata Per cuocere e arrostire alimenti su una sola posizione del ripiano. Cottura convenzio‐...
- Página 135 UTILIZZO QUOTIDIANO Funzione cottura Applicazione Per accedere al Menu: Cottura guidata, Pulizia, Impostazioni. Menu 7.3 Note su: Cottura ventilata umida Questa funzione è stata utilizzata per la conformità alla classe energetica e ai requisiti di ecodesign secondo la normativa UE 65/2014 e UE 66/2014. Test secondo la norma EN 60350-1.
- Página 136 UTILIZZO QUOTIDIANO 7.5 Cottura guidata Legenda Peso automatico disponibile. La quantità di acqua per la funzione vapore. Preriscaldare il forno prima di iniziare a cucinare. Livello del ripiano. Al termine della funzione, controllare se il cibo è pronto. Piatto Peso Livello / Accessorio ripiano Durata Manzo...
- Página 137 UTILIZZO QUOTIDIANO Piatto Peso Livello / Accessorio ripiano Durata Roast beef, al sangue (cottu‐ 75 min ra lenta) 2; lamiera dolci Roast beef, 1 - 1,5 kg; Utilizzare le spezie preferite o il semplice cottura media pezzi spessi 85 min pepe macinato.
- Página 138 UTILIZZO QUOTIDIANO Piatto Peso Livello / Accessorio ripiano Durata Costolette di 2 - 3 kg; uti‐ 90 min 3; leccarda maiale lizzare pun‐ Aggiungere il liquido per coprire il fondo tine crude, 2 di un piatto. Girare la carne a metà cottu‐ - 3 cm Agnello Cosciotto d'a‐...
- Página 139 UTILIZZO QUOTIDIANO Piatto Peso Livello / Accessorio ripiano Durata Altro Polpettone 1 kg 60 min 2; ripiano a filo Utilizzare le spezie preferite. Pesce Pesce intero, 0,5 - 1 kg 30 min 2 lamiera dolci grigliato per pesce Farcire il pesce con burro e utilizzare spezie ed erbe preferite.
- Página 140 UTILIZZO QUOTIDIANO Piatto Peso Livello / Accessorio ripiano Durata Spicchi 1 kg 35 min 3 lamiera dolci rivestita con carta da forno Utilizzare le spezie preferite. Tagliare le patate a pezzi. Verdure miste 1 - 1,5 kg 30 min 3 lamiera dolci rivestita con carta da grigliate forno Utilizzare le spezie preferite.
- Página 141 FUNZIONI DEL TIMER Piatto Peso Livello / Accessorio ripiano Durata Impasto per 1 kg 45 min 150 ml lamiera dolci rive‐ pane integra‐ stita con carta da forno / ripiano a filo le / pane di segale /pane nero in uno stampo per pane 8.
- Página 142 FUNZIONI DEL TIMER Come impostare: Contaminuti Fase 1 Passaggio 2 Passaggio 3 Il display vi‐ sualizza: 0:00 Imposta Contaminuti Premere: Premere: Il timer inizia subito il conto alla rovescia. Come impostare: Tempo di cottura Fase 1 Fase 2 Passaggio 3 Passaggio 4 Il display vi‐...
- Página 143 COME USARE: ACCESSORI Come impostare: Ritardo Il timer inizia il conto alla rovescia a un orario di inizio impostato. 9. COME USARE: ACCESSORI 9.1 Inserimento di accessori Un piccolo rientro sulla parte superiore aumenta il livello di sicurezza. Gli incavi sono anche dispositivi antiribaltamento.
- Página 144 FUNZIONI AGGIUNTIVE 10. FUNZIONI AGGIUNTIVE 10.1 Blocco Questa funzione evita che si cambi per sbaglio la funzione forno. Attivarla quando il forno è in funzione: la cottura impostata continua, il pannello dei comandi è bloccato. Attivarla quando il forno è spento - il forno non può essere acceso, il pannello dei comandi è bloc‐ cato.
- Página 145 CONSIGLI E SUGGERIMENTI UTILI (°C) (min.) Roll dolci, 16 pez‐ vassoio di cottura o lec‐ 20 - 30 carda Panini, 9 pezzi vassoio di cottura o lec‐ 30 - 40 carda Pizza, surgelata, ripiano a filo 10 - 15 0,35 kg Rotolo con mar‐...
- Página 146 CONSIGLI E SUGGERIMENTI UTILI (°C) (min.) Meringhe, 24 vassoio di cottura o lec‐ 25 - 35 pezzi carda Muffin, 12 pezzi vassoio di cottura o lec‐ 30 - 40 carda Pasta saporita, vassoio di cottura o lec‐ 25 - 30 20 pezzi carda Biscotti di pasta...
- Página 147 CONSIGLI E SUGGERIMENTI UTILI 11.3 Tabelle di cottura per gli istituti di test Informazioni per gli istituti di test Test in conformità alla norma IEC 60350-1. (°C) (min.) Tortine, Cottura Lamiera 20 - 30 20 per convenzio‐ dolci teglia nale Tortine, Cottura Lamiera...
- Página 148 PULIZIA E CURA (°C) (min.) Pan di Cottura Ripiano a 2 e 4 40 - 60 Preriscaldare il Spagna, ventilata filo forno per 10 minu‐ stampo per torta Ø26 cm Frollini Cottura Lamiera 140 - 20 - 40 al burro ventilata dolci Frollini...
- Página 149 PULIZIA E CURA 12.1 Note sulla pulizia Pulire la parte anteriore del forno con un panno morbido imbevuto di acqua tie‐ pida e detergente delicato. Servirsi di una soluzione detergente per pulire le superfici metalliche. Agenti di pu‐ Pulire le macchie con un detergente delicato. lizia Pulire la cavità...
- Página 150 PULIZIA E CURA Pas‐ Spegnere il forno e attendere saggio che si raffreddi. Pas‐ Sfilare dapprima la guida di saggio estrazione dalla parete laterale tirandola in avanti. Pas‐ Estrarre la parte posteriore del saggio supporto ripiano dalla parete la‐ terale e rimuoverla. Pas‐...
- Página 151 PULIZIA E CURA Pulizia per pirolisi C3 - Pulizia completa 2 h 30 min Passaggio 2 - premere per selezionare il programma di pulizia. Passaggio 3 - premere per avviare la pulizia. Passaggio 4 Dopo la pulizia, ruotare la manopola delle funzioni di cottura sulla po‐ sizione di spento.
- Página 152 PULIZIA E CURA Fase 1 Aprire completamente la porta e indi‐ viduare la cerniera sul lato destro del‐ la stessa. Fase 2 Usare un cacciavite per sollevare e ruotare completamente il lato cerniera del lato destro. Fase 3 Individuare la cerniera sul lato sinistro della porta.
- Página 153 PULIZIA E CURA Fase 10 Pulire il pannello di vetro con dell'ac‐ qua saponata. Asciugare i pannelli di vetro facendo attenzione. Non pulire i pannelli in vetro in lavastoviglie. Fase 11 Al termine della pulizia, installare i pannelli in vetro e la porta del forno. Assicurarsi di rimontare i pannelli in vetro (A e B) nell'ordine esatto.
- Página 154 RISOLUZIONE DEI PROBLEMI Lampadina posteriore Pas‐ Girare il rivestimento di vetro per toglierlo. saggio Pas‐ Pulire il coperchio in vetro. saggio Pas‐ Sostituire la lampadina con una resistente al calore fino a 300 °C. saggio Pas‐ Installare il coperchio in vetro. saggio 13.
- Página 155 RISOLUZIONE DEI PROBLEMI Componenti La spia è spenta. Cottura ventilata umida - è acceso. La lampadina non funziona. La lampadina è bruciata. Codici di errore Il display visualizza… Controllare se... Err C3 La porta del forno è chiusa o il blocco della por‐ ta non è...
- Página 156 Numero di serie (S.N.) ......... 14. EFFICIENZA ENERGETICA 14.1 Informazioni sul prodotto e scheda informativa sul prodotto* Nome del fornitore Electrolux KODDP76K 949499655 Identificazione modello KODDP76W 949499654 Indice di efficienza energetica 81.2 Classe di efficienza energetica Consumo energetico con carico standard, modalità tradi‐...
- Página 157 STRUTTURA DEL MENU 14.2 Risparmio energetico Il forno è dotato di funzioni che contribuiscono al risparmio energetico durante le operazioni di cottura di tutti i giorni. Verificare che la porta del forno sia chiusa quando lo stesso è in funzione. Non aprire la porta del forno con eccessiva frequenza in fase di cottura.
- Página 158 STRUTTURA DEL MENU O1 - O11 Regolare il valo‐ Selezionare il Confermare l'im‐ Selezionare l'im‐ Confermare l'im‐ re e premere Menu, Imposta‐ postazione. postazione. postazione. zioni. Impostazioni Imposta ora Modifica Luminosità 1 - 5 Volume toni 1 - Bip Volume acustico 1 - 4 2 - Fare clic 3 - Segnale...
- Página 159 CONTENIDO PENSAMOS EN USTED Gracias por adquirir un electrodoméstico Electrolux. Ha elegido un producto que lleva décadas de experiencia e innovación profesionales. Ingenioso y elegante, ha sido diseñado pensando en usted. Así pues, cada vez que lo utilice, puede tener la seguridad de que obtendrá siempre excelentes resultados.
- Página 160 INFORMACIÓN SOBRE SEGURIDAD 4.2 Accesorios........169 11. CONSEJOS..........183 5. CÓMO ENCENDER Y APAGAR EL 11.1 Horneado húmedo + ventilador. 183 HORNO............169 11.2 Horneado húmedo + ventilador - accesorios recomendados....185 5.1 Mandos escamoteables....169 11.3 Tablas de cocción para organismos 5.2 Panel de mandos......170 de control...........
- Página 161 INFORMACIÓN SOBRE SEGURIDAD experiencia y conocimientos suficientes para manejarlo, siempre que cuenten con las instrucciones o la supervisión sobre el uso del electrodoméstico de forma segura y comprendan los riesgos. Es necesario mantener alejados del aparato a los niños de menos de 8 años, así como a las personas con minusvalías importantes y complejas, salvo que estén bajo supervisión continua.
- Página 162 INSTRUCCIONES DE SEGURIDAD Si el cable de alimentación sufre algún daño, el fabricante, • su servicio técnico autorizado o un profesional tendrán que cambiarlo para evitar riesgos. ADVERTENCIA: Asegúrese de que el aparato está • apagado antes de cambiar la bombilla para evitar el riesgo de descarga eléctrica.
- Página 163 INSTRUCCIONES DE SEGURIDAD • Respete siempre la distancia mínima entre el aparato y los demás electrodomésticos y mobiliario. • Antes de montar el aparato, compruebe si la puerta del horno se abre sin limitaciones. • El aparato está equipado con un sistema de refrigeración eléctrica. Debe utilizarse con la fuente de alimentación eléctrica.
- Página 164 INSTRUCCIONES DE SEGURIDAD • Asegúrese de no provocar daños en el enchufe ni en el cable de red. Si es necesario cambiar el cable de alimentación del aparato, debe hacerlo el centro de servicio técnico autorizado. • Evite que el cable de red toque o entre en contacto con la puerta del aparato o con el hueco por debajo del aparato, especialmente mientras funciona o si la puerta está...
- Página 165 INSTRUCCIONES DE SEGURIDAD • Tenga cuidado al abrir la puerta del aparato mientras funciona. Puede liberarse aire caliente. • No utilice el aparato con las manos mojadas ni con agua en contacto. • No ejerza presión sobre la puerta abierta. •...
- Página 166 INSTRUCCIONES DE SEGURIDAD • Antes de realizar una autolimpieza pirolítica o la función de Primer uso, elimine de la cavidad del horno: – cualquier resto de comida, aceite o grasa. – todos los objetos desmontables (incluidos estantes, carriles laterales, etc. suministrados con el producto), en especial todos los recipientes, sartenes, bandejas, utensilios, etc.
- Página 167 • Retire el pestillo de la puerta para evitar que los niños o las mascotas queden atrapados en el aparato. 3. INSTALACIÓN ADVERTENCIA! Consulte los capítulos sobre seguridad. 3.1 Empotrado www.youtube.com/electrolux www.youtube.com/aeg How to install your AEG/Electrolux Oven - Column installation (*mm) min. 550 min. 560 ±1 167/200...
- Página 168 INSTALACIÓN (*mm) min. 550 min. 560 ±1 3.2 Fijación del horno al mueble 168/200...
- Página 169 DESCRIPCIÓN DEL PRODUCTO 4. DESCRIPCIÓN DEL PRODUCTO 4.1 Resumen general Panel de mandos Mando de las funciones de cocción Pantalla Mando de control Resistencia Bombilla Ventilador Relieve de la cavidad Soporte de parrilla extraíble Posiciones de las parrillas 4.2 Accesorios •...
- Página 170 CÓMO ENCENDER Y APAGAR EL HORNO 5.2 Panel de mandos Sensores del panel de control Pulse Gire el mando Calenta‐ Tempori‐ miento Bloqueo zador rápido Seleccione una función de cocción para encender el horno. Gire el mando de las funciones de cocción hasta la posición de apagado para apagar el horno. Cuando el mando de las funciones de cocción se encuentra en la posición de apagado, la pantalla cambia al modo de espera.
- Página 171 ANTES DEL PRIMER USO Indicador de cocción al vapor 6. ANTES DEL PRIMER USO ADVERTENCIA! Consulte los capítulos sobre seguridad. 6.1 Limpieza inicial Antes del primer uso, limpie el horno vacío y ajuste el tiempo: 00:00 Ajuste la hora. Pulse 6.2 Precalentamiento inicial Precaliente el horno vacío antes de utilizarlo por primera vez.
- Página 172 USO DIARIO 7.1 Cómo ajustar: Funciones de cocción Empezar a cocinar Paso 1 Paso 2 Seleccione una función de cocción. Ajuste la temperatura. Cocción al vapor Asegúrese de que el horno esté frío. Paso 1 Paso 2 Paso 3 Paso 4 Precaliente el hor‐...
- Página 173 USO DIARIO Funciones de cocción estándar Función de coc‐ Aplicación ción Para hornear en hasta tres posiciones de parrilla a la vez y para secar ali‐ mentos. Ajuste la temperatura entre 20 y 40°C menos que para Cocción convencional. Aire caliente Para hornear y asar alimentos en una posición de parrilla.
- Página 174 USO DIARIO Función de coc‐ Aplicación ción Para acceder al menú: Cocción asistida, Limpieza, Ajustes. Menú 7.3 Notas sobre: Horneado húmedo + ventilador Esta función se utilizaba para cumplir con los requisitos de eficiencia energética y diseño ecológico según EU 65/2014 y EU 66/2014. Pruebas conforme a EN 60350-1. La puerta del horno debe estar cerrada durante la cocción para que no se interrumpa la función y el horno funcione con la máxima eficiencia energética posible.
- Página 175 USO DIARIO Leyenda La cantidad de agua para la función de vapor. Precaliente el horno antes de empezar a cocinar. Nivel del estante. Cuando termine la función, compruebe si la comida está lista. Plato Peso Nivel/accesorio de la parrilla Duración Vacuno Rosbif, poco 40 min...
- Página 176 USO DIARIO Plato Peso Nivel/accesorio de la parrilla Duración Rosbif, poco hecho (coc‐ 75 min ción lenta) 2; bandeja Use sus condimentos favoritos o simple‐ Rosbif, al 1 - 1,5 kg; mente sal y pimienta con molienda fres‐ punto (cocción piezas de 4 85 min ca.
- Página 177 USO DIARIO Plato Peso Nivel/accesorio de la parrilla Duración Lomo, fresco 1 - 1,5 kg; 55 min 2; fuente de asado en laparrilla trozos de 5 - Use sus especias favoritas. 6 cm Costillas 2 - 3 kg; uti‐ 90 min 3 bandeja honda lice repues‐...
- Página 178 USO DIARIO Plato Peso Nivel/accesorio de la parrilla Duración Ganso entero 4 - 5 kg 110 min 2; bandeja honda Use sus especias favoritas. Coloque la carne en la bandeja honda. Dele la vuel‐ ta a la mitad del tiempo de cocción. Otros Pastel de car‐...
- Página 179 USO DIARIO Plato Peso Nivel/accesorio de la parrilla Duración Verduras / Guarniciones Patatas al 1 kg 50 min 2; bandeja horno Ponga las patatas enteras con piel en la bandeja. Aros 1 kg 35 min 3 bandeja de hornear forrado con papel de hornear Use sus especias favoritas.
- Página 180 FUNCIONES DEL RELOJ Plato Peso Nivel/accesorio de la parrilla Duración Baguette / 0,8 kg 30 min 150 ml bandeja de hor‐ chapata / pan near forrado con papel de hornear blanco Se necesita más tiempo para el pan blanco. Todo el gra‐ 1 kg 45 min 150 ml bandeja de hor‐...
- Página 181 FUNCIONES DEL RELOJ Cómo ajustar: Avisador Paso 1 Paso 2 Paso 3 La pantalla muestra: 0:00 Ajustar la Avisador Pulse: Pulse: El temporizador comienza la cuenta atrás inmediatamente. Cómo ajustar: Tiempo de cocción Paso 1 Paso 2 Paso 3 Paso 4 La pantalla muestra: 0:00...
- Página 182 INSTRUCCIONES DE USO: ACCESORIOS 9. INSTRUCCIONES DE USO: ACCESORIOS 9.1 Inserción de accesorios Una pequeña muesca en la parte superior aumenta la seguridad. Las hendiduras también son dispositivos antivuelco. El borde elevado que rodea la bandeja evita que los utensilios de cocina resbalen de la parrilla.
- Página 183 FUNCIONES ADICIONALES 10. FUNCIONES ADICIONALES 10.1 Bloqueo Esta función impide que se produzca accidentalmente un cambio de la función de horno. Enciéndala cuando el horno funcione: la cocción ajustada continúa, el panel de control está blo‐ queado. Enciéndala cuando el horno está apagado; el horno no se puede encender, el panel de control está...
- Página 184 CONSEJOS (°C) (min) Rollitos dulces, bandeja o bandeja honda 20 - 30 16 piezas Rollitos, 9 piezas bandeja o bandeja honda 30 - 40 Pizza congelada, parrilla 10 - 15 0,35 kg Brazo de gitano bandeja o bandeja honda 25 - 35 Brownie bandeja o bandeja honda 25 - 30...
- Página 185 CONSEJOS (°C) (min) Muffins, 12 pie‐ bandeja o bandeja honda 30 - 40 Tarta salada, 20 bandeja o bandeja honda 25 - 30 piezas Galletas crujien‐ bandeja o bandeja honda 25 - 35 tes de masa que‐ brada, 20 piezas Tartaletas, 8 pie‐...
- Página 186 CONSEJOS (°C) (min) Pasteli‐ Cocción Bandeja 20 - 30 llos, 20 convencio‐ unida‐ des por bandeja Pasteli‐ Aire calien‐ Bandeja 150 - 20 - 35 llos, 20 unida‐ des por bandeja Pasteli‐ Aire calien‐ Bandeja 2 y 4 150 - 20 - 35 llos, 20 unida‐...
- Página 187 MANTENIMIENTO Y LIMPIEZA (°C) (min) Bizco‐ Aire calien‐ Parrilla 2 y 4 40 - 60 Precaliente el hor‐ cho, no 10 minutos. molde de re‐ postería Ø26 cm Mante‐ Aire calien‐ Bandeja 140 - 20 - 40 cados Mante‐ Aire calien‐ Bandeja 2 y 4 140 -...
- Página 188 MANTENIMIENTO Y LIMPIEZA 12.1 Notas sobre la limpieza Limpie la parte delantera del horno con un paño suave humedecido en agua templada y jabón suave. Utilice un producto de limpieza para limpiar las superficies metálicas. Agentes lim‐ Limpie las manchas con un detergente suave. piadores Limpie el interior después de cada uso.
- Página 189 MANTENIMIENTO Y LIMPIEZA Paso 1 Apague el horno y espere a que esté frío. Paso 2 Tire de la parte delantera del carril de apoyo para separarlo de la pared lateral. Paso 3 Tire del extremo trasero del ca‐ rril de apoyo para separarlo de la pared y extráigalo.
- Página 190 MANTENIMIENTO Y LIMPIEZA Limpieza pirolítica C3 - Limpieza a fondo 2 h 30 min Paso 2 : pulse para seleccionar el programa de limpieza. Paso 3 - pulse para comenzar la limpieza. Paso 4 Tras la limpieza, gire el mando de las funciones de cocción hasta la posición de apagado.
- Página 191 MANTENIMIENTO Y LIMPIEZA Paso 1 Abra completamente la puerta y loca‐ lice la bisagra del lado derecho de la puerta. Paso 2 Utilice un destornillador para levantar y girar completamente la palanca de la bisagra derecha. Paso 3 Localice la bisagra del lado izquierdo de la puerta.
- Página 192 MANTENIMIENTO Y LIMPIEZA Paso 10 Limpie los paneles de cristal con agua y jabón. Seque los paneles de cristal con cuidado. No limpie los pa‐ neles de cristal en el lavavajillas. Paso 11 Después de la limpieza, instale el pa‐ nel de vidrio y la puerta del horno.
- Página 193 SOLUCIÓN DE PROBLEMAS Bombilla trasera Paso 1 Gire la tapa de cristal para extraerla. Paso 2 Limpie la tapa de cristal. Paso 3 Cambie la bombilla por otra apropiada termorresistente hasta 300 °C. Paso 4 Instale la tapa de cristal. 13.
- Página 194 SOLUCIÓN DE PROBLEMAS Código de error La pantalla muestra… Compruebe que... Err C3 La puerta del horno está cerrada o el cierre de la puerta no está roto. F102 La puerta del horno está cerrada. F102 El cierre de la puerta no está roto. 00:00 Se ha producido un corte de corriente.
- Página 195 EFICACIA ENERGÉTICA 14. EFICACIA ENERGÉTICA 14.1 Información del producto y hoja de información del producto* Nombre del proveedor Electrolux KODDP76K 949499655 Identificación del modelo KODDP76W 949499654 Índice de eficiencia energética 81.2 Clase de eficiencia energética Consumo de energía con una carga estándar, modo con‐...
- Página 196 ESTRUCTURA DEL MENÚ Asegúrese de que la puerta del horno está cerrada cuando el horno funciona. No abra la puerta del horno muchas veces durante la cocción. Mantenga limpia la junta de la puerta y asegúrese de que está bien fijada en su posición. Utilice utensilios de cocina de metal para mejorar el ahorro energético.
- Página 197 Ajuste el valor y Seleccione la Confirmar ajus‐ Seleccione el Confirmar ajus‐ Menú, Ajustes. ajuste. pulse Ajustes Hora Cambiar Brillo de la pantalla 1 - 5 Tono de teclas 1 - Pitido Volumen del timbre 1 - 4 2 - Haga clic 3 - Sonido apagado Tiempo de funciona‐...
- Página 198 198/200...
- Página 199 199/200...
- Página 200 www.electrolux.com/shop...