Tabla de contenido
Publicidad
Idiomas disponibles
Idiomas disponibles
Enlaces rápidos
INFORMAZIONI COMMERCIALI PER I CONSUMATORI
COMMERCIAL INFORMATION FOR THE CONSUMER
INFORMATIONS COMMERCIALES POUR LE CLIENT
INFORMACIONES COMERCIALES PARA EL CLIENTE
HANDELSINFORMATIONEN FÜR DEN KUNDEN
COMMERCIËLE INFORMATIES VOOR DE KLANT
ISTRUZIONI PER INSTALLAZIONE USO E MANUTENZIONE
IT
INSTALLATION, USE AND MAINTENANCE INSTRUCTION
GB
INSTRUCTIONS D'UTILISATION ET AVIS DE MONTAGE
F
INSTRUCCIONES DE USO Y DE MONTAJE
E
BEDIENUNGSANLEITUNG MIT MONTAGEANWEISUNGEN
D
GEBRUIKSAANWIJZIGING
NL
APPLIQUE
SLT105
INFORMAZIONI TECNICHE
TECHNICAL INFORMATION
INFORMATION TECHNIQUES
INFORMACIONES TÉCNICAS
TECHNISCHE INFORMATIONEN
TECHNISCHE INFORMATIES
TYPE: FSLA
Publicidad
Tabla de contenido

Manuales relacionados para Sirius APPLIQUE SLT105


Resumen de contenidos para Sirius APPLIQUE SLT105
- Página 1 INFORMAZIONI COMMERCIALI PER I CONSUMATORI COMMERCIAL INFORMATION FOR THE CONSUMER INFORMATIONS COMMERCIALES POUR LE CLIENT INFORMACIONES COMERCIALES PARA EL CLIENTE HANDELSINFORMATIONEN FÜR DEN KUNDEN COMMERCIËLE INFORMATIES VOOR DE KLANT ISTRUZIONI PER INSTALLAZIONE USO E MANUTENZIONE INSTALLATION, USE AND MAINTENANCE INSTRUCTION INSTRUCTIONS D’UTILISATION ET AVIS DE MONTAGE INSTRUCCIONES DE USO Y DE MONTAJE BEDIENUNGSANLEITUNG MIT MONTAGEANWEISUNGEN GEBRUIKSAANWIJZIGING APPLIQUE SLT105 INFORMAZIONI TECNICHE TECHNICAL INFORMATION INFORMATION TECHNIQUES INFORMACIONES TÉCNICAS TECHNISCHE INFORMATIONEN TECHNISCHE INFORMATIES TYPE: FSLA...
- Página 3 Il simbolo sul prodotto o sulla confezione indica che il prodotto non deve essere considerato come un normale rifiuto domestico, ma deve essere portato nel punto di raccolta appropriato per il riciclaggio di apparecchiature elettriche ed elettroni- che. Provvedendo a smaltire questo prodotto in modo appropriato, si contribuisce a evitare potenziali conseguenze negative per l’ambiente e per la salute, che po- trebbero derivare da uno smaltimento inadeguato del prodotto. Per informazio- ni più dettagliate sul riciclaggio di questo prodotto, contattare l’ufficio comuna-...
- Página 4 Das Symbol auf dem Produkt oder seiner Verpackung weist darauf hin, dass dieses Produkt nicht als normaler Haushaltsabfall zu behandeln ist, sondern an einem Sam- melpunkt für das Recycling von elektrischen und elektronischen Geräten abgegeben werden muss. Durch Ihren Beitrag zum korrekten Entsorgen dieses Produkts schützen Sie die Umwelt und die Gesundheit Ihrer Mitmenschen. Umwelt und Gesundheit wer- den durch falsches Entsorgen gefährdet. Weitere Informationen über das Recycling dieses Produkts erhalten Sie von Ihrem Rathaus, Ihrer Müllabfuhr oder dem Geschäft, in dem Sie das Produkt gekauft haben. Dieses Elektrohaushaltsgerät ist entspre- chend der EU-Richtlinie 2012/19/EC Über Elektro- und Elektronik – Altgeräte (WEEE).
- Página 5 INDICE Avvertenze Versioni d’uso Installazione Funzionamento Manutenzione...
- Página 6 * Evitare l’uso di materiali che causano AVVERTENZE fiammate (flambè) nelle immediate vici- nanze dell’apparecchio. Nel caso di fritture fare particolarmente attenzione al pericolo di incendio che co- stituiscono olio e grassi. La distanza minima tra la superficie del Particolarmente pericoloso per la sua in- piano di cottura e la parte inferiore della fiammabilità...
- Página 7 Installare il prodotto alla staffa a parete, pre- VERSIONI D’USO cedentemente installata, inserendo il tubo di installazione nell’apposita sede della staffa, vedi fig. 6. Bloccare il prodotto utilizzando la vite in do- L’apparecchio deve essere utilizzato solo in tazione, inserendola come da fig. 7. versione filtrante. Fissare completamente mediante il dado M6, Nella versione filtrante l’aria ed i vapori con- fornito in dotazione. vogliati dall’apparecchio, vengono depurati da un filtro antigrasso, da un filtro al carbone Nel caso in cui il prodotto non risulti perfet- e rimessi in circolazione nell’ambiente. tamente perpendicolare con il piano del pa- vimento, è possibile effettuare una ulteriore regolazione avvitando la vite indicata in figu- ra 8, per allontanare la parte bassa del pro- INSTALLAZIONE dotto dalla parete su cui è installato (fig.9). Mentre viene avvitata la vite (fig.8), spingere la parte bassa del prodotto dal basso verso l’alto per facilitare la regolazione.
-
Página 8: Descrizione Di Funzionamento
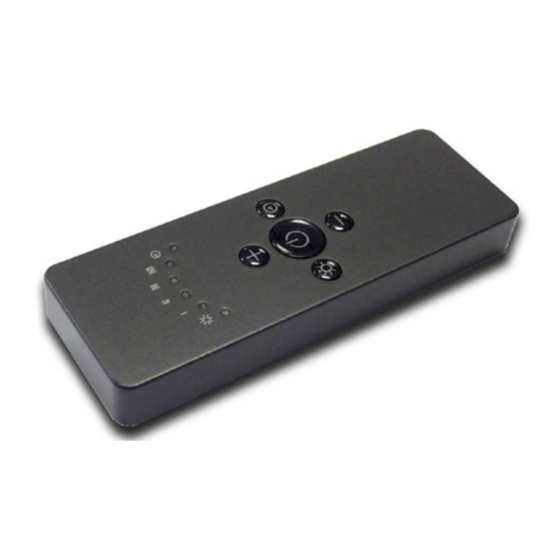
FUNZIONAMENTO Telecomando (Fig. 12) Alla prima accensione mantenere premuto il tasto luce per 5 secondi. MODALITÀ DI FUNZIONAMENTO Configurazione standard: ADIOCOMANDO ERIE La configurazione di fabbrica prevede che RC001 tutti i sistemi “ cappa - radiocomando “ ab- Radiocomando per il comando a distanza di biano lo stesso codice di trasmissione. Nel cappe aspiranti. caso siano installati due sistemi “ cappa - ra- diocomando “ nello stesso locale o nelle im- CARATTERISTIICHE TECNICHE mediate vicinanze i sistemi avendo lo stesso... - Página 9 Ripristino della configurazione di Fabbrica: Il prodotto è dotato di un dispositivo elet- Se si desidera ripristinare la configurazione tronico che permette lo spegnimento auto- di Fabbrica, occorre eseguire la procedura nel matico dopo quattro ore di funzionamento seguente modo: premere contemporanea- dall’ultima operazione eseguita. mente i tasti: TEMPORIZZAZIONI Con l’entrata in vigore dal 1° Gennaio 2015 dei nuovi regolamenti della Commissione in modo continuo per 2 secondi, nello stesso Europea EU65 “Energy label” e EU66 “ Eco-...
- Página 10 MANUTENZIONE Un’accurata manutenzione garantisce un buon funzionamento ed un buon rendimento nel tempo. * Una cura particolare va rivolta al filtro an- tigrasso. Il filtro antigrasso si rimuove aprendo il pan- nello luce tirandolo verso il basso mediante l’apposito pannello (fig. 13). Rimuovere il filtro antigrasso agendo sull’ap- posita maniglia, come da fig. 14. Il filtro car- bone, è posizionato immediatamente dietro al filtro antigrasso ed è possibile rimuoverlo in maniera analoga. La sostituzione del filtro al carbone avviene in rapporto all’uso, almeno una volta ogni sei mesi. Per la pulizia dell’apparecchio stesso viene consigliato l’uso di acqua tiepida e detersivo neutro, evitando l’uso di prodotti contenenti abrasivi.
- Página 11 CONTENTS Warnings Uses Installation Working Maintenance...
- Página 12 In order to avoid possible fire risk, all in- WARNINGS structions for grease-filter cleaning and for removing eventual grease deposits should be strictly followed. * Two persons are needed for the installa- The cooker surface and the inferior part of tion of this product.
- Página 13 Clamp the product, using the provided screw, USES inserting it as in fig. 7. Fix it all, using the provided M6 nut. In case the product proves to be not perfectly perpendicular to the floor plan, it is possible The appliance can be arranged only for filte- to do a further adjustment, securing the screw ring performances. In its filtering version the indicated in fig. 8, to move the lower part of air and fumes conveyed by the appliance are the product away from the wall on which it cleaned both by a grease filter and by an ac- is installed (fig. 9). While securing the screw tive coal filter, and put again into circulation. (fig. 8), push the lower part of the product from the bottom up to ease the adjustment.
-
Página 14: Radio Control
OPERATION MODE WORKING Standard configuration: Standard configuration requires all “cooker hoods – radio control - system” to be pro- vided with the same transmission code. In the event two cooker hoods – radio control Remote control (Fig.12) system are installed in the same room or ne- channel radio control for cooker hood remo- arby, each system may affect the operation of the another. Therefore, the code of one radio control system must be changed. - Página 15 (within 5 seconds). Leds flashing 6 times in- TIMING dicate the procedure is completed. As a result of the new EU65 “Energy label” and EU66 “ Ecodesign” regulations issued by the WARNING! This operation deletes perma- European Commission, which came into force nently the preset codes. as from January 1st, 2015 , our products have been adapted to comply with these new re- Emergency button: quirements. In the event that the radio control does not All of the models complying with the energy work, use the emergency button to switch label requirements, are equipped with new the appliance off. After any necessary repairs...
- Página 16 MAINTENANCE An accurate maintenance guarantees good functioning and long-lasting performance. * Particular care is due to the grease filter. The fat filter can be removed by opening at first the light panel: grasp the specific knob (fig. 13) and pull it down, so that the light panel will open. The fat filter can be removed by using the specific handle, as in fig. 14. The carbon filter is right behind the fat filter and can be remo- ved in the same way.
- Página 17 INDEX Attention Version de l’appareil Installation Fonctionnement Entretien...
- Página 18 * Évitez d’utiliser des matériaux qui cau- ATTENTION sent des flambées à proximité de l’appa- reil. Dans le cas de fritures, faites tout parti- culièrement attention au danger d’incen- die que représentent les huiles et les corps La distance entre la surface de la table de gras.
- Página 19 Installez le produit à l’étrier pour paroi, préa- VERSIONS DE L’APPAREIL lablement installé, et introduisez le tuyau d’installation dans le logement de l’étrier (Fig. 6). L’appareil fonctionne seulement en version Bloquez le produit en utilisant la vis fournie recyclage. (Fig. 7). Fixez le tout par l’écrou M6, fourni avec le produit.
-
Página 20: Descriiptiion De Fonctiionnement
MODE DE FONCTIONNEMENT FONCTIONNEMENT Configuration standard: La configuration d’usine prévoit que tous les systèmes “ hotte - radiocommande “ aient le même code de transmission. Si deux systè- mes “hotte – radiocom- mande” sont installés Radiocommande (Fig. 12) dans la même pièce ou à proximité des systè- mes ayant le même code de transmission, ils Au premier dèmarrage tenir le bouton lumiè- pourraient être influencés et il faudrait chan- re pressè pour 5 secondes. ger le code d’une seule radiocommande. ADIOCOMMANDE Génération d’’un nouveau code de tran- S6/S ÉRIE smission: Radiocommande pour le pilotage à distance La radiocommande est fournie par l’usine de hottes. - Página 21 de manière continue pendant 2 secondes, au TEMPORISATEUR même instant s’allumeront les leds, appuyer Nos produits ont été adaptés pour se con- ensuite sur les touches: former aux nouvelles normes de l’Union Eu- ropéenne en matière de l’EU65 « Étiquette- Énergie » et l’EU66 « Écoconception » (à partir du 1er janvier 2015). La nouvelle électronique des produits ayant (dans les 5 secondes), 6 clignotements des l’ « Étiquette-Énergie » sont pourvus d’un leds indiqueront que l’opération a été com- dispositif de temporisation pour le contrôle plétée.
- Página 22 ENTRETIEN Un entretien soigné est une garantie de bon fonctionnement et de bon rendement de vo- tre appareil dans le temps. * Un soin particulier doit être apporté aux fil- tres à graisse. Retirez le filtre à graisse après avoir ouvert le panneau-lumière en le tirant vers le bas par sa poignée (Fig. 13). Retirez le filtre à graisse par sa poignée (Fig. 14). Le filtre à charbon se trouve directement derrière le filtre à graisse. Retirez ce filtre de la même façon que le filtre à graisse. Le remplacement du filtre à charbon se fait en fonction de son utilisation, au moins une fois tous les 6 mois. Nettoyez l’appareil avec de l’eau tiède et un produit de nettoyage neutre, en évitant tout produit contenant des abrasifs. Le remplacement du câble d’alimentation doit être effectué exclusivement par un per- sonnel autorisé. Pour remplacer la lampe néon et le transfor- mateur il faut ouvrir le panneau comme indi- qué (fig. 13) et enlever les vis périmétriques. Remplacer les composants endommagés avec des composants nouveaux. Les interventions doivent être effectués par techniciens spécia- lisés.
- Página 23 ÍNDICE Advertencias Versiones Instalacion Funcionamiento Mantenimiento...
- Página 24 Particularmente peligroso por su inflama- ADVERTENCIAS bilidad es el aceite ya usado. No utilizar parrillas eléctricas descubiertas. Para evitar un posible riesgo de incendio atenerse a las instrucciones indicadas para la limpieza de los filtros antigrasa y la lim- * La distancia mínima entre el plano de coc- pieza de eventuales depósitos de grasa en ción y la parte inferior de la campana debe el aparado.
-
Página 25: Versiones
Colocar la tapa de la placa de pared, como VERSIONES muestra la fig. 5, prestando atención a no dañar el acabado del tubo, protegido con la cinta adhesiva de papel, como mostraba el punto anterior. El aparato se puede utilizar sólo con la Instalar el producto a la abrazadera de pared, versiόn filtrante. En la versiόn filtrante el aire puesta anteriormente, colocando el tubo de... -
Página 26: Características Técnicas
MODALIDAD DE FUNCIONAMIENTO FUNCIONAMIENTO Configuración estándar: La configuración de fábrica prevé que todos los sistemas de “campana - radiomando” tengan el mismo código de transmisión. Si se instalan dos sistemas “campana - radioman- Radiocontrol (Fig. 12) do” en el mismo local o en las cercanías, los sistemas, teniendo el mismo código de tran- A la primera ignicion mantener el buton luz smisión pueden ser influenciados, por tanto, apretado por 5 segundos. es necesario cambiar el código de un solo ra- diomando. ADIOCONTROL ERIE S6/S Generación de un nuevo código de tran- Radiocontrol para el mando a distancia de smisión: campanas de extractoras. -
Página 27: Temporización
de forma constante durante 2 segundos, en TEMPORIZACIÓN A partir del 1° de enero 2015, con la entra- el mismo momento se encenderán los leds, da en vigor de la nueva normativa de la Co- sucesivamente presione las teclas: misión Europea EU65 “Energy label” y EU66 “ Ecodesign”, hemos adaptado los productos conforme a los requisitos establecidos. Todos los modelos con versión “Energy label” disponen de un equipo electrónico, con fun- (dentro de 5 segundos), 6 parpadeos de los ciones de temporización de la velocidad de leds indicarán que se completó la operación. -
Página 28: Mantenimiento
MANTENIMIENTO Un correcto mantenimiento es garantía de un buen funcionamiento y un buen rendimiento en el tiempo. * Se debe prestar particular atención al filtro anti grasa. El filtro anti grasa se quita abriendo el panel de la luz tirándolo hacia abajo a través del panel especial (fig.13) Quitar el filtro antigrasa usando la manija especial, como muestra la figura 14. El fil- tro de carbón, está colocado inmediatamente detrás del filtro antigrasa y se puede sacar de la misma manera. La sustitución del filtro de carbón se hace según el uso del mismo, por lo menos una vez cada seis meses. -
Página 29: Tabla De Contenido
INHALTSVERZEICHNIS Allgemeine Sicherheitshinweise Allgemeine Montagehinweise Geräteausführung Installation und Montage Schaltung des Geräts Wartung... -
Página 30: Allgemeine Sicherheitshinweise
* Materialen, die Stichflammen verursa- ALLGEMEINE chen (flambiert) sollten nicht in unmittel- SICHERHEITSHINWEISE barer Nähe des Geräts stehen. Vorsicht, beim Frittieren können Öl und Fett in Brand raten. Insbesondere ist gebrauchtes Öl sehr feu- Das Gerät ist so zu montieren, dass der Ab- ergefährlich. -
Página 31: Allgemeine Montagehinweise
Das Produkt mit den im Lieferumfang enthal- ALLGEMEINE tenen Schrauben befestigen (Abb. 7). MONTAGEHINWEISE Die mit der im Lieferumgang enthaltenen Schraubenmutter M6 blockieren. Das Gerät ist nur in Filterversion verfügbar. Hängt das Produkt nicht perfekt waagerecht, Die Luft und die Dämpfe der Filterversion, die kann eine weitere Regulierung am Produkt durchgeführt werden. Die Schraube (Abb. 8) vom Gerät abgesaugt werden, werden sowohl festdrehen, um das untere Teil des Produkts von einem Fettfilter als auch von einem Ko- hlefilter gereinigt und im Raum wieder au- von der Wand leicht lockern (Abb. 9). -
Página 32: Schaltung Des Geräts
SCHALTUNG FUNKTIONSMODALITÄT Standardkonfiguration: DES GERÄTS Die werkseitige Konfiguration sieht vor, dass alle Systeme “Haube - Funksteuerung” den- selben Übertragungscode haben. Sollten zwei Systeme “Haube- Funksteuerung” im selben Funksteuerung (Fig.12) Raum oder in unmittelbarer Nähe zueinander installiert sein, Zur este Zündung, die Beleuchtungstaste für könnten sie beeinflusst werden, weil die Sy- 5 Sekunden gedrückt halten. steme denselben Übertragungscode verwen- den, d. h., der Code einer Funksteuerung UNKSTEUERUNG ERIE muss geändert werden. BEFREE S6/S Funksteuerung zur Fernbedienung von Ab- Erzeugung eines neuen Übertragungscodes: zugshauben. - Página 33 Wiederherstellen der Werkskonfiguration: Das Produkt ist mit einer elektronischen Vor- Falls die Werkskonfiguration wieder herge- richtung ausgestattet, die das automatische stellt werden soll, muss wie folgt vorgegan- Abschalten nach vier Stunden Betrieb ab der gen werden: Gleichzeitig die Tasten: letzten Betätigung ermöglicht. TIMER Die Produkte des Herstellers sind an die neu- für 2 Sekunden gedrückt halten. Dabei schal- en Verordnungen der Europäischen Kommis- ten sich die LEDs ein. Anschließend die Ta- sion (gültig ab 1. Januar 2015) EU65 “Ener- sten: gielabel” und EU66 “ Ökodesign” angepasst. Die neue Elektronik schaltet die Geräte mit En e rgielabel nach einer festgelegten Zeit automa t isch auf einen Luftstrom von maxi- mal 650 m³/h zurück.
-
Página 34: Wartung
WARTUNG Nur eine sorgfältige Pflege garantiert auf Dauer eine gute Leistung und Funktion des Geräts. * Besonders wichtig ist die Reinigung der Fet- tfilter. Das Licht-Paneel mittels des entsprechenden Griffs ziehen und öffnen, um den Fettfilter zu entfernen (Abb. 13). Den Fettfilter mittels des entsprechenden Griffs (Abb. 14) entfernen. Der Kohlefilter be- findet sich direkt hinter dem Fettfilter und die Beseitigung erfolgt auf die gleiche Weise. Der Ersatz des Aktivkohlefilters hängt von der Benutzungsdauer ab, sollte aber möglichst alle sechs Monate erfolgen. Wir empfehlen, das Gerät mit lauwarmem Wa- sser und milden Reinigungsmittel zu reinigen und in keinem Fall Scheuermittel verwenden. Der Ersatz des Stromkabels darf nur von au- torisiertem Fachpersonal vorgenommen wer- den. - Página 35 INHOUDSOPGAVE Waarschuwingen Gebruiksversies Installatie Werking Onderhoud...
- Página 36 * Gebruik geen stoffen of materialen die WAARSCHUWINGEN steekvlammen veroorzaken (flambé) in de onmiddelijke buurt van het apparaat. Pas tijdens het frituren bijzonder goed op voor het brandgevaar dat wordt veroorza- akt door olie en vet. De minimum afstand tussen het kookblad Gebruik olie is bijvoorbeeld zeer gevaarlijk en de onderkant van de afzuigkap moet 65 omdat die nog sneller ontvlamt.
-
Página 37: Installatie
Monteer het product op de beugel die u al GEBRUIKSVERSIES heeft geïnstalleerd en steek de montagebuis in de daarvoor bedoelde zitting in de beugel, zie afb. 6. Het apparaat kan alleen in de filterversie Zet het product vast met de meegeleverde worden gebruikt. In de filterversie worden de schroef die u monteert zoals geïllustreerd op de afbeelding 7. lucht en dampen die in het apparaat komen, Zet volledig vast met de meegeleverde M6- gezuiverd door een vetfilter en een koolfilter en dan weer in de ruimte gestuurd. moer. -
Página 38: Beschrijving Van De Werking
GEBRUIKSAANWIJZING WERKING Standardconfiguratie: De fabrieksconfiguratie voorziet dat alle sy- stemen “kap - afstandsbediening” dezelfde transmissiecode hebben. Wanneer er twee systemen “kap - afstandsbediening” nel- Afstandsbediening (Fig. 12) lo stesso locale o nelle immediate vicinanze geïnstalleerd zijn, lunnen systemen die de- Druk voor het 1ᵉ gebruik de verlichting scha- zelfde transmissiecode hebben elkaar beïn- kelaar gedurende 5 seconden in. - Página 39 De fabrieksconfiguratie terugzetten: Het product beschikt over een elektronisch Als men de fabrieksconfiguratie wenst terug systeem waarmee de kap automatisch uit te zetten,, moet men de volgende procedure wordt gezet na vier uur vanaf de laats uitge- uitvoeren: druk tegelijk continu op de toet- voerde handeling. sen: TIMING Met de inwerkingtreding op 1 januari 2015 van de nieuwe regels van de Europese Com- gedurende 2 seconden, tegelijk gaan de Led’s missie, EU65 “Energy label” en EU66 “ Ecode- aan. Druk vervolgens op de toetsen: sign”, hebben wij onze producten conform gemaakt aan de nieuwe vereisten.
- Página 40 ONDERHOUD Een zorgvuldig onderhoud garandeert een al- tijd goed werkende en renderende afzuigkap. * Besteed genoeg aandacht aan de vetfilter. De vetfilter haalt u uit het apparaat door het verlichtingspaneel naar onder te trekken met de daarvoor bedoelde knop (afb. 13). Trek de vetfilter weg met het daarvoor be- doelde handvat, de afzuigkap van afb. 14. U verwijdert de koolstoffilter die direct achter de vetfilter zit op dezelfde manier. Hoe vaak u de koolstoffilter moet vervangen, hangt af van het gebruik, maar vervang hem minstens om de zes maanden. Reinig het ap- paraat met lauw water en neutrale detergen- ten en gebruik geen schurende producten of middelen. Alleen geautoriseerde technici mogen het stroomsnoer vervangen. Om de fluorlamp (neon) te vervangen, of de voeding ervan, opent u het lichtpaneel zoals beschreven hierboven (zie afb.13), verwi- jdert u de schroeven rondom en opent u het...
- Página 44 90001050099 - GM 06/17...