
Manuales relacionados para Nogueira NSG-9200


Resumen de contenidos para Nogueira NSG-9200
- Página 1 Silo Grain - Ensiladora para granos NSG-9200 Instructions Manual Manual de Instrucciones...
- Página 3 Dear Owner Congratulations on your purchase of the NSG-9200 Grain Silo Filler Machine. This product is the highest quality, specially designed to meet your needs. This manual contains operating instructions and when properly abided by assures good operation, safety, and durability of your NSG-9200 Nogueira. We recommend carefully reading it before beginning to operate the machine.
-
Página 4: Tabla De Contenido
Warranty certificate Warranty control Note: 1- Nogueira máquinas aims its products to be constantly getting upgraded and improved in addition to having its own right to introduce changes in its components and accessories without prior notice. 2- Illustrations in this manual are merely illustrative. -
Página 5: Environmental Conservation
Environmental conservation Nogueira is continually concerned with the environmental conservation, in the development phase, as well in the utilization of processes and materials ecologically appropriate in its production and its products. PROTECT AND RESPECT THE ENVIRONMENT, remember that conservation is the social responsibility of everyone. -
Página 6: Safety
We have developed safety shielding and eliminated dangerous situations. Remember, keeping people healthy and their physical integrity must always be considered to the upmost. We have prepared this manual to make you familiar with your NSG-9200 and, so that you can use it correctly and safely. - Página 7 Only touch a part when you are sure, it is motionless. Always pay attention! - Do not place the machine on cement blocks, hollow bricks, or other supports which can crush from a prolonged weight load. NSG-9200...
- Página 8 Safety - Do not work under a machine lifted by only jacks; always use a safe support base. - If you notice any abnormality in the operation: vibrations, different noises etc., turn off the machine immediately. Check and eliminate the cause before turning on again. - Never operate the machine in closed surroundings and without any ventilation, the gases released from the tractor motor are highly toxic to your health.
-
Página 9: Safety Adhesive Labels
Keep away while it is operating. parts do not stop immediately after turning off Contact with the moving driveshaft can cause the machine. Some parts are also a serious accident. imperceptible when moving and it is not possible to see their movement. NSG-9200... - Página 10 Safety adhesive labels Do not open or remove covers and safety When operating the harvester, wear personal shields on the machine while operating. protective equipment (PPE). Prolonged Keep the hands away from gears and other exposure to noise, without noise protection moving parts, as their movement can catch can cause hearing loss.
-
Página 11: Introducing The Grain Silo Filler
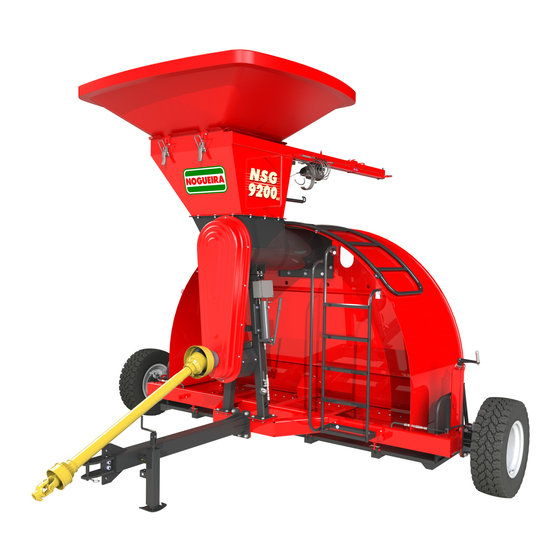
Introducing the grain silo filler fig.01 fig.02 NSG-9200... -
Página 12: Application
Application The NSG-9200 Grain Silo filler was designed to fill polyethylene bags with grains safely and economically. It high level operating capacity, plus its storage option for crops, helps you to avoid high overhead and high costs of cutting the harvest, making it possible for the producer to commercialize at the optimal time based on market conditions. -
Página 13: Hopper Assembly
Hopper assembly Operating position NSG-9200 is shipped from the factory The hopper is supplied disassembled from the assembled in the transport position (fig,07). So, machine. The following instructions show the to place it in the operating position (fig.08), it will correct assembly procedures. - Página 14 Operating position (continuation) fig.09 fig.12 1- Place the foot support base in the above 4- Using the jack, lift the machine and remove displayed position. If it is necessary lift the the previously mentioned wheel. machine a little using the jack. fig.13 fig.10 5- Disassemble the wheel bracket (used only in...
- Página 15 11- Place the wheel in the above displayed position. fig.21 fig.18 12- Remove the jack from the machine and 9- Using the jack, lift the machine and remove the place it on the head bar. above displayed wheel. NSG-9200...
-
Página 16: Important
NOTE: The instructions of bleeding the brakes are found in this manual. fig.22 13- Finally, connect the brake hoses to the two wheels. fig.23 NSG-9200 assembled in the operating position. NOTE: Follow the previous instructions, inversely, in order to position the grain silo filler in the transport position. -
Página 17: Coupling To The Tractor
Place the connection pin and lock it using the transport position. cotter pin. Remember after placing the cotter pin (fig.25) and check if the connector pin is well-latched. Accidental uncoupling of the machine, when towed, can result in a serious accident. NSG-9200... -
Página 18: Leveling
Leveling It is important for the Grain Silo Filler Machine to be level so that the distribution of the product is uniform in the bag. Before starting to operate, look at the machine sideways (fig.27). If it is unleveled, it is possible to adjust the height of the connector as shown in the following instructions. -
Página 19: Preparation And Installing The Driveshaft
Couple the male side to the machine and the female side to the tractor. Place both sides of the driveshaft side-by-side. There must be at least 20 cm play on the MALE and FEMALE ends, as shown on the following picture. fig.31 fig.32 NSG-9200... - Página 20 Keep away from the machine when it is operating. - It is the exclusive responsibility of the authorized Nogueira reseller to perform the preparation of the driveshaft axle and the first test run of the machine. Instructions manual...
-
Página 21: Preparation Of The Terrain
Grain silo filler wheels, which is fundamental during the filling process, and providing good bag placement, as to avoid any tears in the bag. The surrounding areas around the bag must be free of weeds and debris from wasted grains. If necessary spray herbicide to clear the location. fig.35 fig.36 fig.38 fig.37 NSG-9200... -
Página 22: Installing The Bag
Installing the bag After the Grain Silo Filler is in the operating position, proceed as described here after to install the bag: fig.41 fig.39 3- Place the hanger on the ground near the tray. 1- Release the chains from the existing stretchers from both sides of the machine and pull the tray. - Página 23 NOTE: The purpose of the retractable tray is to help in installing the bag. fig.46 8- Place the light side of the bag towards the machine. This way, when it is filled the light side will be outside. NSG-9200...
- Página 24 Installing the bag (continuation) fig.52 fig.50 13- After the bag is placed on the machine, pull 11- Pull the tray and the hanger at the same time, the bag on both sides to smooth out some folded placing the bag on the machine. parts.
-
Página 25: Brake Adjustment
Brake adjustment Perfect operation of the brake system is fundamental to efficient operation of the Grain Silo Filler. The NSG-9200 is equipped with disc brakes, actuated by a centralized hydraulic system, providing equal braking power to both wheels. As the bag fills, the machine is pushed fowards (away from the bag). -
Página 26: Initial Operation
Brake adjustment Initial operation Before starting to operate the machine, the operator must be prepared and conscious of the basic safety and operating rules as described in this manual. If there are any doubts, we recommend asking your reseller or get in touch with our technical support department. -
Página 27: Concluding The Operation
Do not perform bag filling under the stretching rating as recommended by the manufacturer (the scale is printed on the bag). fig.57 The increased air concentration will affect the quality of the stored product. 2- Open the value (B) of the pump. NSG-9200... -
Página 28: Recommendations
Recommendations Cutting the bag If it is necessary to cut the bag before completely - Filling the Grain Silo Filler must be performed by filling it, as the grain filling type or variety is a grain semi-trailer truck or similar equipment, in changed, change of location etc., proceed as order to maintain a constant flow of the product, follows:... -
Página 29: Maintenance
Maintenance During the first 48 hours of operation, constantly Your NSG-9200 requires a minimum of observe the belts and retighten them as maintenance to keep it operating perfectly and long-lasting. Therefore, some preventive necessary. After the first 10 hours of operation, retighten all maintenance procedures are essential: the fastening screws. - Página 30 Maintenance ALIGNING THE PULLEYS BELTS NSG-9200 is equipped with a system for easy Periodically check the actuation belts and keep them properly tightened. alignment of the pulleys. Whenever necessary, align the pulleys by using nuts D and E (fig.64). NOTE: Loose belts slip and can cause heating from the friction, thereby causing premature wear.
-
Página 31: Lubrication
2- ACTUATION AXLE BEARINGS (fig.67); 01 grease fitting, lubricate every 50 hours. fig.68 1- Find the bleeding screw on the brake calipers (fig.68); 2- Remove the rubber protection on the bleeder (fig.68); fig.67 NSG-9200... - Página 32 Changing the brake fluid (continuation) 6- Open the pump valve (B); 3- Insert the hose in the brake bleeder, and the other end bathed in the jar with a little clean brake fluid (fig.69); 4- Use an open or box-end wrench to open the bleeder;...
-
Página 33: Bleeding The Brakes
(fig.72); 7- Repeat the procedure on the other wheel. 2- Remove the rubber protection on the bleeder (fig.72); After concluding the bleeding on both wheels, pour the fluid through the existing hole of the pump. NSG-9200... -
Página 34: Preventive Maintenance
Preventive maintenance We recommend performing preventive maintenance annually, preferably at the end of every harvest season on the NSG-9200, identifying and replacing any worn or damaged parts. Before long storage time periods: - Remove debris of grain from the worm gear and wash the machine completely;... -
Página 35: Technical Specifications
6.5 x 16 Tire pressure 40 lbs/in2 (2,8 kg/cm2) 9 foot Actuation belt C-105 (02) Brakes Disc brakes, with centralized controller. Fluid: NBR 9292 DOT4 / Quantity: 10 ml OPERATION TRANSPORT Length 2730 4700 Height 3530 3070 Width 4300 2720 NSG-9200... -
Página 36: Practical Guideline
These are some of the most common operating failure item symptoms, showing their probable causes and necessary corrective measures. In case of any questions or doubts, get in touch with your Nogueira reseller or technical support department. SYMPTOMS PROBABLE CAUSE... - Página 37 Replace or repair Brake linings are worn Replace the brake lining The brake fluid level is low Fill the fluid There is no pressure in the oil Dirt is in the pump diapgragm Remove the screw and clean pump the spring NSG-9200...
-
Página 38: Additional Information
Additional information Key gauge table Torque table N.m Torque unit Instructions manual... -
Página 39: Technical Support
Technical Support The machine is identified by a serial number, engraved on a plate (1), located on the machine housing. Write the serial number of your machine here: NSG-9200... - Página 42 Essential in the field Instructions manual...
- Página 43 Sr. Propietario Felicitaciones por la adquisición de la embolsadora de granos NSG-9200 Nogueira. Un producto de la más alta calidad, especialmente desarrollado para atender a sus necesidades. Este manual contiene instrucciones de operación y mantenimiento, que, debidamente observadas, serán la garantía de buen funcionamiento con seguridad y durabilida, de su NSG-9200.
- Página 44 Certificado de garantía Control de garantía Notas: 1- Nogueira tiene como objetivo la constante actualización y perfeccionamiento de sus productos, reservándose el derecho de introducir modificaciones en sus componentes y accesorios sin aviso previo. 2- Las ilustraciones contenidas en este manual son meramente ilustrativas. Todas las instrucciones de seguridad deberán ser tenidas en cuenta para ambas configuraciones de...
-
Página 45: Medio Ambiente
Medio ambiente Nogueira tiene una preocupación constante por la preservación del medio ambiente, tanto en el desarrollo, como en la utilización de procesos y materiales ecológicamente apropiados en la producción de sus productos. PROTEJA Y RESPETE EL MEDIO AMBIENTE, recordando que su preservación es responsabilidad social de todos. -
Página 46: Seguridad
Recomendamos que lo lea atentamente antes de utilizar la máquina por primera vez. Si surge cualquier duda, por favor, entre en contacto con nosotros a través de su revendedor Nogueira o de nuestro Departament de Asistencia Técnica. - Página 47 - Componentes móviles, devido a la inercia, continúan en movimiento por algún tiempo más después que la máquina es apagada. Antes de tocar cualquier componente, apague la fuente de accionamiento, mire y escuche si no hay evidencias de movimiento. Solo toque un componente si está seguro de que está parado. Esté siempre atento! NSG-9200...
- Página 48 Seguridad - No apoye la máquina sobre bloques de cemento, ladrillos huecos u otros soportes que puedan desmoronarse bajo el efecto de cargas prolongadas. - Nunca trabaje debajo de una máquina soportada solo por un cricket, utilice siempre un apoyo seguro.
-
Página 49: Adhesivos De Seguridad
Recuerde que las seguridad. Mantenga distancia durante el partes rotativas no paran inmediatamente funcionamiento. El contacto con el cardán en después del apagado. Algunas partes son casi movimiento podrá provocar grave accidente. imperceptibles cuando en movimiento y usted podrá no verlas. NSG-9200... - Página 50 Adhesivos de seguridad No abra o remueva tapas y protecciones de Al operar la máquina, use equipo de seguridad con la máquina funcionando. protección individual (EPI). Mantenga las manos alejadas de las correas y La exposición prolongada al ruido, sin demás partes que, en movimiento, puedan protección, puede provocar pérdida auditiva.
-
Página 51: Conociendo La Embolsadora
Conociendo la embolsadora fig.01 fig.02 Tolva Freno Molinete Rosca (sin-fin) Escalera Pie de apoyo Bomba hidráulica Rueda izquierda Manómetro Rueda derecha Cabezal Percha Cricket Regulador de la bandeja Cardán Bandeja NSG-9200... -
Página 52: Aplicación
Aplicación La embolsadora NSG-9200 fue proyectada para embutir granos en bolsas de polietileno de forma segura y económica. Su alta capacidad de trabajo, aliada a la opción de almacenamiento en el propio cultivo, evita los costos operacionales de almacenaje y los altos costos de flete en el pico de la cosecha, posibilitando para el productor la comercialización en el momento que encuentre las... -
Página 53: Montaje De La Tolva
Montaje de la tolva Posición de trabajo NSG-9200 viene de fábrica montada en la La tolva es proporcionada desmontada de la posición de transporte (fig.07). Para colocarla máquina. Las instrucciones a continuación en la posición de trabajo (fig.08), será necesario muestran la forma correcta de montarla. - Página 54 Posición de trabajo (continuación) fig.09 fig.12 1- Coloque el pie de apoyo en la posición arriba 4- Utilizando el cricket, levante la máquina y indicada. Si fuere necesario levantar un poco la retire la rueda arriba indicada. máquina utilice el cricket. fig.13 fig.10 5- Desmonte el complemento de la rueda...
- Página 55 11- Coloque la rueda en la posición arriba indicada. fig.21 fig.18 12- Retire el cricket de la máquina y colóquelo 9- Utilizando el cricket, levante la máquina y retire en el cabezal. la rueda arriba indicada. NSG-9200...
-
Página 56: Importante
13- Por último, acople las mangueras de los frenos en las dos ruedas. fig.23 NSG-9200 montada en la posición de trabajo. NOTA: Para colocar la embolsadora en la posición de transporte, siga el procedimiento descrito anteriormente, de forma inversa. -
Página 57: Acoplamiento Al Tractor
Coloque el buje de acople y trábelo con el para la posición de transporte. contrabuje. Recuerde colocar el contrabuje (fig.25) y verificar si el buje de acople está bien trabado. El desacople accidental de la máquina, al ser remolcada, podrá resultar en accidente grave. CUIDADO NSG-9200... -
Página 58: Nivelación
Nivelación Para que la distribución del producto dentro de la bolsa sea uniforme, es importante que la embolsadora trabaje nivelada. Antes de iniciar la operación, obsérvela lateralmente (fig.27). Si está desnivelada, se puede ajustar la altura del acople, conforme muestran las siguientes instrucciones. fig.27 Vista lateral de la embolsadora nivelada. -
Página 59: Preparación Y Colocación Del Cardán
Coloque las partes del cardán, lado a lado. Deberá haber una holgura de, como mínimo, 20 cm en las puntas del MACHO y de la HEMBRA, conforme muestra la figura abajo. holgura: 20 cm CORTE CORTE holgura: 20 cm fig.31 fig.32 NSG-9200... -
Página 60: Después Del Corte
Manténgase a distancia segura de la trabajo. máquina en funcionamiento. - Es de responsabilidad exclusiva del revendedor autorizado Nogueira ejecutar la preparación del eje cardán y el primer accionamiento de la máquina. Manual de instrucciones... -
Página 61: Preparación Del Terreno
Se deben mantener los alrededores de la bolsa libre de malezas y restos de granos. Si necesario, aplicar un herbicida para la limpieza del lugar. PERFIL DEL TERRENO fig.35 fig.36 IDEAL UTILIZABLE fig.38 fig.37 EVITAR NO RECOMENDADO NSG-9200... -
Página 62: Colocación De La Bolsa
Colocación de la bolsa Con la embolsadora colocada en la posición de trabajo, proceda como descrito a continuación para la colocación de la bolsa: SOLTE LA CADENA DO ESTIRADOR PERCHA fig.41 BANDEJA fig.39 3- Coloque la percha en el suelo, cerca de la 1- Suelte las cadenas de los estiradores bandeja. - Página 63 NOTA: La función de la bandeja retráctil es auxiliar en la colocación de la bolsa. fig.46 8- Posicione la bolsa con la parte clara volcada hacia la máquina. De esa forma, al llenarla, el lado claro quedará de afuera. NSG-9200...
-
Página 64: Sellar La Extremidad De La Bolsa
Colocación de la bolsa (continuación) SELLAR LA EXTREMIDAD DE LA BOLSA fig.52 fig.50 13- Después de colocada en la máquina, tire de 11- Empuje al mismo tiempo la bandeja y o la bolsa por igual en los dos costados, percha, vistiendo la bolsa en la máquina. deshaciendo algunos pliegues. -
Página 65: Regulado De Los Frenos
Regulado de los frenos El perfecto funcionamiento del sistema de frenos VALVULA es fundamental para la eficiencia de la embolsadora. La NSG-9200 posee frenos a MANÓMETRO disco, accionados por sistema hidráulico centralizado, proporcionando frenado por igual en las dos ruedas. -
Página 66: Inicio De La Operación
Regulado de los frenos Inicio de la operación Antes de iniciar el trabajo, el operador debe estar preparado y consciente de las reglas básicas de seguridad y operación descritas en este manual. En caso de dudas, recomendamos consultar su revendedor o entrar en contacto con nuestro departamiento de asistencia técnica. -
Página 67: Finalizando La Operación
(en la escala impresa en la bolsa). El elevado nivel de aire dentro de la bolsa fig.57 comprometerá la calidad del producto almacenado. 2- Open the value (B) of the pump. NSG-9200... -
Página 68: Recomendaciones
Recomendaciones Corte de la bolsa Si es necesario el corte de la bolsa antes de - La alimentación de la embolsadora debe ser llenarla totalmente, devido a cambio de hecha por vagón granelero o equipamiento variedad o tipo de cereal, cambio de lugar, etc., similar, a fin de mantener un flujo constante y con proceda como descrito a continuación: gran volumen de producto, proporcionando... -
Página 69: Mantenimiento
Mantenimiento Durante las primeras 48 horas de trabajo, Su NSG-9200 necesita un mínimo de observe constantemente las correas, mantenimiento para su perfecto funcionamiento y durabilidad. Para ello, algunos cuidados son retensionando si necesario. indispensables: Después de las primeras 10 horas de trabajo, reajuste todos los tornillos de fijación. -
Página 70: Alineando Las Poleas
Mantenimiento ALINEANDO LAS POLEAS CORREAS La NSG-9200 posee un sistema que permite Verifique periódicamente las correas de accionamiento y manténgalas debidamente alinear fácilmente las poleas. Si necesario, proceda a la alineación actuando en las tuercas estiradas. D y E (fig.64). -
Página 71: Lubricación
D E L E J E ACCIONAMIENTO (fig.67). 01 engrasadora, lubricar cada 50 horas. PROTECTOR fig.68 1- Localice el tornillo del sangrador que se sitúa en la pinza del freno (fig.68). 2- Retire el protector de goma del sangrador (fig.68). fig.67 ENGRASADERA NSG-9200... - Página 72 Cambio del fluido del sistema de frenos (continuación) 6- Abra la válvula de la bomba (B). 3- Instale la manguera en la boquilla de sangrado, dejando el otro extremo sumergido en el recipiente que contiene un poco líquido de frenos limpio (fig.69).
-
Página 73: Sangría De Los Frenos
2- Retire el protector de goma del sangrador 7- Repita el procedimiento en la otra rueda. (fig.72); Después del término de la sangría en las dos ruedas, complete el fluido por el orificio existente en la bomba. NSG-9200... -
Página 74: Conservación
Conservación Se recomienda realizar anualmente, preferentemente al final de cada temporada, una revisión general en la NSG-9200, identificando y substituyendo partes desgastadas o dañadas. Antes de paradas prolongadas: - Remueva restos de granos de la rosca sin-fin y lave la máquina;... -
Página 75: Especificaciones Técnicas
Presión en los neumáticos 40 lbs/pul2 (2,8 kg/cm2) Bolsa 9 pies Correa de accionamiento C-105 (02) Frenos A disco, con comando centralizado Fluído: NBR 9292 DOT4 / Cantidad: 1000 ml OPERACIÓN TRANSPORTE Largo 2730 4700 Altura 3530 3070 Ancho 4300 2720 NSG-9200... -
Página 76: Guía Práctica
Guía práctica Presentamos a continuación los síntomas más comunes de fallas de operación, sus probables causas y las medidas que deben ser tomadas. En caso de dudas, consulte su revendedor Nogueira o entre en contatco con nuestro departamento de asistencia técnica. - Página 77 Substituir la reparación desgastada Pastillas desgastadas Substituir las pastillas Nivel de fluido del freno bajo Completar el fluido Bomba de aceite sin presión Suciedad en el diafragma de la Remover el tornillo y promover bomba la limpieza del espiral NSG-9200...
-
Página 78: Informaciones Adicionales
Informaciones Adicionales Tabla de medidas de las llaves Tabla de Torques Unidad de par de apriete en N.m Manual de instrucciones... -
Página 79: Asistencia Técnica
Anote aquí el número de serie de la máquina: Al enviar comunicaciones o requerir auxilio de la asistencia técnica Nogueira, siempre informe el número de serie y el modelo de la máquina, presentes en la plaqueta de identificación. Al substituir piezas, utilice siempre artículos orinales Nogueira. Solamente las piezas originales son fabricadas de acuerdo con los diseños, materiales... -
Página 80: Certificado De Garantía
09 (nueve) últimos meses - garantía adicional concedida por Nogueira Máquinas Agrícolas. 2- Consiste en la presente garantía, en el compromiso de Nogueira en reparar o sumi- nistrar gratuitamente, en su fábrica, las piezas que a su exclusivo juicio presentan defectos de fabricación. -
Página 81: Instrucciones Para El Registro En El Sitio
1. Llene el TÉRMINO DE RECIBO con la información solicitada y fi rme; 2. Dispare el TÉRMINO DE RECIBO completado y la factura de venta; 3. Acceder al sitio www.nogueira.com.br y haga clic en la pestaña “TÉRMINO DE RECIBO” o acceda nogueira.industriasnb.com/entrega ;... -
Página 82: Esencial En El Campo
Esencial en el campo Manual de instrucciones... - Página 84 NOGUEIRA Ind. Com. Impl. Máquinas Agrícolas S.A. St./R: Fernando de Souza, 533 - Distrito Industrial - CEP 13877-775 Tel/Phone.: +55 19 36381500 nogueira@nogueira.com.br - www.nogueira.com.br CNPJ: 08.510.974/0001-27...