
Manuales relacionados para Nogueira HAYNOG-300


Resumen de contenidos para Nogueira HAYNOG-300
- Página 1 Rotary / Rake - Henificador / Hilerador HAYNOG-300 Instructions Manual Manual de Instrucciones...
- Página 3 This information is extremely important to identify your machine, in cases when you need technical support or replacement parts. Nogueira S/A is always at your disposal to answer any questions or doubts and supply efficient and permanent technical support. The images displayed in this manual are only for illustrative purposes. Thus to facilitate your viewing, the images show cutaway or the safety shielding removed to display it more clearly.
-
Página 4: Tabla De Contenido
Warranty control Notes: 1- Nogueira seeks to constantly and improve its products; it reserves the right to introduce modifications in its components and accessories without previous notice. 2- The illustrations contained in this manual are merely illustrative. All safety instructions must be abided by for both machine configurations. -
Página 5: Environmental Conservation
Environmental conservation Nogueira is continually concerned with the environmental conservation, in the development phase, as well in the utilization of processes and materials ecologically appropriate in its production and its products. PROTECT AND RESPECT THE ENVIRONMENT, remember that conservation is the social responsibility of everyone. -
Página 6: Safety
If you have any doubts or questions, please get in touch with - Do not operate the machine while or after us at your Nogueira reseller or our Technical drinking alcoholic beverages or medications Support Department. - Página 7 Mark any dangerous places or obstacles necessary to get on the machine for any which may impose a hazard to operating the adjustment or repair, disconnect the power take- machine. off from the tractor and wait until the components/ parts are completely motionless. HAYNOG-300...
- Página 8 Safety - If you notice any abnormality In the operation: - When driving the tractor with the machine on vibrations, different noises, etc., turn off the public roadways, obey the current valid machine immediately. Check and eliminate the legislations regarding the maximum height of cause before turning on again.
-
Página 9: Safety Adhesive Labels
Safety adhesive labels HAYNOG-300... -
Página 10: Getting To Know The Haynog-300
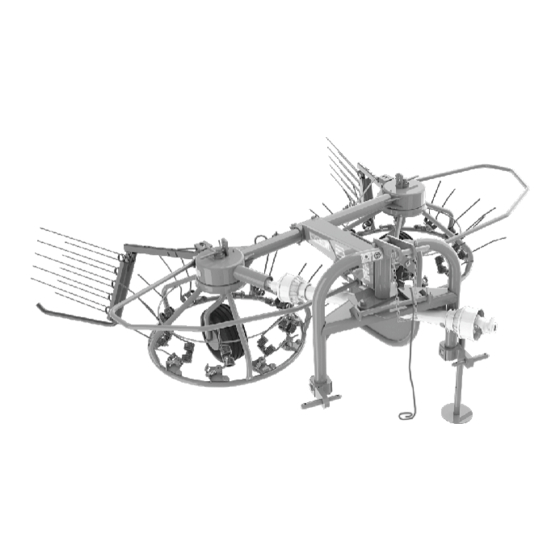
Getting to know the HAYNOG-300 fig.01 fig.02 Fastening bar (LEFT) Rotor Chassi NARROW Spring Fastening lever Lower connector WIDE Spring Driveshaft Support wheel Safety shielding (RIGHT) Rotor Support foot (RIGHT) Deflector (LEFT) Deflector Lever cable Upper connector Instructions Manual... -
Página 11: Presentation
The lower connecting pins are reversible, APPLICATION which makes them enabled for coupling the HAYNOG-300 to category I or II tractors: The HAYNOG-300 was designed for swathing or spreading diverse products used for - Cat. I: The smaller diameter pin is placed on producing hay etc., especially for diverse types... - Página 12 Verify the lower arms of the tractor and make PLACING THE DRIVESHAFT sure they are the same height as the machine before coupling it. Carefully approach the tractor to the machine: 1- First connect the left arm. 2- Then connect the right arm. CAUTION 3- Finally, connect the upper arm.
- Página 13 - Disconnect the power take-off when maneuvering the coupled machine. - It is the exclusive responsibility of the authorized Nogueira reseller to perform the preparation on the driveshaft and the first operation of the machine. After assembling the driveshaft, keep the ends aligned (the following fig.).
-
Página 14: Transport Position
TO THE SIDE OPERATING TRANSPORT POSITION POSITION Perform the following procedure to change the HAYNOG-300 from the operating position to the transport position: 1- Couple the machine to the tractor. FASTENING FASTENER LEVER 2- Block the fastener lever on pin A (fig.10). -
Página 15: Operating Position
TO THE SIDE TRANSPORT OPERATING POSITION POSITION Perform the following procedure to change the machine into the OPERATING position: 1- Couple the machine to the tractor. FASTENER EVER ROPE 2- Pull the rope to unblock the fastener lever (fig.16). HAYNOG-300... -
Página 16: Operation
Operation GENERAL INSTRUCTIONS Lower the hydraulic system of the tractor to a floating position, so that the tractor can adjust to the ground. It is essential to achieve good operation to keep the power take-off rotation between 350 and 540 rpm, thus this reduce wear and wasting hay. Avoid sudden turn towards the right to avoid damaging the driveshaft. - Página 17 It is also possible to change the height of the front part are near the ground. deflectors by simply turning the nylon blocker 180°. 5- Operate the HAYNOG-300 at full speed (540 rpm) and observe if the springs touch the BLOCKER material in front of the machine. If necessary, disconnect the power take-off and adjust the third arm point connector to the tractor.
-
Página 18: Raking
Raking 1- Place the machine in the operating position, as explained in the instructions in this manual. 2- Place all the springs in the “spreading” position (fig.23), in both rotors. NOTE: Changing the position of the springs is done manually, and does not require the use of any tool. Just pull the pin and spring and move it to be indicated position in the following figure. - Página 19 180° BLOCKER 5- The HAYNOG-300 operates at full speed (540 rpm) and observe if the springs touch the material in front of the machine. If necessary, disconnect the power take-off and adjust the third point connection to the tractor.
-
Página 20: Maintenance
Maintenance The HAYNOG-300 requires minimum maintenance to make it work perfectly and achieve a long lifetime. Therefore, the following are essential measures for these purposes: - Keep the machine clear from material debris. - Keep the springs in good operating condition, replacing them whenever damaged. - Página 21 The correct placement of the springs on the rotors is very important to guarantee perfect operation of the HAYNOG-300. When replacing them, observe the assembly and check if it is correct: - The blue label shows it if for the left rotor and the yellow is for the right rotor (in case there is any doubt to identify the right and left rotor, consult this manual).
-
Página 22: Care With The Machine
TIRES Periodically verify and measure the tire pressure. Be careful when filling them; stay next to them and never in front or on the tires. Do not take off or replace the tire on the wheel rim, unless you are equipped with the correct equipment and have the necessary experience to perform this task. -
Página 23: Lubrication
Marfak MP2 Texaco 1- DRIVESHAFT The brackets and bars: lubricate after every 10 operating hours. 2- TRANSMISSION (GEARS) 02 grease fittings: lubricate after every 10 operating hours. 3- TRANSMISSION (BEARINGS) 02 grease fittings: lubricate after every 10 operating hours. HAYNOG-300... -
Página 24: Technical Characteristics
Technical characteristics Operating width 3000 mm Transport width 2800 mm Height 1250 mm Number of rotors Number of narrow springs (per machine) Number of wide springs (per machine) Tires 15 x 6.00 - 6 V-61 4 PR Tire pressure 21 lbs/in² (1,5 kg/cm²) Power take-off rotation 540 rpm Hitching category... -
Página 25: Additional Information
Additional information Key gauge table Torque table N.m Torque unit HAYNOG-300... -
Página 26: Technical Support
Technical Support The HAYNOG-300 is identified by a serial number, engraved on a plate (1), located on the machine housing. Write the serial number of your machine here: Instructions Manual... - Página 28 Essential in the field Instructions Manual...
- Página 30 Essential in the field Instructions Manual...
- Página 31 Esta información será muy importante para la identificación de su máquina, en caso de asistencia o reposición de piezas. Nogueira S/A estará siempre a su disposición, para responder a cualquier consulta, ofreciéndole asistencia técnica eficaz y permanente.
- Página 32 Certificado de garantía Control de garantía Notas: 1- Nogueira tiene como objetivo la constante actualización y perfeccionamiento de sus productos, reservándose el derecho de introducir modificaciones en sus componentes y accesorios sin aviso previo. 2- Las illustraciones contenidas en este manual son meramente ilustrativas. Todas las instrucciones de seguridad deberán ser tenidas en cuenta para ambas configuraciones de...
-
Página 33: Medio Ambiente
Medio ambiente Nogueira tiene una preocupación constante con la preservación del medio ambiente, tanto en el desarrollo, como en la utilizacion de procesos y materiales ecológicamente apropiados en la producción de sus productos. PROTEJA Y RESPETE EL MEDIO AMBIENTE, recordando que su preservación es responsabilidad social de todos. -
Página 34: Seguridad
- Lea el manual de instrucciones antes de Preparamos este manual para que usted encender la máquina. Manténgase atento y conozca su HAYNOG-300 y, así, pueda utilizarlo respete todas las recomendaciones de uso y de la manera más correcta y segura. - Página 35 - Realice el reconocimiento del terreno antes de regulado o reparación, apague el toma de fuerza iniciar el trabajo. Demarque lugares peligrosos del tractor y aguarde hasta que los componentes o con obstáculos que puedan poner en riesgo la estén completamente sin movimiento. operación. HAYNOG-300...
- Página 36 Seguridad - Si observa cualquier anormalidad en el - Al transitar con la máquina en vías públicas, funcionamiento: vibraciones, ruidos diferentes observe las reglas locales de tránsito y etc., apague la máquina inmediatamente. seguridad. Infórmese sobre la legislación Verifique y elimine la causa, antes de encenderla vigente en cuanto a la altura y el ancho nuevamente.
-
Página 37: Adesivos De Seguridad
No se acerque a la máquina antes de su paralización completa. Recuerde que las partes rotativas no paran inmediatamente después del apagado. Algunas partes son casi imperceptibles cuando están en movimiento y usted puede no verlas. HAYNOG-300... -
Página 38: Conozca El Haynog-300
Conozca el HAYNOG-300 fig.01 fig.02 Barra Fijadora Rotor (IZQUIERDO) Chasis Espiral (ESTRECHO) Palanca Fijadora Acople Inferior Espiral ANCHO Cardán Rueda de Apoyo Protección de Seguridad Rotor (DERECHO) Pie de Apoyo Deflector (DERECHO) Deflector (IZQUIERDO) Cable de la Palanca Acople Superior... -
Página 39: Presentación
APLICACIÓN lo que permite el acoplamiento del HAYNOG- 300 en tractores categorías I o II. El HAYNOG-300 fue diseñado para surcar o - Cat. I: El buje con el diámetro menor es esparcir diversos productos utilizados en la colocado en el lado externo. -
Página 40: Colocación Del Cardán
Verificar si los brazos inferiores del tractor COLOCACIÓN DEL CARDÁN están en igual altura antes de acoplar la máquina. Acerque el tractor con cuidado. 1- Acople primero el brazo isquierdo. 2- Luego, acople el brazo derecho. CUIDADO 3- Por último, acople el brazo superior (tercer punto). - Página 41 - Apague el toma de fuerza al maniobrar con la máquina acoplada. - Es de responsabilidad exclusiva del revendedor Nogueira ajecutar la preparación del cardán y el primer accionamiento de la máquina. Al montar el cardán, mantenga los terminales alineados (fig abajo).
-
Página 42: Posición De Transporte
POSICIÓN DE TRANSPORTE Para colocar el HAYNOG-300 en la posición de TRANSPORTE, proceda como descrito a continuación: 1- Acoplar la máquina al tractor. 2- Bloquear la palanca fijadora en el buje A (fig.10). NOTA: Mover un poco la máquina hacia el lado (fig.11), facilitará... -
Página 43: Posición De Trabajo
(fig.17), facilitará el desbloqueo de la palanca (fig.16). Para colocar la máquina en la posición de TRABAJO, proceder como descrito a continuación: 1- Acoplar la máquina al tractor. 2- Tirar de la cuerda, desbloqueando la palanca fijadora (fig.16). HAYNOG-300... -
Página 44: Operación
Operación INSTRUCCIONES GENERALES Bajar el hidráulico del tractor en posición fluctuante para que la máquina se adapte al suelo. Para un buen trabajo es indispensable mantener la rotación en el toma de fuerza entre 350 y 540 rpm, reduciendo así el desgaste y la pérdida de heno. Evitar giros bruscos hacia la derecha para no dañar el cardán. -
Página 45: Altura De Las Ruedas
180°. 5- Hacer funcionar el HAYNOG-300 a plena velocidad (540 rpm) y observar si los espirales tocan el material en el frente de la máquina. Si necesario, desconectar el toma de fuerza y regular el brazo del tercer punto del tractor. -
Página 46: Hilerar
Hilerar 1- Colocar la máquina en la posición de trabajo. 2- Colocar todos los espirales en la posición “hilerar” (fig.23), en los dos rotores. NOTA: El cambio de posición de los espirales es hecho manualmente, no requiere ninguna herramiento. Simplesmente tire del buje con el espiral y desplace hasta la posición indicada en la figura abajo. 3- ALTURA DE LAS RUEDAS: En general, se utiliza el regulado de la rueda en el orificio superior (fig.24). - Página 47 4- Bajar la máquina hasta que los espirales de bloqueador de nylon a 180°. la parte frontal estén cerca del suelo. 5- Hacer funcionar el HAYNOG-300 a plena velocidad (540 rpm) y observar si los espirales tocan el material en el frente de la máquina. Si necesario, apagar el toma de fuerza y regular el brazo del tercer punto del tractor.
-
Página 48: Mantenimiento
Mantenimiento El HAYNOG-300 necesita de un mínimo de mantenimiento para su perfecto funcionamiento y durabilidad. Para tanto, algunos cuidados son indispensables: - Mantener la máquina limpia de restos de material. - Mantener los espirales en buenas condiciones de uso, substituyéndolas inmediatamente cuando dañadas. - Página 49 El posicionamiento correcto de los espirales en los rotores es muy importante para garantizar el perfecto funcionamiento del HAYNOG-300. Al substituirlas, observe si el montaje está correcto: - La etiqueta azul indica que el espiral es para el rotor izquierdo y la amarilla para el rotor derecho (en caso de duda para identificar el rotor derecho y el izquierdo, consulte este manual).
-
Página 50: Conservación
NEUMÁTICOS Verifique periódicamente y mantenga el calibrado correcto de los neumáticos. Tenga cuidado al inflarlos, pemanezca siempre al lado y nunca adelante o sobre el neumático. No intente desmontar o montar el neumático en la rueda, a no ser que tenga equipamiento y la experiencia necesaria para ejecutar este trabajo. -
Página 51: Lubricación
Litholine MP2 Atlantic Marfak MP2 Texaco 1- CARDÁN Crucetas y barras: lubricar cada 10 horas de trabajo. 2- TRANSMISIÓN (ENGRANAJES) 02 engrasadoras: lubricar cada 10 horas de trabajo. 3- TRANSMISIÓN (RODAMIENTOS) 02 engrasadoras: lubricar cada 10 horas de trabajo. HAYNOG-300... -
Página 52: Características Técnicas
Características técnicas Ancho de trabajo 3000 mm Ancho de transporte 2800 mm Altura 1250 mm Número de rotores Numero de espirales estrechos (por máquina) Número de espirales anchos (por máquina) Neumáticos 15 x 6.00 - 6 V-61 4 PR Presión de los neumáticos 21 lbs/pol²... -
Página 53: Informaciones Adicionales
Informaciones Adicionales Tabla de medidas de las llaves Tabla de Torques Unidad de par de apriete en N.m HAYNOG-300... -
Página 54: Asistencia Técnica
Anote aquí el número de serie de la segadora: Al enviar comunicaciones o requerir auxilio de la asistencia técnica Nogueira, siempre informe el número de serie y el modelo de la máquina, presentes en la plaqueta de identificación. Al substituir piezas, utilice siempre artículos orinales Nogueira. Solamente las piezas originales son fabricadas de acuerdo con los diseños, materiales... -
Página 56: Esencial En El Campo
Esencial en el campo Manual de instrucciones... - Página 58 Esencial en el campo Manual de instrucciones...
- Página 60 NOGUEIRA Ind. Com. Impl. Máquinas Agrícolas S.A. St./R: Fernando de Souza, 533 - Distrito Industrial - CEP 13877-775 Tel/Phone.: (19) 3638.1500 - Fax: (19) 3638.1556 nogueira@nogueira.com.br - www.nogueira.com.br CNPJ: 08.510.974/0001-27...