
Manuales relacionados para Nogueira DPM-1

Resumen de contenidos para Nogueira DPM-1
- Página 1 Disintegrator, chopper and grinder Desintegradores, picadores y moledores DPM-1/2/4 Instructions Manual Manual de Instrucciones...
- Página 3 This information is very important for identifying your machine when technical support or part replacement are needed. Nogueira S/A is always at your disposition, ready to answer any question, request for information, and supply efficient and permanent technical support. The images displayed in this manual are only for illustrative purposes. Thus to facilitate your viewing, the images show cutaway or the safety shielding removed to display it more clearly.
-
Página 4: Tabla De Contenido
Warranty certificate Warranty control Note: 1- Nogueira máquinas aims its products to be constantly getting upgraded and improved in addition to having its own right to introduce changes in its components and accessories without prior notice. 2- Illustrations in this manual are merely illustrative. -
Página 5: Environmental Conservation
We have prepared this manual to make you familiar with your machine and, so that you can use it correctly and safety. We recommend carefully reading it before operating the machine the first time. If you have any doubts or questions, please get in touch with us at your Nogueira reseller or our technical support department. SAFETY WARNINGS Safety warnings alert on situations that can be dangerous in some away. -
Página 6: Safety Precautions
Safety - Keep all the protective shielding in its proper SAFETY PRECAUTIONS places and do not operate the machine without it - Read the instruction manual before turning on being installed. the machine. Pay close attention and respect all the operating and safety recommendations - People must not remain on any part of the while operating. - Página 7 Safety - Moveable parts and components, due to - Follow the safety recommendations and pay inertia, they continue moving after the machine attention. Lack of attention while operating can stops operating. cause accidents. Before touching any part, disconnect the actuation source, look, and listen to see of there is any evidence of movement.
-
Página 8: Safety Adhesive Labels
Safety adhesive labels Read the instruction manual before Before performing any maintenance, turning on the machine. Pay close adjustment or lubrication in the machine, attention to all the operating and safety turn off the engine and disconnect the recommendations, in order to avoid any power plug. -
Página 9: Introducing The Shredder, Chopper And Grinder
Introducing the shredder, chopper and grinder DPM-500/1/2/4... -
Página 10: Application
Application The Nogueira shredder, chopper and grinder can be used for dried products as well as for fresh products. Thus, for such products as sugarcane, grasses, branches, roots, tubers and forages used for daily animal feed, as well as for shredding dry products, as corn kernels, corn with the leaves and cob, dried rice plants, corn stalks, dried cereals, cereal straw, and others, used for preparing animal feed and foods. -
Página 11: Assembly Driven By Electric Motors
The machine and the motor are installed on a one-piece base. The Nogueira stand is equipped with special rubber feet which do away for the need of any other base. 1- Electric installation for the power source: This must be done based on the technical specifications, considering such factors as: - Distance, correct cabling distance, as well as breaker switches and safety devices. - Página 12 INSTALLING THE MACHINE AND THE MOTOR ON THE BASE: The base is already prepared with specific places for placing the machine and supporting it, as well as moveable rails for fastening the motor. Once the machine and the motor are placed on the base, then it is necessary to proceed in aligning the pulleys.
-
Página 13: Assembly Driven By Diesel Or Gasoline Motors
Assembly driven by diesel or gasoline motors The machine and the motor are installed on a one-piece base. The Nogueira stand is equipped with special rubber feet which do away for the need of any other base. FASTENING BASE 1- This base has been designed for diesel or gasoline motors but it also can used for electric motors. -
Página 14: Assembly On The Stand Extension
Assembly on the stand extension The option for installation of the DPM on the stand extension, makes it possible to place the motor on the respective stand, and then there is no need to use a base. BASIC INSTALLATION SEQUENCE The stand extension version is shipped from the factory preassembled. - Página 15 Stretch the belts using the existing stretcher on Fasten the motor on the stand rails, then install the pulley and the belts. the stand. Use the nuts on the stretcher for adjustment (G). Place the shield cover (F), the cover (E) and the ventilator (D).
-
Página 16: Cyclone Assembly
Cyclone assembly The cyclone is optional equipment, supplied when ordered. When it is purchased disassembled and packaged. Follow these instructions for assembly: Insert the curved tube in the opening of the cyclone. Insert the three feet in the existing slots on the body of the cyclone. -
Página 17: Assembly As A Tractor Accessory
Assembly as a tractor accessory The Nogueira factory also supplies a special accessory for installing as a tractor accessory. BASIC INSTALLATION SEQUENCE 1- Complete set: If the order is for the complete set, the machine will be shipped completely assembled from the factory. -
Página 18: Operation
Operation Before operating the machine, check the following: See if there are no tools, equipment, or objects on the motor, or on the machine, especially inside the intake chute. - See if there any people or objects near the pulleys or belts; - See if the rotation direction is correct;... - Página 19 GRINDING DRY PRODUCTS WITHOUT USING THE CYCLONE 1- Place the vacuum isolator (4) - if the machine is equipped with the cyclone; 2- Place the box inner cover (1); 3- Place the sieve based on the type of final product (2) insert the most curved part first; 4- Place the moveable cover on the intake chute (3);...
-
Página 20: Maintenance
CUTTING ROOTS AND TUBERS The product is placed in the intake chute and comes out the lower chute. 1- Remove the smooth belt / sieve (2); 2- Place the inner cover (1); 3- Remove the moveable cover of the intake chute (3); 4- Remove the back closure (5);... -
Página 21: Removing The Blades
REMOVING THE BLADES To remove the blades (A), just remove the screws (B), together with their respective washers. SHARPENING THE BLADES 1- The blades must always be sharpened when their cutting edge is dull; 2- Only one side of the cutting edge must be sharpened and the same as the original cutting edge; 3- Try to remove the same amount of material as to not affect the balancing of the blade;... -
Página 22: Lubrication
CHANGING THE HAMMERS There are 4 toothed surfaces on the hammers (A) which can be repositioned as each one becomes worn. Proceed as follows to change the hammer surface or to replace the entire hammer: 1- Cut the locks (B) on the hammer pins. 2- Remove the hammer pins (C), make sure the position of the rings is correct in the spacer rings, and be careful not to mix the sets of hammers, as this will interfere with the balancing of the machine, causing vibrations. -
Página 23: Technical Characteristics
Technical characteristics NOTE: The rotation is in the clockwise direction, when looking from the intake chute direction (picture beside). Production (kg/hour) NOTE: The above productions are only reference values, obtained from test conditions, but these values may vary based on the humidity of the product, specific weight, and opertaing conditions. DPM-500/1/2/4... -
Página 24: Drive Pulley (Actuated By Electric Motor)
Drive pulley (Actuated by electric motor) Drive pulley (Actuated by motors) Belts (Actuated by electric motor) Instructions Manual... -
Página 25: Pulley And Belts (Actuation By Tractor)
Pulley and belts (Actuation by tractor) Belts (Actuation by diesel / gasoline motor) DPM-500/1/2/4... -
Página 26: Pulley And Belts (Actuation By Tractor)
Pulley and belts (Actuation by tractor) DPM-1 DPM-2 DPM-4 Weight (with stand) (kg) Space occupied by the machine (m) 0,70 x 0,50 0,90 x 0,55 0,95 x 0,70 Space occupied by the machine w.o. cyclone - w. base 0,80 x 1,40... -
Página 27: Practical Guide
Practical guide Machine is jammed Due excessive intake, the Stop the motor, clean the excess motor cannot maintain the product, start operating again but required rotation and the ow control the intake to the product accumulates inside machine, so that it does not exceed the machine the recommended capacity Low production... -
Página 28: Additional Information
Additional information Key gauge table Torque table N.m Torque unit Instructions Manual... -
Página 29: Technical Assistance
When replacing parts, you should always use original Nogueira items. Only the original parts are produced in accordance with the designs, materials and project specifications, undergoing a strict quality assurance process. - Página 32 Essential in the field Instructions Manual...
- Página 33 Nogueira S/A estará siempre a su disposición para responder a cualquier consulta, ofreciéndole asistencia técnica eficaz y permanente. Las imágenes presentadas en este manual son de carácter meramente ilustrativo. Para facilitar la visualización, pueden mostrar protecciones de seguridad abiertas o...
- Página 34 Certificado de garantía Control de garantía Notas: 1- Nogueira tiene como objetivo la constante actualización y perfeccionamiento de sus productos, reservándose el derecho de introducir modificacines en sus componentes y accesorios sin aviso previo. 2- Las ilustraciones contenidas en este manual son meramente ilustrativas. Todas las instrucciones de seguridad deberán ser tenidas en cuenta para ambas configuraciones de...
-
Página 35: Medio Ambiente
Recomendamos que lo lea atentamente antes de utilizar la máquina por primera vez. Si ocurre cualquier duda, por favor, entre en contacto con nosotros a través de su revendedor Nogueira o de nuestro Departamento de asistencia técnica. -
Página 36: Precauciones De Seguridad
Seguridad - Nunca toque las poleas o correas con la PRECAUCIONES DE SEGURIDAD máquina encendida. Mantenga las manos - Lea el manual de instrucciones antes de distantes de los componentes en movimiento. encender la máquina. Manténgase atento y respete todas las recomendaciones de uso y - Mantenga los adhesivos de seguridad seguridad durante la operación. - Página 37 Seguridad - Nunca trabaje debajo de una máquina - Esté preparado si ocurre un accidente. soportada solo por un cricket, utilice siempre un Mantenga un kit de primeros auxilios en un lugar apoyo seguro. de fácil acceso. Sepa cómo utilizarlo. - Si observa cualquier anormalidad en el - La utilización de este equipamiento en funcionamiento: vibraciones, ruidos diferentes...
-
Página 38: Adhesivos De Seguridad
Adhesivos de seguridad Apague la fuente de accionamiento Lea el manual de instrucciones antes de (motor o tractor) antes de realizar encender la máquina. servicios de mantenimiento, regulado, Manteniéndose atento y respetando lubricación, limpieza etc., en la máquina. todas las recomendaciones de uso y De esta forma, usted impedirá... -
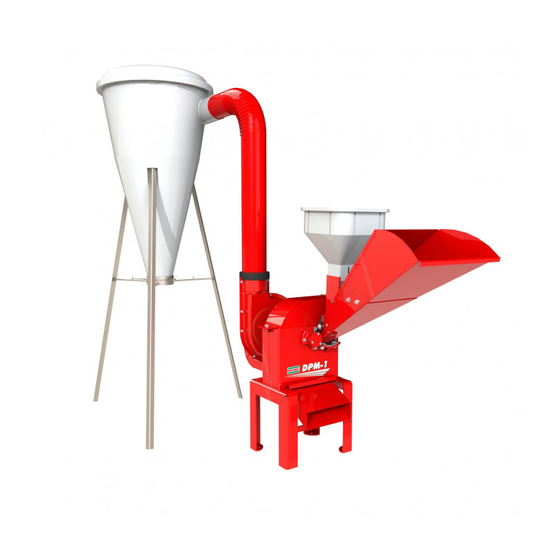
Página 39: Conociendo El Desintegrador, Picador Y Moledora
Conociendo el desintegrador, picador y moledora CENTRÍFUGA TOLVA PICO DE ALIMENTACIÓN FILTRO FONDO PICO DE DE CORTE CAJA DEL VENTILADOR SALIDA INFERIOR CARCASA CABALLETE CABALLETE PROLONGADO MARTILLO CUCHILLA * motor suministrado mediante pedido. DPM-500/1/2/4... -
Página 40: Aplicación
Accionamiento El DPM Nogueira podrá ser accionado por motores (eléctrico, diesel o gasolina) y por tractores. Los accesorios para estos acoplamientos son constituidos por bases, poleas y correas y son suministrados a pedido del cliente. -
Página 41: Montaje Con Motores Eléctricos
Montaje con motores eléctricos Para ser acoplado con motores eléctricos, el DPM Nogueira necesita algunos accesorios que son constituidos por bases, poleas y correas. La máquina y el motor son instalados sobre una única base. La base Nogueira posee soportes especiales de goma, que eliminan la necesidad del asentamiento. -
Página 42: Instalación De La Máquina Y Del Motor Sobre La Base
INSTALACIÓN DE LA MÁQUINA Y DEL MOTOR SOBRE LA BASE: La base posee los puntos para la colocación de la máquina ya dimensionados de acuerdo con el soporte de la misma, así como las guías móviles para la fijación del motor. Una vez colocados la máquina y el motor sobre la base, se debe proceder al alineamiento de las poleas. -
Página 43: Montaje Con Motores A Diesel O Gasolina
Montaje con motores a diesel o gasolina La máquina y el motor son instalados sobre una única base. La base Nogueira posee soportes especiales de goma, que eliminan la necesidad del asentamiento. BASE DE FIJACIÓN 1- Esta base fue proyectada para motores a diesel o a gasolina pero también podrá ser usada para motores eléctricos. -
Página 44: Montaje Con Caballete Prolongado
Montaje con caballete prolongado La opción de DPM con caballete prolongado posibilita la colocación del motor en el propio caballete, sin la necesidad de utilización de una base. SECUENCIA BÁSICA PARA LA INSTALACIÓN La versión con caballete prolongado sale de fábrica premontada, faltando solo la colocación del motor y de las correas. - Página 45 ESTIRADOR Estire las correas utilizando el tensor existente Prenda el motor en las guías del caballete, a continuación, coloque la polea y las correas. en el caballete. Para regular el tensor gire las tuercas (G). Coloque la capa del blindado (F), la tapa (E) y el ventilador (D).
-
Página 46: Montaje De La Centrífuga
Montaje de la centrífuga La centrífuga es equipamiento opcional, suministrado mediante pedido. Cuando adquirido, viene desmontado y embalado. Para su montaje, observe las instrucciones a continuación: Encaje el tubo curvado en la boca de entrada de la centrífuga. Encaje los tres pies en los rebajos existentes en el cuerpo de la centrífuga. -
Página 47: Montaje Con Accesorio Para Tractor
Montaje con accesorio para tractor Nogueira fabrica también un accesorio especial para instalación de la máquina a ser accionada por tractor. ACCESORIO PARA TRACTOR SECUENCIA BÁSICA PARA LA INSTALACIÓN 1- Conjunto completo: Si el pedido fuere hecho para el conjunto completo, la máquina saldrá lista de fábrica. En este caso, la instalación se resume solo al acoplamiento del conjunto al tractor, por intermedio de los tres puntos de... -
Página 48: Operación
Operación Antes de poner la máquina en funcionamiento, se debe verificar: Si no hay herramientas, pertrechos u objetos sobre el motor, o sobre la máquina, principalmente dentro del pico de alimentación: - Si no hay personas u objetos cerca de las poleas y correas; - Si el sentido de rotación está... -
Página 49: Para Moler Productos Secos Sin Utilizar Centrífuga
PARA MOLER PRODUCTOS SECOS SIN UTILIZAR CENTRÍFUGA 1- Colocar el aislador de aspiración (4) - si la máquina está equipada con centrífuga; 2- Colocar la contratapa (1); 3- Colocar el filtro conforme el producto que se desea obtener (2) introduciendo la parte más curva primero;... -
Página 50: Para Cortar Raíces Y Tubérculos
PARA CORTAR RAÍCES Y TUBÉRCULOS El producto es colocado en el pico de alimentación y sale por el pico inferior. 1- Retirar la cinta lisa / filtro (2); 2- Colocar la contatapa (1); 3- Retirar la tapa móvil del pico de alimentación (3); 4- Retirar el cierra-fondo (5);... -
Página 51: Remoción De Las Cuchillas
REMOCIÓN DE LAS CUCHILLAS Para remover las cuchillas (A), basta retirar los tornillos (B), junto con las respectivas arandelas. AFILADO DE LAS CUCHILLAS 1- El afilado de las cuchillas debe ocurrir siempre que el corte estuviere gastado; 2- Debe ser hecha solo de un lado del corte de la cuchilla, procurándose mantener la misma inclinación del corte original;... -
Página 52: Cambio De Los Martillos
CAMBIO DE LOS MARTILLOS Los martillos (A) poseen 4 caras dentadas para ser cambiadas a medida que se desgastan. Para cambiar la cara o substituirlos, proceder de la siguiente manera: 1- Cortar las trabas (B) de los bujes de los martillos; 2- Retirar los bujes de los martillos (C), observando el posicionamiento correcto de los anillos separadores, y tomándose el cuidado de no mezclar los juegos de martillos, pues eso perjudicaría el balanceo de la máquina, provocando vibraciones. -
Página 53: Características Técnicas
Características técnicas POTENCIA NECESARIA (HP) N° DE CUCHILLAS Y MARTILLOS ROTACIÓN Motor Motor Motor N° de N° de Eléctrico a gasolina a diesel martillos cuchillas 5.0 a 7.5 7.0 a 9.0 7.0 a 8.0 4100 7.5 a 10.0 9.0 a 10.5 8.0 a 10.0 3700 10.0 a 12.5... -
Página 54: Polea Del Motor (Accionamiento Con Motor Eléctrico)
MOTORES ELÉCTRICOS / DIESEL / GASOLINA Ø Polea N° de canales B Correas (Accionamiento con motor eléctrico) ALTA ROTACIÓN (3500 rpm) BAJA ROTACIÓN (1750 rpm) correa correa DPM-1 CON BASE DPM-1 CON CABALLETE PROLONGADO* DPM-2 CON CABALLETE PROLONGADO* DPM-2 CON BASE... -
Página 55: Poleas Y Correas (Accionamiento Con Tractor)
Poleas y correas (Accionamiento con tractor) Poleas Ø (mm) Correas máquina accesorio cantidad Correas (Accionamiento con motor diesel/gasolina) cantidad correa DPM-500/1/2/4... -
Página 56: Pesos Y Dimensiones
Pesos y dimensiones DPM-1 DPM-2 DPM-4 Peso (con caballete) (kg) Espacio ocupado por la máquina (m) 0,70 x 0,50 0,90 x 0,55 0,95 x 0,70 Espacio ocupado por la máquina sin centrífuga - 0,80 x 1,40 0,95 x 1,40 0,95 x 1,40 con base (m) Espacio ocupado con centrífuga e con base (m) -
Página 57: Guía Práctico
Guía práctico Trabado de la máquina Debido al exceso de Parar el motor, limpiar el exceso de alimentación, el motor no producto, arrancar nuevamente y consigue mantener la rotación controlar la alimentación de la necesaria y el producto se máquina de manera que no exija acumula dentro de la máquina más que la capacidad indicada Baja producción... -
Página 58: Informaciones Adicionales
Informaciones Adicionales Tabla de medidas de las llaves Tabla de Torques Unidad de par de apriete en N.m Manual de instrucciones... -
Página 59: Asistencia Técnica
Anote aquí el número de serie de la máquina: Al enviar comunicaciones o requerir auxilio de la asistencia técnica Nogueira, siempre informe el número de serie y el modelo de la máquina, presentes en la plaqueta de identificación. Al substituir piezas, utilice siempre artículos originales Nogueira. Solamente las piezas originales son fabricadas de acuerdo con los diseños, materiales... -
Página 60: Certificado De Garantía
09 (nueve) últimos meses - garantía adicional concedida por Nogueira Máquinas Agrícolas. 2- Consiste en la presente garantía, en el compromiso de Nogueira en reparar o sumi- nistrar gratuitamente, en su fábrica, las piezas que a su exclusivo juicio presentan defectos de fabricación. -
Página 61: Importante
1. Llene el TÉRMINO DE RECIBO con la información solicitada y fi rme; 2. Dispare el TÉRMINO DE RECIBO completado y la factura de venta; 3. Acceder al sitio www.nogueira.com.br y haga clic en la pestaña “TÉRMINO DE RECIBO” o acceda nogueira.industriasnb.com/entrega ;... -
Página 62: Esencial En El Campo
Esencial en el campo Manual de instrucciones... - Página 64 NOGUEIRA Ind. Com. Impl. Máquinas Agrícolas S.A. St./R: Fernando de Souza, 533 - Distrito Industrial - CEP 13877-775 Tel/Phone.: (19) 3638.1500 - Fax: (19) 3638.1556 nogueira@nogueira.com.br - www.nogueira.com.br CNPJ: 08.510.974/0001-27...