Integra Omni-Tract Instrucciones De Uso
Ocultar thumbs
Ver también para Omni-Tract:
- Instrucciones de uso (39 páginas) ,
- Instrucciones de utilizacion (38 páginas) ,
- Instrucciones de uso (32 páginas)
Tabla de contenido
Publicidad
Idiomas disponibles
Idiomas disponibles
Enlaces rápidos
Integra
Omni-Tract
®
®
Total Hip Replacement Retractor System
Instructions for Use
EN - ENGLISH ...............................................................................................................................................3
FR - FRANÇAIS ..............................................................................................................................................11
IT - ITALIANO ................................................................................................................................................19
DE - DEUTSCH .............................................................................................................................................27
ES - ESPAÑOL ...............................................................................................................................................35
NL - NEDERLANDS ......................................................................................................................................43
Publicidad
Tabla de contenido

Manuales relacionados para Integra Omni-Tract


Resumen de contenidos para Integra Omni-Tract
-
Página 1: Tabla De Contenido
Integra Omni-Tract ® ® Total Hip Replacement Retractor System Instructions for Use EN – ENGLISH ...............................3 FR – FRANÇAIS ..............................11 IT – ITALIANO ..............................19 DE – DEUTSCH .............................27 ES – ESPAÑOL ...............................35 NL – NEDERLANDS ............................43... - Página 2 This page is intentionally left blank.
-
Página 3: En - English
EN – ENGLISH Integra Omni-Tract ® ® Total Hip Replacement Retractor System Instructions for Use... -
Página 4: System Components
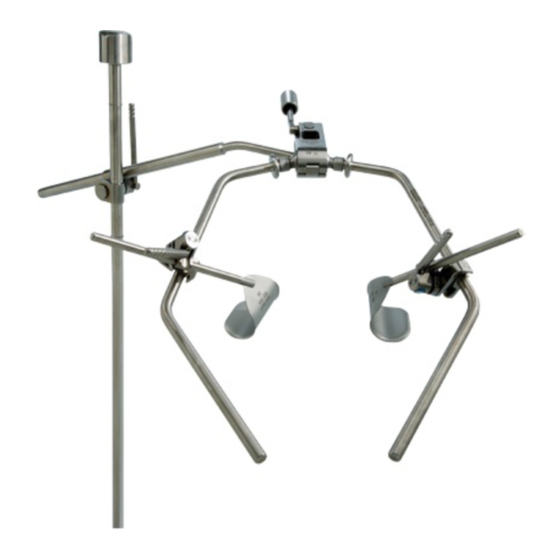
EN – ENGLISH System Components 10144 Articulating 10272 Strap Clamp Retractor Blades Blade Holder 1244 Sterile 10171 Support Arm 10269 Standard 10270 Small Field Post Wishbone Arm Wishbone Arm After draping, place the Sterile Field Clamp on to the O.R. table rail over the drape, just below the anesthesia screen. - Página 5 EN – ENGLISH Anterolateral Set-up Posterolateral Set-up Position the support arm over the patient so that the distal end of the arm is approximately at the midline and is three to five centimeters above the patient and ten centimeters above the top of the incision.
- Página 6 EN – ENGLISH Posterolateral Set-up Anterolateral Set-up Minimum Working Width: 33cm The Wishbone® frame can be adjusted so that it is at or below the horizon of the patient. Be sure that the arms are equidistant from the incision and at a minimum of 33cm apart. Lock the frame arm position by pushing the large handle back and away from the operative field (inset).
- Página 7 EN – ENGLISH Before placing a blade into the incision, be sure the clamp section of the blade holder is as far back toward the proximal end of the holder as possible (1). Also, make sure that the tip of the blade holder is in a neutral position (parallel to blade holder shaft) (inset 2). The proximal knob adjusts the position of the blade holder tip (inset 3).
- Página 8 EN – ENGLISH While continuing to maintain the blades position soft tissue, the proximal knob is turned clockwise to toe-in the blade to the appropriate angle and depth. Next, the key at the top of the clamp is turned clockwise to retract the Additional toeing-in of the blade and lateral retraction can progress to obtain blade backward.
- Página 9 Telephone: 33 (0) 4 37 47 59 10 Integra, the Integra logo, Omni-Tract and Wishbone are registered trademarks of Integra LifeSciences Corporation or its subsidiaries in the United States and/or other countries. OmniAccess is a trademark of Integra LifeSciences Corporation or its subsidiaries. ©2020 Integra LifeSciences Corporation. All Rights Reserved. 40-6126 Rev AAA 2020-09 0773956-2...
- Página 10 EN – ENGLISH This page is intentionally left blank.
-
Página 11: Fr - Français
FR – FRANÇAIS Integra Omni-Tract ® ® Système d’écarteur pour arthroplastie totale de la hanche Mode d’emploi... -
Página 12: Composants Du Système
FR – FRANÇAIS Composants du système 10144 Porte-lame 10272 Clamp à bride Lames d’écarteur articulé 10171 Bras de 1244 Tige pour 10269 Bras standard 10270 Petit soutien champ stérile Wishbone bras Wishbone Après la pose du champ, placer le clamp pour champ stérile sur le rail de la table d’opération juste au-dessous de l’écran d’anesthésie. - Página 13 FR – FRANÇAIS Configuration antéro-latérale Configuration postéro-latérale Positionner le bras de soutien par dessus le patient de sorte que l’extrémité distale du bras se situe environ à la ligne médiane, trois à cinq centimètres au-dessus du patient et dix centimètres au-dessus du haut de l’incision. Verrouiller la position du bras de soutien en poussant la poignée de fixation vers le bas (1).
- Página 14 FR – FRANÇAIS Configuration antéro-latérale Configuration postéro-latérale Largeur utile minimum : 33 cm Le cadre Wishbone® peut être réglé de sorte à se situer au même niveau ou au-dessous de l’horizon du patient. S’assurer que les bras se situent à distance égale de l’incision et qu’ils sont séparés d’au moins 33 cm. Verrouiller la position des bras du cadre en poussant la grande poignée en arrière et en direction opposée au champ opératoire (encadré).
- Página 15 FR – FRANÇAIS Avant de placer une lame dans l’incision, s’assurer que le segment à clamp du porte-lame est placé aussi loin que possible vers l’extrémité proximale du porte-lame (1). De même, s’assurer que l’extrémité du porte-lame est dans une position neutre (parallèle à la tige du porte-lame) (encadré...
- Página 16 FR – FRANÇAIS En continuant à maintenir la position de la lame dans les tissus mous, le bouton proximal est tourné dans le sens horaire pour ajuster la lame selon l’angle et la profondeur appropriés. Ensuite, la clé au bas du clamp est tournée dans le sens Un ajustement supplémentaire de la lame et l’écartement latéral peuvent horaire pour écarter la lame vers l’arrière.
- Página 17 69800 Saint Priest–France Téléphone : 33 (0) 4 37 47 59 10 Integra, le logo Integra, Omni-Tract et Wishbone sont des marques déposées d’Integra LifeSciences Corporation ou de ses filiales aux États-Unis et/ou dans d’autres pays. 40-6126 Rev AAA 2020-09 0773956-2...
- Página 18 FR – FRANÇAIS Cette page est laissée intentionnellement vide.
-
Página 19: It - Italiano
IT – ITALIANO Integra Omni-Tract ® ® Sistema retrattore per la sostituzione totale dell’anca Istruzioni per l’uso... -
Página 20: Componenti Del Sistema
IT – ITALIANO Componenti del sistema 10144 Portalama 10272 Morsetto a Lame del retrattore snodato cinghia 10269 Braccio 10171 Braccio di 1244 10270 Braccio Wishbone standard supporto Colonnina Wishbone piccolo per campo sterile Dopo aver sistemato i teli, collocare il morsetto per campo sterile sulla sponda del tavolo operatorio sul telo appena sotto lo schermo dell’anestesia. - Página 21 IT – ITALIANO Predisposizione anterolaterale Predisposizione posterolaterale Posizionare il braccio di supporto sul paziente in modo che l’estremità distale del braccio sia approssimativamente in corrispondenza della linea mediana, a tre-cinque centimetri al di sopra del paziente e dieci centimetri al di sopra della parte superiore dell’incisione.
- Página 22 IT – ITALIANO Predisposizione posterolaterale Predisposizione anterolaterale Minima ampiezza di lavoro: 33 cm Il telaio Wishbone® può essere regolato in modo che sia a livello con o sotto l’orizzonte del paziente. Assicurarsi che i bracci siano equidistanti dall’incisione e ad un minimo di 33 cm di distanza. Bloccare in posizione il braccio del telaio premendo l’impugnatura grande indietro e lontano dal campo operatorio (riquadro).
- Página 23 IT – ITALIANO Prima di inserire una lama nell’incisione, assicurarsi che la sezione del morsetto del portalama sia il più lontano possibile verso l’estremità prossimale del portalama (1). In aggiunta, assicurarsi che la punta del portalama sia in posizione neutra (parallela all’albero del portalama) (riquadro 2).
- Página 24 IT – ITALIANO Sempre continuando a mantenere la posizione delle lame nel tessuto molle, la manopola prossimale viene ruotata in senso orario per far convergere la lama all’angolo e alla profondità appropriati. Quindi, si ruota in senso orario la chiave La convergenza della lama e la retrazione laterale possono continuare fino ad sulla parte superiore del morsetto per tirare indietro la lama.
- Página 25 69800 Saint Priest–Francia Telefono: 33 (0) 4 37 47 59 10 Integra, il logo Integra, Omni-Tract e Wishbone sono marchi depositati di Integra LifeSciences Corporation o delle sue società controllate negli Stati Uniti e/o in altri paesi. 40-6126 AAA 2020-09 0773956-2...
- Página 26 IT – ITALIANO Questa pagina è stata lasciata intenzionalmente in bianco.
-
Página 27: De - Deutsch
DE – DEUTSCH Integra Omni-Tract ® ® Retraktorsystem für Hüft- Totalendoprothese Gebrauchsanweisung... - Página 28 DE – DEUTSCH Systemkomponenten 10144 10272 Gurtklemme Retraktorblätter Gelenk-Blatthalter 1244 Sterilfeld- 10269 Standard- 10171 Stützarm 10270 Kleiner Pfosten Wishbone-Arm Wishbone-Arm Nach Auflegen der OP-Tücher die Sterilfeldklemme an der OP-Tischschiene über dem OP-Tuch knapp unter dem Anästhesiebogen platzieren. Bei anterolateralen Eingriffen die Klemme auf derselben Seite wie der Primärchirurg anbringen.
- Página 29 DE – DEUTSCH Anterolaterale Anordnung Posterolaterale Anordnung Den Stützarm so über dem Patienten positionieren, dass das distale Ende des Armes ungefähr in der Mittellinie sowie drei bis fünf Zentimeter über dem Patienten und zehn Zentimeter über der Spitze des Schnittes liegt. Den Stützarm durch Herunterdrücken des Sicherungshebels feststellen.
- Página 30 DE – DEUTSCH Posterolaterale Anordnung Anterolaterale Anordnung Mindestarbeitsbreite: 33 cm Der Wishbone®-Rahmen kann so eingestellt werden, dass er sich an oder unter der Oberfläche des liegenden Patienten befindet. Darauf achten, dass die Arme gleich weit vom Schnitt entfernt sind und mindestens 33 cm auseinanderliegen. Die Rahmenarmposition durch Zurückschieben des großen Handgriffs und weg vom Operationsfeld (s.
- Página 31 DE – DEUTSCH Vor der Platzierung eines Blatts in der Inzision darauf achten, dass das Klemmenteil des Blatthalters so weit wie möglich in Richtung des proximalen Endes des Halters liegt (1). Auch darauf achten, dass sich die Spitze des Blatthalters in einer neutralen Position (parallel zum Schaft des Blatthalters) befindet (s.
- Página 32 DE – DEUTSCH Die Blattposition im Weichteilgewebe halten und gleichzeitig den Proximalhebel im Uhrzeigersinn drehen, um das Blatt angemessen einzuschwenken und die Tiefe einzustellen. Dann das Blatt rückwärts bewegen, indem der Drehknopf auf der Oberseite der Klemme im Uhrzeigersinn gedreht wird. Wenn genügend Damit die gewünschte Freilegung erzielt wird, kann das Blatt weiter Druck auf das Weichteilgewebe ausgeübt wird, muss der Chirurg nicht länger eingeschwenkt und seitlich zurückgezogen werden.
- Página 33 69800 Saint Priest–Frankreich Telefon: 33 (0) 4 37 47 59 10 Integra, das Integra-Logo, Omni-Tract und Wishbone sind eingetragene Handelsmarken der Integra LifeSciences Corporation oder deren Tochtergesellschaften in den Vereinigten Staaten und bzw. oder anderen Ländern. 40-6126 AAA 2020-09 0773956-2...
- Página 34 DE – DEUTSCH Diese Seite wurde absichtlich frei gelassen.
-
Página 35: Es - Español
ES – ESPAÑOL Integra Omni-Tract ® ® Sistema retractor para reemplazo total de cadera Instrucciones de uso... -
Página 36: Componentes Del Sistema
ES – ESPAÑOL Componentes del sistema 10144 Portaex- 10272 Abrazadera Extremos del tremo articulante de correa retractor 1244 Poste 10269 Brazo 10171 Brazo de 10270 Brazo de campo Wishbone soporte Wishbone estéril estándar pequeño Después del pañeado, colocar la abrazadera del campo estéril en la barandilla de la mesa del quirófano sobre el paño, justo debajo de la pantalla de anestesia. - Página 37 ES – ESPAÑOL Configuración anterolateral Configuración posterolateral Posicionar el brazo de soporte sobre el paciente de modo que el extremo distal del brazo esté aproximadamente en la línea media y de tres a cinco centímetros más arriba del paciente y diez centímetros más arriba de la parte superior de la incisión.
- Página 38 ES – ESPAÑOL Configuración posterolateral Configuración anterolateral Ancho de trabajo mínimo: 33 cm El marco Wishbone® puede ajustarse de modo que esté en o debajo del borde corporal del paciente. Asegurarse que los brazos estén equidistantes de la incisión y a 33 cm aparte como mínimo. Asegurar la posición del brazo del marco haciendo avanzar el mango grande hacia atrás y lejos del campo quirúrgico (recuadro).
- Página 39 ES – ESPAÑOL Antes de colocar un extremo en la incisión, asegurarse de que la sección de la abrazadera del portaextremo esté atrás tan lejos de la punta proximal del portaextremo como sea posible (1). Además, asegurarse de que la punta del portaextremo esté en una posición neutral (paralela al cuerpo del portaextremo (recuadro 2).
- Página 40 ES – ESPAÑOL Mientras se continúa manteniendo la posición de los extremos en el tejido blando, hacer girar el botón proximal en sentido horario para lograr la convergencia del extremo en el ángulo y la profundidad apropiados. A continuación, hacer girar la llave en la parte superior de la abrazadera para Puede realizarse una convergencia adicional del extremo y retracción lateral retraer el extremo hacia atrás.
- Página 41 Teléfono: 33 (0) 4 37 47 59 10 Integra, el logotipo de Integra, Omni-Tract y Wishbone son marcas registradas de Integra LifeSciences Corporation o sus filiales en EE.UU. y otros países. OmniAccess es una marca de fábrica de Integra LifeSciences Corporation o...
- Página 42 ES – ESPAÑOL Página dejada intencionalmente en blanco.
-
Página 43: Nl - Nederlands
NL – NEDERLANDS Integra Omni-Tract ® ® Retractorsysteem voor volledige heupprothesen Gebruiksaanwijzing... - Página 44 NL – NEDERLANDS Systeemonderdelen 10144 Scharnierende 10272 StrapClamp Retractorbladen bladhouder 1244 Steriele- 10269 Standaard 10171 Steunarm 10270 Kleine veldstaander Wishbone-arm Wishbone-arm Plaats de steriele-veldklamp nadat de patiënt is afgedekt op de rail van de operatietafel boven het afdekmateriaal, vlak onder het anesthesiescherm. Plaats de klamp bij gebruik van een anterolaterale benadering aan de kant van de operateur.
- Página 45 NL – NEDERLANDS Anterolaterale opstelling Posterolaterale opstelling Plaats de steunarm zo boven de patiënt dat het distale uiteinde van de arm ongeveer ter hoogte van de midline staat, drie tot vijf centimeter boven de patiënt en tien centimeter boven de bovenkant van de incisie. Zet de steunarm op zijn plaats vast door de bevestigingsgreep omlaag te drukken (1).
- Página 46 NL – NEDERLANDS Posterolaterale opstelling Anterolaterale opstelling Minimale werkbreedte: 33 cm Het Wishbone®-frame kan zo worden afgesteld dat het ter hoogte van of onder de horizon van de patiënt komt te staan. Zorg dat de twee armen even ver van de incisie en ten minste 33 cm van elkaar verwijderd zijn. Zet de frame-arm op zijn plaats vast door de grote greep naar achteren te drukken, van het operatieveld vandaan (zie detail).
- Página 47 NL – NEDERLANDS Zorg voordat u een blad in de incisie plaatst dat het klampgedeelte van de bladhouder helemaal naar het proximale uiteinde van de houder is geschoven (1). Zorg tevens dat de tip van de bladhouder in een neutrale stand (parallel aan de schacht van de bladhouder) staat (zie detail 2).
- Página 48 NL – NEDERLANDS Houd het blad op zijn plaats tegen de weke delen en draai de proximale knop rechtsom om het blad iets naar voren gekanteld onder de gewenste hoek en op de gewenste diepte te plaatsen. Draai de knop boven op de klamp nu rechtsom Om de gewenste presentatie te verkrijgen kan het blad verder naar voren om het blad naar achteren te trekken.
-
Página 49: Indicaties Voor Gebruik
Parc Technologique de la Porte des Alpes 69800 Saint Priest–Frankrijk Telefoon: 33 (0) 4 37 47 59 10 Integra, het Integra-logo, Omni-Tract en Wishbone zijn gedeponeerde handelsmerken van Integra LifeSciences Corporation of dochterondernemingen in de Verenigde Staten en/of andere landen. 40-6126 AAA 2020-09 0773956-2... - Página 50 Telephone: 33 (0) 4 37 47 59 10 Integra, the Integra logo, Omni-Tract and Wishbone are registered trademarks of Integra LifeSciences Corporation or its subsidiaries in the United States and/or other countries. OmniAccess is a trademark of Integra LifeSciences Corporation or its subsidiaries. ©2020 Integra LifeSciences Corporation. All Rights Reserved. 40-6126 Rev AAA 2020-09 0773956-2...