Tabla de contenido
Publicidad
Idiomas disponibles
Idiomas disponibles
Enlaces rápidos
STIHL FS 361 C-M, 461 C-M
Owners Instruction Manual
WARNING
Read Instruction Manual thoroughly before use and
follow all safety precautions – improper use can cause
serious or fatal injury.
ADVERTENCIA
Antes de usar la máquina lea y siga todas las precauciones
de seguridad dadas en el manual de instrucciones – el uso
incorrecto puede causar lesiones graves o mortales.
Instruction Manual
Manual de instrucciones
Publicidad
Capítulos
Tabla de contenido
Solución de problemas

Manuales relacionados para Stihl FS 361 C-M


Resumen de contenidos para Stihl FS 361 C-M
- Página 1 STIHL FS 361 C-M, 461 C-M Owners Instruction Manual Instruction Manual Manual de instrucciones WARNING ADVERTENCIA Read Instruction Manual thoroughly before use and Antes de usar la máquina lea y siga todas las precauciones follow all safety precautions – improper use can cause de seguridad dadas en el manual de instrucciones –...
- Página 2 Instruction Manual 1 - 56 Manual de instrucciones 57 - 117...
-
Página 3: Tabla De Contenido
5.5 Trimmer / Brushcutter ......10 15.1 STIHL M-Tronic Engine Management System ..37 5.6 Fueling Instructions . -
Página 4: Introduction
Addresses ......... 56 29.1 STIHL Incorporated ....... . 56... -
Página 5: Guide To Using This Manual
Use only cutting Symbols in Text attachments that are specifically authorized by STIHL for The following symbol is included to assist you with the use use with this power tool. Always wear proper protective of the manual: apparel and eye protection. -
Página 6: Main Parts
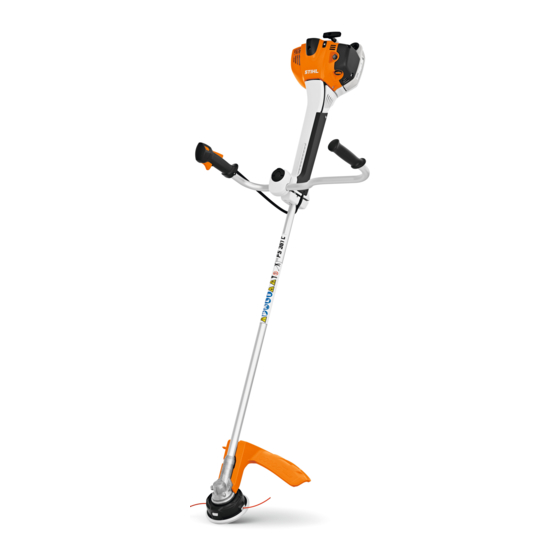
English 3 Main Parts 4 Cap 3 Main Parts Covers the spark plug boot. 5 Spark Plug Boot Connects the spark plug with the ignition lead. Trimmer / Brushcutter 6 Spark Plug Ignites the fuel-air mix in the engine. 7 Starter Grip The grip of the pull starter for starting the engine. -
Página 7: Available Cutting Attachments And Deflectors
English 3 Main Parts Available Cutting Attachments and Deflectors 20 Handlebar For holding and controlling the unit during operation. 21 Throttle Cable For connecting the throttle trigger to the engine. 22 Drive Tube Shaft of the power tool. 23 Gearbox Covers the transmission system. -
Página 8: Safety Symbols On The Products
English 4 Safety Symbols on the Products 6 Mowing Head Wear sturdy boots with non-slip soles. When Mowing head for mounting nylon trimmer line. working with a metal cutting attachment, wear steel-toed safety boots, @ 5.4. 7 Limit Stop Designed for use with circular saw blades to position the power tool steady against the wood and reduce the risk Always wear non-slip, heavy-duty work gloves of injury from blade thrust or kickout. -
Página 9: Deflector For Metal Cutting Attachments
– Use only cutting attachments that are specifically authorized by STIHL for use on your trimmer model. The deflector may be used in combination with ■ Do not lend or rent your trimmer without the instruction grass cutting blades. -
Página 10: Operator
■ STIHL trimmer / brushcutters are equipped with an anti- – Never use a trimmer / brushcutter that has been vibration ("AV") system designed to reduce the modified or altered from its original design. -
Página 11: Personal Protective Equipment
ANSI Z87 "+". – If there is a risk of facial injury, STIHL recommends that you also wear a face shield or face screen over your goggles or protective glasses. -
Página 12: Trimmer / Brushcutter
– Make sure your unit is equipped with the proper deflector and harness for the type – For a list of cutting attachments authorized by STIHL of cutting attachment being used. Keep for your unit, along with the approved deflector and... -
Página 13: Fueling Instructions
Use of parts that are not machine. authorized or approved by STIHL may cause serious or – Fuel your trimmer / brushcutter in a well- fatal injury or property damage. ventilated area, outdoors away from –... - Página 14 English 5 IMPORTANT SAFETY INSTRUCTIONS Fuel Spraying or "Geysering" shut off, cooling air is no longer drawn across the cylinder and the engine temperature will rise for WARNING several minutes before starting to cool. ■ Removing the cap on a pressurized fuel tank can result in ■...
- Página 15 1/2 turn counter- damaged or broken. Stop using the trimmer / brushcutter clockwise. and take it to your authorized STIHL dealer for repair. – If any significant venting occurs, immediately re-seal Vapor Lock the tank by turning the cap clockwise to the closed position.
-
Página 16: Using The Trimmer / Brushcutter
– If your trimmer / brushcutter or any part is damaged or does not function properly, take it to your authorized STIHL servicing dealer. Do not use the unit until the problem has been corrected. 0458-838-8601-A... -
Página 17: Holding And Controlling The Trimmer / Brushcutter
English 5 IMPORTANT SAFETY INSTRUCTIONS ■ Before starting the engine, take the following steps to – Once the engine has started, immediately blip the reduce the risk of personal injury from thrown objects, loss throttle trigger, which should cause the choke lever of control or inadvertent contact with the cutting to move to the run position and allow the engine to attachment:... -
Página 18: Working Conditions
English 5 IMPORTANT SAFETY INSTRUCTIONS – Position the power tool so that all parts of your body – Take special care in overgrown or wet terrain and are clear of the cutting attachment whenever the always watch for hidden obstacles such as tree engine is running. - Página 19 – STIHL does not recommend the use of metal blades when cutting in rocky areas or in areas with debris or – If exhaust fumes become concentrated other objects that could create sparks.
- Página 20 English 5 IMPORTANT SAFETY INSTRUCTIONS with the risks associated with the particular does, have your STIHL dealer check your trimmer / substances you are cutting or with which you are brushcutter and make proper adjustments and working. repairs before use..
- Página 21 – If the cutting attachment loosens after being properly – The cutting attachment and deflector tightened, stop work immediately and have the unit must be an approved combination. inspected by your authorized STIHL servicing dealer. – Keep the deflector properly adjusted at all times.
-
Página 22: Working With The Cutting Attachments
English 5 IMPORTANT SAFETY INSTRUCTIONS – Do not continue work with a damaged or improperly – Never operate this trimmer in the vicinity mounted cylinder housing or a damaged/deformed of any wires or cables that may be muffler shell. It may interfere with the cooling carrying electric current. -
Página 23: Using A Mowing Head
Using the unit with an overly long nylon cutting line blade is mounted. STIHL recommends using a nylon increases the load on the engine and reduces its operating line head for such jobs. -
Página 24: Using A Grass Cutting Blade
English 5 IMPORTANT SAFETY INSTRUCTIONS WARNING – The 4-tooth grass cutting blade is intended to cut grass and weeds. It has 4 cutting knives with cutting edges on ■ To reduce the risk of serious injury: both sides, i.e., front and rear. When the cutting edges on one side become dull, the blade can be turned over to –... - Página 25 English 5 IMPORTANT SAFETY INSTRUCTIONS – Resharpen the brush knife regularly as described on its packaging or instruction leaflet. – When cutting young saplings or other woody materials up to 0.8 in. (2 cm) in diameter, use the left side of the cutting knife to avoid "kickout" situations. –...
-
Página 26: Maintenance, Repair And Storage
@ 5.8.1. handling metal cutting attachments. – The risk of kickout is highest when cutting in the – STIHL recommends that all repair or replacement darker shaded area. To reduce the risk of kickout work be performed by authorized STIHL servicing and resulting injury, do not use this area of the dealers. -
Página 27: Before Starting Work
Before starting work: ■ Use of parts that are not authorized or approved by STIHL may cause serious or fatal injury or property damage. ► Mount the handlebar and control handle, @ 8.1. -
Página 28: Mounting And Removing A Deflector Or Limit Stop
English 8 Assembling the Trimmer / Brushcutter Mounting and Removing a Deflector or Limit To mount the handlebar: Stop ► Shut off the engine, @ 12.1. 8.2.1 Mounting a Deflector WARNING To reduce the risk of injury from thrown objects or contact with the cutting attachment, never operate the trimmer / brushcutter without a properly mounted deflector. -
Página 29: Removing A Deflector
English 8 Assembling the Trimmer / Brushcutter 8.2.2 Removing a Deflector To mount a mowing head: ► Shut off the engine, @ 12.1. To remove a deflector: ► Shut off the engine, @ 12.1. ► Position the unit so that you are facing the underside of the deflector and the drive shaft is pointed upwards. -
Página 30: Removing A Mowing Head
English 8 Assembling the Trimmer / Brushcutter 8.3.2 Removing a Mowing Head To mount a metal cutting attachment: ► Shut off the engine, @ 12.1. To remove a mowing head: ► Shut off the engine, @ 12.1. ► Block the rotation of the drive shaft with the stop pin. ►... -
Página 31: Removing A Metal Cutting Attachment
English 9 Adjusting the Trimmer / Brushcutter ► Screw on the nut (1) counterclockwise and tighten it down ► Remove the rider plate, thrust washer, metal cutting until the cutting attachment is properly and securely attachment and thrust plate. attached. ►... -
Página 32: Adjusting The Handlebar
English 9 Adjusting the Trimmer / Brushcutter Balancing the Trimmer / Brushcutter ► Attach the carabiner (1) to the carrying strip (2) on the trimmer / brushcutter. The mowing head or the metal cutting attachment should come to rest gently on the ground. Adjusting the Handlebar To balance the trimmer / brushcutter: The handlebar can be adjusted to suit the height and reach... -
Página 33: Stihl Motomix
STIHL MotoMix 2-cycle air cooled engine oil. This engine is certified to STIHL MotoMix is ethanol-free, has a high octane rating and operate on mid-grade unleaded gasoline with a minimum ensures that you always use the right gasoline/oil mix ratio. -
Página 34: Refueling The Trimmer / Brushcutter
To properly mix fuel: – Treat every fuel tank as if it is pressurized, particularly ► If not using STIHL MotoMix, only mix sufficient fuel for a if it is half full or more. few days of work. Never mix more than a 30-day supply of –... -
Página 35: Starting The Engine
► If your fuel cap still does not tighten properly, it may be damaged or broken. Stop using the trimmer / brushcutter and take it to your authorized STIHL dealer for repair. 11 Starting the Engine 11.1 Starting the Engine... -
Página 36: Shutting Off The Engine
@ 21.4 or have the trimmer / even if the bulb is filled with fuel. brushcutter inspected by an authorized STIHL servicing dealer before further use. ► If the engine is warm: Leave the choke lever (2) in position . -
Página 37: Checking The Power Tool
► Shut off the engine, @ 12.1. ► Attempt to depress the throttle trigger. If the trigger can be depressed without first depressing the throttle trigger lockout, take the trimmer / brushcutter to an authorized STIHL servicing dealer to be repaired before use. 0458-838-8601-A... -
Página 38: During Operation
English 14 During Operation Stopping the Engine Mowing with a Mowing Head, Grass Cutting Blade or Brush Knife ► Start the engine, @ 11.1. ► Depress the stop switch. The engine should stop. ► If the engine does not stop, move the choke lever to position and have the unit repaired before use. -
Página 39: Adjusting The Nylon Line
► If the mowing line cannot be pulled out to the required length, install a new spool of line. STIHL recommends keeping nylon line in a water bath for at 14.2 Adjusting the Nylon Line least 12 to 24 hours before use to increase its useful life. -
Página 40: Calibrating The Trimmer / Brushcutter
/ brushcutter to be adjusted faster for optimum performance. ► If the engine keeps shutting off, have the trimmer / brushcutter inspected by an authorized STIHL servicing ► If the outside temperature is below 14 °F (- 10 °C) or the dealer before further use. -
Página 41: Summer Operation
These accessories are available from STIHL servicing dealers. To prepare the trimmer for transportation or storage: ► Shut off the engine, @ 12.1. -
Página 42: Transporting
/ brushcutter, @ 6. the power tool down, @ 5.7.5. When storing the trimmer / brushcutter: WARNING If a metal cutting attachment is mounted, STIHL 90° recommends attaching an appropriate transport guard (special accessory) to help reduce the risk of cut injuries from inadvertent contact. -
Página 43: Cleaning
English 19 Cleaning When storing the trimmer / brushcutter for three months or longer: ► Drain and clean the fuel tank in a well ventilated area. Dispose of fuel properly in accordance with local environmental requirements. ► Run the engine until it shuts off. The carburetor will be dry. This helps prevent the carburetor diaphragms from sticking together. -
Página 44: Inspection And Maintenance
Spark arresting screen in muffler Check and Clean Spacer Check Gearbox Check, if grease is visible on the drive shaft before mounting a cutting attachment. If grease is visible, check gear lubrication STIHL recommends an authorized STIHL servicing dealer 0458-838-8601-A... -
Página 45: Inspecting And Maintaining The Trimmer / Brushcutter
(blade thrust) and other reactive To reduce the risk of personal injury from unintended forces, resulting in severe personal injury or death. STIHL activation, shut off the engine before inspecting the recommends having your metal cutting attachment... -
Página 46: Troubleshooting Guide
21 Troubleshooting Guide 21 Troubleshooting Guide 21.1 Trimmer / Brushcutter Many performance issues can be resolved with a few simple steps. When troubleshooting, STIHL recommends that you start with the following measures: ► Replace the air filter, @ 21.2. ► Clean or replace the spark plug, @ 21.3. -
Página 47: Replacing The Air Filter
21.3 Cleaning the Spark Plug WARNING To reduce the risk of fire and burn injury, use only spark plugs authorized by STIHL. Always press the spark plug boot snugly onto the spark plug terminal. ► Turn the screw (1) counterclockwise. -
Página 48: Adjusting The Throttle Cable
English 21 Troubleshooting Guide ► Remove the spark plug boot (3). ► Clean the area around the spark plug with a cloth or soft brush. ► Unscrew the spark plug (4) and clean it with a cloth. ► If the spark plug is corroded, replace it. ►... -
Página 49: Specifications
22.2 STIHL FS 361 C-M, 461 C-M – Displacement: Position of the choke lever: Used to start the engine – FS 361 C-M: 2.30 cu. in. (37.7 cm³) Stop Switch. – FS 461 C-M: 2.78 cu. in. (45.6 cm³) – Engine power according to ISO 8893: –... -
Página 50: Engineering Improvements
If the operating characteristics or the appearance of your machine differs from those described in this manual, please contact your STIHL dealer or the STIHL distributor in your area for assistance. 0458-838-8601-A... -
Página 51: Approved Deflector, Cutting Attachment And Harness Combinations
23 Approved Deflector, Cutting Attachment and Harness Combinations 23 Approved Deflector, Cutting Attachment and Harness Combinations 23.1 STIHL FS 361 C-M, 461 C-M The FS 361 C-M, 461 C-M is approved for use only with the following cutting attachments: Cutting Attachments Deflectors... - Página 52 English 23 Approved Deflector, Cutting Attachment and Harness Combinations – Scratcher tooth circular saw blade 225 (9) Description of the Cutting Attachments – Chisel tooth circular saw blade 225 (10) – AutoCut 46-2 (1) – Carbide tipped circular saw blade 225 (11) –...
-
Página 53: Replacement Parts And Equipment
Warranty Statement STIHL recommends the use of genuine STIHL replacement Your Warranty Rights and Obligations parts. Genuine STIHL parts can be identified by the STIHL part number, the logo and, in some cases, by the The U.S. Environmental Protection Agency (EPA) and STIHL parts symbol . - Página 54 If any emission-related part on your engine is defective, the for the lack of receipts or for your failure to ensure the part will be replaced by STIHL Incorporated at no cost to the performance of all scheduled maintenance. owner. Any warranted part which is not scheduled for...
-
Página 55: Stihl Incorporated California Exhaust And
The maintenance instructions in this manual are based on to the owner. STIHL Incorporated is liable for damages to the application of the recommended 2-stroke fuel-oil other engine components caused by the failure of an mixture. - Página 56 STIHL Incorporated free of charge. part will be replaced by STIHL Incorporated at no cost to the Owner's Warranty Responsibilities owner.
-
Página 57: Trademarks
STIHL Incorporated is liable for damages to 2) Any warranted part that is scheduled only for regular other engine components caused by the failure of a inspection in the written instructions required by the warranted part still under warranty. -
Página 58: Common Law Trademarks
English 29 Addresses Any unauthorized use of these trademarks without the ® The color combination MasterWrench Service express written consent of ANDREAS STIHL AG & Co. KG, orange-grey (U.S. ® MotoMix Waiblingen is strictly prohibited. Registrations #2,821,860; ® OILOMATIC #3,010,057, #3,010,058, ®... - Página 59 5.6 Instrucciones para el llenado de combustible ..67 15.1 Sistema de gestión del motor STIHL M-Tronic..98 5.7 Uso de la motoguadaña / desmalezadora... 71 15.2 Calibración de la motoguadaña / desbrozadora .
-
Página 60: Introducción
Direcciones ........117 29.1 STIHL Incorporated .......117... -
Página 61: Acerca De Este Manual De Instrucciones
Use únicamente accesorios de Indica el riesgo de daños a la propiedad, incluidos la corte que estén autorizados específicamente por STIHL máquina o sus componentes. para el uso con esta herramienta motorizada. Siempre use equipos de protección y gafas de seguridad adecuadas. -
Página 62: Componentes Importantes
español / EE.UU 3 Componentes importantes 4 Tapa 3 Componentes importantes Cubre la bota de bujía. 5 Bota de bujía Conecta la bujía al cable de encendido. Motoguadaña / desmalezadora 6 Bujía Enciende la mezcla de combustible/aire en el motor. 7 Empuñadura de arranque La empuñadura del arrancador que se usa para arrancar el motor. -
Página 63: Accesorios De Corte Y Deflectores Disponibles
español / EE.UU 3 Componentes importantes Accesorios de corte y deflectores disponibles 18 Tornillo de sujeción Fija el manillar en la posición seleccionada. 19 Mango Mango para la mano izquierda del operador. 20 Manillar Para agarrar y controlar la máquina durante los trabajos. 21 Cable del acelerador Para conectar el gatillo de aceleración al motor. -
Página 64: Símbolos De Seguridad En Los Productos
español / EE.UU 4 Símbolos de seguridad en los productos 5 Cuchilla limitadora del hilo Para reducir el riesgo de lesiones oculares o Cuchilla metálica colocada en el deflector que corta el pérdida auditiva, use siempre protectores hilo de nilón a la longitud adecuada. adecuados para los ojos y los oídos. -
Página 65: Deflector Para Cabezas Segadoras
español / EE.UU 5 INSTRUCCIONES IMPORTANTES DE SEGURIDAD Deflector para cabezas segadoras El deflector se puede usar en combinación con cuchillas para matorrales. En los deflectores diseñados para el uso con cabezas segadoras se pueden ver los siguientes símbolos: El deflector se puede usar en combinación con cabezas segadoras. -
Página 66: Uso Previsto
ADVERTENCIA – Utilice exclusivamente los accesorios de corte autorizados específicamente por STIHL para usar ■ El uso de la motoguadaña / desmalezadora puede ser en su modelo de motoguadaña. agotador. El operador debe encontrarse en buenas condiciones, tanto físicas como mentales. -
Página 67: Equipos De Protección Personal
– Sin embargo, las personas con marcapasos u otro cumplen la norma ANSI Z87 "+". dispositivo médico implantado deben consultar a su – Si existe el riesgo de lesionarse el rostro, STIHL médico y al fabricante del dispositivo antes de recomienda usar también una careta o protector utilizar esta motoguadaña / desmalezadora. -
Página 68: Motoguadaña / Desmalezadora
español / EE.UU 5 INSTRUCCIONES IMPORTANTES DE SEGURIDAD Motoguadaña / desmalezadora ■ Para reducir el riesgo de lesiones en la cabeza: – Use un casco de protección aprobado cuando exista ADVERTENCIA el riesgo de lesionarse la cabeza. ■ El contacto con el accesorio de corte en movimiento ■... -
Página 69: Instrucciones Para El Llenado De Combustible
/ desmalezadora. – Nunca intente modificar ni anular en modo alguno ■ Los repuestos auténticos de STIHL se han diseñado los controles ni los dispositivos de seguridad de la específicamente para su herramienta motorizada, y motoguadaña / desmalezadora. - Página 70 español / EE.UU 5 INSTRUCCIONES IMPORTANTES DE SEGURIDAD Permita que el motor se enfríe antes de quitar la tapa del – Tenga sumo cuidado cuando manipule depósito de combustible gasolina o la mezcla de combustible. ADVERTENCIA – No fume ni acerque ningún fuego o llama al combustible o a la motoguadaña / ■...
- Página 71 español / EE.UU 5 INSTRUCCIONES IMPORTANTES DE SEGURIDAD ■ La presión la provocan el combustible y el calor, y puede ■ Una vez que la motoguadaña / desmalezadora se haya acumularse aun si el motor no ha estado en marcha. enfriado lo suficiente, siga las instrucciones de seguridad Cuando la gasolina del tanque se calienta (por la que se dan en este capítulo para quitar la tapa.
- Página 72 / desmalezadora y llévela al presión. concesionario autorizado de STIHL para que la repare. – Nunca quite la tapa girándola directamente a la Bloqueo de vapor posición abierta: antes, espere a que la...
-
Página 73: Uso De La Motoguadaña / Desmalezadora
español / EE.UU 5 INSTRUCCIONES IMPORTANTES DE SEGURIDAD Uso de la motoguadaña / desmalezadora Encontrará las instrucciones de arranque específicas de su modelo en la sección 5.7.1 Antes de usar correspondiente de su manual de instrucciones. ADVERTENCIA – Si el bulbo de la bomba de combustible manual no se llena después de apretar varias veces, coloque la ■... - Página 74 STIHL autorizado. No utilice la unidad hasta personas. que el problema se haya solucionado. ■ Para reducir el riesgo de incendios y explosiones: ■...
-
Página 75: Sujeción Y Control De La Motoguadaña / Desmalezadora
español / EE.UU 5 INSTRUCCIONES IMPORTANTES DE SEGURIDAD operador o se tira al suelo. Este método es muy ■ peligroso porque usted puede perder el control de la motoguadaña / desmalezadora. – Cuando tire del mango de arranque, no se enrolle la cuerda de arranque en la mano. -
Página 76: Condiciones De Trabajo
español / EE.UU 5 INSTRUCCIONES IMPORTANTES DE SEGURIDAD Para reducir el riesgo de lesiones graves o mortales ■ Mantenga la motoguadaña / desmalezadora equilibrada, provocadas por una pérdida del control o por objetos que para poder controlarla correctamente y fatigarse menos salen despedidos: durante el uso. - Página 77 – Si los vapores de escape se concentran a causa de una ventilación insuficiente, – STIHL no recomienda el uso de cuchillas metálicas apague el motor y despeje las cuando se vaya a cortar en zonas rocosas o en las obstrucciones de la zona de trabajo.
- Página 78 – STIHL no recomienda el uso de cuchillas rígidas cuando se corte en áreas 5.7.5 Instrucciones de manejo...
- Página 79 – Nunca use hilos de metal ni reforzados con metal en inmediato y lleve la máquina a un concesionario de esta motoguadaña / desmalezadora. Use servicio STIHL autorizado para que la inspeccionen. únicamente los accesorios de corte que se listan en 0458-838-8601-A...
- Página 80 español / EE.UU 5 INSTRUCCIONES IMPORTANTES DE SEGURIDAD ■ Un accesorio de corte agrietado, dañado o gastado podría no necesitará servicio ni mantenimiento. Para reducir el despedazarse a altas velocidades y causar lesiones riesgo de incendios causados por partículas calientes que graves o mortales.
-
Página 81: Uso De Los Accesorios De Corte
español / EE.UU 5 INSTRUCCIONES IMPORTANTES DE SEGURIDAD ADVERTENCIA – Nunca utilice esta motoguadaña cerca de alambres o de cables que puedan tener corriente eléctrica. Preste atención La expulsión (disparo de la cuchilla) es el y compruebe si hay alambres o cables movimiento repentino e incontrolado de la ocultos antes de empezar a trabajar. -
Página 82: Uso De Una Cabeza Segadora
Para este tipo de trabajos, segado más largo de lo indicado. Con un deflector montado STIHL recomienda usar cabezas con hilo de nilón. correctamente, la cuchilla limitadora integrada ajustará el – Mantenga los accesorios de corte metálicos bien hilo automáticamente al largo adecuado. -
Página 83: Uso De Una Cuchilla Para Pasto
español / EE.UU 5 INSTRUCCIONES IMPORTANTES DE SEGURIDAD ADVERTENCIA 5.8.3 Uso de una cuchilla para pasto ■ Un uso incorrecto de la cuchilla para pasto puede causar grietas, picaduras o roturas. Los fragmentos de cuchilla que salen despedidos pueden provocar lesiones graves o mortales al operador o a las personas de los alrededores. -
Página 84: Uso De La Hoja De Sierra Circular
español / EE.UU 5 INSTRUCCIONES IMPORTANTES DE SEGURIDAD – Tenga mucho cuidado al cortar plantas silvestres y matorrales al bajar la cuchilla de cepillo giratoria. Cuanto más se eleve el accesorio de corte del suelo, mayor será el riesgo de perder el control y de que salgan despedidos pedazos de vegetación cortada hacia los lados. -
Página 85: Mantenimiento, Reparación Y Almacenamiento
– STIHL recomienda encargar todos los trabajos de para cortar árboles ni matorrales. Las técnicas reparación o reemplazo a un concesionario de especiales en que se utilizan las zonas de la cuchilla servicio de STIHL autorizado. -
Página 86: Antes De Empezar A Trabajar
■ El uso de piezas no autorizadas o no aprobadas por Antes de empezar a trabajar: STIHL puede provocar lesiones graves o mortales, así ► Monte el manillar y el mango de control, @ 8.1. como daños materiales. -
Página 87: Instalación Y Retiro De Un Deflector O Tope De Límite
español / EE.UU 8 Armado de la motoguadaña / desmalezadora Instalación y retiro de un deflector o tope de Para montar el manillar: límite ► Apague el motor, @ 12.1. 8.2.1 Montaje de un deflector ADVERTENCIA Para reducir el riesgo de lesiones causadas por objetos que salen despedidos o por contacto con el accesorio de corte, nunca use la motoguadaña / desmalezadora sin un deflector debidamente montado. -
Página 88: Retirada Del Deflector
español / EE.UU 8 Armado de la motoguadaña / desmalezadora ► Inserte los tornillos (2) y apriételos a un par de materiales. Asegúrese de que la cabeza segadora y el 88.5 lbf. pulg. (10 Nm). Asegúrese de que el deflector accesorio de corte estén bien apretados y en buenas está... -
Página 89: Indicación
español / EE.UU 8 Armado de la motoguadaña / desmalezadora INDICACIÓN ADVERTENCIA Si la motoguadaña se usa con un hilo excesivamente largo, Un accesorio de corte metálico dañado o suelto puede aumenta la carga del motor, y su velocidad de vibrar, agrietarse, romperse o desprenderse de la máquina, funcionamiento se reduce. -
Página 90: Retirada De Un Accesorio De Corte Metálico
español / EE.UU 9 Ajuste de la motoguadaña / desmalezadora ► Coloque el accesorio de corte (4) directamente sobre la INDICACIÓN placa de empuje. Asegúrese de que el accesorio de corte Después de montar o retirar el accesorio de corte, siempre está... -
Página 91: Ajuste Del Manillar
español / EE.UU 9 Ajuste de la motoguadaña / desmalezadora Para ajustar el arnés: ► Afloje el tornillo de sujeción (1). ► Gire el mango de control (2) a la posición necesaria. ► Ajuste el largo de la correa del arnés completo (1) de modo que el gancho de muelle (2) quede ►... -
Página 92: Mezcla Del Combustible Y Carga De Combustible En La Motoguadaña / Desmalezadora
Esto podría causar problemas de funcionamiento o daños en el motor. Por esta razón, STIHL le recomienda que use exclusivamente gasolina sin plomo ► Si la , motoguadaña / desbrozadora no está equilibrada de buena calidad. - Página 93 Si no utiliza MotoMix, use solamente el aceite para motores de 2 tiempos STIHL HP Ultra o aceites Para lograr la mezcla correcta de combustible: para motores de 2 tiempos de equivalente alta calidad, ►...
-
Página 94: Carga De Combustible En La Motoguadaña / Desmalezadora
español / EE.UU 10 Mezcla del combustible y carga de combustible en la motoguadaña / 10.2 Carga de combustible en la motoguadaña / más probable cuando el tanque de combustible está lleno hasta la mitad o más. Respete siempre las instrucciones de desmalezadora llenado de combustible que se dan en este manual: –... -
Página 95: Arranque Del Motor
Suspenda el uso de la motoguadaña / desmalezadora y llévela al concesionario autorizado de STIHL para que la repare. 11 Arranque del motor ► Apriete la tapa hacia abajo y, manteniendo una presión constante sobre la misma, gírela despacio... - Página 96 ► Si el motor está a temperatura ambiente: apriete hacia marcha en vacío, ajuste el cable del acelerador @ 21.4o dentro los bordes (flechas) y gire la palanca del solicite a un concesionario autorizado de STIHL que estrangulador (2) a la posición inspeccione la motoguadaña / desbrozadora antes de seguir usándola.
-
Página 97: Apagado Del Motor
español / EE.UU 12 Apagado del motor regresa a la posición de funcionamiento. Si el motor está 12 Apagado del motor caliente, es posible que se pueda arrancar simplemente jalando la cuerda de arranque, sin ajustes adicionales. 12.1 Apagado del motor 13 Comprobación de la herramienta motorizada ADVERTENCIA... -
Página 98: Durante El Funcionamiento
► Intente oprimir el gatillo de aceleración. Si el gatillo se puede apretar sin oprimir antes el bloqueo del gatillo del acelerador, lleve la motoguadaña / desmalezadora a un concesionario de servicio STIHL autorizado para que la reparen antes de utilizarla. Parada del motor ►... -
Página 99: Ajuste Del Hilo De Nilón
► Si no puede tirar del hilo de segado para sacar la longitud necesaria, instale un carrete de hilo nuevo. 14.2 Ajuste del hilo de nilón STIHL recomienda mantener el hilo de nilón en un baño de agua durante un mínimo de entre 12 y 24 horas antes de ADVERTENCIA usarlo, para prolongar su vida útil. -
Página 100: Ajuste Del Carburador
15 Ajuste del carburador 15 Ajuste del carburador 15.1 Sistema de gestión del motor STIHL M-Tronic El sistema de gestión del motor STIHL M-Tronic emplea medios electrónicos para regular la sincronización del motor y la dosificación del combustible en todas las condiciones de funcionamiento, tomando en cuenta la altitud y la calidad del combustible. -
Página 101: Manejo Durante El Invierno
Estos accesorios están disponible en los distribuidores STIHL. 15.3 Manejo durante el invierno El carburador puede congelarse cuando la motoguadaña / 15.4 Manejo durante el verano... -
Página 102: Después De Completar El Trabajo
16 Después de completar el trabajo 16 Después de completar el trabajo ADVERTENCIA Si ha montado un accesorio de corte metálico, STIHL le recomienda instalar un protector para transporte 16.1 Preparación para el transporte o el adecuado (accesorio especial) para reducir el riesgo de sufrir cortaduras por el contacto accidental. -
Página 103: Limpieza
español / EE.UU 19 Limpieza Cuando guarde la motoguadaña / desmalezadora: 19 Limpieza 90° 19.1 Limpieza de la motoguadaña / desmalezadora ADVERTENCIA Para reducir el riesgo de lesiones causadas por una activación accidental, apague el motor antes de realizar cualquier trabajo de limpieza, @ 6. Los usuarios de esta motoguadaña / desmalezadora deben llevar a cabo únicamente las tareas de limpieza que se describen en este manual. -
Página 104: Inspección Y Mantenimiento
Caja de engranajes Verifique si hay grasa visible en el eje de transmisión antes de montar un accesorio de corte. Si hay grasa visible, compruebe la lubricación de los engranajes STIHL recomienda acudir a un concesionario de servicio STIHL autorizado 0458-838-8601-A... -
Página 105: Inspección Y Mantenimiento De La Motoguadaña / Desmalezadora
STIHL metálico (accesorio especial), o encargue a un concesionario de servicio STIHL autorizado que la revise y vuelva a ajustar ADVERTENCIA el equilibrio si fuera necesario. Nunca use un accesorio de corte metálico dañado o sin filo. -
Página 106: Guía De Solución De Problemas
21 Guía de solución de problemas 21.1 Motoguadaña / desmalezadora Muchos problemas de rendimiento se pueden resolver con unos sencillos pasos. Cuando localice averías, STIHL le recomienda que empiece tomando las siguientes medidas: ► Cambie el filtro de aire, @ 21.2. -
Página 107: Sustitución Del Filtro De Aire
► Inserte los tornillos (1) y apriételos. 21.3 Limpieza de la bujía ADVERTENCIA Para reducir el riesgo de incendio y de quemaduras, utilice solamente las bujías autorizadas por STIHL. Siempre inserte el casquillo de la bujía bien apretado en el borne de la bujía. 0458-838-8601-A... -
Página 108: Ajuste Del Cable Del Acelerador
español / EE.UU 21 Guía de solución de problemas ► Gire el tornillo (1) en sentido contrahorario. ► Con cuidado, gire el tornillo (2) del gatillo de aceleración en el sentido de la flecha hasta que note una resistencia ► Levante la tapa (2) y empújela hacia atrás. inicial. -
Página 109: Especificaciones
22.2 STIHL FS 361 C-M, 461 C-M – Cilindrada: Bomba de combustible manual – FS 361 C-M: 2.30 pulg. cúb. (37.7 cm³) – FS 461 C-M: 2.78 pulg. cúb. (45.6 cm³) – Potencia del motor según ISO 8893: Posición de la palanca del estrangulador: el motor –... -
Página 110: Mejoramientos Técnicos
Diámetro máximo permitido del accesorio de corte Velocidad nominal del accesorio de corte Los productos STIHL no se deben eliminar junto con la basura doméstica, sino de acuerdo con las leyes y normas locales, estatales y federales y como se especifica en este manual, @ 25.1. -
Página 111: Accesorio De Corte Y Arnés
23 Combinaciones aprobadas de deflector, accesorio de corte y arnés 23.1 STIHL FS 361 C-M, 461 C-M El modelo FS 361 C-M, 461 C-M está aprobado únicamente para el uso con los siguientes accesorios de corte: Accesorios de corte Deflectores... - Página 112 español / EE.UU 23 Combinaciones aprobadas de deflector, accesorio de corte y arnés – Hoja de sierra circular con dientes de rascado Descripción de los accesorios de corte 225 (9) – Hoja de sierra circular con dientes tipo cincel – AutoCut 46-2 (1) 225 (10) –...
-
Página 113: Piezas Y Equipos De Repuesto
STIHL. Es posible identificar las piezas originales de Sus derechos y obligaciones de garantía STIHL por el número de pieza STIHL, el logotipo de La Agencia de Protección del Medio Ambiente (EPA) de los y, en ciertos casos, el símbolo de piezas EE.UU. - Página 114 / EE.UU 27 Garantía del sistema de control de emisiones STIHL Incorporated debe garantizar el sistema de control de Sin embargo, como propietario del motor pequeño para emisiones de su motor pequeño para uso fuera de carretera equipo de uso fuera de carretera, usted debe ser consciente por el intervalo que se especifica a continuación, siempre...
- Página 115 STIHL autorizado. La prueba de emisiones se puede – Silenciador realizar en las instalaciones de STIHL Incorporated o en un laboratorio de pruebas independiente. – Bujía – Válvula de solenoide (si corresponde) Trabajo bajo garantía...
-
Página 116: Declaración De Garantía De Stihl Incorporated
El Consejo de Recursos del Aire del Estado de California guarde todos los recibos de los trabajos de mantenimiento (CARB) y STIHL Incorporated se complacen en explicarle la que se hagan en su motor pequeño para equipos de uso Garantía del sistema de control de emisiones instalado en el fuera de carretera, pero STIHL Incorporated no puede negar motor de su equipo de uso fuera de carretera para el año... - Página 117 STIHL en cuanto surja el problema. Las 1) Cualquier componente garantizado cuyo reemplazo no reparaciones cubiertas por la garantía deben realizarse en está...
-
Página 118: Marcas Comerciales
STIHL, y que tal maltrato, estación de reparaciones bajo garantía. negligencia, o mantenimiento incorrecto ha sido la causa directa de la necesidad de reparación o sustitución del... -
Página 119: Marcas Comerciales Por Ley Común
Attachment Series™ Series™ TapAction™ STIHL Territory™ STIHL Injection Esta lista de marcas comerciales está sujeta a cambios. Queda terminantemente prohibido todo uso de estas marcas comerciales sin el consentimiento expreso por escrito de ANDREAS STIHL AG & Co. KG, Waiblingen. 0458-838-8601-A... - Página 120 State of California to cause cancer, en el estado de California son considerados birth defects or other reproductive harm. como causantes de cáncer, defectos de nacimiento u otros efectos nocivos para los órganos de la reproducción. 0458-838-8601-A englisch / spanisch USA www.stihl.com *04588388601A* 0458-838-8601-A...