Tabla de contenido
Publicidad
Idiomas disponibles
Idiomas disponibles
Enlaces rápidos
FM/AM
MiniDisc Player
Operating Instructions
Manual de instrucciones
¤ˇ¥˛»¡'œfi
For installation and connections, see the supplied installation/connections
manual.
Para obtener información sobre la instalación y las conexiones, consulte el manual
de instalación/conexiones suministrado.
ˆ ' ¥»
""ƒw‚¸⁄˛‰u‚ ‡s– ¡A‰—
MDX-C6500X
© 2000 Sony Corporation
3-044-893-11 (1)
¤£·£¤ ""¡§ƒw‚¸¡ ‰u‚ ‡s– »¡'œfi ¡¤¡C
GB
ES
CT
Publicidad
Capítulos
Tabla de contenido
Solución de problemas

Manuales relacionados para Sony MDX-C6500X


Resumen de contenidos para Sony MDX-C6500X
- Página 1 For installation and connections, see the supplied installation/connections manual. Para obtener información sobre la instalación y las conexiones, consulte el manual de instalación/conexiones suministrado. ˆ ' ¥» “”ƒw‚¸⁄˛‰u‚ ‡s– ¡A‰— ¤£·£¤ “”¡§ƒw‚¸¡ ‰u‚ ‡s– »¡'œfi ¡¤¡C MDX-C6500X © 2000 Sony Corporation...
-
Página 2: Moisture Condensation
Welcome ! Precautions Thank you for purchasing the Sony MiniDisc • If your car was parked in direct sunlight Player. This unit lets you enjoy a variety of resulting in a considerable rise in features using the following controller temperature inside the car, allow the unit to accessories: cool off before operating it. - Página 3 Notes on attaching labels Notes on MDs Be sure to attach labels on cartridges correctly, as failing to do so may cause the MD to Since the disc itself is housed in a cartridge, become stuck in the unit. free from accidental contact with your fingers and dust, MDs can withstand a certain degree •...
-
Página 4: Tabla De Contenido
Table of Contents Location of controls ..........5 Other Functions Labeling the rotary commander ...... 18 Getting Started Using the rotary commander ......19 Resetting the unit ..........7 Adjusting the sound characteristics ....20 Detaching the front panel ........7 Attenuating the sound ........ -
Página 5: Location Of Controls
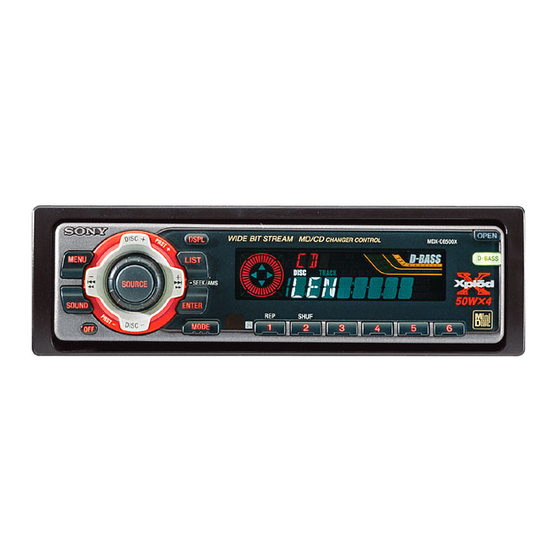
SOURCE -SEEK/AMS SOUND ENTER SHUF MODE MDX-C6500X Refer to the pages listed for details. 1 Volume control dial qg Frequency select switch (located on the bottom of the unit) 2 MENU button 8, 10, 12, 13, 14, 15, 16, The AM (FM) tuning interval is factory-set 17, 21 to the 10 k (200 k) position. -
Página 6: Replacing The Lithium Battery
Location of controls Card remote commander RM-X91 The corresponding buttons of the card remote commander control the same functions as those on this unit. OPEN/CLOSE 1 OFF button 2 MENU button MENU DISC LIST 3 SOURCE button SEEK SEEK 4 SEEK/AMS buttons SOURCE 5 SOUND button 6 DSPL button... -
Página 7: Getting Started
Attaching the front panel Place the hole A in the front panel onto the Getting Started spindle B on the unit as illustrated, then push the left side in. Resetting the unit Before operating the unit for the first time or after replacing the car battery, you must reset the unit. -
Página 8: Turning The Unit On/Off
Turning the unit on/off Setting the clock The clock uses a 12-hour digital indication. Turning on the unit Press (SOURCE) or insert an MD in the unit. Example: To set the clock to 10:08 For details on operation, refer to page 9 (MD/ CD) and page 15 (radio). -
Página 9: Md Player Cd/Md Unit (Optional)
When the last track on the MD is over MD Player The track number indication returns to “1,” CD/MD Unit (optional) and playback restarts from the first track of the Press In addition to playing an MD with this unit alone, you can also control external CD/MD (OFF) Stop playback... -
Página 10: Locating A Specific Track
After you select the desired item, the display Locating a specific track will automatically change to the Motion — Automatic Music Sensor (AMS) Display mode after a few seconds. In the Motion Display mode, all the items are During playback, press either side of scrolled in the display one by one in order. -
Página 11: Playing Tracks Repeatedly
Locating a disc Playing tracks in random — Disc Selection order When an optional CD/MD unit is — Shuffle Play connected, press either side of (DISC/PRST) to select the desired disc. You can select: The desired disc in the current optional •... -
Página 12: Labelling A Cd
To return to normal CD play mode, press Labelling a CD — Disc Memo (ENTER). (For a CD unit with the custom file function) Tips • To erase or correct a name, enter “_” (under-bar) You can label each disc with a personalised for each character. -
Página 13: Locating A Disc By Name
Erasing the disc memo Locating a disc by name Press (SOURCE) repeatedly to select — List-up (For a CD unit with the custom “CD.” file function or an MD unit) Press (MODE) repeatedly to select the CD You can use this function for discs that have unit. -
Página 14: Selecting Specific Tracks For Playback
Playing specific tracks only Selecting specific tracks You can select: •“BANK-ON” — to play the tracks with the for playback “PLAY” setting. — Bank •“BANK-INV” (Inverse) — to play the tracks with the “SKIP” setting. (For a CD unit with the custom file function) If you label the disc, you can set the unit to During playback, press (MENU), then skip or play the tracks of your choice. -
Página 15: Radio
Memorising only the Radio desired stations You can preset up to 18 FM stations (6 each for FM1, FM2, and FM3), up to 12 AM stations (6 Memorising stations each for AM1 and AM2) in the order of your choice. automatically Press (SOURCE) repeatedly to select the —... -
Página 16: Receiving The Memorised Stations
If FM stereo reception is poor Receiving the memorised — Monaural Mode stations During radio reception, press (MENU), then press either side of (DISC/PRST) repeatedly until “MONO-OFF” appears. Press (SOURCE) repeatedly to select the tuner. Press the (+) side of (SEEK/AMS) until “MONO-ON”... -
Página 17: Displaying The Station Name
Tips Storing the station names • To erase or correct a name, enter “_” (under-bar) for each character. • There is another way to start storing station — Station Memo names. Press (LIST) for two seconds instead of steps 2 and 3. You can also complete the You can assign a name to each radio station operation by pressing (LIST) for two seconds and store it in memory. -
Página 18: Locating A Station By Name - List-Up
Locating a station by Other Functions name — List-up Press (LIST) momentarily. You can also control the unit with a rotary The name assigned to the station currently commander. tuned appears in the display. Labeling the rotary commander Press either side of (DISC/PRST) Depending on how you mount the rotary repeatedly until you find the desired commander, attach the appropriate label as... -
Página 19: Using The Rotary Commander
By rotating the control Using the rotary (the SEEK/AMS control) commander The rotary commander works by pressing buttons and/or rotating controls. You can also control an optional CD/MD unit with the rotary commander. By pressing buttons (the SOURCE and MODE buttons) Rotate the control momentarily and release it to: •Locate a specific track on a disc. -
Página 20: Other Operations
Other operations You can also change the operative direction of Rotate the VOL control to these controls with the unit (see “Changing the adjust the volume. sound and display settings” on page 21). Press (ATT) to attenuate the sound. Adjusting the sound characteristics Press (OFF) to turn off the unit. -
Página 21: Changing The Sound And Display Settings
Press the (+) side of (SEEK/AMS) to select Changing the sound and the desired setting (Example: ON or OFF). display settings Press (ENTER). After the mode setting is completed, the The following items can be set: display returns to normal play mode. SET (setting) •... -
Página 22: Additional Information
If the fuse blows, check the power connection and replace the fuse. If the fuse blows again after replacement, there may be an internal malfunction. In such a case, consult your nearest Sony dealer. Main unit Back of the front panel Fuse (10 A) Notes •... -
Página 23: Dismounting The Unit
Dismounting the unit Press the clip inside the front cover with a thin screwdriver, and gently pry the front cover free. Repeat step 1 on the left side. The front cover is removed. Use a thin screwdriver to push in the clip on the left side of the unit, then pull out the left side of the unit until the catch clears the mounting. -
Página 24: Specifications
9 kHz/10 kHz switchable MD changer (6 discs) 531 – 1,602 kHz MDX-65 (at 9 kHz step) Other CD/MD changers 530 – 1,710 kHz with the Sony-BUS system (at 10 kHz step) Source selector Aerial terminal External aerial connector XA-C30 Intermediate frequency 10.7 MHz/450 kHz... -
Página 25: Troubleshooting Guide
Troubleshooting guide The following checklist will help you remedy the problems you may encounter with your unit. Before going through the checklist below, check the connection and operating procedures. General Cause/Solution Problem No sound. •Cancel the ATT function. •Set the fader control to the centre position for two-speaker system. -
Página 26: Radio Reception
When an error occurs during playback of an MD or CD, the disc number of the MD or CD does not appear in the display. The disc number of the disc causing the error appears in the display. If the above-mentioned solutions do not help improve the situation, consult your nearest Sony dealer. -
Página 28: Condensación De Humedad
Precauciones Muchas gracias por la adquisición de este •Si aparca el automóvil bajo la luz solar reproductor de minidiscos Sony. Esta unidad directa y se produce un considerable le permitirá disfrutar de varias funciones aumento de temperatura en su interior, deje mediante el uso de los siguientes accesorios de que la unidad se enfríe antes de utilizarla. -
Página 29: Limpieza
Notas sobre la adhesión de Notas sobre los MD etiquetas Asegúrese de adherir correctamente las Puesto que el disco está alojado en un etiquetas en los cartuchos, ya que en caso cartucho, libre de contactos accidentales de contrario el MD podría atascarse en la unidad. dedos y polvo, los minidiscos pueden soportar cierto grado de tratos bruscos. - Página 30 Indice Localización de los controles ......5 Otras funciones Etiquetado del mando rotativo ......18 Procedimientos iniciales Uso del mando rotativo ........19 Restauración de la unidad ........7 Ajuste de las características de sonido .... 20 Extracción del panel frontal ........ 7 Atenuación del sonido ........
-
Página 31: Localización De Los Controles
-SEEK/AMS SOUND ENTER SHUF MODE MDX-C6500X Consulte las páginas indicadas para obtener más información. 1 Dial de control de volumen qg Selector de frecuencia (situado en la base de la unidad) 2 Botón MENU 8, 10, 12, 13, 14, 15, 16, 17, El intervalo de sintonización de AM (FM) -
Página 32: Control Remoto De Tarjeta Rm-X91
Localización de los controles Control remoto de tarjeta RM-X91 Los botones correspondientes del control remoto de tarjeta controlan las mismas funciones que los de esta OPEN/CLOSE unidad. 1 Botón OFF 2 Botón MENU MENU DISC LIST SEEK SEEK 3 Botón SOURCE SOURCE 4 Botones SEEK/AMS 5 Botón SOUND... -
Página 33: Procedimientos Iniciales
Procedimientos Fijación del panel frontal Coloque el orificio A del panel sobre el eje B iniciales de la unidad como muestra la ilustración y, a continuación, ejerza presión sobre el lado izquierdo para fijarlo. Restauración de la unidad Antes de utilizar la unidad por primera vez o después de sustituir la batería del automóvil, es necesario restaurar dicha unidad. -
Página 34: Activación/Desactivación De La Unidad
Activación/desactivación Ajuste del reloj de la unidad El reloj dispone de una indicación digital de 12 horas. Activación de la unidad Ejemplo: Para ajustar el reloj a las 10:08 Presione (SOURCE) o inserte un MD en la unidad. Para obtener más información sobre el Presione (MENU) y, a continuación, funcionamiento, consulte las páginas 9 (MD/ cualquier lado de (DISC/PRST) varias... -
Página 35: Reproductor De Md Unidad De Cd/Md (Opcional)
Reproductor de MD Cuando finalice el último tema del Unidad de CD/MD La indicación de número de tema volverá a “1” y la reproducción volverá a iniciarse a partir (opcional) del primer tema del MD. Para Presione Además de reproducir el MD con esta unidad, Detener la reproducción (OFF) también puede controlar unidades externas de (OPEN) y, a... -
Página 36: Localización De Un Tema Específico
Después de seleccionar el elemento que desee, Nota Con algunos discos CD TEXT que contengan el visor cambiará automáticamente al modo de muchos caracteres, pueden ocurrir los siguientes desplazamiento de indicaciones por el visor casos: transcurridos unos segundos. — Algunos caracteres no se visualizan. En el modo de desplazamiento de —... -
Página 37: Localización De Discos
Localización de discos Reproducción de temas en — Selección de discos orden aleatorio Con una unidad opcional de CD/MD conectada, presione cualquier lado de — Reproducción aleatoria (DISC/PRST) para seleccionar el disco que desee. Es posible seleccionar: El disco deseado de la unidad opcional de •... -
Página 38: Asignación De Títulos A Los Discos Compactos
Para volver al modo normal de Asignación de títulos a los reproducción de CD, presione (ENTER) durante dos segundos. discos compactos Consejo — Memorando de discos (Unidad de CD con • Para borrar o corregir un título, introduzca función de archivo personalizado) “_”... -
Página 39: Borrado Del Memorando De Discos
Borrado del memorando de discos Localización de discos Presione (SOURCE) varias veces para mediante el nombre seleccionar “CD”. — Función de listado (unidad de CD con Presione (MODE) varias veces para función de archivo personalizado o una seleccionar la unidad de CD. unidad de MD) Esta función puede utilizarse con discos a los Presione (MENU) y, a continuación,... -
Página 40: Selección De Temas Específicos Para Su Reproducción
Reproducción sólo de temas Selección de temas específicos específicos para su Es posible seleccionar: •“BANK-ON” — para reproducir los temas reproducción con el ajuste “PLAY”. •“BANK-INV” (Inverso) — para reproducir — Función de banco los temas con el ajuste “SKIP”. (Unidad de CD con función de archivo personalizado) Durante la reproducción, presione... -
Página 41: Radio
Memorización de las Radio emisoras deseadas Es posible memorizar hasta 18 emisoras en FM (6 en FM1, 6 en FM2 y 6 en FM3) y hasta 12 de Memorización automática AM (6 en AM1 y 6 en AM2) en el orden que desee. -
Página 42: Recepción De Emisoras Memorizadas
Si la recepción de FM en estéreo es Recepción de emisoras de mala calidad — Modo monofónico memorizadas Durante la recepción de la radio, presione (MENU), y, a continuación, Presione (SOURCE) varias veces para cualquier lado de (DISC/PRST) varias seleccionar el sintonizador. veces hasta que aparezca “... -
Página 43: Almacenamiento De Nombres De Emisoras
Para volver al modo de recepción normal Almacenamiento de de la radio, presione (ENTER). nombres de emisoras Consejo — Memorando de emisoras • Para borrar/corregir un nombre, introduzca “_” (barra inferior) para cada carácter. Usted podrá asignar un nombre a cada •... -
Página 44: Localización De Una Emisora Por Su Nombre
Localización de una Otras funciones emisora por su nombre — Functión de listado La unidad también puede controlarse con un mando rotativo. Presione (LIST) durante un instante. El nombre asignado a la emisora actualmente sintonizada aparecerá en el visor. Etiquetado del mando rotativo En función de cómo monte el mando rotativo, adhiera la etiqueta apropiada como se muestra... -
Página 45: Uso Del Mando Rotativo
Mediante el giro del control Uso del mando rotativo (control SEEK/AMS) Este mando funciona mediante la presión de botones y/o el giro de controles. También es posible controlar unidad opcionales de CD/MD con el mando rotativo. Mediante la presión de botones (botones SOURCE y MODE) Gire el control momentáneamente y (SOURCE) -
Página 46: Otras Operaciones
Presione (SOUND) durante dos segundos Otras operaciones manteniendo presionado el control VOL. Gire el control VOL para ajustar el volumen. Presione (ATT) Consejo para atenuar el También es posible cambiar la dirección de sonido. funcionamiento de estos controles con la unidad (consulte “Cambio de los ajustes de sonido y visualización”... -
Página 47: Cambio De Los Ajustes De Sonido Y Visualización
Presione el lado (+) de (SEEK/AMS) para Cambio de los ajustes de seleccionar el ajuste deseado (por ejemplo: ON u OFF). sonido y visualización Presione (ENTER). Es posible ajustar los siguientes elementos: Una vez finalizado el ajuste de modo, SET (ajuste) aparecerá... -
Página 48: Información Complementaria
En este caso, póngase en contacto con Unidad principal el proveedor Sony más próximo. Parte posterior del panel frontal Fusible (10 A) Notas • Como medida de seguridad, antes de limpiar los conectores, apague el motor y extraiga la llave del interruptor de encendido. -
Página 49: Desmontaje De La Unidad
Desmontaje de la unidad Presione el clip del interior de la cubierta frontal con un destornillador fino, y libere dicha cubierta con suavidad. Repita el paso 1 en el lado izquierdo. La cubierta frontal podrá extraerse. Emplee un destornillador fino para presionar el clip de la parte izquierda de la unidad;... -
Página 50: Especificaciones
Conector de antena externa Otros cambiadores de CD/ Frecuencia intermedia 10,7 MHz/450 kHz MD con el sistema BUS de Sensibilidad 30 µV Sony Selector de fuente Sección del amplificador de XA-C30 potencia Las patentes EE.UU. y extranjeras han sido Salidas... -
Página 51: Guía De Solución De Problemas
Guía de solución de problemas La siguiente lista de comprobaciones proporciona ayuda para solucionar la mayoría de los problemas que pueden producirse con la unidad. Antes de consultar la lista que aparece a continuación, compruebe los procedimientos de conexión y funcionamiento. Generales Causa/Solución Problema... -
Página 52: Recepción De Radio
Si se produce un error durante la reproducción de un MD o de un CD, el número del MD o del CD no aparecerá en el visor. El visor mostrará el número del disco que causa el error. Si el problema no se soluciona con las sugerencias anteriormente enumeradas, póngase en contacto con el proveedor Sony más próximo. - Página 54 „ƒ‡⁄ ⁄\ ˆD¡A ¿ `˚“” CD/MD ‚¸‚m * ¤ ´Xfii‡o⁄@¤t†˛¡C ƒ ¥»»¡'œfi ¤Sƒ‡·£⁄˛¡A‰—ƒV–z“ “æ“” Sony ‚g P ›Y‡s– ⁄@»O¿ `˚“”–a CD TEXT ¥\fl “” CD ‚¸ ¿ ‚ ¡C ‚m¡A• …‰'æ CD TEXT ”— * fi ¡A‚ CD TEXT ‚Œ...
- Página 55 ¶K…—¯ ¶•“ ¤ˇ¥˛ MD ¶•“ ¨¥†–N…—¯ ¥¿‰Tƒa¶Kƒb ”—§X⁄W¡A§_«h•|¤ˇ MD ¥dƒ ƒb¥» ‚ ¡C ƒ] MD ”—‚¸ƒb ”—§X⁄”¡A‹G¥i` §K⁄£•V‡Q ⁄ ˜†”N'˛“g⁄Wƒ˙„—¡A¥i‚ß H«K«øfi‡¡Cƒ ”—§X“ • –N…—¯ ¶Kƒb A• “”ƒ ‚m¡C ›–“”ƒ˙„—ƒˆ«fl⁄˛¯ §˛“” ”—§X¥ifl ›P‹G» ¡C‰— • ¶K•s…—¯ ⁄§«e ‡¥ ›Ø¥h´´…—¯ ¡C “‘•N¥H⁄U¤˘¶ ¡C •...
- Página 56 ¥ ¿ ––¤ „“”ƒ ‚m ............. ¤ ¥ƒ¥\fl „– ´ ƒ¡––¤ „¶K…—¯ ......•˙‡˘⁄u§@ ¤ˇ¥˛– ´ ƒ¡––¤ ......„ ›«‰ ¥» ..............‰ ‚‘› ¯TflS'˚ ......... ' ¤ł«e“O ..............· fiz› ¶q ........¥·¶}¡ ˆ –… „„q•‰ ..........§...
-
Página 57: Ƒ 'M
MENU LIST SOURCE -SEEK/AMS SOUND ENTER SHUF MODE MDX-C6500X ‚ † »¡'œ¡A‰— ¤£ƒ‡ˆ ›¶›–¡C 1 › ¶q––¤ « ‰L qf SEEK/AMS ¡— / ¡ˇ¡]· …—¥“¡ ¥k¡^« ¶s 8¡A10¡A12¡A14¡A16¡A17¡A20¡A21 2 MENU « ¶s 8 ¡A 10¡A 12¡A13¡A14¡A15¡A16¡A ƒ ˚› … –··œ 10¡A14 17¡A 21... - Página 58 ––¤ „“”ƒ ‚m ¥d⁄øƒ¡»»–– „ RM-X91 ¥d⁄øƒ¡»»–– „⁄W‹ • ' ¥» ⁄W“”« ¶s¤ª‹ ƒP “”––¤ ¥\fl ¡C 1 OFF « ¶s OPEN/CLOSE 2 MENU « ¶s 3 SOURCE « ¶s MENU DISC LIST 4 SEEK/AMS « ¶s SEEK SEEK 5 SOUND « ¶s SOURCE 6 DSPL «...
-
Página 59: Ł«E"O
ƒw‚¸«e“O ƒp„ˇ' ¥ ¡A–N«e“O“” A ⁄ „ •˙¥» “”⁄ ¶b •˙‡˘⁄u§@ B ¡A M«Æ–N¥“ …– ⁄J¡C ›«‰ ¥» ƒb†˜⁄@ƒ‚¤ˇ¥˛¥» «e'˛§ ·«¤T¤fi„qƒ «Æ¡A¥† ¶•›«‰ ¥» ¡C ¤ł⁄U«e“O¤ˆ¥˛–aƒy Y“”“«¯Ø¡Aƒp¶Œfl] § ¥¡A « ⁄U›«‰ « ¶s¡C ›«‰ « ¶s ø « £›«‰ « ¶s¡A–Nfił £fi ˜`'M‹Y¤˙⁄w O —“”¥\fl ¡C ' ¤ł«e“O –z¥i¤ł⁄U¥»... -
Página 60: Ƒpƒ ¤ˇ
¥·¶}¡ ˆ –… „„q•‰ ‡]'wfi ˜` fi ˜`–˜¥˛ 12 ⁄pfi …˘ƒr¯ª¥ ¡C ¥·¶} „„q•‰ « (SOURCE) '˛‚¸⁄J⁄@–i MD ' „⁄⁄¡C ¤ ƒp¡G–Nfi ˜`‡]'w‹ 10 ¡ G08 ƒ‡ˆ §@“”‚ † ⁄”fie¡A‰— ƒ †˜ 9 ›¶ (MD/CD) 'M « ⁄U (MENU)¡A M«Æ⁄ˇ·_« (DISC/PRST) “” †˜... -
Página 61: Md 'Æ› Cd/Md '¸'M ¡]
• MD ⁄W‡ «Æ⁄@ƒ–…‰'槄†ƒfi ƒ–‚„« ¥ –Nƒ^¤ ¡§ 1¡¤¡A M«Æ⁄S–q MD ⁄W†˜ MD 'æ› ⁄@›”ƒ–¶}'l›«'æ¡C CD/MD ‚¸‚m ¡] ¿ `˚¥¡^ ›n ‰—« ⁄U (OFF) « ¶s –⁄ …‰'æ (OPEN) « ¶s¡A M«Æ« ⁄U h¥X MD ‡ ¿W¥˛¥» …‰'æ MD fi ¡A⁄]fl ––¤ ¥~‡¡ CD/ MD ‚¸‚m“”¡C ƒp“G‡s–... - Página 62 ƒb¿ ' ›n¶ ¥ «Æ¡A¯ª¥ –Nƒb·X‹ «Æƒ ˚ƒa ·M§ « 'w“”ƒ–¥ § ¯ ‹ † ˚¯ª¥ … ƒ¡¡C ¡X ƒ ˚› … ¶˙•P „¡] AMS ¡^ ƒb† ˚¯ª¥ … ƒ¡⁄⁄¡A' ƒ‡⁄W›z¶ ¥ –N‡v⁄@« ¶¶§˙ƒb¯ª¥ « ‚ ¶b–†¯ª¥ ¡C …‰'æ⁄⁄¡A„ ›n‚ı„L“”ƒU›”ƒ– u…¨ƒa« ⁄@⁄U (SEEK/AMS) “”¥...
-
Página 63: ˇ·_'Æ
§ ¥X ”— ¥H¥ •N¶¶§˙…‰'惖¥ ¡X ”—¿ ¡X ¥ ¿ …‰'æ¥\fl • ‡s– ⁄F⁄@¿ `˚¥ “” CD/MD ‚¸‚mfi ¡A‰—« (DISC/PRST) “”¥ ⁄@ˆ ¥H¿ ' ›n ”—¡C ¥i¿ ¡G • «e¿ `˚¥ CD/MD ‚¸‚m⁄⁄“”' ›n ”—§Y¶}'l • SHUF-1 ¡V¥ •N¶¶§˙ƒa…‰'æ• «e ”—⁄⁄“”ƒ–⁄l¡C …‰'æ¡C •... -
Página 64: O Cd
›nƒ^¤ ·¶‡q“” CD …‰'æ⁄Łƒ¡fi ¡A‰—« ƒ …— O CD (ENTER)¡C ¡X ”— O —¥\fl ¡]–a¥˛⁄Æ fi ¥\fl “” CD ‚¸‚m¡^ ›n» • ›nfił £'˛§ § ƒW” fi ¡A‰—‹ ¤C› ƒr†¯¿Ø⁄J¡§ __ ¡¤¡]⁄U –zfl ¥˛› ⁄H–M¥˛ƒW” „¤C–i ”—…— O¡C⁄@–i ƒE‰u¡^¡C ”—‡ ƒh¥i¥H¿Ø⁄J 8 › ƒr†¯¡C›Y–z „ CD …— O¡A (LIST) ¤... - Página 65 fił £ ”— O —¥\fl ‡q„LƒW” ·M§ ”— ⁄ˇ·_« (SOURCE) ¥H¿ ¡§ CD ¡¤¡C ¡X ƒC“ ¥\fl ¡]–a¥˛⁄Æ fi ¥\fl “” CD ‚¸‚m '˛ MD ‚¸‚m¡^ ⁄ˇ·_« (MODE) ¥H¿ CD ‚¸‚m¡C –z¥i¥H„ ⁄w‚g« 'w¥˛⁄ƃW” “” ”—¤ˇ¥˛ƒ„¥\ « (MENU)¡A M«Æ⁄ˇ·_« (DISC/PRST) “”¥ fl...
-
Página 66: Ƒ-Fiw¥\Fl
¶¨…‰'æ« 'w“”ƒ–¥ ¿ « 'w“”ƒ–¥ …‰'æ –z¥i¥H¿ ¡G •¡§BANK-ON ¡¤¡X …‰'æ–aƒ‡¡§ PLAY¡¤‡]'w“”ƒ– ¡X ƒ–fiw¥\fl ¥ ¡C ¡]–a¥˛⁄Æ fi ¥\fl “” CD ‚¸‚m¡^ •¡§ BANK-INV¡¤¡] Inverse ¡^¡X …‰'æ–aƒ‡¡§ SKIP ¡¤ ‡]'w“”ƒ–¥ ¡C ›Y–z „ ”—…— O¡A«h¥i„ ¥» ¶iƒ ‡]'w¡A¤ˇ ⁄§‚ı„L⁄£›n“”ƒ–¥ '˛…‰'æ–z¿ “”ƒ–¥... -
Página 67: O -„Q»O
¶¨ O —' ›n“”„q»O ƒ‹› –z¥i¥H« • –z¿ “”¶¶§˙¡A‡ ƒh‡]'w 18 › FM „q»O¡] F M1¡AFM2 'M FM3 ƒU 6 › ¡^¡A'M‡ ƒh 12 › AM¡]FM1 'M FM2 ƒU 6 › ¡^„q»O¡C ƒ ˚ O —„q»O ⁄ˇ·_« (SOURCE) ¥H¿ ‰ ¿ „¡C ¡X ‡... - Página 68 ›Y FM ¥ ¯Ø`n“”ƒ‹› “‹“p⁄£¤} ƒ‹¯¥' O —“”„q»O ¡X ‡ ƒ `n… ƒ¡ (MENU) « ¶s¡A M«Æ⁄ˇ·_« ƒbƒ‹› ⁄⁄¡A« ⁄U ⁄ˇ·_« (SOURCE) ¥H¿ ‰ ¿ „¡C (DISC/PRST) “”¥ ⁄@ˆ ƒ ¯ª¥ ¡§ MONO- OFF ¡¤¡C ⁄ˇ·_« (MODE) ¥H¿ “i‹q¡C « (SEEK/AMS) “”¡]¡ˇ¡^ˆ ƒ ¯ª¥ ¡§ MONO- ON ¡¤¡C ¡](1) ƒ...
-
Página 69: Q»O O -¥\Fl
›n» • ›nfił £'˛§ § ƒW” fi ¡A‰—‹ ¤C› ƒr†¯¿Ø⁄J¡§¡¯¡¤¡]⁄U ƒs x„q»OƒW” ¡X „q»O O —¥\fl ƒE‰u¡^¡C • ¥ t ¥ ~ ` ƒ ‡ ⁄ @ › ⁄ Ł “ k ¥ ˛ ' ¶ } ' l ƒ s ⁄ J „ q ¥ x ƒ W ” ¡ C § Y –z¥i „¤C›... -
Página 70: Ƒc" ¥\Fl
‡q„LƒW” ·M§ „q»O ¡X ƒC“ ¥\fl ¤ ¥ƒ¥\fl « (LIST) « ¶s⁄ø¤Ł¡C ‹ • «e‰ ⁄J“”„q»O' « 'w“”ƒW” §Y¥X†{ƒb¯ª¥ ⁄]¥i¥˛– ´ ƒ¡––¤ „––¤ „¡C « ⁄W¡C „– ´ ƒ¡––¤ „¶K…—¯ ¥i H– ´ ƒ¡––¤ „“”ƒw‚¸“‹“p–N…—¯ A• ƒa ⁄ˇ·_« (DISC/PRST) “”¥ ⁄@ˆ ƒ § ¤ ' ›n“” ¶K⁄Wƒp⁄U¡C „q»O¡C ' ¿... -
Página 71: ˇ¥˛- ´ Ƒ
‡q„L– ´ ––¤ ` ¡]¡§SEEK/AMS ¡¤––¤ `¡^ ¤ˇ¥˛– ´ ƒ¡––¤ „ ‡q„L« £« ¶s'M¡ '˛– ´ ––¤ ` ¥i `a– ´ ƒ¡––¤ „¡C –z¥i¤ˇ¥˛– ´ ƒ¡––¤ „––¤ ¿ `˚“” CD/MD ‚¸ ‚m¡C ‡q„L« £« ¶s ¡]SOURCE « ¶s'M MODE « ¶s¡^ u…¨ƒa–... -
Página 72: Tfls
›n» ¤ ¥ƒ §@ –z⁄]¥i¥H¥˛¥» `a––¤ ` “” §@⁄ŁƒV¡] ‹ †˜ ´ ˚ VOL ––¤ ` ›¶“”¡§§ ¯ › ¯T'M¯ª¥ ‡]'w¡¤¡^¡C ¥H‰ ‚‘› ¶q¡C « ⁄U (ATT) « ¶s ¥H· fiz› ¶q¡C ‰ ‚‘› ¯TflS'˚ –z¥i¥H‰ ‚‘§C› ¡B “› ¡B¥›¿¯'M¯ª` flS'˚¡C «... -
Página 73: T'm¯ª¥ ‡]'W
« ⁄U (SEEK/AMS) “”¡]¡ˇ¡^ˆ ¥H¿ ' ›n“” § ¯ › ¯T'M¯ª¥ ‡]'w ‡]'w¡]¤ ƒp¡G ON '˛ OFF¡^¡C –z¥i‡]'wƒp⁄U¶ ¥ ¡G « (ENTER)¡C SET ¡]‡]'w¡^ • … ƒ¡‡]'w§„ƒ¤«Æ¡A¯ª¥ §Yƒ^¤ ·¶‡q…‰'æ⁄Ł • CLOCK ¡]fi ˜`¡^¡]†˜ 8 ›¶¡^ ƒ¡¡C • BEEP ¡X ¥·¶}'˛ˆ ‡‹¡§„˚„˚¡¤˜ §i`n¥\fl ¡C •... -
Página 74: O I
§ ·««O I •fi ¡A¥†¶•‰T«O' ¤ˇ¥˛“”«O I •»P › «O I •“”ƒw …˘‹ ƒP¡C›Y«O I •¿N´_¡A‰— ¸‹d „q•‰‡s– ¤ˆƒA§ ·««O I •¡C›Y«O I •§ ·««Æ⁄S‡Q ¿N´_¡A«h¥ifl ‹O⁄”‡¡‹G» ¡Cƒ„fi ¡A‰—ƒV“ “æ“” Sony ‚g P ¿ ‚ ¡C ¥D «e“O“”›I‡¡ «O I • (10 A) ø... - Página 75 ' ¤ł¥» ¤ˇ¥˛`¡«‹`‡ •⁄M« £«e»\‚ “”´Œ” •fƒ'¡A M«Æ »·»·ƒa–N«e»\… _¡C ƒP…¸„ ' ¥“ …¡A›«‰˘¤B˘J §@¡C «e»\§Y¥i¤œ⁄U¡C ¤ˇ¥˛`¡«‹`‡ •⁄M·¡⁄J¥» ¥“ …“”´Œ” •fƒ'¡A M «Æ' ¥X¥» ¥“ …“‰ƒ ´Œ ‘† ´ ƒw‚¸ƒ ‚m¡C ƒP…¸„ ' ¥k …¡A›«‰˘¤B˘J §@¡C –N¥» –qƒw‚¸ƒ ‚m' ¥X¡C...
- Página 76 MD ·«”— ¡] 6 ”—ƒ¡¡^ ‰ ¿ ‰d‡ AM ‰ ¿ ¶¡„j¡G MDX-65 9 kHz/10 kHz ¥i⁄`·« ¤ ¥ƒ–aƒ‡ Sony-BUS ¤t†˛“” 531 – 1,602 kHz CD/MD ·«”— ¡] 9 kHz ¤B¶ifi ¡^ › •‰¿ „ 530 – 1,710 kHz XA-C30 ¡] 10 kHz ¤B¶ifi...
-
Página 77: G» -˘ £« «N
‹G» –˘ £« «n ⁄UƒC ¸‹d“ ƒ‡§U' ‚ ¤M–z¤ˇ¥˛¥» fi ¥ifl „J¤ “” ˆD¡C ƒb¤ˇ¥˛⁄U›–“” ¸‹d“ ⁄§«e¡A‰— ¸‹d‡s– 'M §@¤B˘J‹O§_¥¿‰T¡C •§›z › ƒ]¡ ‚ ¤M⁄Ł“k ‹G» •¤œfił ATT ¥\fl L`n¡C •–N´ø‚ ·›`n „¤t†˛“”¯ª` ––¤ ` ‡]'wƒb⁄⁄⁄ ƒ ‚m¡C •¶¶fi w⁄ŁƒV´ ˚…•‰L¡A‰... - Página 78 ‰— ¥¤ •¯« › §C¤ 50 ¢J ¥H⁄U¡C HI TEMP ƒb MD '˛ CD …‰'æfi ¥X†{¿ø»~¡A¯ª¥ « ⁄W·N⁄£•|¯ª¥ MD '˛ CD “” ”—‚„¡C ƒb¯ª¥ « ⁄W¯ª¥ ‡yƒ¤¿ø»~“” ”—‚„¡C ›Y⁄W›z‚ ¤M⁄Ł“k L§U' § ‰“‹“p¡A‰—ƒV“ “æ“” Sony ‚g P ¿ ‚ ¡C...
- Página 80 Sony Corporation Printed in Korea...