Tabla de contenido
Publicidad
Idiomas disponibles
Idiomas disponibles
Enlaces rápidos
STIHL FC 55
STIH)
Instruction Manual
Manual de instrucciones
Warning!
For safe operation follow all safety
precautions in Instruction Manual - improper
use can cause serious injury.
Advertencia!
Para su seguridad durante el manejo de este
producto, siga siempre las precauciones de
seguridad dadas en el manual de
instrucciones - el uso indebido puede causar
lesiones graves.
Publicidad
Capítulos
Tabla de contenido

Manuales relacionados para Stihl FC 55


Resumen de contenidos para Stihl FC 55
- Página 1 STIH) STIHL FC 55 Instruction Manual Manual de instrucciones Warning! For safe operation follow all safety precautions in Instruction Manual - improper use can cause serious injury. Advertencia! Para su seguridad durante el manejo de este producto, siga siempre las precauciones de...
-
Página 2: Tabla De Contenido
Safety Precautions ......3 Using the Edger ......13 To receive maximum performance and Mounting the Loop Handle ..... 16 satisfaction from your STIHL edger, it is Fitting the Edger Blade ....17 important that you read and understand Fuel ..........18 the maintenance and safety precautions, Fueling .......... -
Página 3: Guide To Using This Manual
Engineering improvements in different ways: individual components. STIHL’s philosophy is to continually Note or hint which is not essential A bullet marks a step or procedure improve all of its products. As a result, for using the machine, but may... -
Página 4: Safety Precautions
Most of these safety precautions and your edger, take a break. warnings apply to the use of all STIHL Tiredness may result in loss of control. Have your STIHL dealer show you how edgers. Different models may have Working with any edger can be to operate your edger. - Página 5 To reduce the risk of injury to your face disease. In order to reduce the risk of STIHL recommends that you also wear Warning! whitefinger disease and carpal tunnel a face shield or face screen over your...
- Página 6 Protect your hands with when there is a danger of authorized attachments are useable for gloves when handling the head injuries. the STIHL edger, their use may, in fact, edger and the cutting tool. be extremely dangerous. Heavy-duty, nonslip gloves improve your grip and protect your hands.
- Página 7 Fueling on the fuel used, the weather conditions, Your STIHL edger uses an oil-gasoline and the venting system of the tank. In mixture for fuel (see the chapter on order to reduce the risk of burns or other “Fuel“...
- Página 8 Move at least 10 feet (3 m) from spot of quantities of fuel. In order To do this with this STIHL leakage before starting. Take care not to to reduce the risk of fuel cap, raise the grip on the get fuel on your clothing.
- Página 9 Maintain a your muffler serviced and repaired by good balance and secure footing. your STIHL Servicing Dealer only. To reduce the risk of injury from loss of control, be absolutely sure that the cutting tool is clear of you and all other...
- Página 10 Work suspect a clogged screen, have your some other authorities, for instance, carefully. muffler maintained by a STIHL Servicing have published lists of substances Always hold the edger firmly with both Dealer. known to cause cancer, reproductive hands.
- Página 11 The cutting attachment could throw objects of this kind and cause personal injury. FC 55...
- Página 12 If the blade continues to worn or dull cutting tools immediately. loosen, see your STIHL dealer. Do not If the cutting tool or deflector becomes Such tools may shatter at high speed attach any blade to a unit without proper clogged or stuck, always turn off the and cause a serious or fatal injury.
- Página 13 STIHL dealer check your edger and manual). or individual. However if you claim make proper adjustments or repairs.
-
Página 14: Using The Edger
Using the Edger Additionally, the daily maintenance Warning! schedule for your edger set forth in your STIHL Owner's Manual should be A worn or damaged muffler is a fire strictly followed. hazard and may cause loss of hearing. Check to see that the muffler is in good For any maintenance please refer to the condition. - Página 15 Adjust the depth wheel (2) so that machine and operator. the blade (3) just touches the ground or breaks the surface of the soil by no more than 1/4“ (5 mm) (B) in the working position. FC 55...
- Página 16 Hold and guide your edger so that the blade is vertical. Cut steadily so that the engine is not lugged down – do not apply force. Cut at a normal walking pace. Do not push the blade into the ground. FC 55...
-
Página 17: Mounting The Loop Handle
Insert the screw (4) through the loop handle and the spacer so that the screw head locates in the hexagon recess. Fit the washer (5) and wingnut (6) and tighten down firmly. FC 55... -
Página 18: Fitting The Edger Blade
Loosen and remove the nut firmly. clockwise (left-hand thread). If the cup spring (10) on the nut (6) Remove the thrust washer. becomes fatigued, install a new nut. see "Guide to Using this Manual" FC 55... -
Página 19: Fuel
English / USA Fuel This engine is certified to operate on Use only STIHL two-stroke engine oil or Fuel mix ages unleaded gasoline and the STIHL two- equivalent high-quality two-stroke Only mix sufficient fuel for a few days stroke engine oil at a mix ratio of 50:1. -
Página 20: Fueling
(6) in the trigger (5) with spring-loaded tongue (6) housing (arrow). and notch (7) in tongue. Now release the the throttle trigger, tongue and throttle interlock in that order. This is the starting throttle position. FC 55... - Página 21 Guide it slowly back into the housing Hold the unit with your left hand and so that the starter rope can rewind press it down firmly – your thumb properly. should be under the housing. Do not stand or kneel on the drive tube! FC 55...
- Página 22 Move the stop switch to O. Unscrew and dry off the spark plug. Continue cranking until engine runs Open the throttle wide. (choke lever to e). Crank the engine several times with the starter to clear the combustion chamber. FC 55...
-
Página 23: Operating Instructions
Check tightness of nuts and power screws (not adjusting screws) at regular Set choke lever to g intervals and retighten as necessary. Press in the tab (1) and swing the filter cover (2) open. Clean away loose dirt from around the filter. FC 55... -
Página 24: Motor Management
With this carburetor it is only possibleto Replace damaged parts of filter. adjust the engine idle speed within fine limits. Place the felt element (3) in the filter housing (4). Close the filter cover so that it snaps into position. FC 55... -
Página 25: Fine Tuning
(LA) Turn low speed screw (L) clockwise after every correction to the low speed (about 1/4 turn) until the engine runs screw (L). and accelerates smoothly. Warm up engine for about 5 minutes. FC 55... -
Página 26: Catalytic Converter
If engine is down on power, difficult to only be operated with unleaded start or runs poorly at idling speed, first gasoline and STIHL two cycle engine check the spark plug. oil or equivalent quality two cycle engine Remove spark plug – see "Starting / oils in a mix ratio of 50:1 (see chapter Stopping the Engine". -
Página 27: Lubricating The Gearbox
If no grease can be seen on the spark plug terminal (1) of the proper inside of the filler plug, size. (Note: If terminal has screw the tube (2) of STIHL gear detachable SAE adapter nut, it must lubricant for brushcutters – see be attached.) "Special Accessories"... -
Página 28: Storing The Machine
STIHL recommends that maintenance and repair work be carried out only by authorized STIHL dealers. STIHL recommends that this work be done by a STIHL servicing dealer see “Guide to Using this Manual” FC 55... -
Página 29: Replacing The Skirt
(B) and obtain the required depth of cut (C). To avoid out-of-balance: check blade on a STIHL balancer – see "Special Accessories". Do not resharpen the blade! Position of skirt Position the skirt (3) correctly in... -
Página 30: Maintenance Chart
Anti-vibration element Have replaced by servicing dealer Visual inspection Cutting blade Replace Check tightness of blade Safety label Replace 1) STIHL recommends that this work be done by a STIHL servicing dealer see “Guide to Using this Manual” FC 55... -
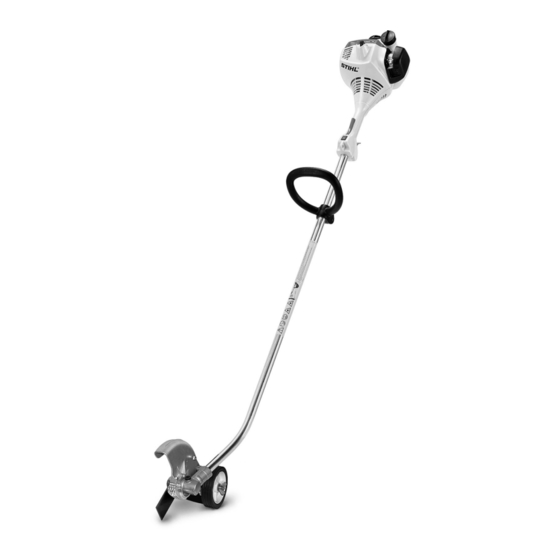
Página 31: Parts And Controls
10= Machine support Machine number 11= Fuel pump 12= Carburetor adjusting screw 13= Starter grip 14= Spark plug boot 15= Muffler (with spark arresting screen for some countries) 16= Cutting blade 17= Deflector 18= Wheel 19= Wingnut 20= Skirt FC 55... - Página 32 Covers the air filter element. 16. Cutting blade. Fuel filler cap. Metal cutting blade for cuttingweeds For closing the fuel tank. and soft green plants. Fuel tank. For fuel and oil mixture. FC 55...
-
Página 33: Specifications
English / USA Specifications Special Accessories EPA / CEPA: Ignition system Contact your STIHL dealer for information regarding special The Emission Compliance Period Type: Electronic (breakerless) accessories that may be available for referred to on the Emissions magneto ignition your product. -
Página 34: Maintenance And Repairs
Users of this unit should carry out only the maintenance operations described in this manual. Other repair work may be performed only by authorized STIHL service shops. Warranty claims following repairs can be accepted only if the repair has been... -
Página 35: Stihl Incorporated Federal And California Emission Control Warranty Statement
California. STIHL service center as soon as a designed, built and equipped to meet the In other states, 1997 and later model problem exists. -
Página 36: Warranty Period
(see also instruction "Fuel"). warranty card to STIHL. If any emission owner if it is determined that a warranted Deviations from this recommendation related part on your engine is defective, part is defective. - Página 37 English / USA FC 55...
- Página 38 Para obtener el rendimiento y satisfac- Uso de la orilladora ......49 Sustitución de la rueda ción máximos de la orilladora STIHL, es Montaje del mango tórico ....52 reguladora de profundidad ..... 63 importante leer y comprender las ins- Colocación de la cuchilla...
-
Página 39: Guía Para El Uso De Este Manual
Mejoramientos técnicos Nota o sugerencia que no es a una ilustración. La filosofía de STIHL es mejorar esencial para el uso de la máquina, continuamente todos su productos. Una descripción de un paso o pero puede ayudar al operador a Como resultado de ello, periódicamente... -
Página 40: Medidas De Seguridad
El uso de cual- sin el manual del usuario. Asegúrese quier orilladora es fatigoso. Si usted Pida a su concesionario STIHL que le que todas las personas que utilicen su padece de alguna dolencia que pueda enseñe el manejo de la orilladora. - Página 41 Para reducir el riesgo de lesionarse la Advertencia de la enfermedad de dedos blancos y cara, STIHL recomienda usar también El sistema de encendido de la máquina del síndrome del túnel del carpio, sír- una careta o protector facial adecuado produce un campo electromagnético de...
- Página 42 STIHL o expresamente autorizados trol auditivo. Utilice un casco de segu- por STIHL para usarse con los modelos ridad aprobado para redu- Use vestimenta protectora adecuada. específicos de orilladoras de STIHL. Si cir el riesgo de lesionarse bien es posible conectar a su orilladora Protéjase las manos con...
- Página 43 Dependiendo del com- Combustible bustible utilizado, de las condiciones cli- La orilladora de STIHL utiliza una mez- máticas y del sistema de ventilación del cla de aceite-gasolina como combusti- tanque, es posible que se forme vapor ble (vea el capítulo "Combustible"...
- Página 44 Aléjese al menos 3 m (10 pies) del punto mes e incendio, apriete la tapa de lle- llenado STIHL de modo en donde ocurrió una fuga antes de nado de combustible a mano con la que quede en posición...
- Página 45 Algunos modelos de Para reducir el riesgo de incendio o cuerpo, asegúrese que las personas orilladoras STIHL están lesiones por quemadura, deje que la estén a por lo menos 15 m (50 pies) de equipados con un máquina se enfríe antes de reabastecer...
- Página 46 índice. Mantenga las Condiciones de trabajo manos en esta posición, para que siem- pre tenga la orilladora bien controlada. Maneje y arranque su orilladora exclusi- vamente al aire libre y en un lugar bien ventilado. FC 55...
- Página 47 El accesorio de corte corte. puede arrojar los objetos de esta clase y causar lesiones personales. FC 55...
- Página 48 Si la cuchilla continúa floja, consulte al se atasca o queda pegado, siempre que no tengan filo. Las herramientas en concesionario STIHL. No instale nin- apague el motor, desconecte el cable de esas condiciones pueden romperse a guna cuchilla a una máquina sin que la bujía y asegúrese que la herramienta...
-
Página 49: Mantenimiento, Reparación Y Almacenamiento
única- motores no diseñados para vehícu- mente en el taller de servicio de STIHL. los. Sin embargo, si usted está recla- No modifique el gobernador del motor ni mando servicio de garantía para... -
Página 50: Uso De La Orilladora
50 horas de fun- llado. Siempre sujete y maneje la cionamiento y ajústela de ser necesario. orilladora hacia el lado derecho de Instale una bujía nueva si sus electrodos su cuerpo. están muy picados. FC 55... - Página 51 Ajuste la rueda (2) de modo que la sentido opuesto a la máquina y al opera- cuchilla (3) apenas toque el suelo o dor. penetre la superficie del suelo por no más de 5 mm (1/4 pulg) (B) en la posición normal de trabajo. FC 55...
- Página 52 Corte de modo uniforme, de manera que el motor no pierda velo- cidad – no aplique fuerza. Camine a un paso normal mientras se corta. No empuje la cuchilla para meterla en el suelo. FC 55...
-
Página 53: Montaje Del Mango Tórico
Inserte el tornillo (4) a través del mango tórico y el espaciador de modo que la cabeza del tornillo quede alojada en el rebajo hexago- nal. Coloque la arandela (5) y la tuerca mariposa (6) y apriételas firme- mente. FC 55... -
Página 54: Colocación De La Cuchilla De La Orilladora
Afloje la tuerca en sentido horario (roscas izquierdas) y retírela. Si el resorte acopado (10) en la tuerca (6) se debilita, instale una Quite la arandela de empuje. tuerca nueva. vea "Guía para el uso de este manual" FC 55... -
Página 55: Combustible
Duración de la mezcla de combusti- nar con una mezcla de 50 a 1 de gaso- motores de dos tiempos o un aceite de lina sin plomo y aceite STIHL para moto- marca equivalente para motores de dos Mezcle una cantidad suficiente de com- res de dos tiempos. -
Página 56: Llenado De Combustible
Ahora suelte el gatillo de acelera- la pestaña. apriete a mano la tapa del tanque lo ción, la pestaña y el bloqueo del más apretada posible. gatillo, en el orden indicado. Esta es la posición de arranque del acele- rador. FC 55... - Página 57 - el pulgar debe estar debajo de la caja. No se pare ni se arrodille sobre el tubo de mando. FC 55...
-
Página 58: Sugerencias Adicionales Para El Arranque
Destornille y seque la bujía. Si el motor está caliente: Abra el acelerador al máximo. Continúe girando el motor hasta Haga girar el motor varias veces que arranque (estrangulador en con el arrancador para despejar la posición e). cámara de combustión. FC 55... -
Página 59: Instrucciones De Manejo
Revise el cubierta del filtro (2). apriete de las tuercas y tornillos (no los tornillos de ajuste) periódicamente y Limpie toda la suciedad de alrede- vuelva a apretar según sea necesario. dor del filtro. FC 55... -
Página 60: Manejo Del Motor
Sustituya las piezas dañadas del filtro. Coloque el elemento de fieltro (3) en la caja del filtro (4). Cierre la cubierta del filtro de modo que encaje en su lugar. FC 55... -
Página 61: Ajuste Normal
(L). rica: Caliente el motor por aproximada- Gire el tornillo de velocidad baja (L) mente 5 minutos. en sentido horario (aprox. 1/4 de vuelta) hasta que el motor funcione y se acelere de modo uniforme. FC 55... -
Página 62: Convertidor Catalítico
STIHL para motores de dos revise la bujía. tiempos o un aceite equivalente en una Saque la bujía – vea „Arranque / mezcla de 50:1 (vea el capitulo "Com-... -
Página 63: Lubricación De Caja De Engranajes
/ parada del motor". ¡Sustituya la cuerda de arranque dañada oportunamente o pida al con- cesionario STIHL que se lo haga! Para reducir el riesgo de incendios y Revise el nivel de grasa periódica- lesiones por quemadura, use sola- mente, aproximadamente cada mente bujías autorizadas por... -
Página 64: Almacenamiento De La Máquina
Cada año, pida que le sustituyan el a armar. En tal caso, pida al concesiona- captador en el tanque. rio STIHL que sustituya el tornillo con la Chispero en silenciador* tuerca mariposa. Si el motor pierde potencia, haga revisar el chispero del silenciador. -
Página 65: Sustitución De La Faldilla
Inserte el tornillo y apriételo bien STIHL recomienda usar exclusivamente firme. las cuchillas de orilladora genuinas de STIHL – vea "Accesorios especiales". Sustituya la cuchilla (1) cuando su largo (A) deja de ser suficiente para mantener la altura necesaria sobre el suelo (B) y para obtener la pro- fundidad de corte deseada (C). -
Página 66: Tabla De Mantenimiento
Solicitar al concesionario de servicio su sustitución Inspección visual Cuchilla Reemplazar Revisar el apriete de la cuchilla Etiquetas de seguridad Reemplazar STIHL recomienda que un concesionario de servicio STIHL efectúe este trabajo * vea "Guía para el uso de este manual" FC 55... -
Página 67: Piezas Y Controles
10= Apoyo de la máquina # N° de serie 11= Bomba de combustible 12= Tornillo de ajuste del carburador 13= Mango de arranque 14= Casquillo de bujía 15= Silenciador con chispero 16= Cuchilla 17= Deflector 18= Rueda 19= Tuerca mariposa 20= Faldilla FC 55... -
Página 68: Definiciones
Cubre el elemento del filtro de aire. corte. 16. Cuchilla. Tapa de llenado de combustible. Cuchilla metálica para recortar Para tapar el tanque de combusti- malezas y plantas verdes blandas. ble. Tanque de combustible. Contiene la mezcla de combustible y aceite. FC 55... -
Página 69: Especificaciones
Accesorios especiales EPA / CEPA: Sistema de encendido Comuníquese con su concesionario STIHL para información acerca de los El período de cumplimiento de emisio- Tipo: Encendido por magneto accesorios especiales que pueden estar nes indicado en la etiqueta de cumpli- electrónico (sin disyuntor) -
Página 70: Mantenimiento Y Reparaciones
Los usuarios de esta máquina deben efectuar únicamente los trabajos de mantenimiento descritos en este manual. Solamente los talleres autoriza- dos por STIHL deben llevar a cabo los demás trabajos de reparación. Los reclamos de garantía presentados después de realizadas las reparaciones serán aceptados únicamente si las mis-... -
Página 71: Del Estado De California
/ EE.UU Declaración de garantía de STIHL Incorporated sobre siste- mas de control de emisiones según normas Federales y del Estado de California Sus derechos y obligaciones de Si existe una condición amparada bajo no contemplados en la garantía, y no garantía, STIHL Incorporated reparará... -
Página 72: Diagnóstico
STIHL y pre- remite la tarjeta de garantía a STIHL. servicio autorizado por STIHL. Todo tra- sente la tarjeta de garantía firmada. - Página 73 / EE.UU FC 55...
- Página 74 ! WARNING! ! WARNING! ! ADVERTENCIA! The engine exhaust from this product The engine exhaust from this product El gas de escape del motor de esta máquina contiene productos químicos que en el estado de contains chemicals known to the State contains chemicals known to the State California son considerados como causantes de of California to cause cancer, birth...