Stihl FS 240 Manual De Instrucciones
Ocultar thumbs
Ver también para FS 240:
- Manual de instrucciones (52 páginas) ,
- Manual de instrucciones (104 páginas)
Tabla de contenido
Publicidad
Idiomas disponibles
Idiomas disponibles
STIHL FS 240, 240 R
{
Instruction Manual
Manual de instrucciones
WARNING
Read Instruction Manual thoroughly
before use and follow all safety
precautions – improper use can
cause serious or fatal injury.
ADVERTENCIA
Antes de usar la máquina lea y siga
todas las precauciones de
seguridad dadas en el manual de
instrucciones – el uso incorrecto
puede causar lesiones graves o
mortales.
Publicidad
Capítulos
Tabla de contenido

Manuales relacionados para Stihl FS 240


Resumen de contenidos para Stihl FS 240
- Página 1 STIHL FS 240, 240 R Instruction Manual Manual de instrucciones WARNING Read Instruction Manual thoroughly before use and follow all safety precautions – improper use can cause serious or fatal injury. ADVERTENCIA Antes de usar la máquina lea y siga...
- Página 2 Instruction Manual 1 - 56 Manual de instrucciones 57 - 116...
-
Página 3: Tabla De Contenido
For further information you Mounting the Cutting Attachment Statement can go to www.stihlusa.com. Fuel STIHL Incorporated California Contact your STIHL dealer or the STIHL Exhaust and Evaporative Fueling distributor for your area if you do not Emissions Control Warranty Fitting the Harness... -
Página 4: Guide To Using This Manual
STIHL dealer or the STIHL illustration. Example: Fuel tank for gasoline distributor for your area for assistance. Loosen the screw (1). -
Página 5: Safety Precautions And Working Techniques
Most of these safety precautions and FS unit that is equipped with a nylon line The use of this machine may be warnings apply to the use of all STIHL head or a head with flexible plastic hazardous. If the rotating line or blade trimmer / brushcutters. - Página 6 WARNING physical conditions that affect blood vessels and blood transport, as well as The ignition system of the STIHL unit high vibration levels and long periods of produces an electromagnetic field of a very low intensity. This field may interfere with some pacemakers.
- Página 7 English use with the specific STIHL model are Always wear heavy duty WARNING authorized. Although certain work gloves (e.g. made of unauthorized attachments are useable leather or other wear To reduce the risk of with STIHL power tools, their use may,...
- Página 8 In order to reduce the risk of burns and Fuel other personal injury from escaping gas Your STIHL power tool uses an oil- vapor and fumes, remove the fuel filler gasoline mixture for fuel (see the cap on your power tool carefully so as to chapter on "Fuel"...
- Página 9 – risk of fire! Have securely mounted on the spark plug – a the machine repaired by a servicing loose boot may cause arcing that could dealer before using it. ignite combustible fumes and cause a fire. FS 240, FS 240 R...
- Página 10 (see appropriate chapter of this manual.) Adjust carrying harness and hand grip to suit your size before starting work. The machine should be properly balanced as FS 240, FS 240 R...
- Página 11 Working Conditions If you cannot set the correct idle speed, working. Wrap your fingers and thumbs have your STIHL dealer check your around the handles. On units with a loop Operate and start your power tool only power tool and make proper handle and barrier bar, left hand on loop outdoors in a well ventilated area.
- Página 12 / brushcutter above ground size, may cause respiratory or other level or with the cutting attachment illnesses. Control dust at the source perpendicular to the ground may FS 240, FS 240 R...
- Página 13 If the behavior STIHL recommends use of the nylon line of the attachment changes during use, heads for such jobs. In addition, be alert WARNING...
- Página 14 STIHL servicing cutting lines. Pieces of wire could break dealer. Some state or federal laws or off and be thrown at high speed toward regulations may require a properly the operator or bystanders.
- Página 15 To reduce the risk of accidents from shattered blades, FS 240, FS 240 R...
- Página 16 Use a all times. small trees, STIHL recommends that the circular saw blade for such work. standard deflector be removed and WARNING...
- Página 17 Never test the ignition system with the parts were used, STIHL may deny Special techniques using the lighter spark plug boot removed from the spark coverage.
- Página 18 Store the power tool in a dry and high or locked location out of reach of children. Before storing for longer than a few days, always empty the fuel tank. See chapter "Storing the Machine" in the instruction manual. FS 240, FS 240 R...
-
Página 19: Approved Combinations Of Cutting Attachment, Deflector, Handle And Harness
English Approved Combinations of Cutting Attachment, Deflector, Handle and Harness Cutting Attachment Deflector, Limit Stop Handle Harness FS 240, FS 240 R... - Página 20 Grass cutting blade 230 - 8 reduce the risk of injury from thrown Brush knife 250 - 3 objects and contact with the cutting 10 Scratcher tooth circular saw blade attachment. 11 Chisel tooth circular saw blade 200 FS 240, FS 240 R...
-
Página 21: Mounting The Bike Handle
Remove the tommy screw – the washer (6) remains on the tommy screw If the spring (5) has slipped out of the lower clamp (1): Replace and/or press the spring into the groove of the clamp as shown FS 240, FS 240 R... - Página 22 Tighten tommy screw Fastening the throttle cable NOTICE Do not kink the throttle cable or run it in tight radiuses – the throttle trigger must move freely! FS 240, FS 240 R...
-
Página 23: Mounting The Loop Handle
(7) clockwise Turn the handle bar 90° and then swivel it downward Tighten tommy screw (3) Into the working position Swivel and turn the handlebar counterclockwise in the opposite of the order described above FS 240, FS 240 R... - Página 24 (2) as far as stop. and insert the screws in the holes. Fit the square nuts (1) and screw Go to "Securing the Loop Handle". them down as far as stop. Go to "Securing the Loop Handle". FS 240, FS 240 R...
-
Página 25: Adjusting The Throttle Cable
Tighten down the screws until the Insert the screws (3) and tighten loop handle can no longer be them down firmly. rotated on the drive tube. If no barrier bar is fitted – lock the nuts if necessary. FS 240, FS 240 R... -
Página 26: Mounting The Cutting Attachment
Insert the screw and tighten it down firmly. Slip the thrust plate (1) over the shaft (2). NOTICE The thrust plate on the gearbox is necessary for mounting cutting tools. FS 240, FS 240 R... - Página 27 Block the shaft. The output shaft (2) must be blocked with the stop pin (6) to mount or remove cutting attachments. The stop pin is included with the machine and is available as a special accessory. FS 240, FS 240 R...
- Página 28 Direction of rotation is indicated by an If the mounting nut has become too arrow on the inside of the deflector. Keep the leaflet and packaging of the loose, fit a new one. metal cutting tool in a safe place. FS 240, FS 240 R...
-
Página 29: Fuel
Remove cutting attachment and its and damage to the engine. Use only STIHL two-stroke engine oil or mounting hardware from the equivalent high-quality two-stroke The chemical composition of the fuel is gearbox – but do not remove the engine oils that are designed for use also important. -
Página 30: Fueling
Remove the fuel filler cap. with the fuel. Refueling Gaso - Oil (STIHL 50:1 or equiva - line lent high-quality oils) US gal. US fl.oz. Take care not to spill fuel while fueling WARNING and do not overfill the tank. -
Página 31: Fitting The Harness
Balance the brushcutter. Put on the shoulder strap (1). Adjust the length of the strap so that the carabiner (2) is about a hand’s width below your right hip. Balance the machine. FS 240, FS 240 R... -
Página 32: Balancing The Trimmer/Brushcutter
Tighten the screw moderately. tool as you would in an emergency. To avoid damage, do not throw the power Allow the unit to hang freely. tool to the ground when practicing. Check the position obtained. FS 240, FS 240 R... -
Página 33: Starting / Stopping The Engine
The ignition is switched on The engine has reached normal again after the engine stops – the engine operating temperature, then shut down is then ready to start. and restarted after more than 5 minutes. FS 240, FS 240 R... - Página 34 – do not touch the throttle trigger or operation. NOTICE lockout lever – your thumb should be under the fan housing. Do not pull out the starter rope all the way – it might otherwise break. FS 240, FS 240 R...
-
Página 35: Transporting The Unit
Check that all settings are correct. Check that there is fuel in the tank and refuel if necessary. Check that the spark plug boot is If a grass cutting blade is mounted: properly connected. Repeat the starting procedure. FS 240, FS 240 R... - Página 36 Fitting transport guard for circular saw blades Fit transport guard on saw blade from below, making sure the limit The transport guard can be used for stop is properly seated in the 200 mm (7.9 in) circular saw blades. recess. FS 240, FS 240 R...
-
Página 37: Operating Instructions
STIHL recommends you use only well away from sources of ignition, until original STIHL air filters. The high quality you need it again. For longer out-of- standard of these parts guarantees service periods – see "Storing the trouble-free operation, a long engine life Machine". -
Página 38: Engine Management
Engine stops while idling Turn the idle speed screw (LA) slowly clockwise until the engine runs smoothly. Cutting tool rotates when engine is idling Turn the idle speed screw (LA) slowly counterclockwise until the cutting attachment stops moving. FS 240, FS 240 R... -
Página 39: Winter Operation
Two different cover plate kits are available to suit the different tank caps. The machine can normally be operated in this temperature range with the shutter (2) in the summer position. Change the position of the shutter if necessary. FS 240, FS 240 R... -
Página 40: Spark Plug
Note for machines with tank cap with hinged grip: The O-ring supplied with the cover plate kit can be left on the machine's tank cap. Depending on the ambient temperature: Set the shutter (2) to the summer or winter position. FS 240, FS 240 R... - Página 41 To reduce the risk of fire and burn injury, Clean dirty spark plug. use only spark plugs authorized by STIHL. Always press spark plug boot (2) snugly onto spark plug terminal (1) of the proper size. (Note: If terminal has...
-
Página 42: Engine Running Behavior
STIHL servicing dealer. NOTICE Do not completely fill the gearbox with grease. Remove the tube of grease (2). Refit the filler plug (1) and tighten it down firmly. FS 240, FS 240 R... -
Página 43: Storing The Machine
Resharpen with a grinder or have balanced as necessary – STIHL Dispose of fuel in accordance with the work done by a dealer – STIHL recommends a STIHL servicing the regulations and having regard recommends a STIHL servicing dealer. -
Página 44: Maintaining The Mowing Head
The thermoplastic cutting blades are If necessary, remove the mowing engages – and allow it to spring referred to as "blades" in the following. head. back. Pull ends of the lines outward. FS 240, FS 240 R... -
Página 45: Inspection And Maintenance By User
If the engine speed increases or if the cutting attachment rotates, the throttle cable has to be adjusted. Use a suitable tool to push the slide to the end of the slot (see Shut down the engine. illustration). FS 240, FS 240 R... - Página 46 A vibration-absorbing rubber element is installed between the powerhead and the drive tube. Have it checked if there are signs of wear or a noticeable increase in vibration levels. FS 240, FS 240 R...
-
Página 47: Maintenance And Care
Carburetor Adjust idle speed Adjust electrode gap Spark plug Replace after every 100 operating hours Visual inspection Cooling inlets Clean Cylinder fins Clean Check Spark arrestor in muffler Clean or replace FS 240, FS 240 R... - Página 48 Replace Only if there is a noticeable loss of engine power STIHL recommends that this work be done by a STIHL servicing dealer Tighten down the muffler mounting screws firmly after first 10 to 20 hours of operation. see chapter "Inspections and Maintenance by Dealer", section "Antivibration Elements"...
-
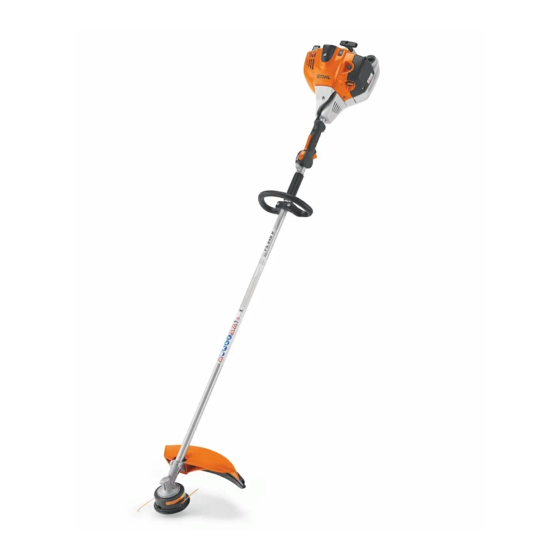
Página 49: Main Parts
12 Handle Support 13 Clamp Screw 14 Throttle Cable Retainer 15 Carrying Ring 16 Choke Lever 17 Manual Fuel Pump 18 Filter Cover 19 Fuel Tank 20 Loop Handle 21 Barrier Bar 22 Spacer Serial Number FS 240, FS 240 R... - Página 50 Attachments and fire. Skirt 10 Throttle Trigger Lockout Metal Mowing Tool Must be depressed before the throttle trigger can be activated. 11 Handlebar For holding and controlling the unit with the hand during operation. FS 240, FS 240 R...
- Página 51 The skirt at the bottom of the deflector must be utilized as described in the chapter "Mounting Single cylinder two-stroke engine the Deflector". Metal Mowing Tool The cutting attachment, i. e. blade, made from metal for different purposes. FS 240, FS 240 R...
-
Página 52: Special Accessories
Idle speed: 2,800 rpm (71.06 in) Cut-off speed (rated): 10,500 rpm FS 240 R: 1865 mm Max. output shaft (73.42 in) speed (cutting attachment): 7,930 rpm Features Ignition System Loop handle Fireproof equipment Electronic magneto ignition FS 240, FS 240 R... -
Página 53: Maintenance And Repairs
Genuine STIHL parts can be identified 1997 and later model year small off-road by the STIHL part number, the STIHL products must not be thrown in equipment engines must be designed, { logo and, in some cases, by the garbage can. Take the product, built and equipped, at the time of sale, to the STIHL parts symbol K. - Página 54 STIHL service center as soon as a the effect of "repair or replace as Air Filter problem exists. The warranty repairs will –...
-
Página 55: Stihl Incorporated California Exhaust And Evaporative Emissions Control Warranty Statement
Service included may be hoses, belts, connectors or other emission-related Bring the product to any authorized assemblies. STIHL servicing dealer and present the Where a warrantable condition exists, signed warranty card. STIHL Incorporated will repair your Maintenance Requirements small off-road equipment engine at no... - Página 56 A statement in such written due to abuse, neglect, or improper STIHL Incorporated at no cost to the instructions to the effect of "repair or maintenance or unapproved owner.
- Página 57 Where to make a Claim for Warranty service the subject engines. Service 6. The owner must not be charged for Bring the STIHL product to any diagnostic labor that leads to the authorized STIHL servicing dealer and determination that a warranted part...
-
Página 58: Trademarks
Any unauthorized use of these Ematic ™ ® trademarks without the express written EASYSTART FixCut ™ consent of ® FARM BOSS ANDREAS STIHL AG & Co. KG, HT Plus ™ ® Waiblingen is strictly prohibited. iCademy IntelliCarb ™ ® MAGNUM Master Control Lever ™... - Página 59 Comuníquese con su representante de Declaración de garantía de STIHL Uso de la correa para hombro STIHL o el distribuidor de STIHL para su Incorporated sobre el control de Equilibro de la unidad zona si no se entiende alguna de las...
-
Página 60: Acerca De Este Manual De Instrucciones
La filosofía de STIHL es mejorar maneras: continuamente todos sus productos. Según el modelo, los pictogramas Se usa un punto para denotar un Como resultado de ello, periódicamente... -
Página 61: Medidas De Seguridad Y Técnicas De Manejo
FS. matorrales equipada con el accesorio de graves o incluso la corte apropiado únicamente para cortar Pida a su concesionario STIHL que le muerte. pasto, matorrales, madera y materiales enseñe el manejo de la herramienta similares. - Página 62 / cortadoras El uso prolongado de una herramienta Use guantes y mantenga las manos – de matorrales de STIHL. Los distintos motorizada (u otras máquinas) expone abrigadas. modelos pueden contar con piezas y al operador a vibraciones que pueden controles diferentes.
- Página 63 Los piezas en movimiento de la máquina. usuarios constantes y Sujétese el pelo de modo que quede regulares deben some - sobre los hombros. terse con frecuencia a un examen o control auditivo. FS 240, FS 240 R...
-
Página 64: Uso De La Herramienta Motorizada
STIHL. Si bien es posible conectar a la herramienta motorizada de STIHL ADVERTENCIA ciertos accesorios no autorizados, su uso puede ser, en la práctica,... - Página 65 / EE.UU daño a la máquina. STIHL recomienda ADVERTENCIA ADVERTENCIA mantener las cuchillas metálicas cubiertas con el protector para el Cargue de combustible su herramienta Compruebe que no exis - transporte (accesorio opcional). motorizada en lugares al aire libre bien ten fugas de combustible ventilados.
- Página 66 ADVERTENCIA combustible, provocando un incendio. No maneje nunca una herramienta motorizada que esté dañada, mal ajustada o mantenida o que no fue armada completa y debidamente. FS 240, FS 240 R...
- Página 67 Ajuste el arnés y la empuñadura de desacelere a la marcha en vacío. modo correspondiente a su estatura antes de empezar a trabajar. La FS 240, FS 240 R...
- Página 68 Cuando el régimen de marcha en vacío está correctamente regulado, el accesorio de FS 240, FS 240 R...
- Página 69 Para reducir el riesgo de lesiones respirador aprobado por NIOSH/MSHA ventilados. causadas por la pérdida del control, para el tipo de polvo presente en el nunca trabaje sobre una escalera o lugar. cualquier otra superficie de soporte FS 240, FS 240 R...
- Página 70 STIHL. No use nunca Para reducir el riesgo de ocasionar queda casi totalmente expuesto y la una orilladora / cortadora de matorrales lesiones a los ojos u otras partes del herramienta motorizada es más difícil de...
- Página 71 ADVERTENCIA herramienta motorizada o daños a la se calientan durante el funcionamiento y cuchilla. Para ese tipo de trabajo, STIHL permanecen calientes por un buen rato Para reducir el riesgo de la rotación recomienda el uso de cabezas con hilo después de apagar el motor.
- Página 72 Uso de las cabezas segadoras Sin embargo, la cabeza PolyCut de rica), en condiciones normales el STIHL con cuchilla de polímero produce No use con un hilo de segado más largo chispero quedará limpio como resultado un mejor corte si no hay plantas a lo que el deseado.
- Página 73 Revise la condición de las cuchillas sus filos o bordes cortantes. PolyCut en intervalos regulares. Siempre sustituya todas las cuchillas si se encuentra una fisura en una cuchilla. FS 240, FS 240 R...
- Página 74 (cuando ha perdido su deflector"). Este tope ayuda a mantener cuchilla). filo de modo apreciable). la máquina en su posición contra el árbol durante el proceso de corte. Los usuarios con poca experiencia deben FS 240, FS 240 R...
-
Página 75: Mantenimiento, Reparación Yalmacenamiento
ADVERTENCIA mantenimiento y la reparación. El uso Para reducir el riesgo de la pérdida de de piezas no fabricadas por STIHL control y de lesiones graves al operador puede causar lesiones graves o o a terceros causadas por la expulsión mortales. - Página 76 El propietario/operador de este producto es responsable del mantenimiento FS 240, FS 240 R...
-
Página 77: Combinaciones Aprobadas De Accesorio De Corte, Deflector, Mango Y Arnés
/ EE.UU Combinaciones aprobadas de accesorio de corte, deflector, mango y arnés Accesorio de corte Deflector, límite de tope Mango Arnés FS 240, FS 240 R... - Página 78 23 Es obligatorio usar el arnés completo Cuchilla para pasto 230 - 8 Cuchilla para matorrales 250 - 3 ADVERTENCIA 10 Sierra circular con dientes raspadores 200 Basado en el accesorio de corte en uso: FS 240, FS 240 R...
-
Página 79: Montaje Del Manillar
(4, 5) separan las abrazadera, de la manera ilustrada. mismas. Saque el tornillo con barra transversal – la arandela (6) permanece con el tornillo. FS 240, FS 240 R... -
Página 80: Indicación
Apriete el tornillo con barra apriete el perno. transversal Conexión del cable del acelerador INDICACIÓN No tuerza el cable del acelerador y no lo deje con curvas de radio agudo – ¡el gatillo de aceleración debe moverse libremente! FS 240, FS 240 R... -
Página 81: Montaje Del Mango Tórico
Gire el manillar 90° y gírelo hacia abajo Apriete el tornillo con barra transversal (3) En la posición de trabajo Invierta los pasos de arriba para girar el manillar en sentido contrahorario FS 240, FS 240 R... - Página 82 (1) y atorníllelas a fondo. tórico". tubo de mando. Si no tiene instalada barra de defensa, fije las Prosiga a "Fijación del mango tuercas de ser necesario. tórico". FS 240, FS 240 R...
-
Página 83: Ajuste Del Cable Del Acelerador
Coloque el deflector en la brida de ranura guía superior en la faldilla y la caja de engranajes. alinéela con el primer orificio. Inserte los tornillos (3) y apriételos Inserte el tornillo y apriételo bien bien firmes. firme. FS 240, FS 240 R... -
Página 84: Montaje Del Accesorio De Corte
(2). Si la tornillería de montaje se embala con la máquina Se pueden montar cabezas segadoras y accesorios de corte metálicos. Deslice la placa de empuje (1) sobre el eje (2). FS 240, FS 240 R... - Página 85 Retiro de la cabeza segadora Bloquee el eje. Destornille la cabeza segadora en sentido horario. Para instalar o quitar los accesorios de corte, es necesario bloquear el eje de salida (2) con el pasador de tope (6). El FS 240, FS 240 R...
- Página 86 Coloque la arandela de empuje (8) intervalos regulares para evitar – el lado convexo debe quedar desgastar solamente uno de sus lados. hacia arriba. Instale la placa de refuerzo (9). FS 240, FS 240 R...
-
Página 87: Combustible
50 a 1 de etanol. enfriados por agua o por aire (por gasolina sin plomo y aceite STIHL para ejemplo, en motores marinos fuera de motores de dos tiempos. borda, motonieves, sierras de cadenas,... -
Página 88: Llenado De Combustible
Tenga cuidado de no derramar el alrededor del mismo para evitar la combustible y no llene en exceso el entrada de tierra al depósito. tanque. Siempre agite bien la mezcla en el recipiente antes de llenar la máquina con combustible. FS 240, FS 240 R... -
Página 89: Uso De La Correa Para Hombro
Colóquese la correa (1) sobre el matorrales. hombro. Ajuste el largo de la correa de modo que el mosquetón (2) quede aproximadamente el ancho de la mano por debajo de su cadera derecha. Equilibre la máquina. FS 240, FS 240 R... -
Página 90: Equilibro De La Unidad
Deje que la unidad cuelgue libre. cual lo haría en caso de emergencia. Verifique la posición resultante. Para evitar dañar la herramienta motorizada, no la lance al suelo cuando esté practicando. FS 240, FS 240 R... -
Página 91: Arranque / Parada Del Motor
Marcha al soltarlo. El encendido vuelve a conectarse una vez que el motor se para – el motor entonces está listo para arrancar. FS 240, FS 240 R... - Página 92 Sujete la máquina firmemente en el suelo con la mano izquierda y Sujete el mango de arranque con la empújela hacia abajo – no toque el mano izquierda. gatillo de aceleración ni la palanca FS 240, FS 240 R...
- Página 93 Mueva la palanca del estrangulador acelerador – la palanca del a < y continúe haciendo girar el estrangulador se mueve a la motor hasta que arranque. posición de marcha F. Después de FS 240, FS 240 R...
-
Página 94: Traslado De La Unidad
El protector de transporte puede usarse asegurando que el tope limitador para sierras circulares de 200 mm (7,9 esté correctamente asentado en la pulg). parte hendida. Si tiene montada una cuchilla para cortar pasto: FS 240, FS 240 R... -
Página 95: Instrucciones Para El Uso
Almacenamiento por corto tiempo: Espere hasta que el motor se enfríe. Vacíe el tanque de combustible y guarde la máquina en un lugar seco, alejada de fuentes de encendido, hasta que la vuelva a utilizar. Para los FS 240, FS 240 R... -
Página 96: Filtro De Aire
STIHL recomienda el uso exclusivo de Afloje los tornillos (1). filtros de aire originales de STIHL. La calidad elevada de estas piezas asegura un desempeño libre de problemas, una vida útil prolongada del motor y una vida útil sumamente... -
Página 97: Gestión Del Motor
La herramienta de corte gira cuando el – motor funciona a ralentí "Copo de nieve" = funcionamiento – de invierno Gire el tornillo de ralentí (LA) lentamente en sentido contrahorario hasta que el accesorio de corte deje de moverse. FS 240, FS 240 R... - Página 98 En máquinas con tapa de tanque con empuñadura articulada: El anillo "O" suministrado con el juego de placa de cierre puede dejarse colocado en la tapa de llenado de la máquina. FS 240, FS 240 R...
-
Página 99: Bujía
Si el motor pierde potencia, es difícil arrancarlo o funciona de modo irregular a marcha en vacío, revise la bujía primero. FS 240, FS 240 R... - Página 100 Instalación de la bujía Atornille la bujía en el cilindro. Presione el casquillo firmemente sobre la bujía FS 240, FS 240 R...
-
Página 101: Funcionamiento Del Motor
INDICACIÓN No llene completamente con grasa la caja de engranajes. Quite el tubo de grasa (2). Vuelva a colocar el tapón de llenado (1) y apriételo firmemente. FS 240, FS 240 R... -
Página 102: Almacenamiento De La Máquina
– STIHL recomienda Deseche el combustible de acuerdo lo haga el concesionario – STIHL acudir a un concesionario STIHL con los reglamentos y teniendo en recomienda acudir a un para servicio. -
Página 103: Mantenimiento De La Cabeza Segadora
Guarde las ajustar el hilo de nilón con la mano. busca de desgaste antes de instalar las instrucciones de la cabeza segadora en cuchillas de corte nuevas. un lugar seguro. FS 240, FS 240 R... -
Página 104: Inspección Y Mantenimiento Por El Usuario
ADVERTENCIA repare la máquina. STIHL recomienda acudir a un concesionario STIHL para Para reducir el riesgo de sufrir lesiones, servicio. siempre apague el motor antes de Empuje hacia abajo el bloqueo (1) y instalar las cuchillas. -
Página 105: Inspección Y Mantenimiento Por El Concesionario
Se instala un elemento de caucho que amortigua vibraciones entre el motor y el tubo de mando. Revíselo si halla señales de desgaste o si se percibe un aumento notable en los niveles de vibración. FS 240, FS 240 R... -
Página 106: Información Para Mantenimiento
– el accesorio de corte no debe girar Carburador Ajustar la velocidad de marcha en vacío Ajustar la distancia entre electrodos Bujía Cambiar después de aprox. cada 100 horas de funcionamiento Inspección visual Entradas de enfriamiento Limpiar Aletas del cilindro Limpiar FS 240, FS 240 R... - Página 107 Solamente si hay una pérdida notable de la potencia del motor STIHL recomienda que un concesionario de servicio STIHL efectúe este trabajo Apriete los tornillos de montaje del silenciador bien firmes luego de las primeras 10 a 20 horas de funcionamiento.
-
Página 108: Componentes Importantes
14 Retenedor del cable del acelerador 15 Argolla de transporte 16 Palanca del estrangulador 17 Bomba de combustible manual 18 Cubierta del filtro 19 Tanque de combustible 20 Mango tórico 21 Barra de defensa 22 Espaciador Número de serie FS 240, FS 240 R... - Página 109 Debe ser oprimido antes de poder activar el gatillo de aceleración. Diseñado para reducir el riesgo de quemaduras y incendios. 11 Manillar Para agarrar con la mano para manejar y controlar la máquina durante los trabajos. FS 240, FS 240 R...
-
Página 110: Especificaciones
Motor descrita en el capítulo "Montaje del deflector". Motor de un cilindro, dos tiempos Herramienta segadora metálica El accesorio de corte, por ejemplo la cuchilla, hecho de metal para varios propósitos. FS 240, FS 240 R... -
Página 111: Accesorios Especiales
FS 240 R 1865 mm (nominal): 10.500 r/min (73,42 pulg) Velocidad máx. de eje de salida (accesorio Características de corte) 7.930 r/min Sistema de encendido Mango tórico Equipo a prueba de incendios Encendido por magneto electrónico FS 240, FS 240 R... -
Página 112: Información De Reparación
STIHL utilizando piezas de repuesto Incorporated se complacen en genuinas de STIHL. explicarle la garantía del sistema de No se debe botar los aparatos STIHL en control de emisiones instalado en el Los repuestos genuinos STIHL se el basurero. Lleve el producto, los motor de su equipo. - Página 113 STIHL Incorporated sin carretera a un centro de servicio STIHL cualquiera de las piezas del motor costo alguno para el propietario. tan pronto surja el problema. Las...
- Página 114 Volante – emisiones se realiza ya sea en la fábrica Esta garantía de los sistemas de control Bujía de STIHL Incorporated o en un – de emisiones no cubrirá ninguno de los laboratorio de ensayos independiente. Válvula de inyección (si puntos siguientes: –...
-
Página 115: Declaración De Garantía De Stihl
Estado de California STIHL tan pronto surja el problema. Las Responsabilidades del fabricante reparaciones bajo garantía deben relativas a la garantía realizarse en un tiempo razonable, sin... - Página 116 Piezas bajo la Garantía de Control emisiones (vea más abajo) debe de servicio autorizado por STIHL. Todo de Emisiones (vea más abajo) debe garantizarse por el intervalo antes trabajo de este tipo se hará gratis para el garantizarse por el período de...
-
Página 117: Marcas Comerciales
La reparación o la sustitución de ® iCademy cualquier componente garantizado y ® MAGNUM normalmente abarcado por la garantía se puede excluir de la garantía si STIHL ® MasterWrench Service Incorporated demuestra el maltrato, ® MotoMix negligencia o mantenimiento incorrecto... - Página 118 ElastoStart ™ Queda terminantemente prohibido todo Ematic ™ uso de estas marcas comerciales sin el FixCut ™ consentimiento expreso por escrito de ANDREAS STIHL AG & Co. KG, HT Plus ™ Waiblingen. IntelliCarb ™ Master Control Lever ™ Micro ™...
- Página 120 California son considerados como causantes de of California to cause cancer, birth cáncer, defectos de nacimiento u otros efectos defects or other reproductive harm. nocivos para los órganos de la reproducción. 0458-742-8621-D englisch / spanisch USA englisch / spanisch USA www.stihl.com *04587428621D* 0458-742-8621-D...