Tabla de contenido
Publicidad
Idiomas disponibles
Idiomas disponibles
Enlaces rápidos
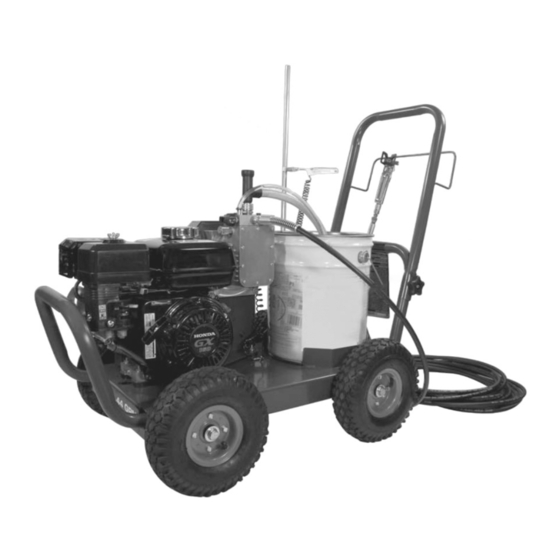
Operating and Assembly Instructions
For questions, parts and accessories: 1-800-626-4401
Operating
Pressure
Engine
0 psi - 3000 psi
160cc Honda Engine
Please read and save these instructions. Read carefully before attempting to assemble, install, operate or maintain the
product described. Protect yourself and others by observing all safety information. Failure to comply with instructions
could result in personal injury and/or property damage! Retain instructions for future reference.
© 2011 Campbell Hausfeld/Scott Fetzer
Earth Ground Not Included
Weight
(lbs)
115 lbs
For parts, product & service information
visit www.chpower.com
Airless
Paint Sprayers
Model PS460G
Capacity (GPM)
@ 0 psi
@ 2000 psi
.60
.44
Bucket not included
Maximum Hose
Length
Maximum Tip Size
1 Gun, 300 ft.
1 Gun, .021 in.
2 Guns, 100 ft.
2 Guns, .015 in.
IN425700AV 9/11
Publicidad
Tabla de contenido
Solución de problemas

Manuales relacionados para Campbell Hausfeld PS460G


Resumen de contenidos para Campbell Hausfeld PS460G
- Página 1 Protect yourself and others by observing all safety information. Failure to comply with instructions could result in personal injury and/or property damage! Retain instructions for future reference. IN425700AV 9/11 © 2011 Campbell Hausfeld/Scott Fetzer For parts, product & service information visit www.chpower.com...
-
Página 2: Tabla De Contenido
Operating Instructions and Assembly Instructions Thank you for the purchase of your new Campbell Hausfeld Table of Contents airless paint sprayer. This manual will help you set up and Specifications ........1 safely operate your airless paint sprayer. -
Página 3: Safety Guidelines
Wear Eye 3000 psi (20 500 kPa). Use only Manual Inhalation and Mask First Protection Campbell Hausfeld replacement neVer use inside only use parts rated at 3000 psi (20 500 kPa) a home or garage, outSiDe and or higher. eVen iF doors and far away from windows are open. - Página 4 Operating Instructions and Assembly Instructions Airless Paint Sprayers ● DO NOT place your body near ● This spray gun is rated for 3000 Before servicing or resting: the spray tip. Keep hands and psi (20 500 kPa). DO NOT use on 1.
-
Página 5: To Reduce The Risk Of Injury
Operating Instructions and Assembly Instructions Airless Paint Sprayers hoses specified by the manufacturer. ● DO NOT use paints or solvents containing halogenated ● Verify that all containers and hydrocarbons such as methyl EqUIPMENT DAMAGE: collection systems are grounded to bromine, carbon tetrachloride, and ● DO NOT modify or otherwise alter prevent static discharge. -
Página 6: Unpacking
Remove the equipment and all parts Handle Assembly from the carton. The carton should contain the following: Carriage Bolt PS460G - HOrIzONTAL GAS AIrLESS PAINT SPrAyEr • 10” x 13” Zip-lock bag including Owner’s Manuals and Hardware that fastens Handle. -
Página 7: Assembly Instructions
Operating Instructions and Assembly Instructions Airless Paint Sprayers Assembly Instructions Pump Assembly TOOLS rEqUIrED: 3/4 in. or Adjustable Wrench 5/8 in. or Adjustable Wrench ASSEMbLy 1. Slide the handle assembly into the Suction slots provided on the frame. Use the Assembly supplied nuts and bolts to secure the handle to the frame. -
Página 8: Preparation
Operating Instructions and Assembly Instructions Airless Paint Sprayers Starting Instructions Preparation gasoline fuel and fumes are flammable, Connect ground and potentially explosive. clamps and wires use proper fuel storage and handling procedures. Do not store fuel or other flammable materials nearby. Have multiple aBc class fire extinguishers nearby. - Página 9 Operating Instructions and Assembly Instructions Airless Paint Sprayers ground the neVer let the Preparation (Continued) gun by holding starter rope return it against the edge of the metal 8. Check fuel level. Add unleaded by itself. Doing so MaY jam the recoil container while flushing.
-
Página 10: Spraying Instructions
Operating Instructions and Assembly Instructions Airless Paint Sprayers Spraying Instructions 2. Move with a smooth arm stroke. 12” read the Move the gun at a steady, even entire pace while keeping the gun general and Specific Safety perpendicular to the surface (See information sections at the Figures to the right). - Página 11 Operating Instructions and Assembly Instructions Airless Paint Sprayers Spraying Instructions HOW TO ATTACH rOLLEr ACCESSOry (Continued) 1. Depressurize and turn off unit per manufacturer’s instructions. CLEArING CLOGS REVERSIBLE TIP: (INcLudEd) 2. Engage gun trigger lock. 1. Rotate the tip to the CLEAN position 3.
-
Página 12: Cleanup
Operating Instructions and Assembly Instructions Airless Paint Sprayers Clean Up Temporary Clean Up CLEAN UP FOr OvErNIGHT STOrAGE NOTE: Cleaning and maintenance of the pump are the most important steps you can take to ensure proper operation and a long life for your airless paint sprayer. -
Página 13: Cleaning Pump
Operating Instructions and Assembly Instructions Airless Paint Sprayers CLEAN UP FOr CHANGING PAINTS Cleaning Pump Or TEMPOrAry STOrAGE FOr MOrE THAN ONE NIGHT WEAr ALL NECESSAry SAFETy GEAr NECESSAry TOOLS / MATErIALS: • Pliers • Rag • Gloves • Two (2) buckets •... - Página 14 Operating Instructions and Assembly Instructions Airless Paint Sprayers CLEAN UP FOr CHANGING PAINTS Cleaning Hose and Gun Or TEMPOrAry STOrAGE FOr MOrE THAN ONE NIGHT (Continued) Allow the to continue cleaning fluid circulating for approximately 10 minutes. 7. Turn pressure to HIGH (completely clockwise).
- Página 15 Operating Instructions and Assembly Instructions Airless Paint Sprayers Shutdown CLEAN UP FOr CHANGING PAINTS Or TEMPOrAry STOrAGE FOr MOrE THAN ONE NIGHT (Continued) 17. Make sure prime/spray control is in SPRAy position to reduce dribbling. 18. Turn pressure to LOW (completely counterclockwise).
- Página 16 Operating Instructions and Assembly Instructions Airless Paint Sprayers Water based Paint Pump Storage Instructions SHOrT TErM - LESS THAN ONE WEEk WEAr ALL NECESSAry SAFETy GEAr NECESSAry TOOLS / MATErIALS: • Pump Protector Solution Pump • Plastic Wrap Protector PUMP PrOTECTION SOLUTION •...
-
Página 17: Trigger Lock
Operating Instructions and Assembly Instructions Airless Paint Sprayers Engine Storage Instructions Spray Gun Maintenance TIP SEAL AND WASHEr Occasionally, you will need to replace pump damage MaY LONG TErM - MOrE THAN 30 DAyS occur if these the silver seal and clear washer located 1. -
Página 18: Unit Maintenance
Operating Instructions and Assembly Instructions Airless Paint Sprayers Unit Maintenance 3. Remove the oil filler cap/dipstick and trash, oust it on the ground, or pour it drain the oil into the container by down a drain. Observe regular maintenance intervals tipping the engine toward the oil to ensure maximum performance and 4. -
Página 19: Maintenance Chart
Operating Instructions and Assembly Instructions Airless Paint Sprayers Maintenance Chart Maintenance User Item Check replace Serviceable? Detail Notes Before each use Product safety As required See parts listing for location of product safety labels and related part numbers. labels Trigger adjustment Before each use See trigger lock warning under Spray Gun Maintenance. - Página 20 Your local Service center or call 1-800-626-4401 Please provide following information: Address parts correspondence to: - Model number Campbell Hausfeld - Serial number (if any) Attn: customer Service - Part descriptions and number as shown in parts list 100 Mundy Memorial Dr.
-
Página 21: Replacement Parts
Operating Instructions and Assembly Instructions replacement Parts List ref. Part Description qty. Frame Weldment AL261000SJ Handle AL263400JJ 5/16-18 x 1-3/4 inch Carriage Bolt MJ101206AV 5/16-18 UNC Star Knob PM080900AV .765" ID Flat Washer MJ105307AV Pneumatic Wheel WA005621AV .765" ID x 1/4 inch Axle Spacer AL177001AV 3/4 inch Palnut PM344759AV... - Página 22 Your local Service center or call 1-800-626-4401 Please provide following information: Address parts correspondence to: - Model number Campbell Hausfeld - Serial number (if any) Attn: customer Service - Part descriptions and number as shown in parts list 100 Mundy Memorial Dr.
- Página 23 Please provide following information: - Model number - Serial number (if any) - Part descriptions and number as shown in parts list Address parts correspondence to: Campbell Hausfeld Attn: customer Service 100 Mundy Memorial Dr. Mt. Juliet, TN 37122 U.S.A. ref.
- Página 24 Your local Service center or call 1-800-626-4401 Please provide following information: Address parts correspondence to: - Model number Campbell Hausfeld - Serial number (if any) Attn: customer Service - Part descriptions and number as shown in parts list 100 Mundy Memorial Dr.
- Página 25 Operating Instructions and Assembly Instructions replacement Parts List ref. Part Description qty. Engine Mounting Plate Weldment AL264100JJ Rivet Nut MJ105205AV GX160 Honda Engine PM004262SJ 5/16-18 UNC x 1-3/4 inch Hex Head Cap Screw ST074311AV 5/16-18 UNC Flange Nut PM031100AV 5/16-24 UNF x 3/4 inch Hex Head Cap Screw MJ101201AV 5/16 inch Split Lockwasher MJ105709AV...
-
Página 26: Troubleshooting Chart
Operating Instructions and Assembly Instructions Troubleshooting Chart Symptom Possible Cause(s) Corrective Action Engine will not start or is hard 1. No gasoline in fuel tank or 1. Fill the tank with gasoline, open fuel shut off valve. Check fuel to start carburetor line and carburetor 2. -
Página 27: Troubleshooting
Operating Instructions and Assembly Instructions Troubleshooting Chart (Continued) Symptom Possible Cause(s) Corrective Action Pump primes and builds 27. Clogged Suction Filter 27. Remove Suction Filter and clean. Also, refer to Maintenance pressure, but does not maintain section pressure once trigger is pulled 28. -
Página 28: Notes
Operating Instructions and Assembly Instructions Notes www.chpower.com... -
Página 29: "Force Feeding" Pump
Operating Instructions and Assembly Instructions Airless Paint Sprayers “Force Feeding” Pump To remove trash that has been caught in the valves, the unit can be force fed. With engine on and prime/spray knob turned to “prime” position, pour the appropriate solvent into the suction tube and then fold hose as shown opposite. -
Página 30: Warranty
ANy INCIDENTAL, INDIRECT, OR CONSEQUENTIAL LOSS, DAMAGE , OR EXPENSE THAT MAy RESULT FROM ANy DEFECT, FAILURE, OR MALFUNCTION OF THE CAMPBELL HAUSFELD PRODUCT. Some states do not allow the exclusion or limitation of incidental or consequential damages, so the above limitation or exclusion may not apply to you. -
Página 31: Pulverizadores De Pintura Sin Aire
Protéjase usted mismo y a los demás cumpliendo toda la información sobre seguridad. ¡No cumplir con las instrucciones PodRíA provocar daños personales y/o materiales! conserve las instrucciones para su consulta futura. ESPANÕL IN425700AV 9/11 © 2011 Campbell Hausfeld/Scott Fetzer... -
Página 32: Descripción
Gracias por comprar el nuevo pulverizador de pintura sin aire de Índice Campbell Hausfeld. Este manual lo ayudará a configurar y poner en Especificaciones......1 funcionamiento de forma segura su pulverizador de pintura sin aire. -
Página 33: Símbolo De Alerta De Seguridad
Instrucciones de Funcionamiento e Instrucciones de Montaje Pulverizadores de Pintura Sin Aire Instrucciones de Seguridad 2. SIEMPRE use los guantes Desembalaje adecuados y el respirador IMPOrTANTES INSTrUCCIONES Después de desembalar el equipo, y los anteojos de DE SEGUrIDAD inspecciónelo cuidadosamente seguridad aprobados GUArDE ESTAS INSTrUCCIONES por si tiene daños que pudieran... - Página 34 Instrucciones de Funcionamiento e Instrucciones de Montaje Pulverizadores de Pintura Sin Aire las piezas de repuesto Campbell ● NO deje la unidad con energía o y liberar la presión rápidamente. Hausfeld clasificadas para 205 bar con presión si la misma queda sin Familiarícese bien con los controles.
-
Página 35: Para Reducir El Riesgo De Lesión
Instrucciones de Funcionamiento e Instrucciones de Montaje Pulverizadores de Pintura Sin Aire que se dan a título de ejemplo, mangueras pulverizadoras de ● NO ponga en funcionamiento la máquina cuando se encuentre son nafta de bajo punto de pintura sin aire de alta presión inflamación, mek, acetona, alcohol que sean conductoras o que estén bajo la influencia del alcohol o... -
Página 36: Desempacado
DESEMPACADO Propietario Retire el equipo y todas las piezas de la Ensamble del mango caja. La caja debe contener lo siguiente: PS460G - PULvErIzADOr DE Perno del carro PINTUrA SIN AIrE, HOrIzONTAL A GASOLINA • Bolsa con cierre hermético de 25,4 cm (10 pulg.) x 33,0 cm (13... -
Página 37: Instrucciones De Ensamblaje
Instrucciones de Funcionamiento e Instrucciones de Montaje Pulverizadores de Pintura Sin Aire Instrucciones de ensamblaje Ensamble de la bomba HErrAMIENTAS NECESArIAS: Llave de 19,1 mm (3/4 pulg.) o ajustable Llave de 15,9 mm (5/8 pulg.) o ajustable ENSAMbLAjE Ensamble 1. Deslice el ensamble del mango en de la succión las ranuras proporcionadas en el... -
Página 38: Preparación
Instrucciones de Funcionamiento e Instrucciones de Montaje Pulverizadores de Pintura Sin Aire Instrucciones de puesta en marcha Preparación el combustible de gasolina y sus vapores Conecte las pinzas y son inflamables y cables de conexión a potencialmente explosivos. tierra use los procedimientos de almacenamiento y manipulación de combustible adecuados. - Página 39 Instrucciones de Funcionamiento e Instrucciones de Montaje Pulverizadores de Pintura Sin Aire Preparación (continuación) encendido, asegúrese de mantener sus 13. Cuando enjuague el sistema con manos y brazos alejados del motor y de líquido de limpieza (ya sea antes 7. El motor SE ENTREGA SIN ACEITE. los componentes del carro.
-
Página 40: Instrucciones De Pulverización
Instrucciones de Funcionamiento e Instrucciones de Montaje Pulverizadores de Pintura Sin Aire Preparación (continuación) 1. Sostenga la pistola perpendicular a la superficie. Quite cualquier película que se pueda 30,48 cm haber formado sobre la pintura debido SIEMPRE sostenga la pistola de a la exposición con el aire. -
Página 41: Uso Intermitente
Instrucciones de Funcionamiento e Instrucciones de Montaje Pulverizadores de Pintura Sin Aire CÓMO CAMbIAr LAS bOqUILLAS Instrucciones de PULvErIzADOrAS pulverización (continuación) Es posible que sea necesario cambiar USO INTErMITENTE las boquillas pulverizadoras durante Si usted está pulverizando y decide un trabajo de pintura. Siga estos pasos detenerse durante varios minutos, trabe para cambios seguros y rápidos de las el gatillo de la pistola pulverizadora... -
Página 42: Limpieza
Instrucciones de Funcionamiento e Instrucciones de Montaje Pulverizadores de Pintura Sin Aire Limpieza Limpieza temporal LIMPIEzA PArA ALMACENAMIENTO DE UN DÍA AL OTrO NOTA: La limpieza y el mantenimiento de la bomba son los pasos más importantes que puede tomar para asegurar un funcionamiento adecuado y una máxima duración de su pulverizador de pintura sin aire. -
Página 43: Limpieza De La Bomba
Instrucciones de Funcionamiento e Instrucciones de Montaje Pulverizadores de Pintura Sin Aire LIMPIEzA PArA CAMbIO DE PINTUrAS Limpieza de la bomba O PArA UN ALMACENAjE TEMPOrAL DE MÁS DE UNA NOCHE USE TODA LA INDUMENTArIA DE SEGUrIDAD NECESArIA HErrAMIENTAS y MATErIALES NECESArIOS: •... -
Página 44: Limpieza De La Manguera Y De La Pistola
Instrucciones de Funcionamiento e Instrucciones de Montaje Pulverizadores de Pintura Sin Aire LIMPIEzA PArA CAMbIO Limpieza de la manguera y de la pistola DE PINTUrAS O PArA UNA ALMACENAjE TEMPOrAL DE MÁS DE UNA NOCHE (continuación) Deje que el líquido de limpieza continúe circulando durante aproximadamente 10 minutos. - Página 45 Instrucciones de Funcionamiento e Instrucciones de Montaje Pulverizadores de Pintura Sin Aire LIMPIEzA PArA CAMbIO Apagado DE PINTUrAS O PArA UNA ALMACENAjE TEMPOrAL DE MÁS DE UNA NOCHE (continuación) 17. Asegúrese de que el control de cebado/pulverización se encuentra en la posición SPRAy (pulverización) para reducir el goteo.
-
Página 46: Pintura Con Base De Agua
Instrucciones de Funcionamiento e Instrucciones de Montaje Pulverizadores de Pintura Sin Aire Pintura con base de agua Instrucciones para el almacenamiento de la bomba. POr POCO TIEMPO (MENOS DE UNA SEMANA) USE TODA LA INDUMENTArIA DE SEGUrIDAD NECESArIA HErrAMIENTAS y MATErIALES Pump Protector NECESArIOS:... -
Página 47: Instrucciones Para Guardar El Motor
Instrucciones de Funcionamiento e Instrucciones de Montaje Pulverizadores de Pintura Sin Aire Instrucciones para guardar el 6. Coloque un trapo sobre el orificio de tuerca (Nº 12, pág. 22) hasta que la bujía y lentamente tire del cordón motor el gatillo comience a soltarse del de encendido varias veces para seguro. -
Página 48: Mantenimiento De La Unidad
Instrucciones de Funcionamiento e Instrucciones de Montaje Pulverizadores de Pintura Sin Aire Mantenimiento de la unidad Elimine el aceite para motor usado, de forma tal que no dañe el medio Observe los intervalos regulares ambiente. Sugerimos que lleve el aceite poner enfuncionamiento el motor con del mantenimiento para asegurar usado dentro de un recipiente sellado... -
Página 49: Tabla De Mantenimiento
Instrucciones de Funcionamiento e Instrucciones de Montaje Pulverizadores de Pintura Sin Aire Tabla de Mantenimiento Elemento de Comprobación Sustitución ¿Mantenimiento Notas de detalle mantenimiento por el usuario? Etiquetas de Antes de cada uso Según necesario Sí Véase la lista de piezas para la localización seguridad del de las etiquetas de seguridad del producto producto... - Página 50 1-800-626-4401 Sírvase suministrarnos la siguiente información: Puede escribirnos a: - Número del modelo Campbell Hausfeld - Número de Serie Attn: customer Service - Descripción y número del repuesto según la lista de repuestos 100 Mundy Memorial Dr.
-
Página 51: Lista De Piezas
Instrucciones de Funcionamiento e Instrucciones de Montaje Lista de Piezas No de Número ref. Descripción de Pieza Ctd. Marco de estructura soldada AL261000SJ Mango AL263400JJ Perno de latonería de 7,9 mm (5/16 pulg.) 18 x 4,4 cm (1,75 pulg.) MJ101206AV Perilla estrella de 7,9 mm (5/16 pulg.) 18 UNC PM080900AV Arandela plana 1,9 cm (0,765 pulg.) de DI... - Página 52 - Número de Serie (si lo tiene) (2x) (2x) - Descripción y número del repuesto según la lista de repuestos Puede escribirnos a: Campbell Hausfeld Attn: customer Service 100 Mundy Memorial Dr. (4x) Mt. Juliet, TN 37122 U.S.A. AL1860 - Metalica (Pro)
- Página 53 Sírvase suministrarnos la siguiente información: - Número del modelo - Número de Serie - Descripción y número del repuesto según la lista de repuestos Puede escribirnos a: Campbell Hausfeld Attn: customer Service 100 Mundy Memorial Dr. Mt. Juliet, TN 37122 U.S.A. No de Número No de Número...
- Página 54 1-800-626-4401 Sírvase suministrarnos la siguiente información: Puede escribirnos a: - Número del modelo Campbell Hausfeld - Número de Serie Attn: customer Service - Descripción y número del repuesto según la lista de repuestos 100 Mundy Memorial Dr.
- Página 55 Instrucciones de Funcionamiento e Instrucciones de Montaje Lista de Piezas No de Número ref. Descripción de Pieza Ctd. Estructura soldada de la placa de montaje del motor (cubierto con pintura AL264100JJ pulverizada) Tuerca del remache MJ105205AV Motor Honda GX160 PM004262SJ Tornillo de sombrerete hexagonal 7,9 mm (5/16 pulg.) 18 UNC x 4,4 cm ST074311AV (1,75 pulg.)
-
Página 56: Tabla De Diagnóstico Y Resolución De Problemas
Instrucciones de Funcionamiento e Instrucciones de Montaje Tabla de Diagnóstico y resolución de Problemas Síntoma Causa(s) posible(s) Acción a tomar El motor no enciende o le 1. No hay gasolina en el tanque de 1. Llene el tanque con gasolina, abra la válvula de cierre de combustible. cuesta encender combustible o en el carburador Revise la línea de combustible y el carburador... -
Página 57: Causa(S) Posible(S)
Instrucciones de Funcionamiento e Instrucciones de Montaje Tabla de Diagnóstico y resolución de Problemas (Continuación) Síntoma Causa(s) posible(s) Acción a tomar La bomba se ceba 27. Filtro de succión obstruido 27. Retire el filtro de succión y limpie. También consulte la sección de y acumula presión, Mantenimiento pero no mantiene la... - Página 58 Instrucciones de Funcionamiento e Instrucciones de Montaje Notas Sp:28...
- Página 59 Instrucciones de Funcionamiento e Instrucciones de Montaje Pulverizadores de Pintura Sin Aire “Alimentación Forzada” de la bomba Para retirar los restos que hayan quedado atrapados en las válvulas, el equipo se puede alimentar forzadamente. Con el motor en funcionamiento y el botón prime/ spray en posición “PRIME”...
- Página 60 A. Proporcionar la prueba de la compra y los registros de mantenimiento. B. Entregar o enviar el producto o componente Campbell Hausfeld al Centro de Servicio Autorizado Campbell Hausfeld más próximo. Los gastos del envío, si los hay, serán soportados por el comprador.