
Manuales relacionados para Shark GS300


Resumen de contenidos para Shark GS300
- Página 1 OWNER’S GUIDE GS300 GUÍA DEL USUARIO GS300_IB_ENG_SPA_101110.indd 1 10-11-11 9:58 AM...
-
Página 2: Important Safety Instructions
WARNINGS IMPORTANT SAFETY INSTRUCTIONS For Household Use Only WHEN USING YOUR SHARK GARMENT STEAMER, 11. This appliance and the accessories become hot during BASIC SAFETY PRECAUTIONS SHOULD ALWAYS use. Exercise care when changing accessories and follow removal and changing instructions as outlined BE FOLLOWED, INCLUDING THE FOLLOWING: in the manual. - Página 3 DO NOT operate in the presence of explosive and/or flammable fumes. for purchasing Store your appliance indoors in a cool, dry area out of the reach of children. the Shark ® Keep your work area well lit. 3 in1 Fabric Let the system cool completely before putting away.
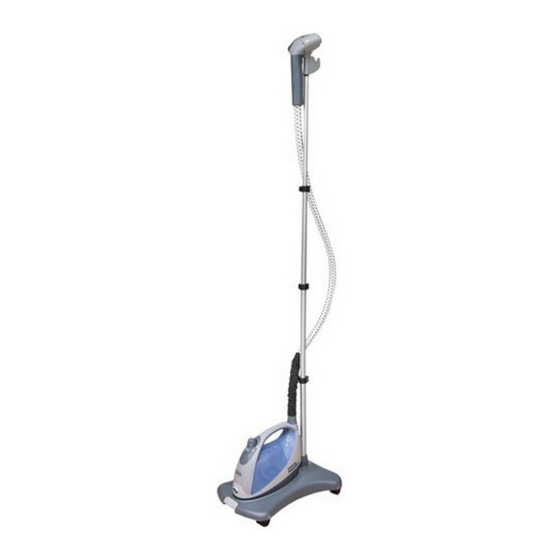
- Página 4 ASSEMBLY GARMENT STEAMER YOUR GARMENT COMPONENTS STEAMER FEATURES A Unit / Garment Steamer F Steam Nozzle L Carrying Handle B Steam hose/steam nozzle with G Garment Hook M Water Tank Cap steam bonnet and bristle brush H Safety Nozzle Strap N Power Switch frame assembled.
- Página 5 ENGLISH fig. 2 fig. 4 fig. 1 fig. 3 ASSEMBLY 4 Attach the steam unit to the base. 6 Hang the steam nozzle on the 1 Remove all packaging from the Pull the release button on the steam nozzle cradle. Secure the appliance.
-
Página 6: Filling The Water Tank
ASSEMBLY- cont. fig. 5 fig. 7 fig. 6 FILLING THE WATER TANK 4 Unscrew the water cap from 8 If filling during use, unplug the 1 Make sure the unit is unplugged the inlet, the cap is tethered to unit from the power outlet and before filling the water tank and can not be using a cup, fill the water tank to... - Página 7 USING YOUR ACCESSORIES ENGLISH fig. 9 fig. 8 STEAM BONNET BRISTLE FRAME 1 The steam bonnet protects your 2 To remove the bonnet, pull the 1 The bristle brush frame provides fabrics from water marks and purple tab from the edge of the deep steam penetration for heavy filters impurities from the water.
- Página 8 USING YOUR GARMENT STEAMER GARMENT HOOK fig. 11 fig. 10 STAND STEAMING 1 Plug the steamer into an electrical 3 Hang your desired garment to the CAUTION: Steam hose can outlet and turn the On/Off Switch garment hook. become hot during use. Never to the “I”...
- Página 9 ENGLISH fig. 12 PORTABLE/TABLETOP STEAMING IMPORTANT: Make sure to hold 3 Plug the steamer into an electircal 1 Use the steamer in portable or the water tank level to the floor. outlet and turn the unit on. tabletop mode to freshen fabrics The steam hose should be fully all around your home.
-
Página 10: Replacement Parts
MAINTENANCE CLEANING & STORING 1 Turn the steamer off “0” and 3 Collapse the telescoping pole for 5 Store the steamer in a cool unplug from the electrical outlet. compact storage and loop the dry place. power cord through the safety 6 “Periodically, remove the steam Let the steamer cool for 30 nozzle strap. -
Página 11: Product Registration
“ATTENTION CUSTOMER SERVICE”. We are constantly striving to improve our products, therefore the specifications contained herein are subject to change without notice. PRODUCT REGISTRATION Please visit www.sharkclean.com or call 1-800-798-7398 to register your new Shark product within ten (10) days of ®... -
Página 12: Instrucciones Importantes De Serguridad
Para uso doméstico solamente AL USAR SU VAPORIZADOR PARA 10. NO lo use en cuero, gamuza, vinílicos, plásticos u PRENDAS SHARK®, SIEMPRE DEBE SEGUIR otros materiales delicados sensibles al vapor. Siempre pruebe la decoloración de todas las telas en la parte PRECAUCIONES BÁSICAS DE SEGURIDAD,... - Página 13 3 en 1 o. Mantenga el área de trabajo bien iluminada. p. Deje que el artefacto se enfríe antes de guardarlo. Shark ® q. Manténgalo fuera del alcance de los niños. r. El tocar partes metálicas calientes, agua caliente o vapor puede causar quemaduras.
- Página 14 ARMADO COMPONENTES DEL FUNCIONES DE SU VAPORIZADOR DE PRENDAS VAPORIZADOR DE PRENDAS A Unidad/vaporizador de prendas F Boquilla de vapor L Mango de transporte B Manguera de vapor/boquilla G Gancho para prendas M Tapa del tanque de agua de vapor con gorra de vapor y H Cinta para sujetar la boquilla N Llave de encendido conjunto de bastidor para cepillo...
- Página 15 ESPAÑOL fig. 2 fig. 4 fig. 1 fig. 3 ARMADO 1 Quite todas partes de embalaje del artefacto. No lo enchufe ni lo 4 Coloque la unidad de vapor en la 6 Cuelgue la boquilla de vapor encienda hasta terminar con el base.
-
Página 16: Importante
ARMADO- cont. fig. 5 fig. 7 fig. 6 LLENANDO EL TANQUE DE AGUA 1 Asegúrese de que la unidad esté 4 Desenrosque la tapa de agua, 8 Si lo llena mientra lo usa, desenchufada antes de llenarla. la tapa está amarrada al tanque desenchufe la unidad del de agua y no se puede remover tomacorriente y llene el tanque... -
Página 17: Usando Sus Accesorios
USANDO SUS ACCESORIOS ESPAÑOL fig. 9 fig. 8 GORRA DE VAPOR BASTIDOR DEL CEPILLO 1 La gorra de vapor protege sus 2 Para sacar la gorra, tire de la 1 El bastidor del cepillo de cerdas telas contra marcas de agua y pestaña violeta del borde de la provee mayor penetración filtra las impurezas del agua. -
Página 18: Usando Su Vaporizador De Prendas
USANDO SU VAPORIZADOR DE PRENDAS GANCHO PARA PRENDAS fig. 11 fig. 10 VAPORIZACIÓN VERTICAL 1 Enchufe el vaporizador en un 3 Cuelgue su prenda deseada del ADVERTENCIA: La manguera de tomacorriente eléctrico y mueva gancho. vapor puede calentarse con el la llave de encendido a la posición uso. - Página 19 ESPAÑOL fig. 12 VAPORIZADO PORTÁTIL/DE MESA 1 Use el vaporizador en modo 3 Enchufe el vaporizador en IMPORTANTE: Asegúrese de un tomacorriente eléctrico y mantener el tanque de agua portátil o de mesa para refrescar enciéndalo. las telas de toda su casa. nivelado.
-
Página 20: Mantenimiento
MANTENIMIENTO LIMPIEZA Y ALMACENAMIENTO 3 Pliegue la vara telescópica para 5 Guarde el vaporizador en un lugar 1 Apague el vaporizador y achicar la unidad y ate el cable seco y fresco. desenchúfelo del tomacorriente. de alimentación con la cinta de 6 De vez en cuando, saque la Deje que se enfríe completamente seguridad de la boquilla de vapor. -
Página 21: Registro Del Producto
CUSTOMER SERVICE”. Nosotros nos esforzamos constantemente en mejorar nuestros productos, por lo tanto las especificaciones aquí indicadas pueden cambiar sin previo aviso products. REGISTRO DEL PRODUCTO Visite www.sharkclean.com o llame al 1-800-798-7395 para registrar su nuevo producto Shark dentro de los diez (10) ®... - Página 22 Notes LLAMADA SIN COSTO: 1-800-798-7395 GS300_IB_ENG_SPA_101110.indd 22 10-11-11 9:58 AM...
- Página 23 Notes www.sharkclean.com GS300_IB_ENG_SPA_101110.indd 23 10-11-11 9:58 AM...
- Página 24 USA: Newton, MA 02459 CANADA: Ville St-Laurent, QC H4S 1A7 English: 1-800-798-7398 Español: 1-800-798-7395 www.sharkclean.com Printed in China / Impreso en China Illustrations may differ from actual product. El dibujo puede no ser igual al producto real. GS300.11.ES.101111 GS300_IB_ENG_SPA_101110.indd 24 10-11-11 9:58 AM...