Tabla de contenido
Publicidad
Idiomas disponibles
Idiomas disponibles
Enlaces rápidos
402159
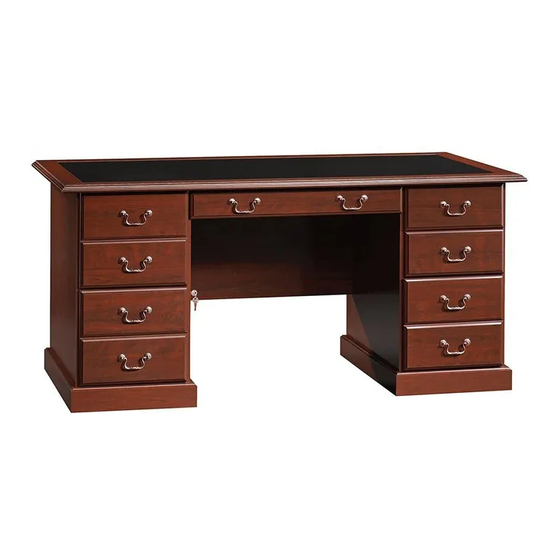
Executive Desk
Heritage Collection
PLEASE CONTACT US
BEFORE RETURNING
YOUR UNIT TO THE STORE
1-800-523-3987
www.sauder.com
NOTE: THIS INSTRUCTION BOOKLET CONTAINS
IMPORTANT SAFETY INFORMATION.
PLEASE READ AND KEEP FOR FUTURE REFERENCE.
English .................... Page 1-27
Français ...............Pages 28-31
Made in the USA
Espanol .............Páginas 32-36
Archbold, OH
Lot #: 354606
Date Purchased: ____________________
07 / 10 / 13
Publicidad
Tabla de contenido

Manuales relacionados para Sauder Heritage Serie


Resumen de contenidos para Sauder Heritage Serie
- Página 1 PLEASE READ AND KEEP FOR FUTURE REFERENCE. BEFORE RETURNING English ....Page 1-27 YOUR UNIT TO THE STORE Français ....Pages 28-31 Made in the USA 1-800-523-3987 Espanol .....Páginas 32-36 Archbold, OH www.sauder.com Lot #: 354606 07 / 10 / 13 Date Purchased: ____________________...
- Página 2 D229 SMALL DRAWER BACK SHORT MOLDING BACK D233 SMALL DRAWER SIDE SIDE MOLDING TOP INSERT D883 SMALL DRAWER BOTTTOM BASE MOLDING MODESTY PANEL KEYBOARD FRONT LARGE DRAWER FRONT KEYBOARD BACK D227 LARGE DRAWER BACK RIGHT KEYBOARD SIDE Page 2 www.sauder.com/services 402159...
-
Página 3: Part Identification
PART IDENTIFICATION: D229 D233 D883 D233 D227 D244 D794 D244 402159 www.sauder.com/services Page 3... - Página 4 CONNECTOR - 4 SMALL DRAWER FILE DRAWER HINGE - 2 MAGNETIC CATCH - 2 FRONT BRACKET - 2 FRONT BRACKET - 6 STRIKE PLATE - 2 LOCK BRACKET - 2 LOCK COVER - 1 LOCK PACK - 1 Page 4 www.sauder.com/services 402159...
-
Página 5: Tabla De Contenido
SILVER 5/8" MACHINE SCREW - 20 BROWN 1" FLAT HEAD SCREW - 4 SILVER 7/8" PAN HEAD SCREW - 14 BLACK 9/16" PAN HEAD SCREW - 2 Screws are shown actual size. You may receive extra hardware with your unit. 402159 www.sauder.com/services Page 5... - Página 6 Assemble your unit on a carpeted fl oor or on the empty carton to avoid scratching your unit or the fl oor. ® To begin assembly, push a SAUDER TWIST-LOCK FASTENER (7F) into the large holes in the RIGHT END (A), LEFT END (B), and UPRIGHTS (C2 and D2).
- Página 7 Use your hammer to tap the MOLDING CONNECTOR (17F) into the notches in the MOLDINGS. Flat end Flat end Tap four MOLDING CONNECTORS (17F) into the notches in the MOLDINGS (U and V). 402159 www.sauder.com/services Page 7...
- Página 8 Fasten the MOLDINGS (U and V) to the TOP INSERT (F2). Use fourteen SILVER 7/8" PAN HEAD SCREWS (22S). Fasten four TIE PLATES (3G) to the MOLDINGS (U and V). Use eight BLACK 9/16" LARGE HEAD SCREWS (1S). Page 8 www.sauder.com/services 402159...
-
Página 9: Gold 5/16" Flat Head Screw
NOTE: For each EXTENSION RAIL, turn a SCREW into the hole shown in the enlarged diagram. Then, slide the inner cartridge of the EXTENSION RAIL in or out to find the other hole that lines up with the hole in the ENDS and UPRIGHTS. Turn a SCREW into this hole. 402159 www.sauder.com/services Page 9... - Página 10 NOTE: The CABINET RAILS are marked "CABINET RIGHT" and "CABINET LEFT" for easy identification. Fasten the KEYBOARD RAILS (AA and BB) to the UPRIGHTS (C2 and D2). Use four GOLD 5/16" FLAT HEAD SCREWS (3S). NOTE: The CABINET RAILS are marked "CABINET RIGHT" and "CABINET LEFT" for easy identification. Page 10 www.sauder.com/services 402159...
- Página 11 Finished edge Finished edge ® How to use the SAUDER TWIST-LOCK FASTENER 1. Insert the dowel end of the FASTENER into the hole of the adjoining part. Dowel end NOTE: The dowel end of the FASTENER must remain fully inserted in the hole of the adjoining part while locking the FASTENER.
- Página 12 BLACK 1-7/8" FLAT HEAD SCREW (4 used in this step) Fasten the MODESTY PANEL (G2) to the UPRIGHTS (C2 and D2). Use four BLACK 1-7/8" FLAT HEAD SCREWS (2S). Page 12 www.sauder.com/services 402159...
- Página 13 ® Fasten the BACKS (E) to the ENDS (A and B) and UPRIGHTS (C2 and D2). Tighten eight TWIST-LOCK FASTENERS. 402159 www.sauder.com/services Page 13...
-
Página 14: Black 1-1/4" Flat Head Screw
(8 used in this step) Curved edge Curved edge Curved edge Fasten the SIDE MOLDINGS (W) to the ENDS (A and B) and UPRIGHTS (C2 and D2). Use eight BLACK 1- 1/4" FLAT HEAD SCREWS (7S). Page 14 www.sauder.com/services 402159... - Página 15 Curved edge Curved edge Curved edge Curved edge ® Fasten the BASE MOLDINGS (X) to the ENDS (A and B) and UPRIGHTS (C2 and D2). Tighten eight TWIST-LOCK FASTENERS. 402159 www.sauder.com/services Page 15...
- Página 16 Using your hammer, tap the TACK GLIDES (12E) into the ENDS (A and B) and UPRIGHTS (C2 and D2). Page 16 www.sauder.com/services 402159...
-
Página 17: Brown 1-1/2" Flat Head Screw
Fasten the KEYBOARD SIDES (R and S) to the KEYBOARD BACK (Q) and then to the KEYBOARD SHELF (T). Use six BROWN 1-1/2" FLAT HEAD SCREWS (14S). NOTE: You should start each SCREW a few turns before completely tightening any of them. 402159 www.sauder.com/services Page 17... - Página 18 Fasten two STRIKE PLATES (6I) to the KEYBOARD FRONT (P). Use two BLACK 1/2" FLAT HEAD SCREWS (11S). Fasten the HINGES (16H) to the KEYBOARD SHELF (T). Use four BROWN 7/16" LARGE HEAD SCREWS (6S). Fasten the KEYBOARD FRONT (P) to the HINGES (TT). Use four BROWN 7/16" LARGE HEAD SCREWS (6S). Page 18 www.sauder.com/services 402159...
-
Página 19: Brown 1" Flat Head Screw
(4 used in this step) Fasten the KEYBOARD SLIDES (CC and DD) to the KEYBOARD SHELF (T). Use four BROWN 1 "FLAT HEAD SCREWS (18S). NOTE: The DRAWER SLIDES are marked “DRAWER RIGHT” and “DRAWER LEFT” for easy identification. 402159 www.sauder.com/services Page 19... -
Página 20: Black 9/16" Pan Head Screw
Insert the LOCK RING (10J) over the key extension on the LOCK. When the drawers are locked, the metal bars on the LOCK will extend beyond the LOCK BRACKETS (9J) on the large drawers in step 18. You may need to loosen the SCREWS that fasten the LOCK BRACKETS and adjust the BRACKETS in or out. Page 20 www.sauder.com/services 402159... - Página 21 D227 D244 D244 D794 Slide the LARGE DRAWER SIDES (D244) onto the DRAWER BACK (D227). Slide the DRAWER BOTTOM (D794) into the grooves in the DRAWER SIDES and DRAWER BACK. Repeat this step for each drawer. 402159 www.sauder.com/services Page 21...
- Página 22 Pull the FILE DRAWER FRONT BRACKETS (10G) apart and slide them into the grooves in the DRAWER SIDES (D244). Fasten the LARGE DRAWER FRONT (H) to the FILE DRAWER FRONT BRACKETS. Use four BLACK 9/16" LARGE HEAD SCREW (1S). Repeat this step for the other drawers. Page 22 www.sauder.com/services 402159...
- Página 23 Fasten a LOCK BRACKET (9J) to two large drawers exactly as shown. Use a BROWN 7/16" LARGE HEAD SCREW (6S) through the oblong hole in each LOCK BRACKET and into the exact pre-drilled hole shown in the LARGE DRAWER SIDES (D244). 402159 www.sauder.com/services Page 23...
- Página 24 Fasten the DRAWER FRONT (L) to the SMALL DRAWER FRONT BRACKETS. Use two BLACK 9/16" LARGE HEAD SCREWS (1S). NOTE: Be sure the DRAWER BOTTOM (D883) fi ts into the groove in the DRAWER FRONT. Repeat this step for the other small drawer. Page 24 www.sauder.com/services 402159...
- Página 25 Fasten the DRAWER SLIDES (GG and HH) to the DRAWER SIDES (D233). Use four GOLD 5/16" FLAT HEAD SCREWS (3S) through holes 1# and # 3. NOTE: The DRAWER SLIDES are marked “DRAWER RIGHT” and “DRAWER LEFT” for easy identification. Repeat this step for the other small drawer. 402159 www.sauder.com/services Page 25...
- Página 26 Slide the FILE RODS (8B) into the FILE GLIDE (5B) on the right DRAWER SIDE. Slide another FILE GLIDE (5B) onto the other end of the FILE RODS (8B), then press this FILE GLIDE over the left LARGE DRAWER SIDE (D244). Repeat this step for the other large drawers. Page 26 www.sauder.com/services 402159...
- Página 27 For long-term care and maintenance of your unit, you may touch up the edges with the TOUCH-UP PEN (9M). NOTE: Please read the back pages of the instruction booklet for important safety information. This completes assembly. Clean with your favorite furniture polish or a damp cloth. Wipe dry. 402159 www.sauder.com/services Page 27...
-
Página 28: Liste De Pièces
COURTE MOULURE ........2 pour future référence. PASSE-CÂBLES ..........1 MOULURE LATÉRALE ........4 Pour contacter Sauder VIS TÊTE LARGE 14 mm NOIRE ....24 MOULURE DE SOCLE ........4 en ce qui concerne cet VIS TÊTE PLATE 48 mm NOIRE ....4 (ENSEMBLE DE GLISSIÈRE ILLUSTRÉ... - Página 29 REMARQUE : L'extrémité fi letée de la FIXATION doit Pour commencer l'assemblage, enfoncer une FIXATION rester complètement insérée dans le trou de la pièce TWIST-LOCK® SAUDER (7F) dans les gros trous de attenante lorsque l'on bloque la FIXATION. l'EXTRÉMITÉ DROITE (A), l'EXTRÉMITÉ GAUCHE (B) 2.
- Página 30 DE TIROIR (D227). Répéter cette étape pour l'autre petit tiroir. Enfi ler le FOND DE TIROIR (D794) dans les rainures des CÔTÉS DE TIROIR et de l'ARRIÈRE DE TIROIR. Répéter cette étape pour chaque tiroir. Page 30 www.sauder.com/services 402159...
- Página 31 fi gurant sur les pages arrière du manuel CÔTÉ GAUCHE DE GRAND TIROIR (D244). d’instructions. Répéter cette étape pour les autres grands tiroirs. Ceci complète l'assemblage. Nettoyer à l’aide d’une encaustique pour meubles ou d’un chiffon humide. Essuyer. 402159 www.sauder.com/services Page 31...
-
Página 32: Escritorio Ejecutivo
TORNILLO NEGRO DE CABEZA PERDIDA de CORREDERA DE EXTENSIÓN ..... 6 32 mm ............8 Sauder en cuanto a RIEL DERECHO DEL GABINETE PARA TORNILLO NEGRO DE CABEZA PERDIDA de esta unidad, refi érase EL TECLADO ..........1 13 mm ............ - Página 33 (3S) a través de los agujeros No. 1 y No. 4. Para comenzar el ensamblaje, empuje un SUJETADOR NOTA: Los RIELES DE GABINETE tienen la inscripción TWIST-LOCK® SAUDER (7F) dentro de los agujeros "CABINET RIGHT" (derecho) y la inscripción "CABINET grandes del EXTREMO DERECHO (A), del EXTREMO LEFT"...
- Página 34 SEGURO se extenderán más allá de los SOPORTES DE CERRADURA (9J) de los cajones grandes en el paso 18. Es posible que tenga que afl ojar los TORNILLOS que aseguran los SOPORTES DE CERRADURA y ajustar los SOPORTES dentro o fuera. Page 34 www.sauder.com/services 402159...
- Página 35 Inserte un TORNILLO MARRÓN DE CABEZA GRANDE de 11 mm (6S) a través del agujero alargado en cada uno de los SOPORTES DE CERRADURA y entre el agujero perforado previamente de los LADOS DE CAJÓN GRANDE (D244). 402159 www.sauder.com/services Page 35...
- Página 36 NOTA: Por favor, lea las páginas de atrás del folleto de instrucciones en cuanto a importante información de seguridad. Esto completa el ensamblaje. Limpie con su pulimento para muebles preferido o un paño húmedo. Seque con un paño. Page 36 www.sauder.com/services 402159...
- Página 37 à mortelles. Les téléviseurs peuvent être un téléviseur. cet effet. particulièrement lourds. De plus, le poids et l’emplacement du tube image ont tendance à rendre les téléviseurs instables et enclins à tomber vers l’avant. 402159 www.sauder.com/services Page 37...
- Página 38 Además, el peso y la ubicación del tubo de imagen tienden a causar la inestabilidad de televisores y propensa a volcarse hacia adelante. Page 38 www.sauder.com/services 402159...
-
Página 39: Garantie Limitée De 5 Ans
4. La présente garantie ne s’applique qu’aux défauts garantis qui se produisent des composantes de mobilier Sauder. Le mot « défaut », tel qu’il est utilisé sous pour la première fois et qui sont signalés à Sauder dans les limites de ouverture les termes de la présente garantie, comprend les imperfections des pièces qui... - Página 40 Archbold, Ohio, where it all began. Certifi cate of Conformity The Sauder name on the box ensures that 1. This certifi cate applies to the Sauder Woodworking Product identifi ed by this Instruction Book. the item you have purchased is made with 2.