Tabla de contenido
Publicidad
Enlaces rápidos
Publicidad
Tabla de contenido

Manuales relacionados para Husqvarna VIKING Huskylock 90


Resumen de contenidos para Husqvarna VIKING Huskylock 90
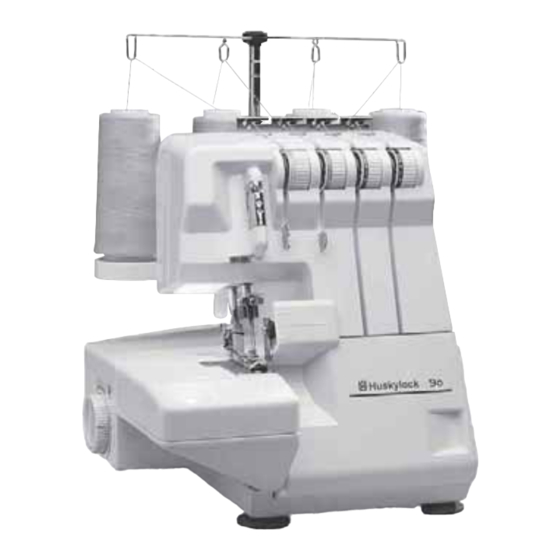
- Página 1 Operating manual Instrucciones Huskylock 90 Huskylock 90...
-
Página 2: Important Safety Instructions
Important Safety Instructions When using the sewing machine, basic safety precautions should always be followed, including the following: Read all instructions before using this household sewing machine DANGER - To reduce the risk of electric shock: • The sewing machine should never be left unattended when plugged in. Always unplug the sewing machine from the electrical outlet immediately after using and before cleaning. -
Página 3: Instrucciones De Seguridad
Esta máquina tiene un cable especial del pedal. Si el cable estuviera dañado cambielo por otro cable del mismo tipo. Este cable se vende por los revendedores de Husqvarna. El montaje del cable debe efectuarse por un especialista. -
Página 4: Tabla De Contenido
Table of contents Indice Safety instructions Instrucciones de seguridad Name of main components Sumario Setting up your machine Preparaciones The position of the thread pole Barra telescópica Spool holders Porta-carretes Spool caps Discos para bobina Connecting the foot machine Conexión Attaching the waste catcher Acumulador de suciedad Controlling the sewing speed... -
Página 5: Name Of Main Components / Sumario
Name of main components / Sumario Thread pole Barra telescópica Thread guide plate Guía hilos Right needle thread tension dial Regulador de la tensión del hilo Spool pin de aguja derecho Porta-carretes Left needle thread tension dial Spool holder Regulador de la tensión del Discos para bobina hilo de aguja izquierdo Needle plate... -
Página 6: Setting Up Your Machine
Setting up your machine / Preparaciones Set your Overlock machine on a sturdy Positioning catches flat surface. Posiciones de medio Position of thread pole Pull up the thread pole to its highest point before threading. Turn the thread pole so the thread guides come right above the spool pins. -
Página 7: Connecting The Foot Machine
Connecting the machine Conexión At the rear side of the machine you will En la parte de atrás de la máquina está find information about the power supply indicada la tensión (voltaje). Antes de (V). Check the power supply setting in the conectar la máquina a la red, asegúrese de machine to ensure that this agrees with the que los valores indicados coincidan con... -
Página 8: Controlling The Sewing Speed
Sewing speed Safety switch The foot control regulates the sewing This machine is equipped with a micro speed. The sewing speed can be adjusted safety switch. The machine is automati- by increasing or decreasing the pressure cally cut off from the electric supply if the on the foot control. -
Página 9: Using The Machine
Using the machine / Funcionamente Handwheel Always turn the handwheel toward you, i.e. in the same direction as on a house- hold sewing machine. Volante Gire siempre el volante hacia Ud. Front cover To open the front cover, slide the hollow to the right as far as it will go, then pull the front cover toward you. -
Página 10: Looper Threading
Looper threading / Enhebrado de los hilos del garfio Correct threading is important, otherwise El enhebrado correcto es muy importante, uneven stitches or thread breakage may porque si no pueden resultar puntadas result. A convenient threading chart is irregulares o se puede romper el hilo. placed on the front panel inside the front Debajo de la tapa frontal hay un esquema cover. - Página 11 Looper threading / Enhebrado de los hilos del garfio Upper looper / Hilo del garfio Lower looper /Hilo del garfio superior inferior Continue according to illustration through Continue according to illustration through (3) - (8) (3) - (11) Continúe según el esquema (3) - (8). Continúe según el esquema (3) - (11).
-
Página 12: Needle Threading
Needle threading / Enhebrado de los hilos de aguja • Turn the handwheel • Ponga la aguja en su toward you until the posición más alta needles are fully raised. girando el volante. • Pass the threads through • Guie el hilo desde el thread guide (1), continue porta-carrete a través del through (2) . - Página 13 Needle threading / Enhebrado de los hilos de aguja • Aguja derecha: • Right needle: Continue according to Continue según el illustration through (4) - (9). Left needle Aguja izquierda eschema (4) - (9). • Left needle: Continue according to •...
-
Página 14: Trial Sewing
Trial sewing / Prueba de cosido When the overlock machine has been threaded for the first time or re-threaded because of thread breakage during sewing, start sewing in the following manner: Cuando el enhebrado está terminado por primera vez después del re-enhebrado empiece de la siguiente manera. -
Página 15: Adjusting Thread Tensions
Adjusting thread tensions / Tensiòn del hilos The thread tensions will vary according to the type and thickness of both thread and fabric. Adjust the thread tension of the machine accordingly while checking the seam. La tensión del hilo es diferente para los diferentes tipos de tela e hilos. Ajuste la tensión del hilo a medida que esté... -
Página 16: Correct And Incorrect Thread
Correct and incorrect thread tension / Tensiòn de los hilos correcta o incorrecta The left needle thread tension is too loose. The right needle thread tension is too loose. Hilo de la aguja izquierda demasiado flojo Hilo de la aguja derecha demasiado flojo Back side Back side Revés... -
Página 17: Table Of Sewing Materials
Table of sewing materials, threads and needles The best tension for one fabric may not be correct for another. The required tensions depend upon stiffness and thickness of the fabric, thread, size and type. If necessary, readjust referring to the chart below. Thin material Medium to thick Thick material... -
Página 18: Table De Telas, Agujas Y Hilos
Tabla de telas, agujas y hilos La tensión del hilo más conveniente para un tipo de tela no es necesariamente la mejor para otro tipo de tela. La tensión correcta del hilo depende de la rigidez y del grosor de la tela, del grosor del hilo y del tipo de hilo. -
Página 19: Changing The Thread
Changing the thread (tying on) /Cambiar el hilo It is simple th change the thread in the Los hilos se pueden cambiar de la manera following manner: siguiente: Corte el hilo existente cerca del porta- Cut the thread above the spool pin and carrete. -
Página 20: Adjustment Of Stitch Length / Longitud De Puntada
Adjustment of stitch length / Longitud de puntada The normal setting for ordinary overlock La longitud normal de puntada para stitch is 2.5. You can adjust the stitch overlock normal es de 2,5 mm. Se puede length from 1.0 to 5.0 mm by turning the cambiar la longitud de puntada entre 1 stitch length dial.