Tabla de contenido
Publicidad
Idiomas disponibles
Idiomas disponibles
Enlaces rápidos
Publicidad
Tabla de contenido

Manuales relacionados para universalblue UBE2408-21

Resumen de contenidos para universalblue UBE2408-21
-
Página 2: Tabla De Contenido
Encimera de gas cristal 5 fuegos 5 burners glass gas hob ÍNDICE ESPAÑOL 1. INSTRUCCIONES DE SEGURIDAD ..........3 2. DESCRIPCIÓN DE LA UNIDAD ........... 4 3. USO DE LA ENCIMERA ............... 5 4. CUIDADO DE LA UNIDAD ............9 5. -
Página 3: Español
ESPAÑOL Felicidades por haber adquirido este producto. recomendamos dedique algunos minutos leer cuidadosamente este Manual de Instrucciones con el fin de hacer un buen uso del mismo. Lea atentamente todas las instrucciones de seguridad antes de utilizar el aparato y conserve este Manual de Instrucciones para poder consultarlo en el futuro 1. -
Página 4: Descripción De La Unidad
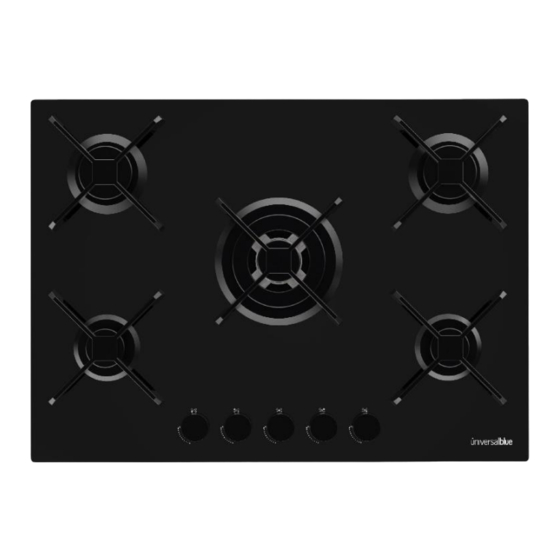
Tenga en cuenta que las piezas de esta placa no son aptas para el lavavajillas. 2. DESCRIPCIÓN DE LA UNIDAD UBE2408-21/ UBE2409-21 Nº de quemadores: 5 Ancho de 70 cm Dimensiones del producto: 68,4 x 51 x 10 cm... -
Página 5: Uso De La Encimera
Ignición para quemadores de gas Dispositivo de seguridad. Se activa cuando la llama se apaga accidentalmente e interrumpe el paso de gas al quemador. Mandos de control de la unidad Nota: la bandeja para grasa en acero inoxidable y la rejilla de hierro fundido ubicada en el quemador, deben ser instaladas respectivamente en la parte superior... -
Página 6: Quemador De Gas
QUEMADOR DE GAS Estos quemadores difieren en tamaño y potencia. Elija el más adecuado para el utensilio que desea utilizar. El quemador puede ser regulado con la perilla de control correspondiente usando uno de los siguientes ajustes: Para encender quemadores, coloque encendedor o fósforo cerca del quemador, presione la perilla de... -
Página 7: Recomendaciones
Si el quemador se apaga accidentalmente, gire la perilla de control a la posición de apagado e intente encender el quemador nuevamente cuando pase un 1 minuto. Por seguridad se recomienda que cierre el suministro de gas en caso de no usar la unidad. Para apagar el quemador, simplemente gire la perilla a la posición de apagado. -
Página 8: Los Recipientes Con Una Parte Inferior Más Gruesa
Asegúrese quemadores encuentran correctamente colocados antes de usarlos. Adicionalmente, los dos quemadores pueden ser usados juntos o separadamente con ollas de diferentes tamaños. Para un mejor rendimiento de la unidad, siga las recomendaciones dadas a continuación: Todos los tipos de recipientes pueden ser usados en este producto. -
Página 9: Cuidado De La Unidad
4. CUIDADO DE LA UNIDAD Antes de realizar la limpieza o mantenimiento a la unidad, desconéctela de la fuente de suministro eléctrico. Para extender la vida útil de la unidad se recomienda que sea limpiada de manera regular y cuidadosamente con el fin de proteger el acabado de la misma. - Página 10 Las hojas de aluminio, los productos plásticos, los objetos hechos de material sintético, el azúcar o los alimentos con un alto contenido de azúcar que se hayan derretido en la superficie de la unidad, deberán ser limpiados tan pronto como sea posible y mientras la superficie esté...
-
Página 11: Instalación
Este procedimiento debe llevarse a cabo por un técnico cualificado. Si hay una fuga de gas siga los siguientes pasos: No encienda la luz. No apague ni encienda ningún aparato eléctrico y no toque ninguna toma de corriente. No use el teléfono. Deje de usar el producto y cierre la válvula de seguridad. - Página 12 El lugar también debe permitir la entrada del aire necesario para una adecuada combustión. El flujo de aire para propósitos de combustión no deberá ser menor a 2m3/h por Kw de la capacidad instalada. El suministro de dicho aire puede ser efectuado a través de una entrada directa desde el exterior a través de un conducto con una sección cruzada interna de al menos 125 cm...
-
Página 13: Instalación De La Unidad Encastrado
Un uso intensivo y prolongado de la unidad puede necesitar ventilación adicional, como, por ejemplo, abrir una ventana o incrementar la potencia del sistema de entrada de aire. Los gases de petróleo licuado son más pesados que el aire, por la tanto se ubicará... - Página 14 Esta unidad debe instalarse en una cocina, comedor, o sala de estar, pero no se debe instalar en baños. Los muebles ubicados al lado de la unidad, que sean más altos que la superficie de la unidad, deberán ser colocados al menos a 110mm del borde del tablero.
- Página 15 Nota: use el gancho que viene en el set de accesorios. Si la unidad no se va a instalar sobre un horno encastrado, se debe insertar un panel de madera para aislarla. Este panel debe ser colocado al menos a 20mm de la parte inferior de la unidad.
-
Página 16: Conexión De Gas Para La Encimera
Cuando se instale sobre un horno encastrado sin ventilador forzado, asegúrese de que en el interior del armario hay entradas y salidas de aire. CONEXIÓN DE GAS PARA LA ENCIMERA La conexión de la unidad al suministro de gas debe llevarse a cabo por un instalador certificado. -
Página 17: Conexión Eléctrica
asegúrese que la presión del gas se ajusta a las indicaciones dadas en la tabla 1 “Especificación de los quemadores y boquillas”. CONEXIÓN AL TUBO FLEXIBLE El conector de alimentación de gas al aparato es un conector macho de 1/2 enroscado a la tubería de gas redonda. Utilice únicamente tuberías y juntas que se ajusten a las normas actualmente en vigor. - Página 18 Conecte el cable de alimentación a un enchufe estándar con la clasificación indicada en la placa de características o conéctelo directamente a la red eléctrica. En este último caso, un sólo polo interruptor debe colocarse entre el aparato y la red eléctrica, con una apertura mínima entre los contactos de 3 mm en el cumplimiento de los códigos de seguridad vigentes.
-
Página 19: Adaptar La Unidad A Los Diferentes Tipos De Gas
6. ADAPTAR LA UNIDAD A LOS DIFERENTES TIPOS DE GAS G20/25 G25.1 G2.350 Boqui 1/100 Poten Boqui Pote Pote Boqu Poten Pote quil uilla Boqui uilla uilla Potenci (mm) ncia ncia illa ncia Quem 1/10 termi 1/10 term term 1/10 termi term ador... -
Página 20: Reemplazo De La Boquilla Del Quemador
REEMPLAZO DE LA BOQUILLA DEL QUEMADOR Afloje la boquilla con una llave inglesa (7). Coloque nueva boquilla, asegúrese de que es apta para el tipo de gas requerido (mire la tabla anterior para tener una referencia). Después de haber convertido la unidad a un tipo de gas diferente, asegúrese de colocar una etiqueta con la nueva información. -
Página 21: Selección De La Llama
Revisar el ajuste de la llama Caliente el quemador con la perilla en posición máxima por 10 minutos. Luego, gire la perilla a la posición de ahorro. La llama no se debe extinguir ni mover sobre la boquilla. Si se dan alguna de esas dos situaciones, es necesario que reajuste la válvula. - Página 22 Ver también la figura 8 para las diversas opciones de funcionamiento (selección del tamaño de la llama). El quemador debe fijarse en la posición máxima durante la fase inicial de la cocción para llevar la comida a ebullición, y luego debe girarse a la posición de ahorro para mantener la cocción.
-
Página 23: Adaptar A Los Diferentes Tipos De Gas
ADAPTAR A LOS DIFERENTES TIPOS DE GAS Categoría de aplicación: I 2ELS 2ELW 3B/P 3B/P 3B/P 2H3+ 2E3B/P 2HS3B/P 2ELWLS3B/P 2ELL3B/P Quemador Tipo de gas Presión Diámetro Carga nominal Carga reducida de la boquilla mbar 1/100mm kcal/h kcal/h Auxiliar Natural G20 0.40 Natural G25 99.7... -
Página 24: Fuente De Gas Y Tabla De Comparación Nacional
Natural G25.1 265.9 2064 0.90 Natural G27 278.8 2064 0.90 Natural G2.350 317.6 2064 0.90 Butano G30 2064 0.90 2064 0.90 2064 0.90 Butano G31 2064 0.90 De triple Natural G20 2924 1290 anillo Natural G25 376.7 2924 1290 Natural G25.1 376.7 2924 1290... -
Página 25: Se Debe Prestar Especial Atención A Las Exigencias
G20 20MBAR, G30-G31(28-30)- I2H3+ GR,IE,IT,PT,ES,GB,CH,CZ,SI,SK 37mbar II2E3B/P G20 20mbar,g30 30mbar G20/G25.1 25mbar, G30 II2HS3B/P 30mbar II2ELWLS3B/ G20/G27 20mbar, G2.350 13mbar,G30 37mbar G20 20mbar,G25 25mbar, G30 II2ELL3B/P 50mbar Nota: Antes de la instalación, asegúrese de que la presión del gas es la correcta y de que el ajuste de la unidad es compatible. Las condiciones de ajuste para este aparato se indican en la etiqueta. - Página 26 de su vida útil no se debe tratar como basura doméstica normal, sino que se debe llevar a los centros de recogida diferenciada de desperdicios eléctricos y electrónicos o bien entregar al vendedor en el momento de comprar un nuevo aparato. La adecuada recogida de este aparato contribuye a evitar posibles repercusiones negativas para el ambiente o la salud de las personas.
-
Página 27: Servicio Postventa
8. SERVICIO POSTVENTA Este producto cuenta con una garantía de 2 años contados a partir de la fecha de compra del producto, con las siguientes condiciones: La garantía es válida sólo con la presentación de la factura de compra del producto. ... - Página 28 Para hacer uso de la garantía acuda al centro donde compró este producto o bien contacte con nosotros de cualquiera de las siguientes formas: o A través del email sat@universalblue.es, adjuntando la factura de compra e indicando sus datos de contacto y brevemente qué problema presenta su producto.
-
Página 29: English
ENGLISH Congratulations on the purchase of your product. We recommend that you take a few minutes to read this User Manual carefully in order to fully understand how to use it correctly. Read all the safety instructions carefully before using the product and keep this User Manual for future reference. -
Página 30: Unit Description
Please note that the parts on this plate are not suitable for the dishwasher. 2. UNIT DESCRIPTION UBE2408-21/ UBE2409-21 5 burners Width: 70 cm Product dimensions: 68,4 x 51 x 10 cm Built-in dimensions: 56 x 48 cm... -
Página 31: How To Use Your Gas Hob
Control knobs for gas burners and electric hot plates. Note: the stainless steel grease tray and the cast iron grid located on the burner must be installed respectively on the top and bottom of the electric heating element, so that the heating element is in the middle of the two. - Página 32 The hob is for domestic cooking use only. It is not designed for commercial or industrial purposes. GAS BURNER The burners are different in size and power. Choose the most appropriate one for the diameter of the cookware being used. The burner can be adjusted with the corresponding control knob using following settings:...
- Página 33 To turn off the burner, simply turn the knob to the off position. If the burner is accidentally turned off, turn the control knob to the off position and try to light the burner again after 1 minute. For safety reasons, it is recommended that you turn off the gas supply if you are not using this appliance.
- Página 34 To rotate the burners, proceed as follows: Make sure the burners are completely cool. Lift the burner completely off its holding. Place it back in the desired position. Make sure that the burners are correctly positioned before use.
-
Página 35: Maintenance
4. MAINTENANCE Before cleaning the unit, disconnect it from the power source. To extend the life of the hob, it is recommended to clean it regularly and carefully. Follow the directions given below: Enameled parts and upper glass should be washed with warm water. - Página 36 Aluminum foil, plastic products, objects made of synthetic material, sugar or food with a high sugar content that have melted on the surface of the unit should be cleaned as soon as possible and while the surface is still hot. It is recommended to clean the grids while they are still hot.
-
Página 37: Installation
Stop using the hob and close the safety valve. Open windows and doors to ventilate the room. Please leave the house and contact our technical service. 5. INSTALLATION The following instructions are directed at the qualified installers, so the installation and maintenance procedures should be followed as professionally as possible. - Página 38 The room must also allow the necessary entry of air for proper combustion. The airflow for combustion purposes should not be less than 2 m³/h per kW of installed capacity. The air supply can be made through a direct entry from the outside through a conduit with an internal cross section of at least 125 cm2, which must be carefully placed to avoid accidental blockage.
- Página 39 chimneys, stoves, etc.) that can increase its internal temperature to more than 50ºC. INSTALLING THE BUILT-IN GAS HOB The hob's burners are designed with an X-type degree of protection against excessive heat. Although this hob can be installed near cabinets, make sure the height does not exceed the height of the burners.
- Página 40 Note: use the hooks that come in the accessory set. If the hob is not to be installed on a built-in oven, a wood panel should be inserted to insulate it. This panel should be placed at least 20mm from the bottom of the unit.
- Página 41 When installing the unit on a built-in oven, the oven should be placed between two sections of wood. Remember to leave a space of at least 45x560mm on the back. When installing the hob on a built-in oven without a forced fan, make sure there are air inlets and outlets inside the cabinet.
- Página 42 to the gas or liquid gas mains must be carried out in accordance with the regulation currently in force, and only after it has been determined that it is adaptable to the type of gas to be used. If this is not the case, follow the instructions given in the paragraph "Adaptation to different types of gas".
- Página 43 label located under the appliance. The ground wire can be identified by its yellow-green color. In the case of installation on a recessed electric furnace, the electrical connections of the unit and the oven must be independent, not only for safety reasons, but also to facilitate the removal of one or both in the future.
-
Página 44: Adapting The Unit To Different Gas Types
proceed as follows: connect the green and yellow wire to the terminal marked "E" or or colored green or green and yellow. Connect the brown wire to the terminal marked "L" or colored red. Connect the blue wire to the terminal marked "N" or colored in black. 6. - Página 45 P.C.I.G20 37.78 MJ/m³ P.C.I.G25.1 32.51 MJ/m³ P.C.I.G25 32.49 MJ/m³ P.C.I.G27 30.98 MJ/m³ P.C.I.G2.350 27.20MJ/ m³ P.C.I.G30 49.47MJ/Kg BURNER NOZZLE REPLACEMENT Loosen the nozzle with a wrench (7). Insert the new nozzle, making sure it is suitable for the type of gas required (see table...
- Página 46 Valve adjustment The valve adjusts the control knob. The knob must be set to the flame saving position ON. Remove the knob and adjust the flame with the help of a small screwdriver. Checking the flame setting Heat the burner with the knob in maximum position for 10 minutes. Then turn the knob to the saving position.
- Página 47 If the burners are set correctly, the flames should be light blue, and the inner cone should be clearly visible. The size of the flame depends on the position of the control knob of the selected burner. See also fig. 8 for the various operating options (flame size selection).
- Página 48 APPLICATION CATEGORY: I 2ELS 2ELW 3B/P 3B/P 3B/P 2H3+ 2E3B/P 2HS3B/P 2ELWLS3B/P 2ELL3B/P Burner Type of Gas Pressure Nozzle Nominal Charge Reduced diameter Charge mbar 1/100mm kcal/h kcal/h Auxiliary Natural G20 0.40 Natural G25 99.7 0.40 Natural G25.1 99.6 0.40 Natural G27 0.40 Natural G2.350...
- Página 49 Natural G27 278.8 2064 0.90 Natural G2.350 317.6 2064 0.90 Butano G30 2064 0.90 2064 0.90 2064 0.90 Butano G31 2064 0.90 Triple-ring Natural G20 2924 1290 Natural G25 376.7 2924 1290 Natural G25.1 376.7 2924 1290 Natural 2924 1290 GAS SOURCE AND NATIONAL COMPARISON TABLE Gas group Supply pressure...
-
Página 50: Environmental Information
G20 20MBAR, G30-G31(28-30)- I2H3+ GR,IE,IT,PT,ES,GB,CH,CZ,SI,SK 37mbar II2E3B/P G20 20mbar,g30 30mbar II2HS3B/P G20/G25.1 25mbar, G30 30mbar G20/G27 20mbar, G2.350 II2ELWLS3B/P 13mbar,G30 37mbar G20 20mbar,G25 25mbar, G30 II2ELL3B/P 50mbar Notes Before installation, make sure the gas pressure is correct and the hob setting is compatible. ... - Página 51 and to human health, which might otherwise be caused if it were disposed of in the wrong way. The symbol on the product indicates that it may not be treated as normal household waste. It should be taken to a collection point for the recycling of electrical and electronic goods.
-
Página 52: After Sales Service
8. AFTER SALES SERVICE This appliance has a warranty of 2 years from the date of purchase, considering the following notes: The guarantee is valid only on presentation of the product's purchase invoice. Damage caused during transport, negligence or misuse, incorrect assembly or installation, as well as external influences such as: atmospheric or electrical rays, flooding, humidity, etc. - Página 53 To make use of the guarantee go to the store where you purchased this product or contact us by: o By email, sat@universalblue.es. Please, attach the invoice, add your contact details and explain briefly what the issue is.
- Página 54 www.universalblue.es...