Tabla de contenido
Publicidad
Idiomas disponibles
Idiomas disponibles
Enlaces rápidos
Publicidad
Capítulos
Tabla de contenido

Manuales relacionados para Stihl FS


Resumen de contenidos para Stihl FS
- Página 1 STIHL FS Manual de instrucciones Instruction Manual...
- Página 2 E Manual de instrucciones 1 - 32 G Instruction Manual 33 - 63...
-
Página 3: Tabla De Contenido
En el caso de que tenga usted alguna Acoplar los dispositivos de pregunta sobre este producto, diríjase a protección su distribuidor STIHL o directamente a Montar la herramienta de corte nuestra empresa de distribución. Ponerse el cinturón de porte Atentamente Equilibrar la máquina... -
Página 4: Herramientas De Acople
INDICACIÓN Advertencia de daños de la máquina o de los diferentes componentes. La herramienta de acople STIHL se puede montar en diferentes máquinas Perfeccionamiento técnico STIHL. De ello forman parte también los... -
Página 5: Indicaciones Relativas A La Seguridad Y Técnica De Trabajo
La ropa deberá ser apro- Indicaciones relativas a la corte o accesorios autorizados piada y no estorbar. seguridad y técnica de por STIHL para esta máquina a motor o Llevar ropa ceñida – traje trabajo piezas técnicamente equivalentes. Si combinado, ningún tiene preguntas al respecto, consulte a abrigo de trabajo. - Página 6 "Ponerse el cinturón de porte" Antes de arrancar STIHL ofrece una extensa gama de La máquina sólo se deberá utilizar si equipamiento de protección personal. reúne condiciones de seguridad para el Comprobar el funcionamiento seguro de trabajo –...
- Página 7 – véase el manual de Durante el trabajo instrucciones del motor universal. No trabajar nunca STIHL recomienda un distribuidor sin el protector Adoptar siempre una postura estable y especializado STIHL. apropiado para la segura.
- Página 8 – también por herramientas de corte de metal encima de 15 m – ¡peli- Parar el motor para cambiar la originales STIHL. Las propiedades de gro de lesiones! – y herramienta de corte – ¡peligro de éstas están armonizadas óptimamente pueden dañar la herra-...
- Página 9 Una herramienta de corte de metal que especializado STIHL. Los distribuidores El protector no se puede no haya sido fabricada por STIHL no especializados STIHL siguen emplear junto con cabe- deberá pesar más, ni ser más gruesa, ni periódicamente cursillos de instrucción...
- Página 10 español Cabezal de corte con hilo de corte El protector no se puede emplear junto con cuchi- llas cortamalezas, cuchillas trituradoras y hojas de sierra circular. El protector no se puede emplear junto con cuchi- llas cortamalezas, cuchillas trituradoras, Usar el cinturón de porte hojas cortahierbas y hojas de sierra circular.
- Página 11 Cabezal de corte con cuchillas de Peligro de rebote en el caso de Hoja cortahierbas plástico – STIHL PolyCut herramientas de corte de metal Para segar bordes de prados silvestres ADVERTENCIA (sin postes, vallas, árboles ni obstáculos similares). Al trabajar con herra- ¡Tener en cuenta las marcas de...
- Página 12 – cortamalezas, si se percibe su embotamiento, según las prescripciones y – de ser necesario – equilibrarla (STIHL recomienda acudir a un distribuidor El peligro de rebote es muy alto en el especializado STIHL) sector negro: es este sector no se deberá...
-
Página 13: Máquinas Básicas Permitidas
STIHL FC 95, FC 110 – En caso necesario, se ha de reequipar la máquina con una argolla para un cinturón de porte. -
Página 14: Combinaciones Permitidas De Herramienta De Corte, Protector, Empuñadura Y Cinturón De Porte
español Combinaciones permitidas de herramienta de corte, protector, empuñadura y cinturón de porte Herramienta de corte Protector, tope Empuñadura Cinturón de porte... - Página 15 Cabezales de corte metal. STIHL SuperCut 20-2 Protectores STIHL AutoCut C 25-2 STIHL AutoCut 25-2 17 Protector para cabezales de corte STIHL AutoCut 30-2 18 Protector con STIHL AutoCut 36-2 19 Faldón y cuchilla sólo para...
-
Página 16: Montar El Asidero Tubular Cerrado
español Montar el asidero tubular cerrado sin Montar el asidero tubular estribo cerrado Montar el asidero tubular cerrado con estribo Colocar la abrazadera (3) en el asidero tubular cerrado (4) y aplicarlos juntos al vástago (5) Colocar la abrazadera (6) Colocar la abrazadera (3) en el asidero tubular cerrado (4) y Aplicar el estribo (2) –... -
Página 17: Montar La Herramienta De Acople
español Fijar el asidero tubular cerrado Montar la herramienta de acople Preparar el acople ADVERTENCIA Par modificar el montaje de la máquina Si al retirar la caperuza se extrajera el básica, parar siempre el motor – ¡peligro tapón del vástago: de lesiones! Introducir presionando el tapón en el vástago hasta el tope... - Página 18 español Montar el engranaje SP 10 En la máquina básica, aflojar los tornillos de apriete (flechas) de la caja del engranaje – no Hacer una marca en el extremo del desenroscarlos FH/HL vástago a una distancia A = 40 mm Retirar el engranaje del vástago (1,6 in.) (con lápiz o rotulador de color)
- Página 19 español En máquinas con asidero tubular Para montar posteriormente una argolla de porte, adquirir ésta como "accesorio cerrado especial" y fijarla en la máquina. Aflojar los tornillos en el asidero tubular cerrado Montar el engranaje (2) en el vástago (3) hasta el tope – al hacerlo, girar un poco el engranaje en vaivén hasta que la caja haya Fijar la argolla portante (1) a una...
-
Página 20: Acoplar Los Dispositivos De Protección
español Montar el faldón y la cuchilla Montar el tope Acoplar los dispositivos de protección Montar el protector ADVERTENCIA Se tiene que montar el tope (6) en el caso de emplear hojas de sierra circular. Colocar el tope (6) en la brida del engranaje Enroscar los tornillos (7) y apretarlos... -
Página 21: Montar La Herramienta De Corte
español Volumen de suministro sin piezas de Estas piezas se encuentran en el juego Montar la herramienta de de piezas que se suministra con la fijación corte máquina y se pueden adquirir como accesorio especial. Depositar la máquina Bloquear el árbol Sólo se pueden montar cabezales de corte que se fijen en el árbol (1) mismo. - Página 22 español Desmontar las piezas de fijación Montar el cabezal de corte con Montar herramientas de corte de metal empalme roscado Guardar bien la hoja de instrucciones adjuntada y el embalaje de la Guardar bien la hoja de instrucciones herramienta de corte de metal. adjuntada para el cabezal de corte.
-
Página 23: Ponerse El Cinturón De Porte
español Ponerse el cinturón de porte ADVERTENCIA ADVERTENCIA Tener en cuenta la flecha para el sentido Sustituir la tuerca si gira con demasiada de giro existente en el lado interior del facilidad. No todas las máquinas básicas están protector. equipadas con cinturón de porte y argolla de porte. - Página 24 español Cinturón sencillo Cinturón doble Enganchar la máquina en el cinturón de porte Ponerse el cinturón sencillo (1) Ponerse el cinturón doble (1) y cerrar la placa broche (3) El tipo y la ejecución del cinturón de Ajustar la longitud del cinturón – el porte y del mosquetón dependen del mosquetón (2) tiene que quedar un Ajustar la longitud del cinturón –...
-
Página 25: Equilibrar La Máquina
español Desenganchar la máquina del cinturón Si se emplea un cinturón simple: Equilibrar la máquina practicar la forma de deslizarlo del de porte hombro. Si se emplea un cinturón doble: Equilibrar la máquina practicar en este cinturón la apertura rápida de la placa de cierre y la forma de deslizarlo de los hombros. -
Página 26: Arrancar / Parar El Motor
español Posiciones de equilibrado Adoptar una postura segura – Arrancar / parar el motor posibilidades: de pie, agachado o arrodillado Con la mano izquierda, presionar Arrancar el motor firmemente la máquina contra el suelo – al hacerlo, no tocar el acelerador, el bloqueo del mismo ni Para arrancar, tener en cuenta por el cursor del mando unificado... -
Página 27: Transporte De La Máquina
español Transporte de la máquina Emplear el protector para el transporte El tipo de protector para el transporte está en función del tipo de herramienta de corte de metal adjuntado en el volumen de suministro de la máquina. Los protectores para el transporte se pueden adquirir como accesorio especial. - Página 28 español Hojas cortahierbas hasta 260 mm Hojas de sierra circular Aplicar desde abajo el protector para el transporte a la herramienta de corte Desenganchar el estribo de Desenganchar el estribo de sujeción del protector para el sujeción del protector para el transporte transporte Girar el estribo de sujeción hacia...
-
Página 29: Lubricar El Engranaje
25 horas de servicio Desenroscar el tornillo roscado (1) – si no se ve grasa en su interior, enroscar el tubo (2) con grasa de engranajes STIHL para engranajes Girar el estribo de sujeción hacia (accesorio especial) fuera Introducir a presión unos 5 g de... -
Página 30: Afilar Herramientas De Corte De Metal
Si el desgaste es escaso, afilar las luego las herramientas de corte con Depositar la máquina herramientas de corte con una lima el dispositivo de equilibrado STIHL apropiada (accesorio especial) – si (accesorio especial) en cuanto a el desgaste es elevado y existen... - Página 31 Por ello, fijarse Renovar la cuchilla, tal como se durante el trabajo en el rendimiento de muestra en las instrucciones STIHL DuroCut, STIHL PolyCut corte del cabezal. En caso de tocar con ilustradas demasiada frecuencia el suelo, la...
-
Página 32: Instrucciones De Mantenimiento Y Conservación
La observancia de las instrucciones de STIHL recomienda encargar los este manual y de las del manual de trabajos de mantenimiento y las Las operaciones que figuran a instrucciones de la máquina básica evita reparaciones siempre a un distribuidor continuación se refieren a condiciones... -
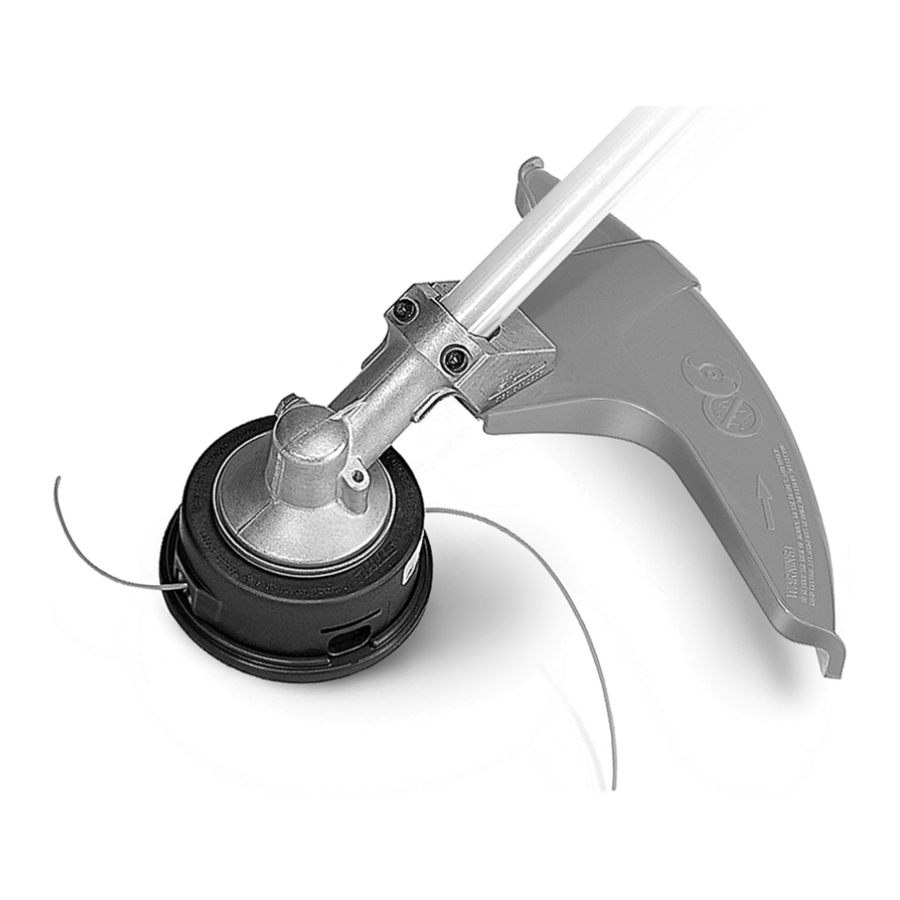
Página 33: Componentes Importantes
español Componentes importantes Vástago Cabezal de corte Protector (sólo para cabezales de corte) Cuchilla (para cabezal de corte) Protector (para todas las herramientas de segar) Faldón (para cabezales de corte) Herramienta de corte de metal Hoja de sierra circular Tope (sólo para hojas de sierra circular) -
Página 34: Datos Técnicos
De no hacerlo, existe el FS 240 9360 rpm peligro de que se produzcan accidentes o daños en la máquina. FS 240 R, FS 260 R 7930 rpm FS 250: 8790 rpm STIHL recomienda emplear piezas de repuesto originales STIHL. - Página 35 English Contents Dear Customer, Interchangeable Attachments Guide to Using this Manual Thank you for choosing a quality engineered STIHL product. Safety Precautions and Working Techniques It has been built using modern Approved Basic Power Tools production techniques and comprehensive quality assurance.
-
Página 36: Interchangeable Attachments
NOTICE Caution where there is a risk of damaging the machine or its individual The STIHL interchangeable attachment components. may be mounted to different STIHL power tools. Engineering improvements This includes KombiAttachmentEngines in some markets. In these markets the STIHL's philosophy is to continually KombiAttachmentEngines and improve all of its products. -
Página 37: Safety Precautions And Working Techniques
Only use cutting attachments and STIHL offers a comprehensive range of accessories that are explicitly approved personal protective clothing and for this power tool model by STIHL or equipment. - Página 38 English Transporting the Power Tool Before Starting emergency. To avoid damage, do not throw the machine to the ground when practicing. Check that your power tool is properly assembled and in good condition – refer Holding and Controlling the Power Tool to appropriate chapters in the instruction manuals of the basic power tool and attachment.
- Página 39 English During Operation see instruction manual of basic power To reduce the risk tool. STIHL recommends an authorized of injury from STIHL servicing dealer. thrown objects, Make sure you always have good never operate the Take special care in slippery conditions balance and secure footing.
- Página 40 – remove any build up of information on a possible fire risk. STIHL recommends the use of original material from the cutting attachment and Do not continue using or attempt to STIHL metal cutting attachments. They deflector.
- Página 41 STIHL recommends the use of genuine STIHL replacement parts. They are Circular saw blades must always be Do not use deflector with specifically designed to match your...
- Página 42 – risk of injury. To reduce the risk of serious injury, never use wire or metal-reinforced line in place of the nylon line. STIHL Polycut Mowing Head with Polymer Blades For mowing unobstructed edges of meadows (without posts, fences, trees...
- Página 43 Resharpen the brush knife regularly – and whenever it has dulled noticeably, and have it balanced if necessary (STIHL recommends a STIHL servicing dealer). Circular Saw Blade Use for grass and weeds only – sweep the brushcutter in an arc like a scythe.
-
Página 44: Approved Basic Power Tools
Combinations with basic power tools Loop handle with barrier bar. – STIHL recommends that you use the other than those listed above are not non-shaded area of the circular saw Operation of this interchangeable permitted since they may result in blade. -
Página 45: Approved Combinations Of Cutting Attachment, Deflector, Handle And Harness
English Approved Combinations of Cutting Attachment, Deflector, Handle and Harness Cutting Attachment Deflector, Limit Stop Handle Harness... - Página 46 Cutting attachments approved. Deflectors Mowing heads STIHL SuperCut 20-2 17 Deflector for mowing heads STIHL AutoCut C 25-2 18 Deflector with STIHL AutoCut 25-2 19 skirt and blade, for mowing heads STIHL AutoCut 30-2 20 Deflector without skirt and blade, for...
-
Página 47: Mounting The Loop Handle
English Mounting the Loop Handle without Mounting the Loop Handle Barrier Bar Mounting Loop Handle with Barrier Bar Place the clamp (3) in the loop handle (4) and position them both against the drive tube (5). Position the clamp (6) against the Place the clamp (3) in the loop drive tube. -
Página 48: Mounting The Attachment
English Securing the Loop Handle Mounting the Attachment Preparations for Mounting the Attachment WARNING If the plug comes out of the drive tube To reduce the risk of injury, always shut when you pull off the cap: off the engine before converting the basic power tool. - Página 49 English Mounting the Gearbox SP 10 Loosen the clamp screws (arrows) on the gearbox housing – do not remove them. Apply a mark (with pencil or felt-tip FH/HL Pull the gearbox off the drive tube. pen) at distance A (40 mm/1.6 in) from the end of the drive tube.
- Página 50 English Push the gearbox (2) onto the drive Align the loop handle (1) and move Mount the carrying ring (1) at tube (3) as far as stop – turn it back it to the most comfortable position. distance A = about 5 cm (2 in) from and forth at the same time –...
-
Página 51: Mounting The Deflector
English Fitting the Skirt and Blade Mounting the Limit Stop Mounting the Deflector Mounting the Deflector WARNING Always fit the limit stop (6) when you use a circular saw blade. Position the limit stop (6) on the gearbox flange. Insert the screws (7) and tighten them down firmly. -
Página 52: Mounting The Cutting Attachment
English If mounting hardware is packed with Block the shaft. Mounting the Cutting machine Attachment Mowing heads and metal cutting attachments may be mounted. Placing power tool on the ground The output shaft (1) must be blocked with the stop pin (2) or screwdriver (2) to mount or remove cutting tools. - Página 53 English Removing the Mounting Hardware Fitting Mowing Head with Screw Mounting Metal Cutting Attachments Mounting Keep the leaflet and packaging of the metal cutting attachment in a safe place. Keep the instruction leaflet for the mowing head in a safe place. WARNING Wear protective gloves to reduce the risk of direct contact with the sharp...
-
Página 54: Fitting The Harness
English Fitting the Harness WARNING WARNING Direction of rotation is indicated by an If the mounting nut has become too arrow on the inside of the deflector. loose, fit a new one. Not all basic power tools are equipped with a harness and carrying ring. NOTICE To retrofit the carrying ring –... - Página 55 English Shoulder strap Full Harness Attaching Machine to Harness Put on the shoulder strap (1). The type and style of the harness and Put on the harness (1) and close the carabiner (spring hook) depend on the locking plate (3). Adjust the length of the strap –...
-
Página 56: Balancing The Machine
English Disconnecting machine from harness If you are using a shoulder strap: Balancing the Machine Practice slipping the strap off your shoulder. If you are using a full harness: Practice Balancing the Machine quickly opening the locking plate and slipping the harness straps off your shoulders. -
Página 57: Starting / Stopping The Engine
English Floating Positions Make sure you have a firm footing, Starting / Stopping the either standing, stooping or Engine kneeling. Hold the unit firmly on the ground Starting the Engine with your left hand and press down – do not touch the throttle trigger, lockout lever or slide control. -
Página 58: Transporting The Unit
English Transporting the Unit Using Transport Guard The type of transport guard depends on the metal cutting attachment supplied with the machine. Transport guards are available as special accessories. 230 mm Grass Cutting Blades 250 mm Brush Knives... - Página 59 English Grass Cutting Blades up to 260 mm Circular Saw Blades Fit the transport guard on the cutting attachment from below. Disconnect wire rod from the Disconnect wire rod from the transport guard. transport guard. Swing wire rod outwards. Swing wire rod into position. Hook wire rod to the transport guard.
-
Página 60: Lubricating The Gearbox
Unscrew the filler plug (1). If no grease can be seen on the inside of the filler plug, screw the tube (2) of STIHL gear lubricant (special accessory) into the filler hole. Swing wire rod outwards. Squeeze up to 5 g grease into the Fit transport guard on saw blade gearbox. -
Página 61: Sharpening Metal Cutting Blades
Resharpen with a grinder or have balanced as necessary – STIHL the work done by a dealer – STIHL recommends a STIHL servicing recommends a STIHL servicing dealer. - Página 62 PolyCut in place of the cutting blades. illustrated instructions. grass surface. STIHL DuroCut, STIHL PolyCut Mount the mowing head on the Tap it on the ground once – fresh machine. line is advanced and the blade on...
-
Página 63: Maintenance And Care
English servicing dealer. STIHL dealers are Maintenance and Care Minimize Wear and Avoid regularly given the opportunity to attend Damage training courses and are supplied with the necessary technical information. The following intervals apply to normal Observing the instructions in this manual operating conditions only. -
Página 64: Main Parts
English Main Parts Drive tube Mowing head Deflector for mowing heads only Line limiting blade Deflector for all mowing attachments Skirt for mowing heads Metal mowing attachment Circular saw blade Limit stop for circular saw blades only... -
Página 65: Specifications
FS 80, FS 85 7,500 rpm approved by STIHL for this power tool or approved disposal site for environment- FS 87, FS 90 7,500 rpm are technically identical. Only use high- friendly recycling. - Página 66 English...
- Página 68 0458-501-8721-A spanisch / englisch www.stihl.com *04585018721A* 0458-501-8721-A...