Tabla de contenido
Publicidad
Idiomas disponibles
Idiomas disponibles
Enlaces rápidos
PowPak
| Installation
TM
Dimming Module with EcoSystem
®
Part of the Energi TriPak
Part of the Energi TriPak
Family
Family
TM
TM
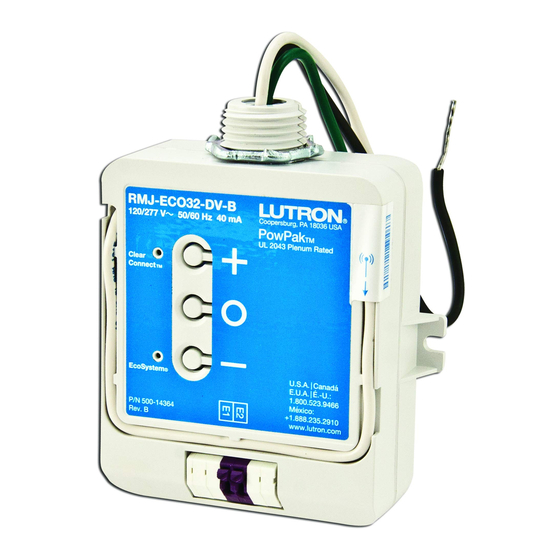
RMJ-ECO32-DV-B
UL 2043 Plenum Rated
120 / 277 V~ 50 / 60 Hz 40 mA
EcoSystem
: 18 V- 125 mA
®
Important Notes:
Please read before installing.
•
For installation by a qualified electrician in accordance with all local and
national electrical codes.
•
Note: Use copper conductors only.
•
Check to see that the device type and rating is suitable for the application.
•
DO NOT install if product has any visible damage.
•
If moisture or condensation is evident, allow the product to dry completely
before installation.
•
Operate between 32 °F (0 °C) and 104 °F (40 °C).
•
0% to 90% humidity, non-condensing.
•
For indoor use only.
WARNING
Shock Hazard. May result in serious injury or death.
Turn off power at circuit breaker before installing the unit.
PowPak
TM
Dimming Module
Install in center of room to
maximize RF coverage.
Radio
Powr Savr
TM
Occupancy
Sensor
30 ft (10 m)
Maximum
Pico
®
Wireless
Transmitter
40 ft (12 m)
All Wireless Transmitters must be installed within
30 ft (10 m) of the PowPak
Dimming Module.
TM
Default Functionality
Occupancy Sensors
Occupied:
All lights 100% .
Unoccupied:
Link
Cal.
Test
All lights off.
Wireless Transmitters
On:
All lights 100%.
Preset: All lights 50%.
Off:
All lights off.
Daylight Override
Pressing the raise button on an associated
Pico
will temporarily override daylighting for
®
the fixtures in that Pico
group.
®
Daylight Re-Enable
Daylighting will be re-enabled for that Pico
group
®
when one of the following occurs:
• Two hours have passed since the override.*
• ON, OFF or Preset button has been
pressed on a Pico
controlling that group.
®
• All associated Occupancy Sensors have
reported unoccupied.
*
Each time a daylighting override occurs for any Pico
®
the two hour timer is reset.
Lutron Electronics Co., Inc. | 7200 Suter Road
Coopersburg PA, 18036-1299, U.S.A.
Required Components
For each system ensure you have:
041-361
Rev. A
10/2011
One PowPak
Dimming Module.
TM
Clear Connect
TM
LED
EcoSystem
®
LED
PowPak
Dimming Module
TM
with EcoSystem
(1 maximum)
®
Start Here
(For programming see reverse)
1
Mount, wire and install EcoSystem
devices and lighting fixtures
Connect power wiring (hot, neutral, ground) to each
fixture. Connect bus cable (E1 and E2) to each fixture.
Once complete, energize power to all fixtures, which should
turn on to full brightness. If fixtures do not go to full brightness,
check wiring and consult ballast installation guide.
Ground
Fixture Ground
White
Black
E1
E2
To additional EcoSystem
ballasts or modules.
®
3
Associate Wireless Transmitters to PowPak
Before beginning this step, make sure that there are no other PowPak
It is possible that wireless transmitters from other systems can be incorrectly associated to this system.
Daylight calibration
5
Complete this step if the Daylight Sensor should control all fixtures
in the room equally. Otherwise skip this step and see steps 6 and
11 on reverse.
A
Set lights in room to desired light level.
B
Press & hold " Cal. " for 6 seconds.
C
Exit room for 5 minutes for
calibration to complete.
Note: When calibration has
completed, all lights will flash and
the system will begin daylighting.
group,
Need Help? www.lutron.com or call the Lutron Technical Support Center, 24/7 at 1.800.523.9466
At least one Wireless Transmitter.
Raise
+
All On
Lower
E1 & E2
EcoSystem
®
Bus Supply
(Class 1 or 2)
Radio Powr Savr
TM
Occupancy Sensor
(6 maximum)
2
Install PowPak
®
Dimming Module
When installing a PowPak
Module, use supplied conduit nut and
wire the module as shown.
Suggested Installation Location:
Install in center of room.
Typical
This ensures proper RF coverage of area.
EcoSystem
NEU
®
If installing unit inside a junction box please see Application Note #423.
N/C
ballast shown
HOT
Once installed, energize the PowPak
all fixtures. The fixtures will start at high-end and individually dim
E1
when given an address. Once addressing is complete, all the
E2
ballasts will return to high-end.
If ballasts are not properly addressing, see "Reset Factory Defaults" below.
Dimming Module
TM
modules being set up within the same building.
TM
A
B
Hold the indicated button on each transmitter
Hold All On "
"
for 6 seconds. All ballasts will flash to show
for 6 seconds
Wireless Transmitters have been associated.
on PowPak
TM
Dimming Module
until ballasts flash.
The Clear Connect
TM
LED will begin
flashing at a rate
of
⁄
second ON,
1
2
⁄
second OFF.
1
2
C
Hold All On "
Dimming Module to save association.
Default: All Wireless Transmitters control all EcoSystem
Troubleshooting
Ballasts cannot be
controlled locally from
PowPak
Dimming Module.
TM
Fixtures do not respond to
Wireless Transmitter(s).
Wireless Transmitter(s)
cannot be associated to
PowPak
Dimming
TM
Module.
PowPak
Clear Connect
Link
Cal.
TM
Test
LED is on solid and EcoSystem
(Bottom) LED is flashing.
+
Link
Cal.
Test
Radio Powr Savr
Pico
Wireless
TM
®
Daylight Sensor
Transmitter
(1 maximum)
(9 maximum)
TM
120/277 V~
50/60 Hz
Dimming
TM
Green
(Ground)
Conduit
Nut
Dimming Module and
TM
4
Link
Cal.
Test
" for 6 seconds on PowPak
TM
Note: Please consult individual component
devices.
®
www.lutron.com
• Ensure the breaker(s) to the PowPak
Dimming Module
TM
and ballasts are on.
• Ensure the PowPak
Dimming Module is wired to the ballast(s).
TM
• Reset to factory defaults.
• Ensure the breaker(s) to the PowPak
Dimming Module and
TM
ballasts are on.
• Ensure Wireless Transmitters are associated to the PowPak
Dimming Module.
• Reset to factory defaults.
• The maximum number of Wireless Transmitters have been
associated to the PowPak
Dimming Module. To remove a
TM
previously set up Wireless Transmitter, tap a Wireless Transmitter
button three times, on the third tap hold for three seconds
and then tap three more times.
(Top)
• Daylight calibration has failed. Press any button on Pico
TM
Wireless Transmitter or PowPak
Dimming Module and
®
TM
restart calibration.
At least one EcoSystem
H-Series ballast,
®
A-Series LED driver or Hi-lume
3D digital ballast.
®
Please reference "Ballast Installation Best Practices Guide"
P/N 041-170 at www.lutron.com
Note: Rapid Start sockets MUST
be used with EcoSystem
ballasts.
®
EcoSystem
H-Series,
®
Hi-lume
3D digital, or A-Series LED
®
(32 maximum. May be pre-installed in light fixtures.)
White
(Neutral)
Black
(Hot)
To Ballasts
Note:
Use 18 to 16 AWG
(0.75 to 1.5 mm
E 1
solid wire only.
E 2
Permanently install Wireless
Transmitters
Link
Test
installation guides for information.
Reset Factory Defaults
Note: In some instances it may be necessary
to reset the PowPak
Dimming Module
TM
and connected EcoSystem
devices
®
back to factory default settings. Before
beginning, make sure all devices are
connected and powered.
Triple-tap any button on the
A
PowPak
Dimming Module and
TM
hold until the LEDs begin to
TM
flash slowly. (Release)
Within 3 seconds of the start of
B
flashing, triple-tap the same button
again and the LEDs will flash rapidly
indicating that the unit has been
reset to factory defaults.
Note: Any associations or programming
®
previously set up with the PowPak
TM
will be erased and will need to be
re-programmed.
)
2
Publicidad
Tabla de contenido

Manuales relacionados para Lutron EcoSystem PowPak RMJ-ECO32-DV-B


Resumen de contenidos para Lutron EcoSystem PowPak RMJ-ECO32-DV-B
- Página 1 PowPak | Installation Need Help? www.lutron.com or call the Lutron Technical Support Center, 24/7 at 1.800.523.9466 Required Components For each system ensure you have: Dimming Module with EcoSystem ® 041-361 Part of the Energi TriPak Part of the Energi TriPak...
- Página 2 For warranty on any associated Pico Transmitter to move to the next fixture. ® service, return unit to place of purchase or mail to Lutron at 7200 Suter Rd., (Next fixture will flash.) Coopersburg, PA 18036-1299, postage pre-paid. PowPak...
-
Página 3: Comience Aquí
¿Necesita ayuda? Visite www.lutron.com o llame al Soporte técnico de Lutron al PowPak | Instalación +1.888.235.2910 las 24 / 7 Componentes requeridos Módulo de atenuación con EcoSystem ® Para cada sistema, asegúrese de contar con lo siguiente: 041-361 Parte de la familia de Energi TriPak Parte de la familia de Energi TriPak Rev. -
Página 4: Programación
Pico asociado para pasar a la siguiente luminaria. ® se efectuó la compra o envíela por correo a Lutron a 7200 Suter Rd., (La siguiente luminaria parpadeará). Coopersburg, PA 18036-1299, con el franqueo prepagado. Ajuste del nivel de iluminación mínimo Repita los pasos B y C hasta que todas las filas queden Módulo de atenuación... - Página 5 PowPak | Installation Besoin d’assistance? Visitez www.lutron.com ou appelez le Centre d’assistance technique de Lutron Composants requis ouvert 24 / 7, au 1.800.523.9466 Pour chaque système, assurez que vous Module gradateur avec EcoSystem ® disposez des éléments suivants : 041-361 Appartient à...
- Página 6 Besoin d’assistance? Visitez www.lutron.com ou appelez le Centre d’assistance technique de Lutron PowPak | Programmation Groupez les dispositifs ouvert 24 / 7, au 1.800.523.9466 (Facultatif) Module gradateur avec EcoSystem ® Le groupage Groupage pour Fenêtres Fenêtres Le groupage de 041-361 Appartient à...
- Página 7 Lutron, EcoSystem, Hi-lume, and are registered trademarks of Lutron Electronics Co., Inc. NEC is a registered trademark of the National Fire Protection Association, Quincy, Massachusetts. UL is a registered trademark of Underwriters Laboratories, Inc. NEMA is a registered trademark and service Lutron Electronics Co., Inc.
-
Página 8: Montaje De Balastro
Lutron Electronics Co., Inc. NEC es una marca registrada de la National Fire Protection Association, Quincy, Massachusetts. UL es una marca registrada de Underwriters Laboratories, Inc. NEMA es una marca registrada y marca de servicio de... - Página 9 Lutron Electronics Co., Inc NEC est une marque déposée de la National Fire Protection Association, Quincy, Massachusetts. UL est une marque déposée de Underwriters Laboratories, Inc NEMA est une marque déposée et marque de service...