Tabla de contenido
Publicidad
Idiomas disponibles
Idiomas disponibles
Enlaces rápidos
Publicidad
Tabla de contenido

Manuales relacionados para Eurosystems Euro102

Resumen de contenidos para Eurosystems Euro102
- Página 1 Bedienungsanleitung für Euro102 Stand 01.06.2018 eurosystems Deutschland Motorgeräte Handelsgesellschaft mbH Im Fuchshau 14 D-73635 Rudersberg Tel: +49 7183 / 30 590-0 Fax: +49 7183 / 30 590-20 info@eurosystems.info www.eurosystems.info...
- Página 4 N. di giri della fresa al 1’ (minuto primo) - Motozappe a 3 velocità + 1 RM Cultivator RPM - Motor driven rotary cultivator with 3 speeds + 1 reverse Revoluciones por minuto de la fresa - Motoazada de 3 velocidades + 1 marcha atrás Fräsenumdrehungen pro Minute - Motorhacken mit 3 Vorwärts - und 1 Rückwärstgang N.
- Página 5 Velocità di marcia in km/h - Motozappe a 3 velocità + 1 RM Driving speed in kph - Motor driven rotary cultivator with 3 speeds + 1 reverse Velocidad en km/h - Motoazada de 3 velocidades + 1 marcha atrás Fahrgeschwindigkeit in km/h - Motorhacken mit 3 Vorwärts + 1 Rückwärtsgang Vitesse de marche en km/h - Motohouse à...
- Página 6 Leggere il manuale prima di usare la macchina - Attenzione: rotazione fresa. Read the instructions manual before operating on the machine - Danger tiller rotation. Lire le mode d'emploi avant l'usage - Attention: danger rotation fraise. Lesen Sie die Gebrauchsanweisung vor der Inbetriebnahme - Achtung: drehende Hackwerkzeuge.
- Página 7 Retromarcia Etichetta acceleratore Innesto frizione Reverse drive Clutch connection Label accelerator Marcha atrás Etiqueta acelerador Embrague Rückwärtsgang Einkuppeln Aufkleber - Gashebel Marche arrière Plaquette acceleration Embrayage Marcha atrás Embraiagem Plaqueta do acelerador Costruttore Numero di serie articolo – Progressivo Manufacturer Serial number - Progressive Constructor Número de serie artículo –...
- Página 8 Istruzioni d’uso originali INTRODUZIONE Indice Gentile cliente, la ringraziamo per la fiducia accordata ai ns. prodotti e le auguriamo un piacevole utilizzo della sua macchina. Abbiamo creato queste istruzioni per I’uso allo scopo di assicurare, fin dall’inizio, un funzionamento privo d’inconvenienti.
- Página 9 4 - Non mettere in moto la macchina quando si è davanti alla fresa, né avvicinarsi ad essa quando è in moto. Tirando la corda di avviamento del motore, le frese e la macchina stessa devono rimanere ferme (se le frese girano intervenire sul registro di regolazione del tendi-cinghia). 5 - Durante il lavoro, per maggiore protezione, vanno indossate calzature robuste e pantaloni lunghi.
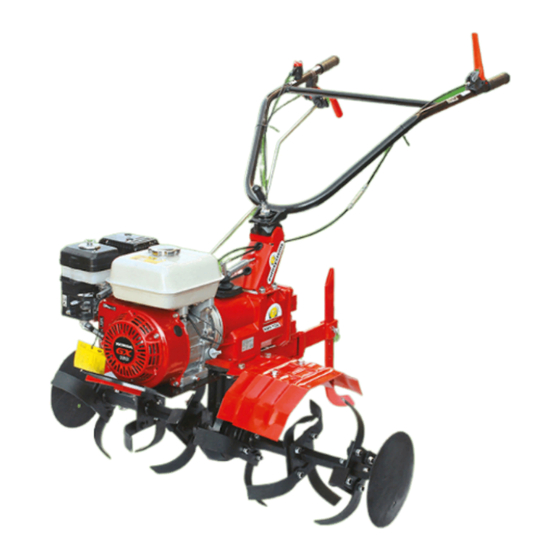
- Página 10 MONTAGGIO DELLE FRESE A ZAPPETTE (Fig. 4) L’albero porta-frese è realizzato con un profilo esagonale per consentire la sostituzione rapida degli attrezzi in funzione del lavoro da eseguire. Pulire i mozzi delle frese e il profilo esagonale dell’albero; spalmare una piccola quantità...
- Página 11 (5) in senso orario (accertarsi che i denti dello snodo siano perfettamente innestati). La macchina è configurata per lavorare con i manubri orizzontali rispetto al piano ed in asse con il telaio della macchina. Per ragioni ergonomiche e di utilizzo è tuttavia possibile inclinarla lateralmente ed in altezza. Occorre prestare attenzione se si lavora in queste configurazioni, in quanto si riduce la distanza tra la posizione di guida e gli utensili in rotazione.
- Página 12 En709 Lwa = 104,4 dB(A), valore d’incertezza nella misura K = ±1,5 dB(A). Vibrazioni alle stegole secondo EN 709 e ISO 5349= 8,2 m/s , valore d’incertezza nella misura K = ±4,1 m/s per mod. con motore diesel; 7,5 m/s , K = ±3,7 m/s per mod.
- Página 13 Translation of original user instructions INTRODUCTION List of contents Dear Customer: Thank you for your trust in purchasing our products. We wish you to enjoy using our machines. The following working instructions have been issued to ensure reliable operating from the beginning. If you carefully follow such information the machine will operate with complete satisfaction have a long service life.
- Página 14 is experienced, take action on the belt stretcher control nut). 5 - During working operations, for protection purposes, it is recommended to wear technical/strong shoes and long trousers. Be careful , because when machine is operating the danger to be wounded in the toes or feet is really high. Walk, never run with the machine. 6 - During the machine transport and all the maintenance, cleaning, equipment change operations, the engine must be switched off.
-
Página 15: Clutch Adjustment
accordance with the job to be performed. Clean thoroughly the tiller hubs and the hex. shaft section; applicate some grease to make mounting and tiller future removal easier. Fit the tiller hub (1) to the hex. motor-hoe tiller shaft. Make sure that: the cutting edge of the small hoes is towards the machine FRONT the bore on tiller hub matches the hole of the motor-hoe hex. -
Página 16: Technical Specification
Have handlebar locked again through clockwise rotation of lever (5), and make certain that teeth mesh accurately. The unit is intended to be used in an upright manner with the handlebars in a horizontal position in relation to the plane of the earth and in axis with the frame of the machine. For ease of use in some conditions it is possible to adjust the unit’s handlebar (side / up or down). - Página 17 Measured sound pressure level with En709, Leq = 90,9 dB (A), with a uncertainty value K = ±1,3 dB (A) with diesel engine and Leq = 83,1 dB (A), with a uncertainty value K = ±1,2 dB (A) with petrol engine. Handlebar vibration in compliance with EN 709 and ISO 5349.
-
Página 18: Introducción
Traducción del manual de instrucciones original INTRODUCCIóN Contenido Estimado cliente: Lo felicitamos por su compra y le agradecemos su confianza. Esperamos que esta máquina sea de su agrado durante muchos años. Con el fin de garantizar un funcionamiento correcto, hemos creado este folleto de utilización. -
Página 19: Montaje De La Motoazada
en funcionamiento. Tirando el cable de arranque del motor, las fresas y la máquina misma deben permanecer paradas (si las fresas giran intervenir en la regulación del tensor de correa). 5 - Durante el trabajo, para mayor protección, se deben calzar zapatos de seguridad y pantalones largos. Prestar mucha atención, porque el peligro de heridas en los dedos o en los pies con la máquina en función es muy elevado. -
Página 20: Regulación Embrague
de los aperos en función del trabajo a realizar. Limpiar los bujes de las fresas y el perfil hexagonal del eje; aplicar una pequeña cantidad de grasa para facilitar el montaje, así como el futuro desmontaje de las fresas. Insertar el buje portafresas (1) en el eje hexagonal de la motoazada teniendo en cuenta que: el corte de la fresa debe estar colocada hacía la parte delantera de la motoazada;... -
Página 21: Trabajos De Mantenimiento
el manillar en la posición deseada. 3 - Volver a fijar el manillar girando la palanca (5) hacía la derecha (asegúrese de que los dientes de la pieza de conexión estén perfectamente encajadas. La máquina está preparada para trabajar con el manillar en posición horizontal respecto al plano de trabajo y en paralelo con el bastidor de la máquina misma. -
Página 22: Accesorios - Aperos
incertidumbre K = ± 1,3 dB (A) con motor diesel y Leq = 83,1 dB(A), coeficiente de incertidumbre K = ± 1,2 dB (A) con motor a gasolina. Valor de potencia acústica según EN 709, Lwa = 104,4 dB(A), coeficiente de incertidumbre K = ±1,5 dB(A). Vibraciones en las manceras según EN 709 y ISO 5349. - Página 23 Übersetzung der originalen Betriebsanleitung EINLEITUNG Inhaltsverzeichnis Lieber Kunde, wir danken Ihnen für das Vertrauen, das Sie uns geschenkt haben, und wünschen Ihnen eine angenehme Benutzung der Maschine. Wir haben diese kurze Anleitung geschrieben, damit Sie von Anfang an einen störungsfreien Betrieb erhalten. Lesen Sie diese Hinweise aufmerksam durch und Sie werden sich lange Zeit an einer Maschine erfreuen, die Einleitung reibungslos funktioniert.
- Página 24 wenn sie läuft. Wenn man die Zündschnur des Motors zieht, dürfen die Maschine und die Fräse sich noch nicht bewegen. 5 - Während der Arbeit sollte man zum besseren Schutz festes Schuhwerk und lange Hosen tragen. Vorsichtig vorgehen, weil eine große Gefahr besteht, sich bei laufender Maschine die Finger oder die Füße zu verletzen.
- Página 25 Menge Fett darauf streichen, um die Montage und das spätere Ausbauen der Fräsenelemente zu vereinfachen. Die Naben der Fräsenelemente (1) auf die Sechskantwelle der Motorhacke aufziehen und dabei folgendes berücksichtigen: # Der schneidende Teil der Hackmesser muß zur Vorderseite der Motorhacke zeigen. # Die Bohrung in der Nabe des Fräsenelements muß mit der Bohrung der Sechskantwelle der Motorhacke übereinstimmen.
-
Página 26: Technische Daten
Arbeiten jeder Art sollte die Position des Lenkholms an die Bedürfnisse des Bedieners angepaßt werden, damit die Motorhacke sich einfach führen läßt. 1 - Den Hebel (5) im Gegenuhrzeigersinn drehen. 2 - Den Lenkholm auf die gewünscht Position bringen. 3 - Das Lenkholm erneut blockieren, indem man den Hebel (5) im Uhrzeigersinn dreht. - Página 27 Gewicht: mit Dieselmotor 111 kg, mit Benzinmotor 95 kg. Reifendruck (Abb. 8): Vorderreifen: 1,2 kp/cm - Hinterreifen 1,6 kp/cm BETRIEBSGERÄUSCH UND SCHWINGUNGEN: Schallleistungspegel laut Richtlinie En 709, Leq = 90,9 dB(A), Messunsicherheit K = ±1,3 dB (A) bei Modell mit Dieselmotor und Leq = 83,1 dB(A), Messunsicherheit K = ±1,2 dB (A) bei Modell mit Benzinmotor. Höchstzulässige Schallwerte ist LWA = 104,4 dB(A), Messunsicherheit K = ±1,5 dB (A).
- Página 28 Traduction du mode d‘emploi original INTRODUCTION Sommaire Félicitations, nous vous remercions de la confiance que vous nous avez témoignée et nous vous souhaitons une utilisation agréable de votre motobineuse. Nous avons créé cette notice d’utilisation afin de vous garantir, dès le début un fonctionnement sans Introduction inconvénients.
-
Página 29: Montage De La Motobineuse
4 - Ne pas mettre en marche la machine lorsqu’on se trouve devant la fraise et ne pas s’y approcher lorsqu’elle est en marche. Lorsqu’on tire sur la corde du lanceur, les fraises et la machine ne doivent pas se mettre en marche (si c’était le cas, agir sur la vis de réglage du tendeur de courroie). - Página 30 (4). Enfiler le timon (5) à l’extrémité du bras (1), bloquer avec l’axe (6) et la goupille (7). MONTAGE DES FRAISES A BECHES (Fig. 4) L’arbre porte-fraises est réalisé avec un profil hexagonal pour permettre le remplacement rapide des outils en fonction du travail à effectuer. Nettoyer les moyeux des fraises et le profil hexagonal de l’arbre ; étaler une petite quantité de graisse pour faciliter le montage et la dépose de la fraise.
- Página 31 REGLAGE DES MANHERONES (Fig. 6) Le mancheron de conduite est orientable latéralemente et en hauteur. Avant de commencer tout type de travail il est conseillé d’adapter la position du mancheron de conduite aux exigences de l’opérateur pour rendre la motobineuse facile à...
- Página 32 Fraise (Fig. 7) : à bêches interchangeables, avec largeur de travail allant de 61 à 125 cm (dans la figure n. 7 sont indiquées les différentes solutions de composition de la fraise). Poids : avec moteur Diesel = 111 kg, avec moteur Essence = 95 kg. Pression de gonflage des pneumatiques (fig 8) : Pneus Avant : 1,2 kg/cm - Pneus Arrière : 1,6 kg/cm NIVEAU SONORE ET VIBRATIONS :...
-
Página 33: Introdução
Tradução do manual original INTRODUÇÃO Indice Excelentíssimo cliente, agradecemos a confiança que demonstrou nos nossos produtos e fazemos votos para que a utilização da sua máquina seja sempre agradável. Redigimos estas instruções de uso com a finalidade de garantir um funcionamento da máquina sem problemas Introdução desde o começo. - Página 34 ficar paradas (se as fresas giram deve-se intervir na regulação do tensor da correia). 5 Durante o travalho, use luvas, calçados à prova de corte com sola antiderrapante, óculos protectores e auricolares para proteger os ouvidos. Prestar muita atenção durante o uso porque as lâminas em movimento são potencialmente perigosos para as mãos e os pés. Também é...
- Página 35 motoenxada lembrando-se que: a parte afiada das enxadas deve ficar virada para a frente da motoenxada; o furo feito no cubo da fresa deve coincidir com o furo do veio hexagonal da motoenxada. Fixe a fresa com enxadas no veio da motoenxada utilizando o parafuso (2), a anilha (3) e a porca (4).
-
Página 36: Dados Técnicos
máquina no lado e em altura. Ter cuidado cuando travalharem nestas posições porque a distância entre o conductor e as ferramentas rotativas reduze-se substancialmente. MANUTENÇÃO NÃO ESPERE QUE OS COMPONENTES DA MOTOENXADA SE DESGASTEM PELO USO: SUBSTITUA-OS QUANDO FOR PRECISO. INTERVIR EM TEMPO SIGNIFICA OBTER UM MELHOR FUNCIONAMENTO DA MÁQUINA E, AO MESMO TEMPO, UMA CONSIDER ÁVEL ECONOMIA, PORQUE SE EVITAM DANOS MAIORES. -
Página 37: Acessórios - Alfaias Que Podem Ser Usadas
de incerteza K = ±1,3 dB (A) para o mod. com motor a diesel e Leq = 83,1 dB (A), coeficiente de incerteza K = ±1,2 dB (A) para o mod. com motor a gasolina. Valor max. de potência acústica Lwa = 104,4 dB (A) , coeficiente de incerteza K = ±1,5 dB (A). Vibrações max.