
Manuales relacionados para Shark 803XC

Resumen de contenidos para Shark 803XC
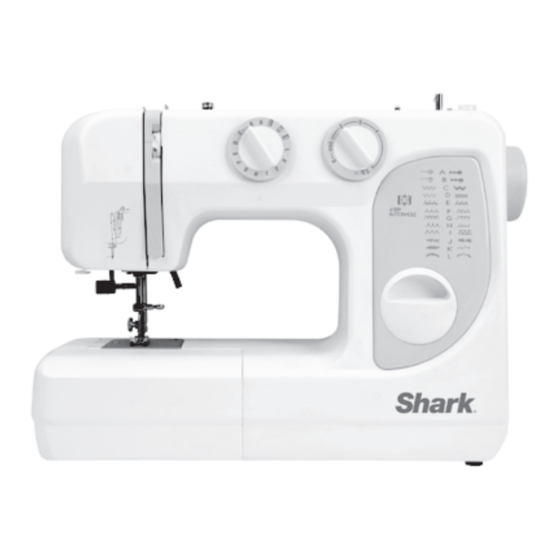
- Página 1 Instruction Manual Instruccion Manual Manuel D’Instruction 803XC Model / Modelo / Modèle 4400 Bois Franc, St. Laurent, Quebec, H4S 1A7 , Tel.: 1 (800) 361-4639 EURO-PRO Operating LLC: www.euro-pro.com...
-
Página 2: Important Safety Instructions
IMPORTANT SAFETY INSTRUCTIONS When using an electrical appliance, basic safety precautions should always be followed, including the following: Read all instructions before using (this sewing machine) DANGER To reduce the risk of electric shock: An appliance should never be left unattended when plugged in. Always unplug this appliance from the electric outlet immediately after using and before cleaning. -
Página 3: Instrucciones Importantes De Seguridad
INSTRUCCIONES IMPORTANTES DE SEGURIDAD Siempre deberá seguir las precauciones de seguridad básicas al usar este aparato eléctrico, incluyendo las siguientes precauciones: Lea todas las instrucciones antes de usar esta máquina de coser PELIGRO Para reducir el riesgo de choques eléctricos: Se requiere supervisión constante de este aparato cuando esté... - Página 4 calibre de 15 watts. - 3 -...
-
Página 5: Tabla De Contenido
Table of contents Principal Parts ..............................Accessories ............................... Preparing to sew Connecting the machine to the power source ................. Changing the bulb ..........................Sewing table ............................Attaching the presser foot ......................... Changing the needle .......................... Matching needle/fabric/thread ......................Setting the spool pins ........................Winding the bobbin .......................... - Página 6 Índice Partes Principales ............................... Accesorios ................................Preparación para coser Conectando la máquina al tomacorriente ..................Cambiando la lámpara.......................... Extensión ............................... Instalación de la pata prensora ......................Reemplazo de la aguja ......................... Combinando aguja / tela / hilo ......................Ajuste de los soportes de carretes ..................... Devanado de la bobina .........................
- Página 7 Table des matières Pièces principales ..............................Accessoires ................................Préparation à la couture Branchement de la machine à l’alimentation électrique ..............Changement de l’ampoule ........................Table de rallonge ........................... Pose du pied presseur ......................... Remplacement de l’aiguille ........................Tableau des aiguilles et fils ........................Ajustement des porte-bobines ......................
-
Página 8: Principal Parts
Principal parts / Piezas principales / Pièces principales Reverse sewing lever Controle de retroceso Levier de marche arrière Pattern selector dial Botón selecteur de puntos Sélecteur de point Stitch length dial Disco de la longitud de puntada Sélecteur de longueur de point Bobbin winder stopper Tapón de bobina Butée de bobineur... -
Página 9: Accessories
Accessories Accesorios Accessoires Accessorios standard (1) Accessoires standard (1) Standard accessories (1) a. All Purpose foot a. Pie universal a. Pied universel b. Zipper foot b. Pie para cremallers b. Pied pour fermeture éclair c. Buttonhole foot c. Pie para ojales c. -
Página 10: Preparing To Sew
Preparing to sew - Preparación para coser - Préparation à la couture Connecting the machine to the power source Caution: Always make sure that the machine is unplugged from the power source and the main switch is on “O” when the machine is not in use and before inserting or removing parts. -
Página 11: Conectando La Máquina Al Tomacorriente
Preparing to sew - Preparación para coser - Préparation à la couture Conectando la máquina al tomacorriente Branchement de la machine à l’alimentation électrique Advertencia: Attention : Siempre verifique que la máquina esté desenchufada Assurez-vous que la machine est débranchée de del tomacorriente y que el interruptor principal se l’alimentation et que le commutateur principal est sur «... -
Página 12: Changing The Bulb
Preparing to sew - Preparación para coser - Préparation à la couture Changing the bulb Caution: Always make sure that the machine is unplugged from the power source and the main switch is on “O” when the machine is not in use and before inserting or removing parts. -
Página 13: Sewing Table
Preparing to sew - Preparación para coser - Préparation à la couture Sewing Table The sewing table provides added sewing surface and can be easily removed for free arm sewing. Free-arm sewing is used when sewing tubular and hard-to-reach areas on a garment such as the hems of pant legs or sleeves. -
Página 14: Attaching The Presser Foot
Preparing to sew - Preparación para coser - Préparation à la couture Attaching the presser foot Important: Turn the power switch to the “O” position before attaching or removing accessories. To attach: Place the presser foot so that the pin on the foot lies just under the groove of the presser foot holder. -
Página 15: Changing The Needle
Preparing to sew - Preparación para coser - Préparation à la couture Changing the needle Important: Turn the power switch to the “O” position before inserting or removing the needle. Replace the needle at the first sign of thread breakage or skipped stitches. Select the correct type and size of needle for the fabric being sewn. -
Página 16: Matching Needle/Fabric/Thread
Preparing to sew - Preparación para coser - Préparation à la couture Combinando aguja / tela / hilo GUÍA DE SELECCIÓN DE AGUJA, TELA, HILO TAMAÑO DE TELAS HILOS LA AGUJA Telas muy livianas – algodón delgado, voile, sarga, seda, Hilo liviano de algodón, nylon o poliéster. -
Página 17: Tableau Des Aiguilles Et Fils
Preparing to sew - Preparación para coser - Préparation à la couture SÉLECTION DES AIGUILLES ET FILS Tissus légers : coton léger, voile, serge, mousseline, Fil de coton, fil de soie, fil de nylon ou fil synthétique. tricot de coton, jersey, crêpes, polyester, tissu pour blouse ou chemise. -
Página 18: Setting The Spool Pins
Preparing to sew - Preparación para coser - Préparation à la couture Setting the spool pins The spool pins are used for holding the spool of thread in order to feed the thread to the machine. To use, pull the spool pin up and place the spool of thread over it. To store, remove the spool of thread and push it down. -
Página 19: Threading The Bobbin Case
Preparing to sew - Preparación para coser - Préparation à la couture Threading the bobbin case Place the bobbin into the bobbin case. Make sure that the thread unwinds in the direction of the arrow. Fig. 1) Pull the thread into the bobbin case slot (Fig. 2) Draw the thread under the tension spring and into the delivery eye. -
Página 20: Threading The Upper Thread
Preparing to sew - Preparación para coser - Préparation à la couture Threading the upper thread Caution: Before threading, make sure that the machine is turned “Off”. Raise the take-up lever to its highest position by turning the handwheel towards you. Raise the presser foot. -
Página 21: Bringing Up The Lower Thread
Preparing to sew - Preparación para coser - Préparation à la couture Bringing up the lower thread Raise the presser foot and hold the needle thread lightly with your left hand. (Fig. 1) Turn the handwheel slowly towards you with your right hand until the needle goes down and comes up again to its highest point. -
Página 22: Thread Tension
Preparing to sew - Preparación para coser - Préparation à la couture Thread tension Note: The bobbin thread tension has been adjusted at the factory and readjustment is not usually required. Lower thread tension: To test the bobbin thread tension, remove the bobbin case with the bobbin from the machine and hold the Fig. -
Página 23: Seam Guide Line
Preparing to sew - Preparación para coser - Préparation à la couture Seam guide line The numbers on the needle plate indicate the distance between the center needle position and the seam guide line. (Fig. 1) The numbers in the front of the needle plate are in milimeters and the ones in the back are in inches. -
Página 24: Choosing Your Pattern
Basic sewing - Costuras básicas - Couture de base Choosing your pattern To sew straight stitches, select stitch pattern “A” on the pattern selector dial. (Fig. 1) To sew zigzag stitches, set the pattern selector dial to “B”. (Fig. 1) To obtain any other stitch pattern shown on the stitch selection panel, select the letter on the stitch Fig. -
Página 25: Straight Stitch Sewing
Basic sewing - Costuras básicas - Couture de base Straight stitch sewing Turn the pattern selector dial to the “A” position. Adjust the stitch length by turning the stitch length dial to the desired stitch length. (Fig. 1) Reverse sewing Reverse sewing is used for locking the end of seams and where reinforcement is needed. -
Página 26: Zigzag Sewing
Basic sewing - Costuras básicas - Couture de base Zigzag sewing 0.5~4 Simple zigzag sewing is widely used for overcasting, sewing on buttons, etc. Use the All Purpose foot. Turn the pattern selector dial to “B” for the zigzag All Purpose Foot stitch. -
Página 27: Overcasting
Utility sewing - Costura pesada - Couture utilitaire Overcasting The overcasting stitch is used on seam allowances to prevent fabrics from fraying at raw edges. Use the All Purpose foot. Set the pattern selector dial to “B”. All Purpose Foot Pata multiuso Set the stitch length dial anywhere between “1”... -
Página 28: Elastic/Tricot Stitch
Utility sewing - Costura pesada - Couture utilitaire Elastic/Tricot stitch 0.5~2 The elastic stitch can be used for mending, sewing elastic or for joining two pieces of fabric. Use the All Purpose foot. All Purpose Foot Set the pattern selector dial to “C”. Pata multiuso Set the stitch length dial anywhere between “0.5”... -
Página 29: Sewing Buttons
Utility sewing - Costura pesada - Couture utilitaire Sewing buttons You can use the sewing machine to sew buttons onto your garment. Lower feed dog. See page 22 for instructions. All Purpose Foot Use the All Purpose foot. Pata multiuso Push Set the pattern selector to “B”. -
Página 30: Sewing Buttonholes
Utility sewing - Costura pesada - Couture utilitaire Sewing buttonholes 0.5~1 Note: It is recommended that you practice sewing buttonholes on a scrap piece of fabric before trying to sew them on the actual garment. Preparing to sew a buttonhole: Measure the diameter of the button to be used and add 1/8-inch (0.3 cm) for the bartacks. - Página 31 Utility sewing - Costura pesada - Couture utilitaire Sewing buttonholes Stitching Machine Setting Step 1: Step Puntadas Ajuste de la máquina Paso Turn the pattern selector dial to . (1) Couture Réglage de la machine Étape Sew at moderate speed until you reach the end of your de points mark.
-
Página 32: Zipper Application
Utility sewing - Costura pesada - Couture utilitaire Zipper application Remove the All Purpose foot and replace with the Zipper foot. Zipper Foot Pin or baste the zipper tape to the fabric and place it Pie para cremalleras under the Zipper foot. Pied de fermeture-éclair Smooth the upper and lower threads towards the... -
Página 33: Hemmer Foot
Utility sewing - Costura pesada - Couture utilitaire Using the Hemmer foot 1 ~ 4 Use the Hemmer foot for hems in fine or sheer fabrics. Attach the Hemmer foot. Set the stitch length dial between “1” and “4”. Select the straight stitch. (A) Hemmer Foot Neaten the edge of the fabric. -
Página 34: Using The Quilting Foot
Utility sewing - Costura pesada - Couture utilitaire Using the Quilting foot Attach the Quilting foot. Select the straight stitch. (A) Set the stitch length dial between “1” and “4”. Quilting Foot Use a marker to space your row of stitches evenly. Pata para acolchar Align the presser foot with your marks and lower the Pied pour quilt... -
Página 35: Shell Tuck Stitch
Decorative sewing - Costuras decorativas - Couture décorative Shell tuck stitch The shell tuck stitch can be used to sew a picot edge on a lightweight fabric. All Purpose Foot Set the pattern selector dial to “E”. Pata multiuso Pied tout usage Use the All Purpose foot. -
Página 36: Decorative Satin Stitch Patterns
Decorative sewing - Costuras decorativas - Couture décorative Decorative satin stitch patterns 0.5~1 Use the All Purpose foot. Set the stitch length dial between “0.5” and “1” . Select the satin stitch that you wish to use. All Purpose Foot (H, I or K) Pata multiuso Pied tout usage... -
Página 37: Smocking Stitch
Decorative sewing - Costuras decorativas - Couture décorative Smocking stitch Step 1: Use the All Purpose foot. Set the stitch length dial to “4”. All Purpose Foot Select the straight stitch “A”. Pata multiuso Pied tout usage Sew straight lines 3/8” apart across the area to be smocked. -
Página 38: Rampart Stitch
Decorative sewing - Costuras decorativas - Couture décorative Rampart stitch 1 ~ 2 Use this stitch to join heavy weight interlining, seams, sewing on elastic, or visible hems. Use the All Purpose foot. All Purpose Foot Set the stitch length dial between “1” and “2”. Pata multiuso Pied tout usage Set the pattern selector dial to “F”. -
Página 39: Satin Stitch Foot
Using optional accessories - Uso de accesorios opcionales - Utilisation des accessoires en option Using the Satin Stitch foot (*not included with the machine) Satin Stitches Use the Satin Stitch foot for satin stitching and sewing Puntadas de satén decorative stitches. Points passé... -
Página 40: Dobladillos Invisibles
Using optional accessories - Uso de accesorios opcionales - Utilisation des accessoires en option Blind hem foot 0.5~2 (*not included with the machine) Note: The Blind Hem foot can be used for sewing hems on garments, curtains, trousers, etc. It takes practice to sew blind hems. -
Página 41: Button Sewing Foot
Using optional accessories - Uso de accesorios opcionales - Utilisation des accessoires en option Sewing buttons (*not included with the machine) You can use the sewing machine to sew buttons onto your garment. Button Sewing Foot* Lower feed dog. See page 22 for instructions. (optional) Pata para coser botones* Use the All Purpose foot. -
Página 42: Cording Foot
Using optional accessories - Uso de accesorios opcionales - Utilisation des accessoires en option Using the Cording foot 1 ~ 4 (*not included with the machine) Use the Cording foot for decorative effects on cushions, tablecloths, etc. Attach the Cording foot. Set the stitch length dial between “1”... -
Página 43: Overcasting Foot
Using optional accessories - Uso de accesorios opcionales - Utilisation des accessoires en option Using the Overcasting foot (*not included with the machine) Attach the Overcasting foot. Set the pattern selector dial to “B”. Set the stitch length dial anywhere between “1” and Overcasting Foot* “2”. -
Página 44: Gathering Foot
Using optional accessories - Uso de accesorios opcionales - Utilisation des accessoires en option Using the Gathering foot on fine and medium weight fabric (*not included with the machine) Attach the Gathering foot. Select the straight stitch. (A) Gathering Foot* Set the stitch length dial between “1”... -
Página 45: Darning/Embroidery Foot
Using optional accessories - Uso de accesorios opcionales - Utilisation des accessoires en option Using the Darning/Embroidery foot (*not included with the machine) Push the drop feed control to “ ” to lower the feed dogs. (See page 22 for instructions.) Set the stitch length dial to “0”. -
Página 46: Darning
Using optional accessories - Uso de accesorios opcionales - Utilisation des accessoires en option Using the Darning/Embroidery foot (*not included with the machine) Darning Zurcido Raccommodage Darning: Note: Free motion darning is accomplished without the sewing machine’s internal feed system. Movement of the fabric is controlled by the operator. -
Página 47: Embroidery
Using optional accessories - Uso de accesorios opcionales - Utilisation des accessoires en option Using the Darning/Embroidery foot (*not included with the machine) Embroidery Bordado Embroidery: Broderie Select the zigzag stitch pattern (B). Stitch along the outline of the design by moving the embroidery hoop*. -
Página 48: Dismantle/Oil/Assemble The Hook Race
Maintenance - Mantenimiento - Entretien Caution: Always make sure that the machine is unplugged from the power source and the main switch is on the “O” before inserting or removing any parts and before cleaning. To dismantle the hook race: Raise the needle to its highest position and open the hook cover. -
Página 49: Oiling The Machine
Maintenance - Mantenimiento - Entretien Caution: Always make sure that the machine is unplugged from the power source and the main switch is on the “O” before inserting or removing any parts and before cleaning. Oiling the machine: oil these points lubrique estos puntos Apply a few drops of fine quality sewing machine oil Huilez ces points... -
Página 50: Troubleshooting Guide
Trouble shooting guide Problem Cause Correction Rethread the machine. The machine is not threaded correctly. Reduce the thread tension (lower The thread tension is too tight. number). The thread is too thick for the needle. Select a larger needle. Upper thread breaks The needle is not inserted correctly. -
Página 51: Guía Para La Localización De Problemas
Guía para la localización de problemas Problema Causa Solución 1. Enhebre nuevamente la máquina. 1. La máquina no está enhebrada correctamente. 2. El hilo está muy tensionado. 2. Reduzca la tensión del hilo (número menor). 3. El hilo es demasiado grueso para la aguja. 3. -
Página 52: Guide De Dépannage
Guide de dépannage Problème Cause Correction 1. Renfilez la machine. 1. La machine n’est pas enfilée correctement. 2. Diminuez la tension du fil (chiffre plus faible). 2. La tension du fil est trop grande. 3. Choisissez une aiguille plus grosse. 3. - Página 53 25 YEAR LIMITED WARRANTY EURO-PRO Operating LLC warrants the sewing machine head and any of its parts other than those covered by the 2- year warranty below or those subject to normal wear and tear for a period of 25 years from date of the original purchase, to be free of defective parts due to imperfections in the workmanship and materials, subject to the following conditions, exclusions and exceptions.
- Página 54 GARANTÍA LIMITADA DE 25 AÑOS EURO-PRO Operating LLC garantiza el cabezal de la máquina de coser y cualquiera de sus partes que no estén cubiertas por la siguiente garantía de 2 años, o aquellas sujetas al desgaste normal, por un período de 25 años desde la fecha de compra original, contra cualquier falla de materiales o fabricación, sujeto a las siguientes condiciones, exclusiones y excepciones.
-
Página 55: Garantie Limitée De 25 Ans
GARANTIE LIMITÉE DE 25 ANS EURO-PRO Operating LLC garantit cette tête machine à coudre ainsi que toutes ses pièces, autres que celles couvertes par la garantie de 2 ans ci-dessous et autres que celles assujetties à l’usure normale, contre toute défectuosité matérielle ou de main d’œuvre pour une période de 25 ans à...