Levolor Sheer Shadings Manual De Instalación
Ocultar thumbs
Ver también para Sheer Shadings:
- Instalación (29 páginas) ,
- Instalación (27 páginas) ,
- Instalación (48 páginas)
Tabla de contenido
Publicidad
Idiomas disponibles
Idiomas disponibles
Enlaces rápidos
Sheer Shadings
Persianas traslúcidas
Stores diaphanes
INSTALLATION • OPERATION • CARE
INSTALACIÓN • FUNCIONAMIENTO • CUIDADO
INSTALLATION • FONCTIONNEMENT • ENTRETIEN
Continuous Cord Loop Operating System
Sistema de funcionamiento circular
continuo con cordón
Système de cordon à boucle continue
20-0034-033_Sheer_Shadings_Cont_Cordloop_F_010621.indd 1
1/6/21 4:47 PM
Publicidad
Tabla de contenido
Solución de problemas

Manuales relacionados para Levolor Sheer Shadings


Resumen de contenidos para Levolor Sheer Shadings
- Página 1 Sheer Shadings Persianas traslúcidas Stores diaphanes INSTALLATION • OPERATION • CARE INSTALACIÓN • FUNCIONAMIENTO • CUIDADO INSTALLATION • FONCTIONNEMENT • ENTRETIEN Continuous Cord Loop Operating System Sistema de funcionamiento circular continuo con cordón Système de cordon à boucle continue 20-0034-033_Sheer_Shadings_Cont_Cordloop_F_010621.indd 1...
-
Página 2: Child Safety
Only supplied tension device and hardware should be used. Replacement parts may be obtained by contacting customer service at 1-800-538-6567. Continuous Cord Loop Operating System Continuous Cord Loop Operating System © 2020 LEVOLOR ® , Inc. 20-0034-033_Sheer_Shadings_Cont_Cordloop_F_010621.indd 2-3 1/6/21 4:47 PM... -
Página 3: Product View
GETTING STARTED GETTING STARTED Product View Thank you for purchasing LEVOLOR Sheer Shadings. With proper installation, ® operation, and care, your new shadings will provide years of beauty and performance. Single Headrail Shading Installation Please thoroughly review this instruction booklet before beginning installation. -
Página 4: Installation Overview
INSTALLATION INSTALLATION Installation Overview CAUTION: Failure to follow ALL installation instructions may cause the shading to fall, possibly resulting in injury or property damage. • Your order will include the correct number of installation brackets for your shading width, as shown in the table below. INSIDE MOUNT •... -
Página 5: Outside Mount
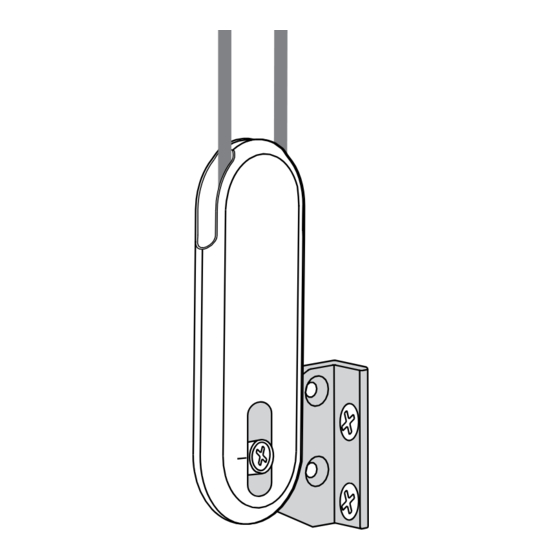
INSTALLATION INSTALLATION Two-On-One Headrail Shadings. • Lever Drill the screw holes using a " drill bit. NOTE: Two additional installation brackets should be placed on each side of the panel split. IMPORTANT: Use drywall anchors when mounting into drywall. Panel Split •... - Página 6 INSTALLATION INSTALLATION • Install the Shading Lever If using spacer blocks: Headrail • Position the shading so that — Stack spacer blocks on the backside of the installation brackets, the front faces you. Longer Screw Spacer Installation • — Using #6 Hex Head Screws long enough for Slide the headrail into the Blocks Bracket...
- Página 7 INSTALLATION OPERATION Attach the Magnetic Hold-Down Brackets (Optional) Operate the Shading Lower and Open the Vanes of the Shading • Lower the shading keeping the vanes closed. To Lower the Shading and • Open the Vanes Place the magnetic hold-down bracket onto the bottom rail just inside the end cap, oriented as shown.
- Página 8 OPERATION OPERATION Troubleshooting Troubleshooting Problem The shading headrail will not snap into the installation brackets. Problem The shading raises or lowers unevenly, the fabric rubs against one end of the headrail, or the bottom rail is uneven when fully raised. Solution Check that the installation brackets are aligned and level.
- Página 9 Check that the tension device is mounted correctly. See “Install the Tension Device” on page 11. Sheer Shadings can be ultrasonically cleaned by a professional with the exception of light-dimming fabrics. Check that the installation brackets are level. Shim to level, if necessary.
-
Página 10: Sistema Operativo Sin Cordón Système Sans Cordon
Sheer Shadings Persianas traslúcidas Stores diaphanes INSTALLATION • OPERATION • CARE INSTALACIÓN • FUNCIONAMIENTO • CUIDADO INSTALLATION • FONCTIONNEMENT • ENTRETIEN Cordless Operating System Sistema operativo sin cordón Système sans cordon 20-0037-012_Sheer_Shadings_Cordless_F_010621.indd 1 1/6/21 4:48 PM... -
Página 11: Tabla De Contenido
Removing the Shading ................15 Cleaning Procedures ..............15 – 16 Warranty ....................16 Magnetic Hold-Down Bracket Bottom (Optional) Rail Hinge End Cap Pull Tab Cordless Operating System Cordless Operating System © 2020 LEVOLOR ® , Inc. 20-0037-012_Sheer_Shadings_Cordless_F_010621.indd 2-3 1/6/21 4:48 PM... -
Página 12: Getting Started
GETTING STARTED INSTALLATION Thank you for purchasing LEVOLOR Sheer Shadings. With proper installation, Installation Overview ® operation, and care, your new shadings will provide years of beauty and performance. • Your order will include the correct number of installation brackets for your shading Please thoroughly review this instruction booklet before beginning installation. -
Página 13: Mount The Installation Brackets - Outside Mount
INSTALLATION INSTALLATION • Lever Drill the screw holes using a " drill bit. CAUTION: Failure to follow ALL installation instructions may cause the shading to fall, possibly resulting in injury or property damage. IMPORTANT: Use drywall anchors when mounting into drywall. •... -
Página 14: Mount The Installation Brackets - Side Mount
INSTALLATION INSTALLATION • • Center the installation brackets or extension brackets on your marks and mark If using spacer blocks: where to drill the screw holes. — Stack spacer blocks on the backside of the installation brackets Longer — A minimum 1 ⁄... -
Página 15: Install The Shading
INSTALLATION OPERATION Install the Shading Lever • Drill the screw holes using a " drill bit. Headrail • Position the shading so that CAUTION: Use drywall anchors when mounting into drywall. the front faces you. • Attach the hold-down brackets to the mounting surface Installation •... -
Página 16: Troubleshooting
OPERATION OPERATION Troubleshooting Troubleshooting Troubleshooting Problem The shading will not snap into the installation brackets. Problem The shading is hard to raise or lower, or will not raise or lower. Solution Check that the installation brackets are aligned and level. Solution Shadings cannot be forced into tight inside mount window openings. -
Página 17: Care
Bottom Rail Weight on page 13.) Cleaning Procedures Sheer Shadings are made of 100% polyester, which means they are inherently durable and resilient. However, care must be taken to avoid wrinkling the fabric, particularly where the vanes meet the facings. -
Página 18: Persianas Traslúcidas Stores Diaphanes
Sheer Shadings Persianas traslúcidas Stores diaphanes INSTALLATION • OPERATION • CARE INSTALACIÓN • FUNCIONAMIENTO • CUIDADO INSTALLATION • FONCTIONNEMENT • ENTRETIEN Motorized Operating System Sistema de funcionamiento motorizado Système motorisé... - Página 19 Holder (optional) result in serious injury or death. Please reference all warning tags Remote Control Kit and labels in the instructions and on the shade. (optional) Sheer Shadings Motorized Operating System © 2022 LEVOLOR Sheer Shadings Motorized Operating System ®...
-
Página 20: Tools And Fasteners Needed
GETTING STARTED INSTALLATION Thank you for purchasing LEVOLOR Sheer Shadings. With proper installation, Installation Overview ® operation, and care, your new shadings will provide years of beauty and performance. • Your order will include the correct number of installation brackets for your shading Please thoroughly review this instruction booklet before beginning the installation. -
Página 21: Before You Begin
• Use a level to check that the mounting surface is level. USING THE INMOTION APP Shim the brackets, if necessary. • If you purchased a hub, download the LEVOLOR InMotion ™ app to get started. • Attach the installation brackets using the screws provided. - Página 22 (not provided). Match anchors to Minimum Depth the wall thickness. Failure to mount the brackets securely may result in injury or property damage. NOTE: Spacer blocks cannot be used with side mount installations. Sheer Shadings Motorized Operating System Sheer Shadings Motorized Operating System...
-
Página 23: Install The Shading
• Refer to the following troubleshooting procedures for specific solutions for your shade. using the screws provided. If questions remain, please contact LEVOLOR Customer Service at 1-800-LEVOLOR or Adjust the • If necessary, adjust bracket height by loosening the screw... -
Página 24: Troubleshooting
If necessary, reapply the static spray each time the shading is Check that the fabric winds evenly and does not rub against the professionally cleaned. headrail. If uneven, see “Adjust the Bottom Rail Weight” on page 13. Sheer Shadings Motorized Operating System Sheer Shadings Motorized Operating System... -
Página 25: Care
Continuous exposure through open windows and doors will accelerate the fabric deterioration. Sheer shadings are made of 100% polyester, which means they are inherently durable and resilient. However, care must be taken to avoid wrinkling the fabric, particularly NOTE: Improper cleaning may void warranty. - Página 26 Persianas traslúcidas INSTALACIÓN • FUNCIONAMIENTO • CUIDADO Sistema de funcionamiento motorizado...
- Página 27 Consulte todos los rótulos y las etiquetas Kit del control remoto (opcional) de advertencia en las instrucciones y en la pantalla. (opcional) Sistema de funcionamiento motorizado de persianas traslúcidas © 2022 LEVOLOR Sistema de funcionamiento motorizado de persianas traslúcidas ®...
-
Página 28: Introducción
INTRODUCCIÓN INSTALACIÓN Gracias por comprar las persianas traslúcidas LEVOLOR . Con la instalación, el Descripción general de la instalación ® funcionamiento y el cuidado adecuados, las persianas nuevas brindarán años de • Su pedido incluirá la cantidad correcta de abrazaderas de instalación para el ancho de la belleza y rendimiento. -
Página 29: Antes De Comenzar
Si es necesario, coloque calzas en las abrazaderas. USO DE LA APLICACIÓN INMOTION • Fije las abrazaderas de instalación con los tornillos proporcionados. • Si compró un concentrador, descargue la aplicación LEVOLOR InMotion para comenzar. ™ IMPORTANTE: No apriete demasiado los tornillos. Compruebe que la palanca •... -
Página 30: Montaje Lateral
INSTALACIÓN INSTALACIÓN • Si utiliza bloques separadores: apile los bloques separadores Marcas en los en la parte posterior de las abrazaderas de instalación. extremos del cortinero Si utiliza tornillos hexagonales #6 (no se proporcionan), Tornillo que sean lo suficientemente largos para ofrecer más largo Bloques 5"... -
Página 31: Instalación De La Persiana
Ajuste la Si quedan preguntas, comuníquese con el Servicio al Cliente de LEVOLOR al • Fije las abrazaderas de fijación inferior a la superficie de abrazadera mediante 1-800-LEVOLOR o 1-800-538-6567. -
Página 32: Importante
FUNCIONAMIENTO FUNCIONAMIENTO Solución de problemas Solución de problemas Es difícil subir o bajar la persiana o el travesaño inferior no se detiene La persiana no sube ni baja de forma pareja, la tela roza un Problema en el límite superior. Problema extremo del cortinero o el travesaño inferior está... -
Página 33: Cuidado
Garantía Aspirado Para obtener información completa sobre la garantía, visite LEVOLOR.com o llame al • Use una aspiradora de mano de succión baja para una Servicio al Cliente al 1-800-538-6567. Frente remoción más profunda del polvo. -
Página 34: Stores Diaphanes
Stores diaphanes INSTALLATION • FONCTIONNEMENT • ENTRETIEN Système motorisé... - Página 35 Veuillez vous référer à Concentrateur l’ensemble des étiquettes d’avertissement qui se trouvent dans les (facultatif) Ensemble de télécommande instructions et sur le store. (optionnel) Système de stores diaphanes motorisé © 2022 LEVOLOR Système de stores diaphanes motorisé ®...
-
Página 36: Pour Commencer
POUR COMMENCER INSTALLATION Survol de l’installation Nous vous remercions d’avoir acheté le store diaphane LEVOLOR . Installé, manipulé ® et entretenu correctement, votre nouveau store demeurera beau et fonctionnel pour • Le nombre adéquat de supports d’installation pour la largeur de votre store sera fourni de nombreuses années. -
Página 37: Avant De Commencer
UTILISATION DE L’APPLICATION INMOTION • Fixez les supports d’installation à l’aide des vis fournies. • Si vous avez acheté un concentrateur, téléchargez l’application LEVOLOR InMotion™ IMPORTANT : Évitez de serrer excessivement les vis. Assurez-vous que le levier peut pour commencer. - Página 38 INSTALLATION INSTALLATION • Si vous utilisez des blocs-espaceurs : empilez-les à Marques indiquant À l’aide de vis no 6 à l’arrière des supports d’installation. l’extrémité du caisson tête hexagonale (non incluses) suffisamment longues Vis plus pour assurer une installation sécuritaire, fixez les vis à longues Blocs- Espacez uniformément...
-
Página 39: Installation Du Store
Si des questions subsistent, veuillez communiquer avec le service à la clientèle de à l’aide des vis fournies. support à LEVOLOR au 1 800 LEVOLOR (1 800 538-6567). l’aide de • Au besoin, réglez la hauteur du support en desserrant la la rainure vis et en faisant glisser le support vers le haut ou vers le bas. -
Página 40: Dépannage
FONCTIONNEMENT FONCTIONNEMENT Dépannage Dépannage Le store est difficile à relever ou à abaisser, ou la traverse Le store se relève ou s’abaisse de façon inégale, le tissu frotte Problème inférieure ne s’arrête pas à la limite supérieure. Problème contre l’une des extrémités du caisson ou la traverse inférieure n’est pas droite lorsque le store est complètement relevé. -
Página 41: Entretien
Garantie Aspirateur Pour obtenir des renseignements complets sur la garantie, visitez le site LEVOLOR.com ou • Pour un nettoyage plus complet, utilisez un aspirateur communiquez avec le service à la clientèle au 1 800 LEVOLOR ou au 1 800 538-6567. - Página 42 © 2022 LEVOLOR ® 5775 Glenridge Drive Building A Atlanta, GA 30328 20-0048-084 1029595...
- Página 43 Sheer Shadings Persianas traslúcidas Stores diaphanes INSTALLATION • OPERATION • CARE INSTALACIÓN • FUNCIONAMIENTO • CUIDADO INSTALLATION • FONCTIONNEMENT • ENTRETIEN Motorized Operating System Sistema de funcionamiento motorizado Système motorisé...
- Página 44 Holder (optional) result in serious injury or death. Please reference all warning tags Remote Control Kit and labels in the instructions and on the shade. (optional) Sheer Shadings Motorized Operating System © 2022 LEVOLOR Sheer Shadings Motorized Operating System ®...
-
Página 45: Getting Started
GETTING STARTED INSTALLATION Thank you for purchasing LEVOLOR Sheer Shadings. With proper installation, Installation Overview ® operation, and care, your new shadings will provide years of beauty and performance. • Your order will include the correct number of installation brackets for your shading Please thoroughly review this instruction booklet before beginning the installation. -
Página 46: Before You Begin
• Use a level to check that the mounting surface is level. USING THE INMOTION APP Shim the brackets, if necessary. • If you purchased a hub, download the LEVOLOR InMotion ™ app to get started. • Attach the installation brackets using the screws provided. - Página 47 (not provided). Match anchors to Minimum Depth the wall thickness. Failure to mount the brackets securely may result in injury or property damage. NOTE: Spacer blocks cannot be used with side mount installations. Sheer Shadings Motorized Operating System Sheer Shadings Motorized Operating System...
-
Página 48: Install The Shading
• Refer to the following troubleshooting procedures for specific solutions for your shade. using the screws provided. If questions remain, please contact LEVOLOR Customer Service at 1-800-LEVOLOR or Adjust the • If necessary, adjust bracket height by loosening the screw... -
Página 49: Troubleshooting
If necessary, reapply the static spray each time the shading is Check that the fabric winds evenly and does not rub against the professionally cleaned. headrail. If uneven, see “Adjust the Bottom Rail Weight” on page 13. Sheer Shadings Motorized Operating System Sheer Shadings Motorized Operating System... -
Página 50: Care
Continuous exposure through open windows and doors will accelerate the fabric deterioration. Sheer shadings are made of 100% polyester, which means they are inherently durable and resilient. However, care must be taken to avoid wrinkling the fabric, particularly NOTE: Improper cleaning may void warranty. - Página 51 Persianas traslúcidas INSTALACIÓN • FUNCIONAMIENTO • CUIDADO Sistema de funcionamiento motorizado...
- Página 52 Consulte todos los rótulos y las etiquetas Kit del control remoto (opcional) de advertencia en las instrucciones y en la pantalla. (opcional) Sistema de funcionamiento motorizado de persianas traslúcidas © 2022 LEVOLOR Sistema de funcionamiento motorizado de persianas traslúcidas ®...
-
Página 53: Herramientas Y Sujetadores Necesarios
INTRODUCCIÓN INSTALACIÓN Gracias por comprar las persianas traslúcidas LEVOLOR . Con la instalación, el Descripción general de la instalación ® funcionamiento y el cuidado adecuados, las persianas nuevas brindarán años de • Su pedido incluirá la cantidad correcta de abrazaderas de instalación para el ancho de la belleza y rendimiento. -
Página 54: Antes De Comenzar
Si es necesario, coloque calzas en las abrazaderas. USO DE LA APLICACIÓN INMOTION • Fije las abrazaderas de instalación con los tornillos proporcionados. • Si compró un concentrador, descargue la aplicación LEVOLOR InMotion para comenzar. ™ IMPORTANTE: No apriete demasiado los tornillos. Compruebe que la palanca •... - Página 55 INSTALACIÓN INSTALACIÓN • Si utiliza bloques separadores: apile los bloques separadores Marcas en los en la parte posterior de las abrazaderas de instalación. extremos del cortinero Si utiliza tornillos hexagonales #6 (no se proporcionan), Tornillo que sean lo suficientemente largos para ofrecer más largo Bloques 5"...
-
Página 56: Instalación De La Persiana
Ajuste la Si quedan preguntas, comuníquese con el Servicio al Cliente de LEVOLOR al • Fije las abrazaderas de fijación inferior a la superficie de abrazadera mediante 1-800-LEVOLOR o 1-800-538-6567. - Página 57 FUNCIONAMIENTO FUNCIONAMIENTO Solución de problemas Solución de problemas Es difícil subir o bajar la persiana o el travesaño inferior no se detiene La persiana no sube ni baja de forma pareja, la tela roza un Problema en el límite superior. Problema extremo del cortinero o el travesaño inferior está...
-
Página 58: Cuidado
Garantía Aspirado Para obtener información completa sobre la garantía, visite LEVOLOR.com o llame al • Use una aspiradora de mano de succión baja para una Servicio al Cliente al 1-800-538-6567. Frente remoción más profunda del polvo. - Página 59 Stores diaphanes INSTALLATION • FONCTIONNEMENT • ENTRETIEN Système motorisé...
- Página 60 Veuillez vous référer à Concentrateur l’ensemble des étiquettes d’avertissement qui se trouvent dans les (facultatif) Ensemble de télécommande instructions et sur le store. (optionnel) Système de stores diaphanes motorisé © 2022 LEVOLOR Système de stores diaphanes motorisé ®...
-
Página 61: Installation
POUR COMMENCER INSTALLATION Survol de l’installation Nous vous remercions d’avoir acheté le store diaphane LEVOLOR . Installé, manipulé ® et entretenu correctement, votre nouveau store demeurera beau et fonctionnel pour • Le nombre adéquat de supports d’installation pour la largeur de votre store sera fourni de nombreuses années. -
Página 62: Avant De Commencer
UTILISATION DE L’APPLICATION INMOTION • Fixez les supports d’installation à l’aide des vis fournies. • Si vous avez acheté un concentrateur, téléchargez l’application LEVOLOR InMotion™ IMPORTANT : Évitez de serrer excessivement les vis. Assurez-vous que le levier peut pour commencer. - Página 63 INSTALLATION INSTALLATION • Si vous utilisez des blocs-espaceurs : empilez-les à Marques indiquant À l’aide de vis no 6 à l’arrière des supports d’installation. l’extrémité du caisson tête hexagonale (non incluses) suffisamment longues Vis plus pour assurer une installation sécuritaire, fixez les vis à longues Blocs- Espacez uniformément...
-
Página 64: Installation Du Store
Si des questions subsistent, veuillez communiquer avec le service à la clientèle de à l’aide des vis fournies. support à LEVOLOR au 1 800 LEVOLOR (1 800 538-6567). l’aide de • Au besoin, réglez la hauteur du support en desserrant la la rainure vis et en faisant glisser le support vers le haut ou vers le bas. -
Página 65: Dépannage
FONCTIONNEMENT FONCTIONNEMENT Dépannage Dépannage Le store est difficile à relever ou à abaisser, ou la traverse Le store se relève ou s’abaisse de façon inégale, le tissu frotte Problème inférieure ne s’arrête pas à la limite supérieure. Problème contre l’une des extrémités du caisson ou la traverse inférieure n’est pas droite lorsque le store est complètement relevé. -
Página 66: Entretien
Garantie Aspirateur Pour obtenir des renseignements complets sur la garantie, visitez le site LEVOLOR.com ou • Pour un nettoyage plus complet, utilisez un aspirateur communiquez avec le service à la clientèle au 1 800 LEVOLOR ou au 1 800 538-6567. - Página 67 © 2022 LEVOLOR ® 5775 Glenridge Drive Building A Atlanta, GA 30328 20-0048-084 1029595...
-
Página 68: Remote Control Guide
Remote Control Guide © LEVOLOR 2022 ®... - Página 69 Table of Contents Thank you for choosing LEVOLOR InMotion motorized ® ™ window coverings. This product has been custom built for you from the highest quality materials. To avoid errors and save valuable time, please read these instructions to ensure you are properly programming your new remote.
-
Página 70: Product Overview
Product Overview Cellular, Natural, and Roman Shades Programming Programming button, charging port, and indicator light are located in the shade’s right headrail end cap. Programming button does not act as a manual control and the shade will not move when the button is pressed. During setup, the shade will confirm programming by jogging, with a slight down and up movement. -
Página 71: Banded, Roller And Sheer Shades
Product Overview Banded, Roller and Sheer Shades Programming Programming button, charging port, and indicator light are located on the right-side of the shade headrail. Programming button acts as a manual control and the shade will move when the button is pressed. During setup, the shade will confirm programming by beeping and jogging, with a slight down and up movement. -
Página 72: Wood Blinds
Product Overview Wood Blinds Programming Programming button is located inside the headrail on the left corner of the motor and a paperclip or similar tool must be used to activate. The programming button is not accessible when mounted. Programming button acts as a manual control and the blind will move when the button is activated. -
Página 73: Positioning
Product Overview Positioning Each blind or shade comes with predefined position limits that can be adjusted as needed. Upper Limit This is the highest position available which provides the best view and protects product from damage. Lower Limit This is the lowest position available which fully covers the window and matches the length requested at time of order. -
Página 74: Remote Control
Remote Overview Remote Control The LEVOLOR InMotion remote has 15 available channels and each channel can control up to 20 shades at once. This remote is designed to control bottom-up shades and tilt-only wood blinds. Front View LCD Display Stop... -
Página 75: Battery Installation
Remote Overview Battery Installation Gently press down on cover and slide to remove. Install 2 AAA batteries (included). Align batteries as shown below. Program your remote, replace the back cover and install closure screw. Remove Back Cover Install (2) AAA Batteries As Shown Replace... -
Página 76: Wall Holder
Remote Overview Wall Holder Provide a home for LEVOLOR remotes with the remote holder. Tools Needed to Mount Remote Holder • Power drill • 3⁄32” drill bit • Phillips screwdriver • Pencil Remote Holder Mounting Instructions Choose location and mark wall plate placement. -
Página 77: Programming
Programming Getting Started During programming, all blinds and shades will jog by moving slightly down and up. Banded, roller, and sheer shades will both jog and provide an audible beep. Certain programming functions will affect all blinds and shades on the selected channel such as – favorite position, travel limits, operating mode, and motor speed. -
Página 78: Favorite Position
Programming Pair Remote to Blind or Shade Use the and + buttons to select the channel to pair. Press and hold the programming button on the motor (about 2 seconds) until the motor jogs x 1 and/or beeps x 1. In the next 10 seconds, press and hold the ... -
Página 79: Operating Mode
Programming Operating Mode This procedure will set the operating mode on all blinds and shades assigned to a specific channel. All blind and shade motors can be set to two different operating modes. Continuous Mode (Default setting) Recommended for cellular, natural, roller, and roman shades. -
Página 80: Motor Speed
Programming Motor Speed This procedure will set the motor speed on all blinds and shades assigned to a channel. All motors have 3 speeds available and are set to the slowest speed by default. Set to Faster Speed Press one P2 button in the battery compartment of the remote until motor jogs x 1 and/or beeps x 1. -
Página 81: Travel Limits
Programming Travel Limits This procedure will adjust the travel limits on all blinds and shades assigned to a channel. Upper and lower travel limits are set at the factory during production to your order specification. Upon installation, adjustment of these limits may be necessary to better suit your needs. -
Página 82: Add Or Remove Additional Remote
Programming Disable Limit Setting After all programming is complete, lock the remote to prevent accidental or unintended changes to motor direction, travel limits, and operating mode. Remove cover from back of remote and locate the lock switch between the P2 buttons above batteries. Move the switch to the left to lock. -
Página 83: Operation
Operation Operating Instructions Cellular, Natural, Roller, and Roman Shades Once your shade has been paired with the remote, use the up and down buttons to raise and lower the shade. Press and hold the stop button to send to Favorite Position. -
Página 84: Additional Information
Place all other motors to same channel. respond). sleep. See page 8 for more information. Warranty Visit LEVOLOR.com/warranty or call customer service at 1-800-LEVOLOR for more information. Customer Service To contact customer service with an questions or 1-800-LEVOLOR concerns, you may reach us at... -
Página 85: Specifications
Additional Information Specifications Voltage ................3V Radio Frequency ......433.92 MHz Bi-directional Transmitting Power ........... 10 milliwatt Operating Temperature ..14°F to 122°F (-10°C to 50°C) RF Modulation ..............FSK Lock Function ..............Yes IP Rating ................IP20 Transmission Distance ......up to 200m (outdoor) Declarations U.S. - Página 86 L’exploitation est autorisée aux deux conditions suivantes: (1) l’appareil ne doit pas produire de brouillage, et (2) l’utilisateur de l’appareil doit accepter tout brouillage radioélectrique subi, même si le brouillage est susceptible d’en compromettre le fonctionnement. LEVOLOR 2022 © 20-0048-200 Remote Control Guide Home...