Tabla de contenido
Publicidad
Idiomas disponibles
Idiomas disponibles
Enlaces rápidos
STIHL FC 85
STIH)
Instruction Manual
Manual de instrucciones
Warning!
For safe operation follow all safety
precautions in Instruction Manual - improper
use can cause serious injury.
Advertencia!
Para su seguridad durante el manejo de este
producto, siga siempre las precauciones de
seguridad dadas en el manual de
instrucciones - el uso indebido puede causar
lesiones graves.
Publicidad
Capítulos
Tabla de contenido

Manuales relacionados para Stihl FC 85


Resumen de contenidos para Stihl FC 85
- Página 1 STIH) STIHL FC 85 Instruction Manual Manual de instrucciones Warning! For safe operation follow all safety precautions in Instruction Manual - improper use can cause serious injury. Advertencia! Para su seguridad durante el manejo de este producto, siga siempre las precauciones de...
-
Página 2: Tabla De Contenido
Working Techniques ....... 12 To receive maximum performance and Mounting the Loop Handle ..... 15 satisfaction from your STIHL edger, it is Adjusting the Throttle Cable* ..15 important that you read and understand Fitting the Cutting Blade ....16 the maintenance and safety precautions, Fuel .......... -
Página 3: Guide To Using This Manual
Engineering improvements in different ways: components. STIHL’s philosophy is to continually Step or procedure without direct Note or hint which is not essential improve all of its products. As a result, for using the machine, but may reference to an illustration. -
Página 4: Safety Precautions
Most of these safety precautions and Working with any edger can be warnings apply to the use of all STIHL Have your STIHL dealer show you how strenuous. If you have any condition that edgers. - Página 5 To reduce the risk of injury to your face The ignition system of your unit disease. In order to reduce the risk of STIHL recommends that you also wear produces an electromagnetic field of a whitefinger disease and carpal tunnel a face shield or face screen over your very low intensity.
- Página 6 Protect your hands with when there is a danger of authorized attachments are useable for gloves when handling the head injuries. the STIHL edger, their use may, in fact, edger and the cutting tool. be extremely dangerous. Heavy-duty, nonslip gloves improve your grip and protect your hands.
- Página 7 Fueling build up inside the gas tank depending on the fuel used, the weather conditions, Your STIHL edger uses an oil-gasoline Preparation for the use of the edger and the venting system of the tank. In mixture for fuel (see the chapter on...
- Página 8 STIHL combination wrench or a similar filler port. Then turn the handle on the tool can be used to tighten down the filler cap as far as possible in clockwise cap.
- Página 9 NIOSH/MSHA for the type of dust and / obstructions and objects, including the or fumes encountered. ground, because when the engine starts at starting-throttle, engine speed will be fast enough for the clutch to engage and turn the cutting tool. FC 85...
- Página 10 Never use your edger as a hedge trimmer. Warning! Never divert discharge of material toward bystanders nor allow anyone near the area of operation. Use care in directing discharge to avoid glass enclosures, automobiles, and the like. FC 85...
- Página 11 If the behavior of the tool could cause the edger to kick out or changes, stop the engine immediately, loosen, see your STIHL dealer. Do not attach any blade to a unit without proper could cause damage to the blade. In...
- Página 12 Have such work Improper use of any edger can cause properly or if nonapproved performed at your STIHL service shop serious or fatal personal injury. replacement parts were used, STIHL only. Do not modify the engine governor In order to reduce risk of eye injury may deny warranty.
-
Página 13: Working Techniques
Working Techniques Additionally, the daily maintenance Warning! schedule for your edger set forth in your STIHL Owner's Manual should be A worn or damaged muffler is a fire strictly followed. hazard and may cause loss of hearing. Check to see that the muffler is in good For any maintenance please refer to the condition. - Página 14 (3) just touches the away from the machine and operator. ground or breaks the surface of the soil by no more than 0.2" / 5 mm (B) in the normal working position. FC 85...
- Página 15 Hold and guide the unit so that the blade is vertical. Cut steadily so that the engine speed does not decline to any major extent – do not apply force! Cut at a normal walking pace. Do not push the blade into the ground! FC 85...
-
Página 16: Mounting The Loop Handle
Adjusting loop handle to most handle. comfortable position: Release clamp screw (5). Move the loop handle along the drive tube as required - retighten the clamp screw. see "Guide to Using this Manual" FC 85... -
Página 17: Fitting The Cutting Blade
(4) until the drive shaft is blocked. Apply combination wrench (5) to screw (6). Loosen screw clockwise (left-hand thread) and take it out. Remove retaining ring, plain washer and thrust washer. see "Guide to Using this Manual" FC 85... -
Página 18: Fuel
English / USA Fuel This engine is certified to operate on Use only STIHL two-stroke engine oil or unleaded gasoline and the STIHL two- equivalent branded two-stroke engine stroke engine oil at a mix ratio of 50:1. oils that are designed for use only in air cooled two-cycle engines. -
Página 19: Fueling
When mixing, pour oil into the canister first, and then add gasoline. Close the canister and shake it vigorously by hand to ensure proper mixing of the oil with the fuel. Gaso- Oil (STIHL 50:1 or line equivalent branded oils) US gal. US fl.oz 2 1/2 12.8... -
Página 20: Starting / Stopping The Engine
– even if bulb is filled with $ – stop (6). Now release the throttle trigger, fuel. slide control and trigger interlock in To stop the engine: Push the slide that order. This is the starting control in direction of c (7). throttle position. FC 85... - Página 21 Continue cranking until the engine Do not stand or kneel on the drive speed. runs. tube! This could permanently Open the throttle slightly and allow damage the drive tube.. engine to warm up for a brief period. FC 85...
-
Página 22: Operating Instructions
If the engine still does not start: screws (not adjusting screws) at regular Move the slide control in direction of intervals and retighten as necessary. c to $ Pull off the spark plug boot (10). Unscrew and dry off the spark plug. FC 85... -
Página 23: Cleaning The Air Filter
Install the foam element (3) in the the filter. filter cover (2). Remove the foam and felt filter Place felt element (4) (lettering elements. facing inward) in filter housing (5). Fit filter cover so that it snaps into position. FC 85... -
Página 24: Adjusting The Carburetor
This setting provides an optimum fuel-air screw (LA) so that the cutting blade mixture under most operating does not rotate. conditions. With this carburetor it is only possible to adjust the high speed screw within fine limits. see “Guide to Using this Manual” FC 85... -
Página 25: Adjusting Idle Speed
Turn low speed screw (L) clockwise If screen is damaged or coked up, fit (about 1/4 turn) until the engine runs a new one. and accelerates smoothly. Refit the spark arresting screen. see “Guide to Using this Manual” FC 85... -
Página 26: Lubricating The Gearbox
Do not not completely fill the gear operating hours injury, use only spark plugs housing with grease. or earlier if the electrodes are badly authorized by STIHL. Always press Refit the filler plug and tighten it eroded. spark plug boot (2) snugly onto down firmly. -
Página 27: Replacing The Starter Rope And Rewind Spring
Specifications) and then thread the rope rotor. To help reduce the risk of rope through the top of the grip and injury, wear face protection and the rope bush (7). gloves. Refit the cap in the grip. FC 85... - Página 28 – see turn it back and forth until the rewind "Special Accessories" – do not open spring anchor loop (8) engages. the wire retainer! Insert the screw (5) and tighten it down securely. Go to "Tensioning the Rewind Spring". FC 85...
-
Página 29: Storing The Machine
If this is not the case, the spring is overtensioned and could break. Take one turn of rope off the rotor. Go to "Fitting the Starter Cover". FC 85... -
Página 30: Replacing The Depth Wheel / Gearbox Wheel
If the parts are then reassembled, the captive function is no longer guaranteed. In such a case have the screw and wingnut replaced by your STIHL dealer. Release screws (3) on arm (4) and remove together with arm. FC 85... -
Página 31: Fitting The Skirt
Starting from the bottom (a), fit the skirt in the holder, push it up all the way and pull it (b) over the edge of the holder until it slips into position. FC 85... -
Página 32: Replacing The Cutting Blade
Blade”. damage. screw (1) firmly. The wear guard must be replaced Only use genuine STIHL cutting blades as soon as the deflector (2) (arrow) – see “Special Accessories“ becomes visible at the latest. Replace the blade (1) when its... - Página 33 Remove the cutting blade – see chapter “Fitting the Cutting Blade” Take out the screws (3). Fit the new wear guard (4). Insert screws and tighten down firmly. Fit the blade – see chapter “Fitting the Cutting Blade”. FC 85...
-
Página 34: Maintenance Chart
Check Spark arresting screen* in muffler Clean or replace All accessible screws and nuts Retighten (not adjusting screws) Anti-vibration element Have replaced by STIHL dealer Visual inspection Cutting blade Replace Check tightness of blade Inspect Wear indicator for gearbox Replace... -
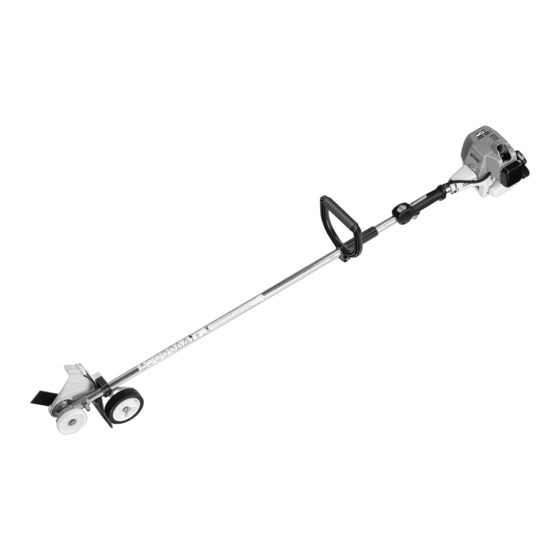
Página 35: Parts And Controls
12= Depth wheel 13= Wingnut 14= Fuel filler cap 15= Carburetor adjusting screw 16= Choke lever 17= Fuel pump 18= Starter grip 19= Fuel tank 20= Muffler (with Spark arresting screen*) # Serial number see “Guide to Using this Manual“ FC 85... - Página 36 For resting machine on the ground. required depth of cut. risk of fire. 13. Wingnut. Must be loosened to shift the wheel to adjust the depth of cut. FC 85...
-
Página 37: Specifications
1.10 in (28 mm) Fuel mix: see chapter Engine power “Fuel” to ISO 8893: 1.3 bhp (0.95 kW) Idle speed: 2,800 rpm Max. engine speed: 10,500 rpm Max. output shaft speed (blade) 4,150 rpm see “Guide to Using this Manual“ FC 85... -
Página 38: Special Accessories
The symbol may appear alone on small parts. Stop pin Special resin-free lubricating oil Combination wrench 3.5 fl.oz (100 ml) bottle STIHL balancer Wheels Contact your STIHL dealer for the latest information on these and other special Depth wheel accessories. Gearbox wheel FC 85... -
Página 39: Stihl Incorporated Federal Emission Control Warranty Statement
You are responsible for presenting your small off-road equipment engine to a Obligations Coverage: STIHL service center as soon as a The U.S. Environmental Protection In the U.S., 1997 and later model year problem exists. The warranty repairs will Agency (EPA) and STIHL Incorporated... -
Página 40: Maintenance Requirements
This Emission Control Systems replaced by STIHL Incorporated at no used for any warranty maintenance or Warranty shall not cover any of the cost to the owner. Any warranted part... - Página 41 English / USA FC 85...
- Página 42 Técnicas de trabajo ......52 Para obtener el rendimiento y satisfac- Montaje del mango tórico ....55 ción máximos de la orilladora STIHL, es Ajuste del cable del acelerador* ..55 importante leer y comprender las ins- Colocación de la cuchilla ....56 trucciones de mantenimiento y las pre- Combustible ........
-
Página 43: Guía Para El Uso De Este Manual
Paso o procedimiento sin referencia Mejoramientos técnicos los componentes individuales. directa a una ilustración. La filosofía de STIHL es mejorar conti- Nota o sugerencia que no es nuamente todos su productos. Como esencial para el uso de la máquina, Descripción del paso o procedimiento resultado de ello, periódicamente se... -
Página 44: Medidas De Seguridad
No preste ni alquile nunca su orilladora padece de alguna dolencia que pueda sin el manual del usuario. Asegúrese Pida a su concesionario STIHL que le ser agravada por la fatiga, consulte a su que todas las personas que utilicen su enseñe el manejo de la orilladora. - Página 45 Por lo tanto, para reducir el riesgo Para reducir el riesgo de lesionarse la de la enfermedad de dedos blancos y cara, STIHL recomienda usar también Advertencia del síndrome del túnel del carpio, sír- una careta o protector facial adecuado El sistema de encendido de la máquina...
- Página 46 STIHL o expresamente autorizados trol auditivo. Utilice un casco de segu- por STIHL para usarse con los modelos ridad aprobado para redu- Use vestimenta protectora adecuada. específicos de orilladoras de STIHL. Si cir el riesgo de lesionarse bien es posible conectar a su orilladora Protéjase las manos con...
- Página 47 Dependiendo del com- Combustible dora bustible utilizado, de las condiciones cli- La orilladora de STIHL utiliza una mez- Ajuste el arnés y la empuñadura de máticas y del sistema de ventilación del cla de aceite-gasolina como combusti-...
- Página 48 Si la mancha, cámbiesela inmediata- de la llave combinada STIHL o una triangular en el mango coincida con mente. herramienta similar para dejarla bien aquélla en la boca de llenado.
- Página 49 FC 85...
- Página 50 Se debe tener cuidado especial cuando las condiciones del suelo son resbaladi- zas (suelo húmedo, nieve) y en terreno difícil y con mucha vegetación. Para evi- tar tropezarse, esté atento a los obstá- culos ocultos tales como tocones, raíces y zanjas. FC 85...
- Página 51 Si no tuerca de retención puede estar desgas- puede regular correctamente el ralentí, tada o dañada y debe ser sustituida. pida a su concesionario STIHL que revise la orilladora y haga los ajustes o reparaciones correspondientes. FC 85...
-
Página 52: Mantenimiento, Reparación Y Almacenamiento
única- sección de seguridad de este manual. El motores no diseñados para vehícu- mente en el taller de servicio de STIHL. uso indebido de cualquier orilladora los. Sin embargo, si usted está recla- No modifique el gobernador del motor ni puede causar lesiones graves o morta- mando servicio de garantía para... -
Página 53: Técnicas De Trabajo
Instale una bujía nueva si sus electrodos el punto de partida, los cambios de están muy picados. dirección, etc. Siempre sujete y maneje la orilladora hacia el lado derecho de su cuerpo. FC 85... - Página 54 Ajuste la rueda (2) de modo que la sentido opuesto a la máquina y al opera- cuchilla (3) apenas toque el suelo o dor. penetre la superficie del suelo por no más de 0,2 pulg / 5 mm (B) en la posición normal de trabajo. FC 85...
- Página 55 Haga los cortes de modo uniforme para evitar que la velocidad del motor se reduzca significativamente – ¡No aplique fuerza hacia abajo! Camine a un paso normal mientras se corta. ¡No empuje la cuchilla para meterla en el suelo! FC 85...
-
Página 56: Montaje Del Mango Tórico
Suelte el tornillo de fijación (5). Deslice el mango tórico a lo largo del tubo de mando a la posición deseada y vuelva a apretar el torni- llo de fijación. vea "Guía para el uso de este manual" FC 85... -
Página 57: Colocación De La Cuchilla
Aplique la llave combinada (5) al tornillo (6). Gire el tornillo en sentido horario (roscas izquierdas) y quítelo. Retire el anillo de retención, las arandelas plana y de empuje. vea "Guía para el uso de este manual" FC 85... -
Página 58: Combustible
Use solamente el aceite STIHL para nar con una mezcla de 50 a 1 de gaso- motores de dos tiempos o un aceite de lina sin plomo y aceite STIHL para moto- marca equivalente para motores de dos res de dos tiempos. -
Página 59: Llenado De Combustible
Cierre el envase y agítelo vigorosa- mente a mano para asegurar que se mezclen bien el aceite y la gasolina. Gaso- Aceite (STIHL 50:1 ó aceite lina de calidad equivalente) oz fl EE.UU. EE.UU. -
Página 60: Arranque / Parada
(7). de combustible. cado. Esta es la posición de arranque del acelerador. FC 85... -
Página 61: A Temperaturas Ambiente Muy Bajas
¡No se pare ni se arrodille sobre el y el motor regresa a ralentí. tubo de mando! Se podría dañar Abra ligeramente el acelerador y permanentemente el tubo de deje que el motor se caliente por mando. unos segundos. FC 85... -
Página 62: Instrucciones De Manejo
Si el motor todavía no arranca: tornillos de ajuste) periódicamente y Mueva el control deslizante en el vuelva a apretar según sea necesario. sentido indicado por c a $ Saque el casquillo de la bujía (10). Destornille y seque la bujía. FC 85... -
Página 63: Limpieza Del Filtro De Aire
Coloque el elemento de fieltro (4) Retire los elementos de espuma y (las marcas orientadas hacia aden- de fieltro del filtro. tro) en la caja del filtro (5). Coloque la tapa del filtro de modo que se trabe en su lugar. FC 85... -
Página 64: Ajuste Del Carburador
Con este carburador es posible ajustar normal en cada caso. tornillo de ralentí (LA) para que la el tornillo de velocidad rápida dentro de cuchilla no gire. una gama pequeña. vea "Guía para el uso de este manual” FC 85... -
Página 65: Chispero* En Silenciador
Gire el tornillo de velocidad baja (L) Vuelva a instalar el chispero. en sentido horario (aprox. 1/4 de vuelta) hasta que el motor funcione y se acelere de modo uniforme. vea "Guía para el uso de este manual" FC 85... -
Página 66: Lubricación De La Caja De Engranajes
Coloque una bujía nueva después de STIHL. Siempre encaje un casquillo Vuelva a colocar el tapón de llenado 100 horas de funcionamiento, aproxi- (2) del tamaño correcto bien ajus- y apriételo firmemente. -
Página 67: Sustitución De La Cuerda De Arranque Y Resorte De Rebobinado
(vea Especificaciones) y des- riesgo de lesionarse, póngase pués pase la cuerda por la parte guantes y protector facial. superior del mango y por el buje de la cuerda (7). Vuelva a instalar la tapa en el mango. FC 85... -
Página 68: Sustitución Del Resorte De Rebobinado Roto
"Accesorios especiales" -- ¡no abra arrancador– el alambre retenedor! gírelo hacia uno y otro lado para engranar la espiral terminal d(8) del resorte de rebobinado. Inserte el tornillo (5) y apriételo bien firme. Pase a "Tensado del resorte de rebobinado". FC 85... -
Página 69: Almacenamiento De La Máquina
Cuando la cuerda de arranque se extiende completamente, debe ser posible girar el rotor media vuelta adicional. En caso contrario, el resorte está sobretensado y podría romperse. Quítele una vuelta de la cuerda al rotor. Pase a "Instalación de la tapa del arrancador". FC 85... -
Página 70: Sustitución De La Rueda Reguladora De Profundidad /Rueda De Caja De Engranajes
En tal caso, pida al concesiona- rio STIHL que sustituya el tornillo con la Saque los tornillos (3) del brazo (4) tuerca mariposa. y retírelos junto con el brazo. - Página 71 (6) quede a la vista. Comenzando en la parte inferior (a), coloque la faldilla en el sujeta- dor, empuje hacia arriba hasta donde tope y pásela (b) por encima del borde del sujetador hasta que se deslice a su lugar. FC 85...
-
Página 72: Sustitución De La Cuchilla
Como mínimo, el protector contra Utilice exclusivamente cuchillas origina- desgaste debe sustituirse cuando el les STIHL - vea „Accesorios especiales“. deflector (2) (flecha) está visible. Sustituya la cuchilla (1) cuando su Es posible dañar severamente la largo (A) deja de ser suficiente para... -
Página 73: Sustitución Del Protector Contra Desgaste
Sustitución del protector contra desgaste Retire la cuchilla (vea "Colocación de la cuchilla") Saque los tornillos (3). Coloque el protector nuevo (4). Inserte los tornillos y apriételos bien firmes. Coloque la cuchilla (vea "Coloca- ción de la cuchilla") FC 85... -
Página 74: Tabla De Mantenimiento
Limpiar Revisar Chispero en silenciador* Limpiar o reemplazar Todos los tornillos y tuercas accesibles Volver a apretar (salvo los tornillos de ajuste) Solicitar al concesionario STIHL su Elementos antivibración reemplazo Inspección visual Cuchilla Reemplazar Revisar el apriete de la cuchilla... -
Página 75: Piezas Y Controles
15= Tornillo de ajuste del carburador 16= Palanca del estrangulador 17= Bomba de combustible 18= Mango de arranque 19= Tanque de combustible 20= Silenciador (con chispero*) # Número de serie vea "Guía para el uso de este manual" FC 85... -
Página 76: Definiciones
13. Tuerca mariposa. Es necesario soltarla para mover la rueda para ajustar la profundidad de corte. FC 85... -
Página 77: Especificaciones
Potencia del motor 0,95 kW (1,3 tible: "Combustible" según ISO 8893: bhp) Ralentí: 2800 rpm Velocidad máx. del 10 500 rpm motor: Velocidad máx. de 4150 rpm eje de salida (cuchi- lla) vea "Guía para el uso de este manual" FC 85... -
Página 78: Accesorios Especiales
Aceite especial STIHL pieza de STIHL, el logotipo STIHl Faldilla y el símbolo de piezas de STIHL( Aceite lubricante especial libre de Protector contra des- En las piezas pequeñas, el símbolo resina gaste de la caja puede aparecer solo. -
Página 79: Declaración De Garantía De Stihl Incorporated Sobre Sistemas De Control De Emisiones Según Normas Federales
/ EE.UU Declaración de garantía de STIHL Incorporated sobre siste- mas de control de emisiones según normas Federales Sus derechos y obligaciones costo alguno, incluido el diagnóstico (si reducirá las obligaciones de la garantía el trabajo de diagnóstico fue realizado del fabricante del motor. -
Página 80: Diagnóstico
STIHL. La prueba del sistema Lleve el producto a cualquier centro de reglamentos aplicables durante un de control de emisiones se realiza ya servicio autorizado por STIHL y pre- período de dos años. - Página 81 / EE.UU FC 85...
- Página 82 ! WARNING! ! WARNING! ! ADVERTENCIA! The engine exhaust from this product The engine exhaust from this product El gas de escape del motor de esta máquina contiene productos químicos que en el estado de contains chemicals known to the State contains chemicals known to the State California son considerados como causantes de of California to cause cancer, birth...