Tabla de contenido
Publicidad
Idiomas disponibles
Idiomas disponibles
Enlaces rápidos
Publicidad
Capítulos
Tabla de contenido

Manuales relacionados para Nogueira SILONOG-F


Resumen de contenidos para Nogueira SILONOG-F
- Página 3 Before operating the machine for the first time, read all the safety instructions as well as all further information in this Manual. Nogueira Agricultural Machinery will always be at your disposal to get back to you on any enquiries, offering efficient and permanent technical support.
-
Página 4: Tabla De Contenido
Instructions Manual TABLE OF CONTENTS Identification ............5 Environment ............5 Safety Precautions ..........6 General Safety.............6 Safety in preparation ...........7 Operational Safety ..........8 Safety in Maintenance .........9 Safety in Transportation........10 Personal Safety ..........10 Safety Stickers...........12 Safety Stickers...........13 Knowing how to Operate the Machine....14 Truck or Wagon Transportation ......15 Application ............16 Advantages ............16... -
Página 5: Identification
Your Bagger is identified with a serial number, found on the tag fixed on the machine body. Write down your machine serial number: IMPORTANT! 1- By sending messages or requesting Nogueira Technical Support, always inform your serial number and the machine model, found on the identification tag. -
Página 6: Safety Precautions
Instructions Manual SAFETY PRECAUTIONS CAUTION Warning! The Bagger operator must be familiar The word CAUTION indicates situations where with operating and maintenance there is potential risk or hazard, and, if not avoided, procedures, as well as safety might cause serious injuries information, found in this manual. -
Página 7: Safety In Preparation
Instructions Manual SAFETY IN THE PREPARATION chains for this purpose, so that they remain static, without rotating. Never use the cardan ƒ M a k e s u r e t h e m a c h i n e i s shafts without their protection covers. -
Página 8: Operational Safety
Instructions Manual OPERATIONAL SAFETY ƒ Do not allow children or curious people to approach the machine when it is in operation or ƒ Never operate the machine in during maneuvers. case you have ingested alcoholic ƒ Keep all the covers and protections in their beverages or taken medicine, proper places and do not operate the machine which might change your state of... -
Página 9: Safety In Maintenance
Instructions Manual SAFETY IN Remember: moving components due to inertia keep TRANSPORTATION moving for longer even when the machine is turned off. Before you touch any machine parts, turn off ƒ Turn off the tractor PTO, the the power supply, check and listen if there is no engine and remove the key evidence of movement. -
Página 10: Personal Safety
Instructions Manual TRANSPORTATION SAFETY PERSONAL SAFETY ƒ Transportation of the machine ƒ Personal safety as well as other people’s is while it is coupled to the tractor one of our major concerns in the design and must not be done on public roads development of a machine. - Página 11 Instructions Manual ƒ Moving components due to inertia keep moving for longer even when the machine is turned off. Before you touch any machine parts, turn off the power supply, check and listen if there is no evidence of movement. Only touch any machine components if you are absolutely sure that they are stationary.
-
Página 12: Safety Stickers
Instructions Manual SAFETY STICKERS Read this Instructions Manual before you turn on the machine. The tractor must be turned off and the key removed from the ignition in order to perform any kinds of maintenance, adjustment, lubrication, cleaning etc. in the machine. Keep away from the articulation area, between the machine and the tractor. -
Página 13: Safety Stickers
Instructions Manual SAFETY STICKERS Number of rotations per minute. Never approach your hands of the endless screw when it is moving. Do not use the cardan shaft without its safety protection. -
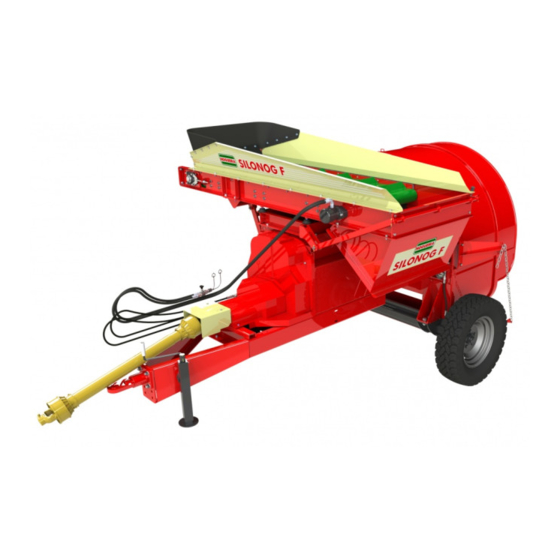
Página 14: Knowing How To Operate The Machine
Instructions Manual KNOWING THE BAGGER Conveyor Belt Jack Hydraulic engine Conveyor Belt Tensioner 10 Right wheel Front cover 11 Screw (Endless screw) Manometer Brake 12 Tray Hitch 13 Hydraulic pump Cardan Shaft... -
Página 15: Truck Or Wagon Transportation
Instructions Manual TRUCK TRANSPORTATION The Bagger coupled to a tractor must only transit within the property, observing the maximum speed of 5km/h. Whenever it is necessary to transport the machine over long distances, or whenever there is the need of using it on public roads, transportation must be done on a truck or wagon. -
Página 16: Application
Instructions Manual APPLICATION Designed to bag chopped green material, used for daily treatment of your animals, in polyethylene bags, in a safe and economical way. Ideal for bagging maize forage, sorghum, sunflower, sugarcane etc., pastures such as alfalfa, summer or winter crops, such as barley, rye, oat etc. ADVANTAGES: ƒ... -
Página 17: Functioning
Instructions Manual FUNCTIONING The forage is unloaded onto the conveyor belt that transports it, and unloads it inside the screw conveyor compartment. The screw transports it and pressurizes the forage towards the bag. When it is pressurized, the material becomes more compact and pushes the set machine/tractor, which moves forward. -
Página 18: Tractor Coupling
Instructions Manual TRACTOR COUPLING The Bagger operates coupled to the tractor’s drawbar. When you couple it, proceed as follows: Choose a flat and levelled surface, since it makes the procedure easier and safer. Approach the tractor carefully, aligning the drawbar with the machine hitch. The drawbar must fit the Bagger’s hitch. -
Página 19: Uncoupling
Instructions Manual UNCOUPLING Choose a flat and leveled surface to park the Bagger. In case this is not possible, you must add shims to the wheels to ensure that the machine is completely stationary. Uncouple the hoses of the valves from the tractor’s remote control. -
Página 20: Levelling
Instructions Manual LEVELLING It is recommended for the Bagger to be with its rear end slightly tilted downward (with the bag by the side). This will allow the bag to be manufactured without any folds. Before you start the operation, observe the machine laterally and, if necessary, the height of the hitch (E) can be adjusted. -
Página 21: Cutting And Cardan Shaft Coupling
Instructions Manual CUT AND COUPLING OF THE CARDAN SHAFT Initially, it is necessary to verify is the cardan length is adequate to the tractor that will be used. Due to the variation in the distance between the tractor PTO and the machine drive shaft, it might be necessary to cut the cardan. - Página 22 Instructions Manual TRACTOR IMPORTANT! Turn off the tractor and take the ignition key off the panel before you couple the cardan shaft. Couple the solid shaft (male side) onto the machine MACHINE and the tubular one (female side) onto the tractor. Place the cardan parts side by side (parallel) –...
- Página 23 Instructions Manual AFTER CUTTING According to the Manufacturer, it is recommended Using a file, remove all the filings that the angle when the cardan is functioning can from the tubes. Clean and lubricate reach maximum 35º for a very short time. When with a thin layer of grease.
-
Página 24: Choosing A Proper Place For Bagging
Instructions Manual CHOOSING THE RIGHT PLACE FOR MOUNTING It is recommended that you choose a high place, without the risk of flooding, far from trees, fences or whichever elements might cause risk of bag perforation. The place must be of easy access and enable the movement of trucks and machines for the filling and removal of the forage within the bag. -
Página 25: Placing The Bag In The Bagger
Instructions Manual PUTTING THE BAG ON THE BAGGER Before you put the bag on the Bagger, you should check if the machine is aligned with the tractor. The more aligned the assembly machine and tractor is, the straighter the bag will be. If necessary, manoeuver the tractor until you get the best alignment. - Página 26 Instructions Manual plastic straps IMPORTANT! In order to keep it folded, the bag leaves the factory tied with some plastic straps. Do not remove the straps. They must only be removed after the bag is mounted on the machine. With the help of a person, lift and put on the bag on the Bagger.
- Página 27 Instructions Manual IMPORTANT! There are two printed tracks on the bag that indicate what the maximum allowable stretching is. When Let the you put on the bag on the machine, you must tracks make sure that the tracks are in a visible position. visible (Make sure they are not hidden on the side under the machine).
- Página 28 Instructions Manual Bag placed with all the tying straps removed. PUT ON THE CLIP (Provided with the Bagger). Pass the clip over the bag and fasten its tips on the chain supports of the tray, on both sides of the machine.
- Página 29 Instructions Manual A f t e r i t i s p l a c e d o n t h e m a c h i n e , p u l l the bag evenly on both sides of the Bagger, releasing some folds.
-
Página 30: Closing The Bag
Instructions Manual CLOSING THE BAG The procedure to close the bag is very important to ensure the quality of the material to be bagged. The closing must be hermetic, seeking the maximum removal of air from inside the bag. NOTE! There are different ways to close the bag, we will show here a recommended method by the Dealer. -
Página 31: Hose Coupling
Instructions Manual HOSE COUPLING The activation and movement of the conveyor belt, from its working condition to transportation or vice- versa, are performed respectively by the hydraulic engine (A) and the piston (B), both activated through the tractor’s hydraulic system. Before you couple the hoses, remove the caps Couple the pairs of hoses onto the valves from the tractor’s remote control. -
Página 32: Transport Position
Instructions Manual MOUNTING THE CONVEYOR BELT FOR WORKING CONDITIONS The installation of the conveyor belt for operations is performed by the piston (A), activated by the tractor’s hydraulic system. In order to put it in the position for operations, couple the hoses onto the valves from the tractor’s remote control: Activate the lever from the tractor’s remote control to activate the piston (A). -
Página 33: Braking And Compaction
Instructions Manual BRAKING AND COMPACTION As the screw compacts the material inside the bag, the machine is pushed forward (in the opposite direction to the bag). During this process, the machine brake controls the material compaction inside the bag. Always bear in mind that the tractor’s brake is not used to perform the printed tracks on the bag indicate the bagging;... -
Página 34: Adjusting The Brakes
Instructions Manual ADJUSTING THE BRAKES Your Bagger is equipped with a braking system composed of disc brakes on the two wheels, hydraulic pump and manometer. This system allows better pressure control in the brakes, aiming at providing the adequate compaction of the bag. BRAKING THE BAGGER Close the relief valve of the pump (B). -
Página 35: General Recommendations
Instructions Manual Special care after bagging: GENERAL RECOMMENDATIONS ƒ Keep the area surrounding the bag clear, free The Bagger’s efficient and safe of weeds, bushes, rodents and other animals or plants that might damage it. operation demands each operator to ƒ... -
Página 36: Before Turning On The Machine
Instructions Manual BEFORE YOU TURN ON THE OPERATION MACHINE ƒ Turn on the tractor and activate the PTO until it reaches 540rpm in the PTO. Leave the tractor ƒ Observe if the surroundings of the engine in neutral position. (Remember that the machine and the working area are tractor brakes are not used, only the Bagger clear before you put it in operation. -
Página 37: Getting The Bag Ready
Instructions Manual FINALIZING THE BAG On the bag there is an end marker, which displays its maximum filling. When this mark appears, usually with two or three folds to finalize the bag, proceed as follows: Pare a alimentação da Embutidora. Stop feeding the Bagger. -
Página 38: Cutting The Bag
Instructions Manual CUTTING THE BAG In case you need to interrupt the bag filling to use only a part of the bag, you will need to proceed with its cut, as follows: As soon as you finish the feeding, release the Bagger brakes, opening the relief valve of the pump (B) and the pressure valve (A). -
Página 39: Maintenance
Instructions Manual MAINTENANCE Regular maintenance, performed in an adequate way, is the most efficient manner to ensure maximum performance and durability to your Bagger. CAUTION! Put all controls in neutral position, kill the engine, pull the parking brake, take the ignition key off the panel and wait until all moving parts are stationary before you perform maintenance, adjustments and repairs. -
Página 40: Chain Maintenance
Instructions Manual CHAIN MAINTENANCE The chain is responsible for the movement of the PTO axis to the endless screw. In order to prolong its useful life, it is indispensable to keep it properly adjusted and lubricated. It is recommended a daily check-up and also the control of the clearance through the tensioner. -
Página 41: Tensioning The Conveyor Belt
Instructions Manual TENSIONING A CONVEYOR BELT In order to achieve the proper tension on the feeding belt, you must use two tensioners, and proceed as follows: Loosen the nuts (E) from the bolts that fix the bearings on both sides of the conveyor belt. (Four bolts on each bearing housing). -
Página 42: Brake Fluid Change
Instructions Manual BRAKE FLUID EXCHANGE necessary. It is recommended to exchange it after two seasons. Recommended fluid: Brake Fluid NBR 9292 – DOT System Capacity – 1 Litter Necessary Material: BLEEDER ƒ A piece of plastic hose (Approximately 50cm length), with diameter corresponding to the brake bleeder nipple. -
Página 43: Bleed Of Braking System
Instructions Manual Open the pump meter (B). Activate the lever (C) from the pump several times, until all the fluid is expelled. Fill up the pump with new fluid. Activate the lever from the pump several times, until the bleeder releases new fluid. Close the bleeder. - Página 44 Instructions Manual Find the bleeder bolt that is located on the brake calliper. BLEEDER Remove the rubber protector from the bleeder. (Picture 72). Install the hose on the bleeder nipple, leaving the other end immersed in the recipient, containing a little of clean brake fluid. Besides avoiding dirt, this will make it easier to see the PROTECTOR air bubbles leaving the hose.
-
Página 45: Lubrication
Instructions Manual LUBRICATION Adequate and regular lubrication is indispensable for a good performance and durability of your Bagger. Recommended intervals take into consideration its use in normal working conditions. In severe conditions, they must be shortened. It is recommended to periodically verify lubrication, as well as using clean and high quality lubricants. - Página 46 Instructions Manual NUT FRONT BEARING Lubricate through the greaser 3 every 8 hours’ work. PTO AXIS FRONT BEARING Lubricate through the greaser 4 every 8 hours’ work. PTO AXIS REAR BEARING Lubricate through the greaser 5 every 8 hours’ work. PTO CARDAN SHAFT Lubricate bars and crossheads every 8 hours’...
-
Página 47: Transmission Chain (A) Lubrication
Instructions Manual TRANSMISSION CHAIN (A) LUBRICATION The adequate lubrication will prolong useful life, avoid oxidation and the premature wear of chains. Apply a thin layer of special chain oil, such as MAXLUB ND-03 Bardahl. If possible, use a special chain lubricant (spray grease), since it provides a more efficient lubrication between the chain pins and rollers. -
Página 48: Conservation
Instructions Manual CONSERVATION It is recommended to perform, especially at the end of each season, a machine general overhaul, identifying and replacing all worn or damaged parts. Remember that the off-season period is the best moment to perform preventive maintenance and, therefore, rest assured for the next harvest. -
Página 49: Technical Characteristics
Instructions Manual TECHNICAL CHARACTERISTICS Minimum drive power 45hp in the PTO PTO rotation 540 RPM System Continuous flow of 20/25 ton/h Tire pressure 40 lbs/pol² (psi) /2.76bar 6 feet Brakes Disk Brakes on two wheels Fluid: NBR 9292 DOT 3 Quantity: 1 Litter Dimension (mm) Operation... -
Página 50: Maintenance Program
Instructions Manual MAINTENANCE PROGRAM REQUIRED SERVICE MAINTENANCE POINTS 8 Hours Hitch Coupling Pin PTO bearing housings Endless screw bearings PTO cardan shaft Conveyor belt bearings 40 Hours Conveyor Belt Articulations Chain of Front Transmission Tires Pressure Brakes Hydraulic Hoses 100 Hours Oil Leakage Fluid of Braking System... -
Página 51: Practical Guide
Instructions Manual PRACTICAL GUIDE Here we present the most common symptoms of operating failures, their probable causes and precautions you should take. In case there are any other enquiries, find one of our Authorized Dealers or get in contact with our Post-Sale Department. It is going to be our pleasure to help you with any assistance you might need. - Página 52 Instructions Manual SYMPTOM PROBABLE CAUSE PROCEDURE L o w f l u i d p r e s s u r e o r Damaged hose. Check brake hoses on both uneven braking wheels. Reparo da bomba Replace the pump. desgastado.
-
Página 53: Key Gauge Table
Instructions Manual SCREW GAUGE TABLE... -
Página 54: Torque Table
Instructions Manual TORQUE TABLE - Metric Thread Torque uniti: N.m... - Página 55 Instructions Manual TORQUE TABLE - Inch Thread Torque uniti: N.m...
-
Página 56: Warranty Certificate
09 (nine) last months - additional warranty granted by Nogueira Máquinas Agrícolas. 2- This warranty is based on Nogueira's commitment to repair or provide free of charge in its factory any parts that in their sole discretion have manufacturing defects. The warranty covers only defects in material and / or workmanship, and labor, freight and other expenses are not covered by this certificate. -
Página 57: Warranty Terms
1. Complete the TERM OF DELIVERY with the requested information and sign; 2. Photograph the completed TERM OF DELIVERY and the Sales Invoice; 3. Access the site www.nogueira.com.br and click on the ‘TERM OF DELIVERY’ tab or go to nogueira.industriasnb.com/entrega ;... - Página 59 Recomendamos su lectura atenta, antes de poner en marcha la máquina. La Nogueira S/A estará siempre a su disposición para responder cualquier consulta, ofreciéndole asistencia técnica eficaz y permanente. As imagens apresentadas neste manual são de caráter meramente ilustrativo.
- Página 60 Manual de Instrucciones ÍNDICE Identificación........................5 Medio ambiente ........................5 Precauciones de seguridad ....................6 Seguridad General ......................6 Seguridad en la preparación ....................7 Seguridadoperacional.......................8 Seguridad en el mantenimiento ..................9 Seguridad en el transporte .....................10 Seguridad personal ......................10 Adhesivos de seguridad ....................12 Adhesivos de seguridad ....................13 Conociendo la embutidora....................14 Transporte sobre camión o carretas ................15 Aplicación ........................16...
-
Página 61: Identificación
Manual de Instrucciones IDENTIFICACIÓN Su Embutidora es identificada con número de serie, ubicado en la placa fijada en el cuerpo de la máquina. Anote aquí el número de serie de su máquina: ¡IMPORTANTE! Al enviar comunicaciones o solicitar ayuda de la Asistencia Técnica, siempre informe el número de serie y el modelo de la máquina, presentes en la placa de identificación. -
Página 62: Precauciones De Seguridad
Manual de Instrucciones PRECAUCIONES DE SEGURIDAD Advertencia de ¡CUIDADO! El operador de Embutidora debe La palabra “CUIDADO” indica situaciones donde familiarizarse con los procedimientos hay riesgo oculto en potencial, cuyas consecuencias de operación y mantenimiento y podrán causar lesiones graves si no se las evita. la información de SEGURIDAD relacionada en este manual. -
Página 63: Seguridad En La Preparación
Manual de Instrucciones SEGURIDAD EN LA podrá ser utilizada en esta condición. Antes de PREPARACIÓN conectar la máquina, asegúrese de que todas las protecciones van puestas. ƒ Asegúrese de que la máquina ƒ Fije los extremos de las protecciones de los está... -
Página 64: Segurança Operacional
Manual de Instrucciones ƒ No deje que los niños o curiosos se acerquen a SEGURANÇA OPERACIONAL la máquina cuando estén en funcionamiento o ƒ No opere la máquina si ha durante maniobras. ingerido bebidas alcohólicas ƒ Mantenga todos los blindajes y protecciones o medicamentos que alteren en sus lugares y no funcione la máquina sin las su estado normal. -
Página 65: Seguridad En El Mantenimiento
Manual de Instrucciones SEGURIDAD EN EL que la máquina se apague. Antes de tocar MANTENIMIENTO cualquier parte de la máquina, apague la fuente de accionamiento, observe y escuche si no ƒ Apague la toma de fuerza, el hay evidencia de movimiento. Sólo toque un motor del tractor y retire la llave de componente solamente si ya no hay ningún arranque antes de ajustar, lubricar... -
Página 66: Seguridad En El Transporte
Manual de Instrucciones SEGURIDAD EN EL SEGURIDAD PERSONAL TRANSPORTE ƒ La seguridad del operador y demás personas es una de las principales preocupaciones ƒ El transporte de la máquina en el diseño y el desarrollo de una máquina. acoplada al tractor no debe Sin embargo, cada año se producen muchos realizarse en vías públicas y accidentes que podrían haberse evitado... - Página 67 Manual de Instrucciones Sólo toque un componente si está seguro de que no tiene ningún movimiento. ¡Esté siempre atento! ƒ N u n c a e n t r e e n l a r o s c a transportadora (sinfín) con la máquina funcionando.
-
Página 68: Adhesivos De Seguridad
Manual de Instrucciones ADHESIVOS DE SEGURIDAD Lea el manual de instrucciones antes de funcionar la máquina. Apague el tractor y retire la llave de la ignición antes de realizar servicios de mantenimiento, ajustes, lubricación, limpieza, etc., en la máquina. Manténgase fuera del área de articulación entre la máquina y el tractor. -
Página 69: Adhesivos De Seguridad
Manual de Instrucciones ADHESIVOS DE SEGURIDAD Número de giros por minuto. Nunca acerque las manos de la rosca transportadora (sinfín) en movimiento. No utilice el cardán sin la protección de seguridad. -
Página 70: Conociendo La Embutidora
Manual de Instrucciones CONOCIENDO LA EMBUTIDORA Cinta Gato Motor Hidráulico Tensor de la cinta Blindaje Frontal 10 Rueda Derecha Manómetro 11 Rosca (Sinfín) Freno 12 Bandeja Encabezado 13 Bomba hidráulica Cardan... -
Página 71: Transporte Sobre Camión Ocarrete
Manual de Instrucciones TRANSPORTE SOBRE CAMIÓN O CARRETE La Embutidora acoplada a un tractor sólo podrá circular en el interior de la propiedad, observándose la velocidad máxima de 5 km / h. siempre que sea necesario transportar la máquina a largas distancias, o hay necesidad de utilizar vías públicas, el transporte debe realizarse sobre camiones o carretes. -
Página 72: Aplicación
Manual de Instrucciones APLICACIÓN Diseñada para embutir material verde picado, utilizado para el trato animal, en bolsas de polietileno de forma segura y económica. Ideal para embolsar forraje de maíz, sorgo, girasol, caña de azúcar, etc., pastos como alfalfa, cultivos de verano o invierno, tales como: cebada, centeno, avena, etc. -
Página 73: Funcionamiento
Manual de Instrucciones FUNCIONAMIENTO El forraje se descarga sobre la cinta que la transporta y lo deposita dentro del compartimiento de la rosca sinfín. La rosca transporta y presiona el forraje hacia la bolsa. Al presionarse, el material se empaqueta y empuja el conjunto máquina / tractor que se desplaza hacia adelante. -
Página 74: Acoplamiento Al Tractor
Manual de Instrucciones ACOPLAMIENTO AL TRACTOR La Embutidora opera acoplada a la barra de tracción del tractor. Al acoplarla, proceda como se describe a continuación: Elija un lugar plano y nivelado, de esta manera, será más fácil y seguro. Acerque el tractor con cuidado, procurando alinear la barra de tracción con el enganche de la máquina. -
Página 75: Desacoplamiento
Manual de Instrucciones DESACOPLAMIENTO Elija un lugar plano para aparcar la Embutidora. Si no es posible, se deben apoyar las ruedas para garantizar la completa inmovilización de la máquina. Desacople las mangueras de las válvulas del mando a distancia del tractor. Desbloquee el gato (D) y bájelo hasta el suelo. -
Página 76: Nivelación
Manual de Instrucciones NIVELACIÓN Se recomienda que la embutidora esté con la parte trasera ligeramente inclinada hacia abajo (lado de la bolsa). Esto permitirá que la bolsa sea confeccionada sin pliegues. Antes de comenzar la operación, observe la máquina lateralmente, si es necesario, se puede ajustar la altura del acoplamiento (E) (instrucciones en el ítem ACOPLAMIENTO AL TRACTOR en este manual). -
Página 77: Corte Y Acoplamiento Del Cardan
Manual de Instrucciones CORTE Y ACOPLAMIENTO DEL CARDAN En primer lugar hay que comprobar si la longitud del cardan es adecuada para el tractor que se utilizará. Debido a la distancia entre la toma de fuerza del tractor y el eje de accionamiento de la máquina variar en los diferentes modelos de tractor, puede ser necesario cortar el cardan. - Página 78 Manual de Instrucciones TRACTOR ¡IMPORTANTE! Apague el tractor y retire la llave de la ignición antes de acoplar el cardan. Acople la barra maciza (macho) en la máquina y la MÁQUINA tubular (hembra) en el tractor. Coloque las partes del cardan lado a lado (paralelas) - como muestra la figura al lado.
-
Página 79: Después Del Corte
Manual de Instrucciones DESPUÉS DEL CORTE: Según a la recomendación del fabricante, Utilizando una lima, dé acabado en el ángulo, con el cardan en funcionamiento, las partes. Limpie y lubrique con una puede alcanzar como máximo 35º por un corto fina capa de grasa. -
Página 80: Elección Del Lugar Para La Embutición
Manual de Instrucciones ELECCIÓN DEL LUGAR PARA LA EMBUTICIÓN Se recomienda la elección de un lugar alto, sin riesgo de inundación, lejos de árboles, cercas o cualquier elemento que pueda causar riesgo de perforación de la bolsa. El local debe ser de fácil acceso y posibilitar el movimiento de camiones y máquinas para la embutición y la retirada del forraje de dentro de la bolsa posteriormente. -
Página 81: Puesta Del Bolsa En La Embutidora
Manual de Instrucciones PUESTA DE LA BOLSA EN LA EMBUTIDORA Antes de colocar la bolsa en la Embutidora, compruebe que la máquina está alineada con el tractor. Cuanto más alineado esté el conjunto máquina y tractor, más rectilínea quedará la bolsa. En caso necesario, maniobre el tractor hasta obtener la mejor alineación. - Página 82 Manual de Instrucciones Cintas ¡IMPORTANTE! Para mantenerla doblada, la bolsa viene de fábrica atada con algunas cintas plásticas. No quite las cintas por el momento. Se deben quitar sólo después de que la bolsa esté colocada en la máquina. Con la ayuda de una segunda persona, levante y vea la bolsa en el cuerpo de la embutidora.
- Página 83 Manual de Instrucciones ¡IMPORTANTE! En la bolsa existen bandas impresas que indican cuál es el estiramiento máximo permitido. Al colocar Deje las la bolsa en la máquina, tenga cuidado de que las franjas franjas se encuentren en una posición bien visible visible (cuidado para que no queden en el lado inferior de la máquina).
- Página 84 Manual de Instrucciones Bolsa colocada y con todas las cintas de amarre removidas. COLOQUE LA PRESILLA (suministrada con la embutidora) Pase la presilla sobre la bolsa y sujete sus puntas en los soportes de las cadenas de la bandeja, a ambos lados de la máquina. La función de la presilla es retener la bolsa de forma que suelte un pliegue a la vez, a medida que va PRESILLA...
-
Página 85: Incorrecto
Manual de Instrucciones Después de colocada en la máquina, tire bolsa por igual en los dos lados de la embutidora, deshaciendo algunos pliegues. Estire la bolsa de 1,50 a 2 metros y proceda al cierre inicial. ¡IMPORTANTE! Al tirar bolsa, observar que los pliegues internos (los que quedan por dentro de la bolsa) son deshechos. -
Página 86: Cerrado De La Bolsa
Manual de Instrucciones CERRADO DE LA BOLSA La operación de cierre de la bolsa es muy importante para garantizar la calidad del material embolsado. El cierre debe ser hermético, procurando retirar el máximo de aire de dentro de la bolsa. NOTA! Existen diferentes formas de cerrar la bolsa, a continuación mostraremos un método indicado... -
Página 87: Acoplamiento De Las Magueras
Manual de Instrucciones ACOPLAMIENTO DE LAS MANGUERAS El accionamiento y el movimiento de la estera, de la posición de trabajo para trasporte o viceversa, son hechos respectivamente por el motor hidráulico (A) y el pistón (B), ambos accionados a través del sistema hidráulico del tractor. -
Página 88: Puesta De Las Cintas En La Posición De Trabajo
Manual de Instrucciones PUESTA DE LA CINTA EN LA POSICIÓN DE TRABAJO La colocación de la estera en la posición de trabajo es realizada por el pistón (A), accionado por el sistema hidráulico del tractor. Para colocarla en la posición de trabajo, conecte las mangueras en las válvulas del mando a distancia del tractor: Accione la palanca del mando a distancia del... -
Página 89: Frenado Y Compactación
Manual de Instrucciones FRENADO Y COMPACTACIÓN A medida que la rosca compacta el material dentro de la bolsa, la máquina se empuja hacia adelante (en el sentido contrario a la bolsa). Durante este proceso, el freno de la máquina actúa controlando la compactación del material dentro de la bolsa. -
Página 90: Regulación De Los Frenos
Manual de Instrucciones REGULACIÓN DE LOS FRENOS Su embutidora está equipada con un sistema de frenado compuesto de frenos a disco en las dos ruedas, bomba hidráulica y manómetro. Este sistema permite un mejor control de la presión en los frenos para proporcionar la compactación adecuada de la bolsa. -
Página 91: Recomendaciones Generales
Manual de Instrucciones Después de las primeras 5 horas de trabajo: RECOMENDACIONES ƒ Repita los apartados anteriores. GENERALES ƒ Después de este período, proceda según la La operación eficiente y segura programación normal de mantenimiento. de la Embutidora requiere que cada operador lea y entienda los Cuidados durante la operación: procedimientos operativos y todas... -
Página 92: Antes De Poner La Máquina En Funcionamiento
Manual de Instrucciones ANTES DE PONER OPERACIÓN LA MÁQUINA EN ƒ Conectar el tractor y aumentar la rotación hasta FUNCIONAMIENTO alcanzar 540 rpm en la toma de fuerza. Dejar el tractor en punto neutro (recuerde que el freno del tractor no se utiliza, sólo los frenos de la ƒ... -
Página 93: Finalizando La Bolsa
Manual de Instrucciones FINALZANDO LA BOLSA Al final de la bolsa hay un marcado del límite de llenado. Al surgir esta marcación (generalmente cuando faltan de dos a tres pliegues para terminar la bolsa) proceda de la siguiente manera: Pare la alimentación de la Embutidora. Abra la válvula (A). -
Página 94: Cortando La Bolsa
Manual de Instrucciones CORTANDO LA BOLSA En caso de que necesite interrumpir el llenado de la bolsa, utilizar solamente una parte de ella, será necesario proceder el corte de la misma procediendo como descrito a continuación: Una vez terminada la alimentación, suelte los frenos de la Embutidora, abriendo la válvula de alivio de la bomba (B) y la válvula de presión (A). -
Página 95: Mantenimiento
Manual de Instrucciones MANTENIMIENTO El mantenimiento periódico, realizado de forma adecuada, es la manera más eficaz de garantizar máxima eficiencia y durabilidad para su Embutidora. CUIDADO Coloque todos los controles en punto muerto, pare el motor, tire del freno de estacionamiento, retire la llave de la ignición y espere a que todas las piezas móviles paren antes de realizar mantenimiento, ajustes, reparaciones. -
Página 96: Mantenimiento De La Banda
Manual de Instrucciones MANTENIMIENTO DE LA BANDA La banda transmite movimiento del eje de toma de fuerza a la rosca embutidora. Para prolongar su vida útil es indispensable mantenerla adecuadamente regulada y lubricada. Se recomienda la verificación diaria y el control de la holgura a través del tensor, según el procedimiento descrito a continuación: Apague el tractor y retire la llave de la ignición. -
Página 97: Aplicando Tensión A Las Cintas
Manual de Instrucciones APLICANDO TENSIÓN A LAS CINTAS Para tensar la estera de alimentación, se deben utilizar los dos tensores, procediendo como se describe a continuación: Suelte las tuercas (E) de los tornillos que fijan los cojinetes en los dos lados de la estera (son 4 tornillos en cada cojinete). -
Página 98: Cambio De Líquido De Frenos
Manual de Instrucciones CAMBIO DE LÍQUIDO DE FRENOS Mantenga el nivel de fluido en el sistema comple- tando siempre que sea necesario. Se recomienda su cambio cada dos temporadas. Fluido recomendado: Fluido de freno NBR 9292 - DOT4. Capacidad del sistema: 1 litro. VALVULA DE PURGA Material necesário:... -
Página 99: Purga Del Sistema De Frenos
Manual de Instrucciones Abra la palanca (A) Abra el registro de la bomba (B). Accione la palanca (C) de la bomba repetidamente hasta que todo el fluido se expulse. Sujete la bomba con un fluido nuevo. Accione la palanca de la bomba repetidas veces hasta que salga líquido nuevo por la válvula de purga. - Página 100 Manual de Instrucciones Localice el tornillo de la válvula de purga VALVULA DE situado en la pinza del freno (fig.72). PURGA Quite el protector de la válvula de purga (fig.72). Instale la manguera en la boquilla de la válvula de purga, dejando la otra extremidad sumergida en la vasija conteniendo un poco de fluido de freno limpio.
-
Página 101: Lubricación
Manual de Instrucciones LUBRICACIÓN La lubricación adecuada y regular es indispensable para el buen desempeño y durabilidad de la Embutidora. Los intervalos indicados tienen en cuenta su utilización en condiciones normales de trabajo. En condiciones severas, deben reducirse. Se recomiendan inspecciones periódicas y el uso de lubricantes limpios y de buena calidad. -
Página 102: Mancal Delantero De La Rosca
Manual de Instrucciones MANCAL DELANTERO DE LA ROSCA Lubricar a través del engrasador 3 cada 8horas de trabajo. MANCAL DELANTERO DEL EJE DE TDP Lubricar a través del engrasador 4 cada 8 horas de trabajo. MANCAL TRASERO DEL EJE DE TDP Lubricar a través del engrasador 5 cada 8 horas de trabajo. -
Página 103: Lubricación De La Cadena De Transmisión
Manual de Instrucciones LUBRICACIÓN DE LA CADENA DE TRANSMISIÓN (A) La lubricación adecuada prolonga la vida útil, evita la oxidación y el desgaste prematuro de las bandas. Aplique una ligera capa de aceite especial para bandas, como el MAXLUB ND-03 Bardal. Si está... -
Página 104: Conservación
Manual de Instrucciones CONSERVACIÓN Se recomienda realizar, preferentemente al final de cada temporada, una revisión general en la máquina, identificando y sustituyendo partes desgastadas o dañadas. Recuerde que el período de entre zafra es el mejor momento para hacer el mantenimiento preventivo y con ello estar tranquilo para la próxima cosecha. -
Página 105: Características Técnicas
Manual de Instrucciones CARACTERÍSTICAS TÉCNICAS Potencia mínima para accio- 45 CV en la toma de fuerza namiento Rotación en la toma de fuerza 540 RPM Sistema fluxo contínuo 20/25 ton/h Presión en los neumáticos 40 lbs/pulg² (psi) 2,76 bar Bolsa 6 ‘... -
Página 106: Programa De Mantenimiento
Manual de Instrucciones PROGRAMA DE MANTENIMIENTO SERVICIO REQUERIDO PUNTOS DE MANTENIMIENTO 8 horas Perno del enganche del encabezado Rodamiento de los mancales de la TDP Rodamientos de la rosca sinfín Cardan de la TDP Rolamentos da esteira 40 horas Rodamientos de la cinta/estera Banda de transmisión frontal Presión de los neumáticos Mangueras hidráulicas de los frenos... -
Página 107: Guía Práctico
Manual de Instrucciones GUÍA PRÁCTICO A continuación presentamos los síntomas más comunes de fallas de operación, sus probables causas y las providencias que deben ser tomadas. En caso de duda, consulte a su distribuidor autorizado o póngase en contacto con nuestro departamento de asistencia técnica. - Página 108 Manual de Instrucciones SÍNTOMA PROBABLE CAUSA PROCEDIMIENTO Baja presión del fluido o Manguera dañada. Comprobar las mangueras de frenado desigual. los frenos e las dos ruedas. A j u s t e d e l a b o m b a Sustituir el ajuste.
-
Página 109: Tabla De Vitola De Llaves
Manual de Instrucciones TABLA DE VITOLA DE LLAVES... -
Página 110: Tabla De Torque - Rosca De Tornillo Métrica
Manual de Instrucciones TABLA DE TORQUE – Rosca Métrica Unidad de torque: N.m... -
Página 111: Tabla De Torque - Rosca De Tornillo Pulgada
Manual de Instrucciones TABLA DE TORQUE – Rosca Pulgada Unidad de torque: N.m... -
Página 112: Certificado De Garantía
09 (nueve) últimos meses - garantía adicional concedida por Nogueira Máquinas Agrícolas. 2- Consiste en la presente garantía, en el compromiso de Nogueira en reparar o sumi- nistrar gratuitamente, en su fábrica, las piezas que a su exclusivo juicio presentan defectos de fabricación. -
Página 113: Nota De Garantia
09 (nueve) últimos meses - garantía adicional concedida por Nogueira Máquinas Agrícolas. 2- Consiste en la presente garantía, en el compromiso de Nogueira en reparar o sumi- nistrar gratuitamente, en su fábrica, las piezas que a su exclusivo juicio presentan defectos de fabricación. - Página 115 NOGUEIRA lnd. Com. lmpl. Máquinas Agrícolas S.A. Rua Fernando de Souza, 533 - Distrito Industrial CEP 13877-775 - Phone: +55 19 3638.1500 CNPJ: 08.510.97 4/0001-27 nogueira@nogueira.com.br www.nogueira.com.br Essential in the field Esencial en el campo...