
Manuales relacionados para Babyauto ZARAUZCON fix 123


Resumen de contenidos para Babyauto ZARAUZCON fix 123
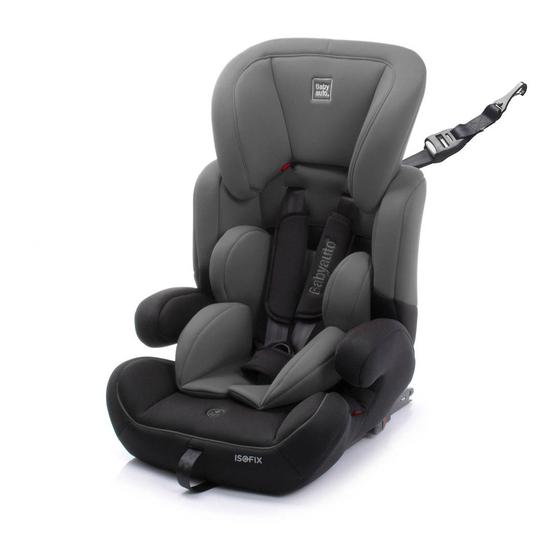
- Página 1 ZARAUZCON fix 123 HB-20 Grupo • Group — Apto para Suitable for — 9 - 36 kg Manual de uso InstructIons for use...
- Página 2 Español — iNstRUCCiONes de UsO - sistema de retención infantil Grupo 1/2/3 de 9 a 36 kg. (de 9 meses a 12 años aprox.) English — iNstRUCtiON mANUAl - Child safety seat Group 1/2/3 from 9 kgs to 36 kgs (from 9 months to 12 Years approx)
- Página 3 • Vista general • Overview • Instalación de la silla Grupo 1 • Installing the child seat Group 1 click • Puestos de instalación en el vehículo • Installation positions whitin the vehicle...
- Página 4 • Instalación de la silla Grupo 1 / Top tether • Installing the child seat Group 1 / Top tether • Instalación del niño Grupo 1 • Fastening the chlid to the seat Group 1 Top tether P. 1 Top tether P. 2 Top tether P.
- Página 5 • Retirar el arnés de 5 puntos y la funda textil • Instalación del niño Grupo 2/3 • Fastening the child into the seat Group 2/3 • Removing the 5-point harness system and cover.
- Página 6 10. Los artículos rígidos y las piezas de plástico de la silla de seguridad imPORtANte deben colocarse e instalarse de forma que no puedan, durante el uso diario del vehículo, quedar atrapados en un asiento móvil o en lea cuidadosamente ANtes de una puerta del coche.
-
Página 7: Instalación De La Silla. Isofix + Top Tether
1. VistA GeNeRAl 3. Empuje la silla contra el asiento del vehículo para replegar el sistema ISOFIX y que la silla quede completamente pegada al I. Freno de seguridad del top tether A. Protectores del arnés asiento (fig. 3.4). J. Top Tether B. -
Página 8: Grupo 2 Y 3. Instalación Con Isofit + Cinturón De Vehículo (Cinturón De 3 Puntos)
2. Pulse el botón de la hebilla de seguridad y abra el arnés (fig. del arnés y rotándola, pásela a traves de la ranura de la base de la silla para liberar la hebilla (fig. 5.4). Retire la hebilla del arnés 4.3). -
Página 9: Instrucciones De Lavado
7. limPieZA Y mANteNimieNtO imPORtANt Please read carefully BefORe 1. Para el lavado de las cintas y partes de plástico enjabonar con installing the child seat in the vehicle. detergente neutro y agua templada. 2. Asegúrese que no entra jabón dentro de la hebilla o piezas metálicas. -
Página 10: Installation Points Within The Vehicle
use of the vehicle, to become trapped by a movable seat or in 2. iNstAllAtiON POiNts WitHiN tHe VeHiCle a door of the vehicle. 11. Ensure that the seat is not damaged by the webbing between or Facing the direction of travel underneath heavy luggage, adjustable seats or slamming the car door etc. - Página 11 installing the Top Tether 3. The correct belt height of the shoulder pads is attained when the strap disappears into the shell slightly above the shoulder of the child. Make sure that the harness straps fit properly over Look for this symbol the shoulders of the child (fig.
-
Página 12: Cleaning And Maintenance
6. GROUP 2 ANd 3. iNstAlAtiON fOR CAR Belt (3 POiNts) 7. CleANiNG ANd mAiNteNANCe ANd isOfit sYstem 1. To wash belts and plastic parts, use neutral detergent and warm water. Solamente GRUPO 2/3. Desde aprox. AVisO 4 a 12 años (15-36 Kg) 2. - Página 13 BABYAUTO GROUP Parque Empresarial Zuatzu Edificio Donosti, 2ª planta Oficina 3 20018 San Sebastián (Gipuzkoa) Spain t. (+34) 943 833 013 f. (+34) 943 833 004 e. info@babyauto.com...