
Manuales relacionados para Berkel RED LINE 220


Resumen de contenidos para Berkel RED LINE 220
- Página 1 RED LINE 220 / 250 / 300 User Manual • Manuale d’uso • Bedienungsanleitung Mode d’emploi • Gebruikershandleiding • Manual Usuario...
- Página 3 RED LINE - 220 / 250 / 300 INTRODUCTION Thank you for trusting us by purchasing our product. Before using the slicer, we recommend reading this manual carefully. The machines described in this manual comply with Directives 2006/42/CE - 2006/95/CE - 2004/108/ CE and European standard EN 1974:1998 +A1 as regards safety against mechanical risks: Slicers - Hygiene and safety specifications.
-
Página 4: Tabla De Contenido
INDEX 1. INTRODUCTION ................................. 1.1 Purpose of the manual ................................1.2 Conservation of the manual ..............................1.3 Intended use of the machine .............................. 2. GENERAL ....................................2.1 Limits of use of the machine, safety regulations ....................2.1.1 Environmental conditions of use of the machine .................... -
Página 5: Introduction
Red Line 220, red Line 250 and Red Line 300. ufacturer or an authorised service centre, citing The purpose of this manual is to allow the user, the number of the paragraph in question. -
Página 6: Warranty And Responsibility Of The Manufacturer
As an operator only persons 18 years of age mains; or older are permitted, in perfect psycho- - use protective gloves for the cleaning and physical condition and with proven attitude and maintenance operations; capability, having the necessary knowledge for - place and remove the goods to be sliced manoeuvring and normal maintenance of simple on the sliding plate only with the carriage... -
Página 7: Responsibilities Of The User
RED LINE - 220 / 250 / 300 2.3. RESPONSIBILITIES OF THE USER - allow only capable personnel with proper behaviour to use the machine. The user, in order to take advantage of the war- ranty provided by the manufacturer, must strictly observe the requirements indicated in this man- 2.4. -
Página 8: Included Components And Accessories
3.2. INCLUDED COMPONENTS - boneless meats (cooked or raw at a AND ACCESSORIES temperature not lower than +3 °C); Unless otherwise requested, the following doc- - bread and cheeses (obviously types which uments and accessories are supplied with the can be sliced such as gruyère, fontina, etc.); machine: - instruction manual for operation and 3.4. -
Página 9: Description
RED LINE - 220 / 250 / 300 4. DESCRIPTION WARNING: Lift the machine with the help of an- other person, taking into consideration that the heavier part is the side with the blade. 4.1. OPENING THE PACKAGING Verify that the packaging is integral upon deliv- once this operation is complete, check the ery. -
Página 10: Main Components
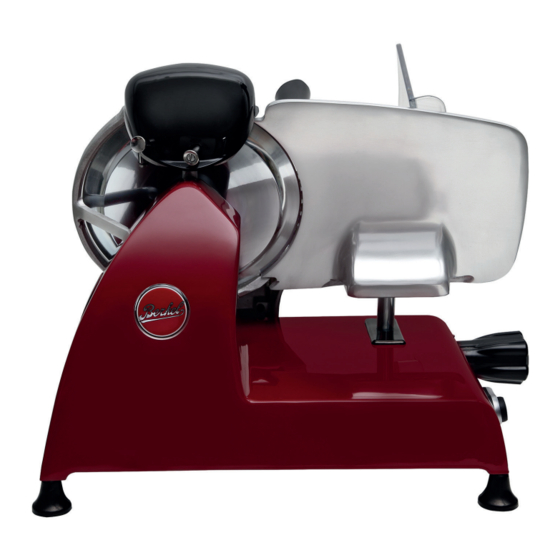
4.2. MAIN COMPONENTS 1. Start button (white) 2. Stop button (red) 3. Identification plate, technical informations and CE marking 4. Foot 5. Thickness adjustment knob 6. Thickness gauge plate (vela) 7. Safety guards 8. Meat table 9. Product press holder 10. -
Página 11: General Description
RED LINE - 220 / 250 / 300 4.3 GENERAL DESCRIPTION ily identified by position and colour. Operation of the machine is indicated by an indicator light. The slicer was designed and built in conform- This control system prevents accidental starting ity to directive 2006/42/CE - 2006/95/CE of the machine after possible interruption of the - 2004/108/CE and European regulation EN... -
Página 12: Installation
5. INSTALLATION If the power cable is not long enough due to specific installation needs, request assistance from qualified and authorised personnel. Do not carry out “movable” type electrical connections. 5.1. INSTALLATION OF THE MACHINE Install the machine on a level, smooth and dry surface suitable for supporting the weight of the machine itself plus the products to be sliced. -
Página 13: Use Of The Slicer
RED LINE - 220 / 250 / 300 6. USE OF THE SLICER 6.2.1. General information The machines must be carefully cleaned at least once a day and more often if necessary. After a fairly long period of inactivity the machine must 6.1 LOADING PRODUCTS ONTO THE also be cleaned before use. -
Página 14: Cleaning Of The Machine Body And The Removed Parts
Dismantling the blade cover using a soft, spongy cloth and a semi-rigid nylon 1. Rotate the blade shield disc 90° anticlock- brush for the sharp areas of the plate and the wise using the special knob; product holder. 2. a spring facilitates the extraction of the WARNING: For the cleaning operations of the blade shield disc. -
Página 15: Instructions For Removal Of The Blade
RED LINE - 220 / 250 / 300 Cleaning the machine body Clean the machine body with a damp cloth or a sponge, rinsing frequently with hot water. Dry carefully. Cleaning the sharpener Clean the body with a damp cloth and the springs with a semi-rigid brush. -
Página 16: Reassembung The Slicer
Reassembling the blade cover 6.2.5 Reassembling the slicer 1. Reassemble the blade cover Reassembling the sharpener Insert the sharpener unit as shown in the figure as shown in the figure; until it comes to a stop in the correct position. 2. -
Página 17: Maintenance And Repair
RED LINE - 220 / 250 / 300 7. MAINTENANCE AND REPAIR 7.1. GENERAL The following maintenance operations are per- mitted for the operator: - blade sharpening, periodically; Frequency and duration of sharpening depend on the use of the equipment (operating times and type of product sliced). -
Página 18: Carriage Sliding Guides (Weekly)
release the sharpener; 7.3. LUBRICATION OF activate the blade by MEAT TABLE SUPPORT ARM pressing the start button; CARRIAGE SUDING GUIDES carry out sharpening of (weekly) the blade pressini sharp- WARNING: Use only the ening spring button (1) oil included. If there is for 10-15 seconds;... -
Página 19: Troubleshooting
RED LINE - 220 / 250 / 300 8. TROUBLESHOOTING WARNING: In this chapter the most common problems which occur during use of the slicer are indicated as well as the necessary operations to eliminate the possible causes. If the problem persists do not insist in troubleshooting but immediately contact personnel qualified and authorised by the manufacturer. -
Página 20: Demolition Of The Slicer
9. DEMOLITION OF THE SLICER The machines are comprised of: - aluminium/magnesium alloy structure; - inserts and various components and stainless steel; - electrical parts and electrical cables; - electric motor; - plastic material, etc. If dismantling and demolition are entrusted to third parties, use only companies authorised for disposal of the above-mentioned materials. - Página 21 RED LINE - 220 / 250 / 300 INTRODUZIONE Nel ringraziare per la fiducia accordataci nell’acquisto di un nostro prodotto, raccomandiamo, prima di mettere in funzione l’affettatrice, di leggere attentamente questo manuale. Le macchine descritte in questo manuale rispondono, per quanto riguarda le sicurezze contro i rischi di natura meccanica, alle Direttive 2006/42/CE - 2006/95/CE - 2004/108/CE e alla normativa europea EN 1974:1998 +A1: Affettatrici - Specifiche di igiene e sicurezza.
- Página 22 INDICE 1. INTRODUZIONE ....................................1.1 Scopo del manuale ................................. 1.2. Conservazione del manuale ............................1.3. Destinazione d’uso delle macchine ..........................2. GENERALITÀ ......................................2.1. Limite d’impiego della macchina, norme di sicurezza .................. 2.1.1. Condizioni ambientali d’impiego della macchina .................... 2.1.2. Norme generali di sicurezza .............................
-
Página 23: Introduzione
Red Line 220, Red Line non specifici per il modello di macchina. 250 e Red Line 300. -
Página 24: Garanzia E Responsabilità Del Costruttore
In qualità di operatore sono ammesse unicamente spetto di rottura, movimenti non corretti, ru- mori insoliti; persone di età superiore ai 18 anni, in perfette - prima di eseguire la pulizia o di effettuare condizioni psico-fisiche, di provata attitudine e interventi di manutenzione scollegare la mac- capacità... -
Página 25: Obblighi Dell'utilizzatore
RED LINE - 220 / 250 / 300 2.3. OBBLIGHI DELL’UTILIZZATORE - adibire all’uso della macchina personale di capacità ed attitudini adeguate. L’utilizzatore per poter usufruire della garanzia fornita dal costruttore deve osservare scrupo- losamente le prescrizioni indicate nel presente 2.4. -
Página 26: Corredo Di Fornitura Ed Accessori
3.2. CORREDO DI FORNITURA 3.4. PRODOTTI CHE NON SI POSSONO ED ACCESSORI AFFETTARE Se non altrimenti richiesto sono forniti a cor- I prodottti che non si possono affetta- redo della macchina i seguenti documenti ed re perchè possono provocare danni a accessori: cose e a persone sono i seguenti: - manuale istruzioni per l’uso e la... -
Página 27: Descrizione
RED LINE - 220 / 250 / 300 4. DESCRIZIONE 6. sollevare ed estrarre la macchina ancora av- volta in un foglio di polietilene trasparente; ATTENZIONE: sollevare la macchina in due 4.1. APERTURA DELL’IMBALLO persone tenendo conto che il peso maggiore Verificare che alla consegna l’imballo sia inte- è... -
Página 28: Componenti Principali
4.2. COMPONENTI PRINCIPALI Pulsante di avviamento (bianco) Pulsante di arresto (rosso) Targhetta di identificazione, dati tecnici e marcatura CE Piedino Manopola regolazione spessore fetta Piastra spessimetro (vela) Protezione di sicurezza Piatto portamerce Maniglia del pressamerce 10. Lama 11. Anello di sicurezza (paralama) 12. -
Página 29: Descrizione Generale
RED LINE - 220 / 250 / 300 4.3. DESCRIZIONE GENERALE effettuano con due pulsanti posti anteriormen- te all’operatore e facilmente identificabili nella L’affettatrice è stata progettata e realizza- posizione e nel colore; il funzionamento della ta in conformità alla direttiva 2006/42/CE - macchina è... -
Página 30: Installazione
5. INSTALLAZIONE Se, per particolari esigenze d’installazione, il cavo di alimentazione non fosse sufficientemente lungo, richiedere l’intervento di personale qua- 5.1. INSTALLAZIONE DELLA MACCHINA lificato ed abilitato; non eseguire collegamenti Installare la macchina su di un piano ben livella- elettrici di tipo “volante’. to, liscio, asciutto ed adatto a sostenere il peso della macchina stessa più... -
Página 31: Uso Dell'affettatrice
RED LINE - 220 / 250 / 300 6. USO DELL’AFFETTATRICE 6.2.1. Informazioni generali Le macchine devono essere accuratamente pu- lite almeno una volta al giorno; se necessario con maggior frequenza. Dopo un periodo più 6.1 CARICAMENTO MERCE SUL o meno lungo di inattività devono essere pulite PIATTO E TAGLIO anche prima dell’utilizzo. -
Página 32: Pulizia Del Corpo Macchina E Delle Parti Rimosse
Smontaggio del coprilama spugnoso e uno spazzolino di nylon semirigido per le zone del piatto e del pressamerce ap- 1. Ruotare di 90° in senso antiorario il disco puntito. paralama tramite l’apposita manopolina; ATTENZIONE: Per le operazioni di pulizia del- 2. -
Página 33: Istruzioni Per La Rimozione Della Lama
RED LINE - 220 / 250 / 300 Pulizia del corpo macchina Pulire il corpo macchina con un panno umido o una spugna risciacquando frequentemente con acqua calda. Asciugare con cura. Pulizia dell’affilatoio Pulire il corpo con un panno umido e le mole con uno spazzolino di nylon semirigido. -
Página 34: Rimontaggio Dell'affettatrice
Rimontaggio del coprilama 6.2.5 Rimontaggio dell’affettatrice 1. Rimontare il coprilama come in figura; Rimontaggio dell’affilatoio 2. ruotare di 90 gradi in senso orario il copril- Inserire il gruppo affilatoio come in figura sino ama, fino a bloccarlo nella sua posizione ini- al suo arresto in posizione corretta. -
Página 35: Manutenzionee Riparazione
RED LINE - 220 / 250 / 300 7. MANUTENZIONE E RIPARAZIONE 7.1. GENERALITÀ Gli interventi di manutenzione consentiti all’ope- ratore sono i seguenti: - affilatura lama, periodicamente; Periodicità e durata dell’affilatura dipendono dall’utilizzo dell’apparecchiatura (tempi di la- voro e tipo di prodotto lavorato). - lubrificazione guide scorrimento carrello, set- timanalmente;... -
Página 36: Lubrificazione Asta E Scorrimento Trasversale
rilasciare l’affilatoio; 7.3. LUBRIFICAZIONE GUIDE avviare la lama pre- DI SCORRIMENTO CARRELLO mendo il pulsante di BRACCIO SUPPORTO avviamento; PIATTO PORTAMERCE effettuare l’affilatura (settimanalmente) della lama premendo AVVERTENZA: Utilizzare muto per 10-15 se- esclusivamente l’olio in condi il pulsante della dotazione. -
Página 37: Ricerca Ed Eliminazione Dei Guasti
RED LINE - 220 / 250 / 300 8. RICERCA ED ELIMINAZIONE DEI GUASTI AVVERTENZA: In questo capitolo sono indicati gli inconvenienti più comuni che si verificano durante l’uso dell’affettatrice e sono indicate le operazioni necessarie per eliminarne le possibili cause. -
Página 38: Demolizione E Smaltimento
9. DEMOLIZIONE E SMALTIMENTO Ai sensi dell’ art. 13 del Decreto legislativo n°51 del 25 luglio 2005 “Attuazione delle Direttive comunitarie 2002/95/CE, 2002/96/CE e 2003/108/CE relative alla riduzione dell’uso di sostanze pericolose nelle apparecchiature elettriche e elettroniche, nonché allo smaltimento dei rifiuti”. Il simbolo del “contenitore di spazzatura barrato”... - Página 39 RED LINE - 220 / 250 / 300 EINLEITUNG Wir möchten uns bei Ihnen für das mit dem Kauf eines unserer Produkte entgegen gebrachte Vertrauen bedanken und sie daran erinnern, bevor Sie die Schneidemaschine in Betrieb nehmen die Bedienungs- und Wartungsanleitung aufmerksam durchzulesen. Die in dieser Anleitung beschriebenen Maschinen erfüllen die Sicherheitsanforderungen im Bereich mechanischer Risiken der Richtlinien 2006/42/EG - 2006/95/EG - 2004/108/EG und der europäischen Verordnung EN 1974:1998 +A1: Schneidemaschinen - Spezifikationen zur Hygiene und...
- Página 40 INHALTSANGABE 1. EINLEITUNG ..................................1.1 Zweck der bedienungsanleitung ..........................1.2 Aufbewahrung der bedienungsanleitung ......................1.3 Gebrauchsbestimmung der maschinen ........................2. ALLGEMEINES ................................. 2.1. Einsatzeinschränkungen der maschine, sicherheitsbestimmungen ............2.1.1. Raumbedingungen für den einsatz der maschine ....................2.1.2. Allgemeine sicherheitsbestimmungen ........................2.2.
-
Página 41: Einleitung
Informationen für den Gebrauch und die Der Hersteller lehnt jede Haftung für Schäden, Wartung der Schneidmaschine für Lebensmittel die aus unsachgemäßen Gebrauch oder dem mit Rundmesser Modelle Red Line 220, Red Line Bedienen der Maschine durch nicht geschultes 250 und Red Line 300. Personal... -
Página 42: Garantie Und Haftung Des Herstellers
Als Maschinenbediener sind ausschließlich Per- - Die Maschine bei Schäden, unregelmäßigem sonen über 18 Jahre im perfekten physischen Betrieb, Verdacht auf Bruch, nicht korrekten Zustand, nachgewiesener Aufnahmefähigkeit Bewegungen, ungewöhnlichen Geräuschen so- und Befähigung mit den notwendigen Kenntnis- fort anhalten; sen für den normalen Gebrauch und Wartung - Vor jeder Reinigungs- oder Wartungsarbeit einfacher mechanischer und elektrischer Bautei- die Maschine vom Stromnetz nehmen;... -
Página 43: Pflichten Des Benutzers
RED LINE - 220 / 250 / 300 2.3. PFLICHTEN DES BENUTZERS Personal bedienen lassen. Damit der Benutzer die Herstellergarantie in Anspruch nehmen kann, muss er die in der 2.4. KENNZEICHEN - SCHILDER Bedienungsanleitung stehenden Vorschriften An der Maschine befindet sich das folgende strengstens einhalten, vor allem: Schild: - Die Maschine immer sachgemäß... -
Página 44: Begleitende Dokumente Und Zubehör
3.2. BEGLEITENDE DOKUMENTE UND - Fleisch ohne Knochen (gekocht oder roh bei einer Temperatur nicht unter +3°C); ZUBEHÖR Wenn es nicht anders bei der Bestellung fest- - Brot und Käse (selbstverständlich gelegt worden ist, werden mit der Maschine die Hartkäse wie Gruviera, Fontina, usw.). folgenden Dokumente und Zubehörteile mitge- liefert: 3.4. -
Página 45: Beschreibung
RED LINE - 220 / 250 / 300 4. BESCHREIBUNG ACHTUNG: Die Maschine mit zwei Mann anhe- ben und darauf achten, dass der Hauptteil des Gewichts an der Messerseite liegt. 4.1. ÖFFNEN DER VERPACKUNG Den Inhalt der Verpackung kontrollieren Die Verpackung bei der Entgegennahme auf und prüfen, ob er den Angaben auf dem Schäden überprüfen;... -
Página 46: Hauptkomponenten
4.2. HAUPTKOMPONENTEN 1. Starttaster (weiss) 2. Stopptaster (rot) 3. Typenschild, technische daten und CE- kennzeichnung 4. Fuss 5. Reglerknopf für die schnittdicke 6. Platte führerlehre 7. Sicherheitseinrichtungen 8. Schneidgutplatte 9. Griff anschlagplatte 10. Messer 11. Sicherheitsring (messerschutz) 12. Schleifvorrichtung 13. Knopf messerhaube 14. -
Página 47: Allgemeine Beschreibung
RED LINE - 220 / 250 / 300 4.3 ALLGEMEINE BESCHREIBUNG Dieses Steuersystem verhindert ein ungewolltes Starten der Maschine nach einer Unterbrechung Die Schneidemaschine ist in Übereinstimmung der Stromversorgung; das heißt, die Schneide- mit der Richtlinie 2006/42/EG - 2006/95/EG maschine kann nur mutwillig neu gestartet wer- - 2004/108/EG und der europäischen Verord- den. -
Página 48: Montage
5. MONTAGE rungen, die Länge des Versorgungskabels nicht ausreicht, sich an geschultes Fachpersonal wen- den; keine elektrischen Anschlüsse “improvisieren”. 5.1. MONTAGE DER MASCHINE Die Maschine auf einer planen glatten und tro- ckenen Fläche, die geeignet ist, das Gewicht der Maschine plus dem Schneidgut zu tragen, montieren;... -
Página 49: Bedienung Der Schneidemaschine
RED LINE - 220 / 250 / 300 6. BEDIENUNG DER 6.2. REINIGUNG DER SCHNEIDEMASCHINE 6.2.1. Allgemeine informationen SCHNEIDEMASCHINE Die Maschinen müssen mindestens einmal am Tag sorgfältig gereinigt werden; wenn nötig, 6.1. LADEN DES SCHNEIDGUTS AUF DIE auch öfters. Nach einem mehr oder weniger PLATTE UND SCHNITT längeren Zeitraum, in dem die Maschinen nicht benutzt worden sind, müssen sie auch vor dem... -
Página 50: Reinigen Des Maschinengehäuses Und Der Abgebauten Teile
Ausbau der Messerhaube wenden, mit einem weichen Schwammtuch und 1. Die Messerschutzscheibe mit Hilfe des Knopfs einer mittelharte Nylonzahnbürste für die spit- um 90° gegen den Uhrzeigersinn drehen; zen Bereiche der Schneidgutplatte und der An- schlagplatte arbeiten. 2. Eine Feder erleichtert das Herausziehen d Messerschutzscheibe. -
Página 51: Anweisungen Für Die Entfernung Des Messers
RED LINE - 220 / 250 / 300 Reinigen des Maschinengehäuses Das Maschinengehäuse mit einem feuchten Tuch oder einem Schwamm reinigen und häufig mit armen Wasser spülen. Sorgfältig abtrocknen. Reinigen der Schleifvorrichtung Das Gehäuse mit einem feuchten Tuch und die Scheiben mit einer mittelharten Nylonzahnbürs- te reinigen. -
Página 52: Wiederzusammenbauen Der Schneidemaschine
Wiedereinbau der Messerhaube 6.2.5 Wiederzusammenbau der schneidemaschine 1. Die Messerhaube wie in der Ab- bildung einbauen. Wiedereinbau der Schleifvorrichtung Die Schleifvorrichtung wie in der Abbildung ein- 2. Die Messerhaube im Uhrzeigersinn setzen, bis sie in der korrekten Position einrastet. um 90° drehen, bis sie in ihrer ACHTUNG: Niemals die Anfangsposition einrastet. -
Página 53: Wartung Und Reparatur
RED LINE - 220 / 250 / 300 7. WARTUNG UND REPARATUR 7.1. GENERAL Der Bediener darf die folgenden Wartungsar- beiten ausführen: - Schleifen des Messers: regelmäßig; Die Abstände und die Dauer des Schleifens hän- gen natürlich von den Gebrauch der Maschine ab (Arbeitszeiten und Schneidgut). -
Página 54: Schmieren Der Führungsschienen Für Schlitten
4. Die Schleifvorrichtung 7.3. SCHMIEREN loslassen; DER SCHIENEN DES GLEITSCHLITTENS ARM 5. Den Starttaster drücken, um das Messer in Betrieb AUFLAGEPLATTE (Wöchentlich) zu setzen; WARNHINWEIS: 6. Den Taster der Ausschließlich das Schleifscheibe (1) drücken mitgelieferte Öl verwenden. und für 10 - 15 Sekunden Wenn kein Öl mehr da ist, direkt beim gedrückt halten, um das Hersteller bestellen... -
Página 55: Schadenssuche Und Schadensbehebung
RED LINE - 220 / 250 / 300 8. SCHADENSSUCHE UND SCHADENSBEHEBUNG WARNHINWEIS: In diesem Kapitel werden die während des Gebrauchs der Schneidemaschine am häufigsten vorkommenden Störungen und die notwendigen Arbeitsschritte, um die möglichen Ursachen zu beheben, angegeben. Wenn die Störung andauert, nicht weiter nach der Ursache suchen, sondern sich sofort an vom Hersteller autorisiertes Fachpersonal wenden. -
Página 56: Verschrottung Der Schneidemaschine
9. VERSCHROTTUNG DER SCHNEIDEMASCHINE Die Maschinen setzen sich zusammen aus: - Konstruktion aus Aluminium/Magnesiumlegierung; - Einsätze und verschiedene Komponenten aus Edelstahl; - Elektrische Teile und elektrische Kabel; - Elektromotor; - Kunststoffe usw. Wird der Abbau und die Verschrottung Dritten anvertraut, sich ausschließlich an Firmen wenden, die für die Entsorgung er oben genannten Materialien autorisiert sind. - Página 57 RED LINE - 220 / 250 / 300 INTRODUCTION Nous vous remercions de la confiance que vous nous avez accordé en achetant un de nos produits; nous vous recommandons cependant, avant de démarrer la trancheuse, de lire attentivement ce manuel. Les machines décrites dans ce manuel respectent, en ce qui concerne la sécurité...
- Página 58 SOMMAIRE 1. INTRODUCTION ........................59 1.1. But du manuel ...........................59 1.2. Conservation du manuel........................59 1.3. Utilisation des machines ........................59 2. GÉNÉRALITÉS ............................59 2.1. Limites d’utilisation de la machine, normes de sécurité .............59 ............59 2.1.1. Conditions environnementales d’utilisation de la machine ....................59 2.1.2.
-
Página 59: Introduction
à utilisation alimentaire, avec du personnel non formé, de modifications et/ou une lame circulaire, modèles Red Line 220, Red de réparations effectuées personnellement ou Line 250 et Red Line 300. Le but du présent par du personnel non autorisé, d’une utilisation... -
Página 60: Garantie Et Responsabilités Du Constructeur
En qualité d’opérateur, seules les personnes - arrêtez immédiatement la machine en cas de défaut, de fonctionnement anormal, de suspicion âgées d’au moins 18 ans, en parfaites conditions psychophysiques d’aptitude et de capacité prouvées de rupture, de mouvements incorrects, de bruit et ayant les connaissances nécessaires pour la insolite;... -
Página 61: Obligations De L'utilisateur
RED LINE - 220 / 250 / 300 2.3. OBLIGATIONS DE L’UTILISATEUR attitudes appropriées pour utiliser la machine. Pour pouvoir utiliser la garantie fournie par le constructeur, l’utilisateur doit respecter scrupu- 2.4. MARQUAGES - PLAQUES leusement les prescriptions indiquées dans le La plaque suivante se trouve sur la présent manuel et en particulier: machine:... -
Página 62: Matériel Fourni Et Accessoires
3.2. FOURNITURE ET ACCESSOIRES - pains et fromages (évidemment du type à dé- couper tels que le gruyère, la fontine, etc.). Si non spécifiquement demandé, les documents et accessoires suivants sont fournis avec la ma- chine: 3.4. PRODUITS QUI NE PEUVENT PAS - manuel d’instruction d’utilisation et ÊTRE DÉCOUPÉS d’entretien;... -
Página 63: Description
RED LINE - 220 / 250 / 300 4. DESCRIPTION soulevez et extrayez la machine encore enroulée dans une feuille en polyéthylène transparent; 4.1. OUVERTURE DE L’EMBALLAGE ATTENTION: Soulevez la machine avec deux Vérifiez que lors de la livraison, l’emballage soit personnes en tenant compte du fait que le poids intègre;... -
Página 64: Composants Principaux
4.2. COMPOSANTS PRINCIPAUX 1. Bouton de démarrage (blanc) 2. Bouton d’arrêt (rouge) 3. Plaque d’identification de la machine, des données techniques et du marquage CE 4. Pied 5. Poignée de réglage de l’épaisseur de la tranche 6. Plaque de la jauge d’épaisseur (écran) 7. -
Página 65: Description Générale
RED LINE - 220 / 250 / 300 4.3 DESCRIPTION GÉNÉRALE identifiables du fait de leur position et de leur couleur; le fonctionnement de la machine est si- La trancheuse a été conçue et réalisée en confor- gnalé par un indicateur lumineux. mité... -
Página 66: Installation
5. INSTALLATION suffisamment long, demander l’intervention d’un personnel qualifié et habilité; n’effectuez pas de branchements électriques de type «provi- soires». 5.1. INSTALLATION DE LA MACHINE Installez la machine sur un plan bien nivelé, lisse, sec et adapté pour soutenir le poids de la machine, en plus du produit à... -
Página 67: Utilisation De La Trancheuse
RED LINE - 220 / 250 / 300 6. UTILISATION DE LA 6.2.1. Informations générales Les machines doivent être soigneusement net- TRANCHEUSE toyées au moins une fois par jour; si nécessaire, effectuez-le plus souvent. Après une période plus ou moins longue d’inactivité, elles doivent 6.1 CHARGEMENT DU PRODUIT SUR LE être nettoyées avant d’être utilisées. -
Página 68: Nettoyage Du Corps De La Machine Et Des Pièces Retirées
Démontage du couvre-lame. avec un pH entre 7et 8, à une température de 1. Tournez de 90° en sens antihoraire le disque travail non inférieure à 30 °C en utilisant un linge pare-lame à l’aide de la poignée appro- doux, spongieux et une brosse en nylon semi-ri- priée;... -
Página 69: Instruction Du Retrait De La Lame
RED LINE - 220 / 250 / 300 Nettoyez le corps de la machine Nettoyez le corps de la machine avec un linge humide et une éponge en les rinçant fréquem- ment avec de l’eau chaude. Séchez avec soin. Nettoyez l’aiguisoir Nettoyez le corps avec un linge humide et les ressorts avec une brosse en nylon semi-rigide. -
Página 70: Remontage De La Trancheuse
Remontage du couvre-lame. 6.2.5 Remontage de la trancheuse 1. Remontez le couvre-lame comme le montre la Remontage de l’aiguisoir. figure; Insérez le groupe aiguisoir comme sur la figure jusqu’à ce qu’il s’arrête dans la position correcte. 2. tournez de 90 degrés en sens horaire le couvre-lame, jusqu’à... -
Página 71: Entretien Et Réparation
RED LINE - 220 / 250 / 300 7. ENTRETIEN ET RÉPARATION 7.1. GÉNÉRALITÉS Les interventions d’entretien que peut effectuer l’opérateur sont les suivantes: - aiguisage de la lame, régulièrement; La périodicité et la durée de l’aiguisage dé- pendent de l’utilisation de l’appareille (temps de travail et type de produit travaillé). -
Página 72: Lubrification Des Guides De Glissement Du Chariot
relâchez l’aiguisoir; 7.3. LUBRIFICATION DES démarrez la lame en GUIDES DE GLISSEMENT appuyant sur le bouton DU CHARIOT DU BRAS DE d’allumage; SUPPORT DU PLAT PORTE- effectuez l’aiguisage de ALIMENT (hebdomadaire) la lame en maintenant AVERTISSEMENT: Utilisez appuyé pendant 10 à uniquement l’huile fournie. -
Página 73: Recherche Et Élimination Des Pannes
RED LINE - 220 / 250 / 300 8. RECHERCHE ET ÉLIMINATION DES PANNES AVERTISSEMENT: Ce chapitre contient les inconvénients les plus communs qui se vérifient pendant l’utilisation de la trancheuse et contient les opérations nécessaires pour en éliminer les causes possibles. Lorsque l’inconvénient persiste, n’insistez pas à chercher la cause mais appelez immédiatement du personnel qualifié... -
Página 74: Démolition Et Élimination
9. DÉMOLITION ET ÉLIMINATION Les machines sont composées de: -Structure en alliage d’aluminium; -Pièces en acier inoxydable; -Matières plastiques, etc. Si le démontage et la démolition sont confiés à des tiers, contacter uniquement des entreprises spécialisées et autorisées pour la récupération et la démolition des tels matériaux. Si la démolition est effectuée en interne, il est nécessaire de séparer les matériaux suivant leurs typologies et de contacter par la suite les entreprises autorisées pour leur récupération et leur démolition. - Página 75 RED LINE - 220 / 250 / 300 INLEIDING We danken u voor de aankoop van één van onze producten. We raden aan om deze handleiding aandachtig door te lezen alvorens de snijmachine in gebruik te nemen. De machines beschreven in deze handleiding voldoen aan de veiligheidsvoorschriften ter bescherming tegen mechanische risico’s, d.w.z.
- Página 76 INHOUDSOPGAVE 1. INLEIDING ..................................... 1.1. Doel van de handleiding ..............................1.2. De handleiding bewaren ..............................1.3. Gebruiksbestemming van de machines ........................2. ALGEMENE INFORMATIE ............................2.1. Gebruikslimieten van de machine, veiligheidsnormen ................. 2.1.1. Omgevingsvoorwaarden voor het gebruik van de machine ...............
-
Página 77: Inleiding
Red Line 220, Red Line 250, Red Line voor zelfstandig verrichte wijzigingen en/of re- 300, nodig is. paraties, door het gebruik van niet-originele of... -
Página 78: Garantie En Aansprakelijkheid Van De Fabrikant
De machine mag enkel worden gebruikt door per- - Stop de machine onmiddellijk en licht het per- sonen ouder dan 18 jaar die in perfecte geestelijke soneel van een erkend servicecentrum in als u een storing, verkeerde bewegingen of vreemd en lichamelijke staat verkeren en waarvan een cor- geluid waarneemt en/of breuken veronderstelt;... -
Página 79: Plichten Van De Gebruiker
RED LINE - 220 / 250 / 300 2.3. PLICHTEN VAN DE GEBRUIKER 2.4. MARKERINGEN - PLAATJES Op de machine is het volgende Om het recht op de garantie van de fabrikant plaatje aangebracht: niet te verliezen, moet de gebruiker de aanwij- zingen van deze handleiding nauwgezet nale- - typeplaatje met de gegevens van de ven, en met name:... -
Página 80: Leveringsomvang En Accessoires
3.2. LEVERINGSOMVANG EN - vlees zonder bot (gekookt of rauw bij een minimum temperatuur van +3 °C); ACCESSOIRES - brood en kaas (zacht, zoals bijv. gruyère, enz.). De volgende documenten en accessoires worden meegeleverd, tenzij anders wordt aangevraagd: - gebruikers- en onderhoudshandleiding; 3.4. -
Página 81: Beschrijving
RED LINE - 220 / 250 / 300 4. BESCHRIJVING OPGELET: til de machine met zijn tweeën op. Houd er daarbij rekening mee dat het deel met het mes zwaarder is. 4.1. UITPAKKEN Controleer aan het einde de inhoud van de Verifieer bij de levering of de verpakking heel verpakking en ha na of deze met het uit- is, Informeer onmiddellijk de expediteur of uw... -
Página 82: Hoofdcomponenten
4.2. HOOFDCOMPONENTEN 1. Startknop (wit) 2. Stopknop (rood) 3. Typeplaatje met technische specificaties en CE-markering 4. Pootje 5. Dikteregelaar 6. Dikteplaat 7. Voorwand 8. Vleestafel 9. Handgreep vleesklem 10. Mes 11. Beschermingsring 12. Slijpapparaat 13. Mesplaatknop 14. Demonteerbare kroon 15. Onderstel 16. -
Página 83: Algemene Beschrijving
RED LINE - 220 / 250 / 300 4.3. ALGEMENE BESCHRIJVING wordt door een signaallamp aangegeven. Het bedieningssysteem voorkomt dat de ma- De snijmachine is ontworpen en vervaar- chine na een onderbreking van het elektrische digd conform de richtlijnen 2006/42/EG – circuit ongewenst kan worden ingeschakeld. -
Página 84: Installatie
5. INSTALLATIE Als wegens bijzondere installatie-eisen de voe- dingskabel niet lang genoeg is, wend u dan tot ervaren en gekwalificeerd personeel. Verricht 5.1. INSTALLATIE VAN DE MACHINE geen “noodaansluitingen”. Installeer de machine op een droge, gladde en vlakke ondergrond die het gewicht van de ma- chine plus het te snijden levensmiddel kan dra- gen, zie paragraaf 3.1. -
Página 85: Gebruik Van De Snijmachine
RED LINE - 220 / 250 / 300 6. GEBRUIK VAN DE SNIJMACHINE 6.2. REINIGING VAN DE SNIJMACHINE 6.2.1 Algemene informatie 6.1 WAREN OP DE VLEESTAFEL De machines moeten minstens één keer per dag of vaker nauwgezet worden gereinigd. Als PLAATSEN EN SNIJDEN de machines een bepaalde periode lang niet 1. -
Página 86: Reiniging Van De Behuizing En De Gedemonteerde Onderdelen
Demontage van de mesplaat met pH 7-8, bij een bedrijfstemperatuur van 1. Laat de mesplaat met de specifieke minstens 30 °C, een zachte, sponsachtige doek mesplaatknop 90° linksom draaien; en een nylon niet al te hard borsteltje voor de vleestafel en de scherpe vleesklem. 2. -
Página 87: Instructies Voor De Demontage Van Het Mes
RED LINE - 220 / 250 / 300 Reiniging van de machinebehuizing Maak de machinebehuizing schoon met een vochtige doek of spons en spoel deze regelma- tig met warm water uit. Maak zorgvuldig droog. Reiniging van het slijpapparaat Maak de behuizing met een vochtige doek schoon. -
Página 88: Hermontage Van De Snijmachine
6.2.5. Hermontage van de snijmachine Hermontage van de mesplaat 1. Hermonteer de mesplaat Hermontage van het slijpapparaat volgens de afbeelding; Breng de slijpgroep aan volgens de aanwij- 2. Laat de mesplaat 90 graden zingen van de afbeelding tot deze in de juiste rechtsom draaien tot deze in de stand is geplaatst. -
Página 89: Onderhoud En Reparaties
RED LINE - 220 / 250 / 300 7. ONDERHOUD EN REPARATIES 7.1. ALGEMENE INFORMATIE De gebruiker mag het volgende onderhoud ver- richten: - Het mes regelmatig slijpen; De regelmaat en de duur van het slijpen hangen af van het gebruik van het apparaat (bedrijfsu- ren en type bewerkt product). -
Página 90: Glijgeleiders Van De Vleestafel Smeren
Laat het slijpapparaat 7.3. GLIJGELEIDERS VAN DE ARM VAN DE WAGEN VAN los; DE VLEESTAFEL SMEREN Schakel het mes met een (elke week) druk op de startknop in; WAARSCHUWING: Slijp het mes door de Gebruik uitsluitend de knop van de slijpsteen meegeleverde olie. -
Página 91: Storingen Opsporen En Verhelpen
RED LINE - 220 / 250 / 300 8. STORINGEN OPSPOREN EN VERHELPEN WAARSCHUWING: In dit hoofdstuk worden de meest voorkomende problemen beschreven die zich tijdens het gebruik van de snijmachine kunnen voordoen. Bovendien worden de handelingen beschreven die voor het verhelpen van de mogelijke oorzaken nodig zijn. Probeer de oorzaak niet te vinden als het probleem blijft bestaan, maar wend u onmiddellijk tot gekwalificeerd en door de fabrikant erkend personeel. -
Página 92: Afbraak Van De Snijmachine
9. AFBRAAK VAN DE SNIJMACHINE De machines zijn gemaakt van: - een structuur van aluminium-/magnesiumlegering; - diverse elementen en componenten van roestvrij staal; - elektrische onderdelen en elektrische kabels; - elektromotor; - kunststof, enz. Wend u uitsluitend tot erkende vuilverwerkingsbedrijven als de demontage en afbraak door derden worden verricht. -
Página 93: Introducción
RED LINE - 220 / 250 / 300 INTRODUCCIÓN Queremos darle las gracias por la confianza depositada a la hora de adquirir un producto de nuestra marca; antes de poner en funcionamiento la máquina de cortar en lonchas le recomendamos leer atentamente este manual. - Página 94 ÍNDICE 1. INTRODUCCIÓN ................................1.1. Finalidad del manual ................................1.2. Conservación del manual ..............................1.3. Destino de uso de las máquinas ........................... 2. GENERALIDADES ................................2.1. Límites de empleo de la máquina, normas de seguridad ................ 2.1.1. Condiciones ambientales de empleo de la máquina ..................
-
Página 95: Finalidad Del Manual
En caso de dudas acerca cuchilla circular, Modelo Red Line 220, Red Line del contenido del manual o para aclaraciones 250 y Red Line 300. La finalidad del presente... -
Página 96: Garantía Y Responsabilidad Del Fabricante
Para un mejor uso respete las siguientes indicaciones: y a la laceración para realizar las operaciones de limpieza y mantenimiento; - instale la máquina de acuerdo con las instruccio- nes contenidas en el apartado ‘instalación’; - coloque y extraiga el producto que desea cortar en lonchas sobre plato de acero corredizo sola- - instale la máquina en un lugar fuera del alcance mente con el carro completamente retraído y con... -
Página 97: Obligaciones Del Usuario
RED LINE - 220 / 250 / 300 2.3. OBLIGACIONES DEL USUARIO 2.4. MARCAS - PLACAS DE IDENTIFICACIÓN El usuario para poder utilizar la garantía suministrada por el fabricante debe observar Sobre la máquina se encuentra colocada detalladamente las prescripciones indicadas en la siguiente placa: el presente manual y especialmente: - placa de identificación del fabricante, máqui-... -
Página 98: Conjunto De Equipamiento Y Accesorios
3.2 CONJUNTO DE EQUIPAMIENTO Y - pan y quesos (obviamente del tipo que puede ACCESORIOS cortarse en lonchas como gruyer, fontina, etc.). Junto con la máquina son suministrados los siguientes documentos y accesorios: 3.4. PRODUCTOS QUE NO SE PUEDEN - manual para la instalación, el uso y el CORTAR EN LONCHAS mantenimiento;... -
Página 99: Descripción
RED LINE - 220 / 250 / 300 4. DESCRIPCIÓN ATENCIÓN: Entre dos personas levante la má- quina teniendo en cuenta que el peso mayor se encuentra situado en el lado de la cuchilla. 4.1. APERTURA DEL EMBALAJE concluida operación controlar Verifique que en el momento de la entrega el contenido del embalaje y verifique que... -
Página 100: Componentes Principales
4.2. COMPONENTES PRINCIPALES 1. Botón de arranque (blanco) 2. Botón de detención (rojo) 3. Placa de identificación, datos técnicos y marca 4. Pie 5. Manivela de regulación del espesor de la loncha 6. Plancha calibradora del espesor (vela) 7. Protección de seguridad 8. -
Página 101: Descripción General
RED LINE - 220 / 250 / 300 4.3 DESCRIPCIÓN GENERAL dicador luminoso. Tal sistema de mando impide que se produzcan arranques accidentales de la La máquina de cortar en lonchas ha sido dise- máquina después de una posible interrupción ñada y realizada de acuerdo con la directiva del circuito eléctrico de alimentación;... -
Página 102: Instalación
5. INSTALACIÓN alimentación no fuera lo suficientemente largo, solicite la intervención de personal cualificado y habilitado; no realice conexiones eléctricas de tipo “volante”. 5.1. INSTALACIÓN DE LA MÁQUINA Instale la máquina sobre una superficie que esté bien nivelada, seca e indicada para sostener el peso de la misma máquina más los productos que desea cortar;... -
Página 103: Uso De La Máquina De Cortar En Lonchas
RED LINE - 220 / 250 / 300 6. USO DE LA MÁQUINA DE 6.2. LIMPIEZA DE LA MÁQUINA DE CORTAR EN LONCHAS CORTAR EN LONCHAS 6.2.1 Información general Las máquinas deben ser limpiadas adecuada- 6.1. CARGA DE LOS PRODUCTOS SOBRE mente al menos una vez al día;... -
Página 104: Limpieza Del Cuerpo De La Máquina Y De Las Partes Extraídas
suave, esponjoso y un cepillo de nylon semirígi- Desmontaje del cubre cuchilla do para aquellas zonas del plato y del prensa 1. Gire 90º en sentido antihorario el disco alimentos apuntadas. paracuchilla a través de una manivela; ATENCIÓN: Para las operaciones de limpieza 2. -
Página 105: Limpieza De Los Componentes Contenidos En El Basamento
RED LINE - 220 / 250 / 300 Limpieza del cuerpo de la máquina Limpie el cuerpo de la máquina con un paño hú- medo o una esponja enjuagando con frecuencia con agua caliente. Seque cuidadosamente. Limpieza del afilador Limpie el cuerpo con un paño húmedo y las mue- las con un cepillo de nylon semirígido. -
Página 106: Volver A Montar La Máquina De Cortar En Lonchas
Volver a montar el cubre cuchilla 6.2.5 Volver a montar la máquina de cortar en lonchas 1. Volver a montar el cubre cuchilla como se muestra en figura; Colver a montar el afilador Introducir el grupo afilador, como se muestra en 2. -
Página 107: Mantenimientoy Reparación
RED LINE - 220 / 250 / 300 7. MANTENIMIENTO Y REPARACIÓN 7.1. GENERALIDADES Las intervenciones de mantenimiento permitidas al operador son las siguientes: - afilado de la cuchilla: periódicamente; La periodicidad y la duración del afilado de- penden obviamente del uso del aparato (tiem- pos de funcionamiento y producto con el que se trabaja). -
Página 108: Lubricación De Las Guías De Desplazamiento Del Carro
suelte el afilador; 7.3. LUBRICACIÓN DE LAS GUÍAS DE DESPLAZAMIENTI accione la cuchilla pre- DEL CARRO BRAZO DE sionando el botón de en- APOYO DEL PLATO PORTA cendido; ALIMENTOS (semanalmente) realice el afilado de la ADVERTENCIA: Utilice cuchilla pulsando y man- exclusivamente el teniendo pulsado duran- aceite suministrado con... -
Página 109: Búsqueda Y Eliminación De Problemas
RED LINE - 220 / 250 / 300 8. BÚSQUEDA Y ELIMINACIÓN DE PROBLEMAS ADVERTENCIA: En este capítulo se indican los incovenientes más comunes que se verifican durante el uso de la máquina de cortar en lonchas y las operaciones necesarias para eliminar las posibles causas. -
Página 110: Demolición De La Máquina De Cortar En Lonchas
9. DEMOLICIÓN DE LA MÁQUINA DE CORTAR EN LONCHAS Las máquinas están compuestas por: - estructura en aleación de aluminio/magnesio; - insertos y diferentes componentes de acero inoxidable; - partes eléctricas y cables eléctricos; - motor eléctrico; - materiales plásticos, etc. Si el desmontaje y la demolición son confiados a terceras partes acuda exclusivamente a empresas autorizadas para la eliminación de dichos materiales. - Página 112 Van Berkel International S.r.l. Via Varese, 14 • 21041 Albizzate (VA) +39 0331 990825 info@berkelinternational.com www.theberkelworld.com...