
Manuales relacionados para Sartorius Biotrate LH-723080


Resumen de contenidos para Sartorius Biotrate LH-723080
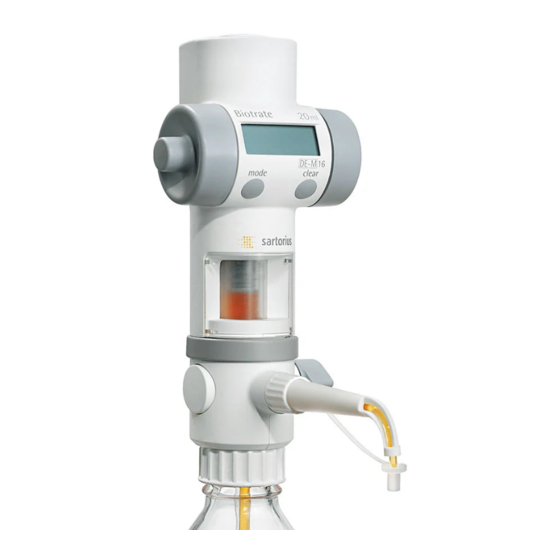
- Página 1 Sartorius Biotrate Digital Burette / Digitalbürette Burette électronique / Bureta digital Language Page User Manual / Bedienungsanleitung Mode d’ emploi / Manual Usario www.sartorius.com...
- Página 2 Germany Phone +49.551.308.0 Fax +49.551.308.3289 The status of the information, specifications, and illustrations in this manual are subject to change. Sartorius reserves the right to make changes to the technology, features, specifications, and design of the equipment www.sartorius.com without notice.
-
Página 3: Tabla De Contenido
Inhalt Content Seite page Sicherheitsvorschriften ..............4 Warnings and safety instructions ..........4 Einzelteile ..................8 Individual components ..............8 Funktionsprinzip ................9 Principle of operation ..............9 Einsatzverbote ................10 Prohibited applications ..............10 Einsatzbeschränkungen ...............11 Restricted applications ..............11 Gerät vorbereiten .................12 Preparation of device ..............12 6.1 Einsetzen des Lichtschutzfensters ..........12 6.1 Using the light protection window ..........12 6.2 Befestigung Ansaugschlauch ............13... - Página 4 Inhalt Content Seite page Sterilisation ..................33 Sterilization ...................33 9.1 Vorbereitung .................33 9.1 Preparations for sterilization ............33 9.2 Demontage ................... 34 9.2 Disassembly .................. 34 9.3 Ansaug-/Ausstoß- und Rückführventil lockern ......34 9.3 How to loosen the suction, discharge and 9.4 Sterilisation durchführen ............... 36 recirculation valve ................
-
Página 5: Sicherheitsvorschriften
1. Sicherheitsvorschriften 1. Warnings and safety instructions Achtung! Please note: Vor Gebrauch die Bedienungsanleitung und die Please read the user manual and safety instructions Sicherheitsvorschriften sorgfältig lesen und beach- carefully. Each person working in the laboratory ten. Jeder im Labor beschäftigten Person sind diese must be familiar with these safety instructions prior Sicherheitshinweise vor Benutzung bekannt zu to using the device. - Página 6 1. Sicherheitsvorschriften 1. Warnings and safety instructions - Beachten Sie die Hinweise und Vorschriften des - Instructions provided by the reagent manufacturer Reagenzherstellers. must be observed at any time. - Das Gerät darf nur zum Titrieren von Flüssigkeiten - This device is only intended for titrating fluids. eingesetzt werden, wobei definierte Einsatzverbote Certain applications are either prohibited or und Einsatzbeschränkungen unbedingt einzuhalten...
- Página 7 1. Sicherheitsvorschriften 1. Warnings and safety instructions - Achten Sie darauf, dass weder Sie selbst noch - Make sure that you do not endanger yourself or eine andere Person gefährdet werden. Nie in any other person. Never work towards another Richtung einer Person arbeiten;...
- Página 8 1. Sicherheitsvorschriften 1. Warnings and safety instructions - Bei Störungen, z. B. - In the event of errors, such as - schwergängiger oder festsitzender Kolben - slow moving or jammed piston - verklebtes oder undichtes Ansaug-/Ausstoß-/ - sticky or leaking suction/ Rückführventil discharge/recirculation valve - undichte Stellen...
-
Página 9: Einzelteile
- 8 - 2.Einzelteile 2. Einzelteile 1. Ausstoßeinheit komplett 1. Ausstoßeinheit komplett 2. Rückführventil 2. Rückführventil 3. Ansaugventil 3. Ansaugventil 4. Ausstoßventil 4. Ausstoßventil 5. 3-Weg-Hahn mit Griff, 5. 3-Weg-Hahn mit Griff, Mutter, Scheibe, O-Ring Mutter, Scheibe, O-Ring 6. Deckel 6. -
Página 10: Funktionsprinzip
3. Funktionsprinzip 3. Principle of operation - Das Gerät ist ein manuell bedienbarer - The device is a manually operated bottle top burette Flaschenaufsatz-Titrierer mit Digitalanzeige zum with digital display for the titration of fluids. Titrieren von Flüssigkeiten. Das Grundgerät The basic unit has thread A45 built in. -
Página 11: Einsatzverbote
3. Funktionsprinzip 3. Principle of operation - Werden die Handräder nach dem Befüllen der - Once the burette has been filled, hold the hand Bürette auf den Körper zu gedreht, öffnet sich wheels with the thumbs and index fingers, move das Ausstoßventil und gibt Flüssigkeit aus dem your thumbs downward, turning the hand wheels Zylinder durch die Ausstoßeinheit ab. -
Página 12: Einsatzbeschränkungen
5. Einsatzbeschränkungen 5. Restricted applications - hochkonzentrierte Säuren, Laugen- und - highly concentrated acids, alcalines, salt solutions, Salzlösungen, HF. - die Digitalbürette ist für einen Arbeitstemperatur- - the burette is suitable for operating temperatures bereich von +4 °C bis +50 °C geeignet. between +4°C and +50°C. -
Página 13: Gerät Vorbereiten
6. Gerät vorbereiten 6. Preparation of the device Achtung, vor Montagebeginn beachten! Attention, please note prior to assembly! - Ein einwandfreier und sicherer Betrieb ist - Proper and safe operation is only warranted if nur bei Verwendung der beiliegenden Original- the enclosed original parts are used. -
Página 14: Befestigung Ansaugschlauch
verwenden. 6.1 Befestigung Ansaugschlauch 6.2 Befestigung Ansaugschlauch 6.1 How to Connect the Suction Tube 6.2 How to connect the suction tube - Ansaugschlauch neben Vorratsflasche - Ansaugschlauch neben Vorratsflasche Hold suction tube next to supply bottle - Hold suction tube next to supply bottle stellen, dabei zeigt das Schlauchende stellen, dabei zeigt das Schlauchende with the retainer ring pointing towards... -
Página 15: Befestigung Rückführschlauch
- 14 - 6.2 Befestigung 6.3 Befestigung Rückführschlauch 6.3 How to connect the recirculation tube Rückführschlauch 6.2 How to Connect the - 14 - Recirculation Tube - Rückführschlauch in Rückführöffnung - Firmly press recirculation tube in the 6.2 Befestigung - Rückführschlauch in Rückführöffnung des Ventilblocks fest einstecken. - Página 16 6.4 Befestigung Ausstoßeinheit 6.4 How to connect the discharge tube - Ausstoßeinheit bis zum Anschlag auf- - Ausstoßeinheit bis zum Anschlag auf- - Attach discharge tube securely. - Ausstoßeinheit bis zum Anschlag auf- - Attach discharge tube securely. stecken. stecken. - Attach discharge tube securely.
-
Página 17: Gerät Auf Flasche Aufschrauben
6.5 Gerät auf Flasche aufschrauben 6.5 Secure device on bottle - 16 - - Gerät mit oder gegebenenfalls ohne - Screw device either with or without 6.4 Gerät auf Flasche aufschrauben 6.4 Secure Device on Bottle Gewindeadapter auf Vorratsflasche adapter onto reservoir bottle. aufschrauben. -
Página 18: Batterie Einsetzen
6.7 Batterie einsetzen 6.7 Inserting the battery Bevor Sie das Gerät verwenden können, Prior to using the device, the battery muss die Batterie (Typ Lithium 3V, CR-2032) (lithium 3V type, CR-2032) should be in das Batteriefach auf der Rückseite des inserted in the battery compartment at Gerätes eingelegt werden. -
Página 19: Titrieren
7. Titrieren 7. Titrating 7. Titrieren 7. Titrating Achtung! Please note: Achtung! Please note: - Sicherheitsvorschriften (siehe Punkt 1) einhalten - Always follow safety instructions (refer to - Sicherheitsvorschriften (siehe Punkt 1) einhalten - Always follow safety instructions (refer to section - Einsatzverbote und Einsatzbeschränkungen section 1) as well as application prohibitions - Einsatzverbote und Einsatzbeschränkungen... -
Página 20: Remove Closure Cap
7.1 Verschlusskappe abnehmen 7.1 Remove closure cap - 18 - - 18 - - Verschlusskappe entsprechend der Ab- - Press closure cap back on as shown. - Verschlusskappe entsprechend der Ab- - Press closure cap back on as shown. - 18 - - Verschlusskappe entsprechend der Ab- - Press closure cap back on as shown. -
Página 21: Befüllen Der Digitalbürette
unteren Anschlagpunkt gebracht wird. times briefly in both directions. Make unteren Anschlagpunkt gebracht wird. times briefly in both directions. Make unteren Anschlagpunkt gebracht wird. times briefly in both directions. Make 7.2 Entlüften des Gerätes 7.2 How to prime the device Sind keine Luftblasen mehr im Schauglas sure that the piston is moved completely Sind keine Luftblasen mehr im Schauglas... - Página 22 - 20 - 7.3 Befüllen der Digitalbürette 7.3 How to fill the digital burette befüllt. Dies kann entweder bis zum Gesamt- wheels away from the body. The burette may either Dies kann entweder bis zum Gesamtvolumen The burette may either be filled completely (10 ml, 20 ml volumen ( 20 ml bzw.
-
Página 23: Titration
7.4 Titration 7.4 Titration eigentlichen Titration einige Tropfen Medium in ein dispensing the first few drops of the titrant into a Abfallgefäß abzugeben und nach Zurücksetzen des waste container prior to the actual titration. To begin Anzeigewertes auf Null mit der Titration zu beginnen. the titration process reset the display value to zero. -
Página 24: Kundenspezifische Kalibrierung Quick-Cal
eigentlichen Titration einige Tropfen Medium in ein dispensing the first few drops of the titrant into a Abfallgefäß abzugeben und nach Zurücksetzen des waste container prior to the actual titration. To begin Anzeigewertes auf Null mit der Titration zu begin- the titration process reset the display value to zero. - Página 25 7.6 Kundenspezifische Kalibrierung Quick-Cal 7.6 Customer-specific calibration Quick-Cal Nach Auswaage vorzugsweise des Nominalvolumens und After calculating the actual volume of the dispensed fluid Errechnen des unter Anwenderbedingung tatsächlich (ideally use the maximum burette volume), the new factor can be entered directly as the customerspecific calibration ausgegebenen Volumens, kann dieses direkt als kundenspezifischer Kalibrierungsfaktor eingegeben factor (higher factor means smaller volume output).
-
Página 26: Reinigung
8. Reinigung 8. Cleaning Um eine lange Lebensdauer Ihrer Digitalbürette zu To warrant the lifetime of your digital burette, the gewährleisten, muss das Gerät regelmäßig gereinigt device must be cleaned on a regular basis. werden. In folgenden Fällen ist das Gerät zwingend zu reinigen: The following situations require the device to be cleaned: - nach Titrieren von Reagenzien, deren Einsatz - After titration of reagents whose application is... -
Página 27: Wartung / Reinigung
8. Reinigung 8. Cleaning Please note: Achtung! Achtung! Please note: - Before the attempt is made to clean the device, - Vor Reinigungsbeginn Schutzkleidung, Schutzbrille - Vor Reinigungsbeginn Schutzkleidung, Schutzbrille - Before the attempt is made to clean the device, put put on protective clothing, glasses and gloves. - Página 28 - 26 - 8.1 Wartung / Reinigung 8.1 Maintenance / cleaning - Gerät mittels geeignetem Handschutz - Unscrew and remove device from - Gerät mittels geeignetem Handschutz - Unscrew and remove device from von Vorratsflasche abschrauben und reservoir bottle wearing suitable hand von Vorratsflasche abschrauben und reservoir bottle wearing suitable hand herausnehmen (Ansaugschlauch ragt...
- Página 29 8.1 Wartung / Reinigung 8.1 Maintenance / cleaning - Durch mehrmaliges hin und her drehen - Completely empty the device by rota- - Durch mehrmaliges hin und her drehen - Completely empty the device by rotating der Handräder das Gerät vollständig ting the hand wheel back and forth der Handräder das Gerät vollständig the hand wheel back and forth...
- Página 30 8.1 Wartung / Reinigung 8.1 Maintenance / cleaning - 28 - - Nachfolgende Teile in eine geeignete - Remove the following parts from the - Nachfolgende Teile in eine geeignete - Remove the following parts from the Reinigungslösung legen und zuvor wie burette as described below and place Reinigungslösung legen und zuvor wie burette as described below and place...
-
Página 31: Intensivreinigung
8.2 Intensivreinigung 8.2 Thorough Cleaning 8.2 Intensivreinigung 8.2 Thorough cleaning - Zuerst Reinigung gemäß 8.1 durch- - First perform cleaning as described in section 8.1 - Zuerst Reinigung gemäß 8.1 durchführen. - First perform cleaning as described in section 8.1 führen. - Página 32 - 30 - 8.2 Intensivreinigung 8.2 Thorough cleaning Hinweis! Please note: Hinweis! Please note! Gegebenenfalls kann der Kolben durch If necessary, piston and toothed rack seitliches Schieben von der Zahnstange can be separated by sliding the piston Gegebenenfalls kann der Kolben durch If necessary, piston and toothed rack seitliches Schieben von der Zahnstange entfernt werden.
- Página 33 8.2 Intensivreinigung 8.2 Thorough cleaning - Geräteoberteil auf Ventilblock mit with the left edge of the marking on - Geräteoberteil auf Ventilblock mit Zylinder - Place upper section of the device onto the Zylinder aufstecken. Pfeil auf the chrome ring. Insert upper section aufstecken.
-
Página 34: Sterilisation
9. Sterilisation 9. Sterilization Die medienführenden Teile der Digitalbürette sind All parts of the digital burette which come in dampfsterilisierbeständig bis 121 °C/2 bar und contact with fluid can be steam-sterilized up to einer Einwirkzeit nach DIN te = 20 min. 121 °C/2 bar and sustain a sterilization time according to DIN te = 20 min. -
Página 35: Demontage
9.2 Demontage 9.2 Disassembly 9.2 Demontage 9.2 Disassembly - Neben den in Punkt 8.1 aufgeführten Teilen wer- - In addition to the parts listed under 8.1 all other - Neben den in Punkt 8.1 aufgeführten Teilen werden - In addition to the parts listed under 8.1 all other den die anderen medienführenden Teile der parts of the burette which come in contact with die anderen medienführenden Teile der Digital-... - Página 36 - 34 - 9.3 Ansaug-/Ausstoß-und Rückführventil lockern 9.3 How to loosen suction, discharge and recirculation valve - Ausstoßventil mit Montageschlüssel - Loosen discharge valve by turning it - Ausstoßventil mit Montageschlüssel - Loosen discharge valve by turning it durch halbe Drehung gegen den durch halbe Drehung gegen den 180 degrees counter-clockwise with 180 degrees counter-clockwise with...
-
Página 37: Sterilisation Durchführen
9.4 Sterilisation durchführen 9.4 How to perform a sterilization 9.4 Sterilisation durchführen 9.4 How to Perform a Sterilization Dampfsterilisation aller Medienführenden Perform steam-sterilization of all parts, Teile durchführen (bis 121 °C/2 bar, coming in contact with fluid (up to 121 °C/ Dampfsterilisation aller Medienführen- Perform steam-sterilization of all parts, Einwirkzeit nach DIN te = 20 min.). - Página 38 - 36 - 9.5 Kolben wieder einbauen 9.5 How to reassemble the piston Zum Einbau die Zahnstange so ausrichten, dass For assembly, align the toothed rack in such a Zum Einbau die Zahnstange so ausrichten, dass For assembly, align the toothed rack in such a die Verzahnung zum Sichtfenster zeigt und unter way, that the teeth face the view glass.
-
Página 39: Ansaug-/Ausstoß-/Rückführventil Festdrehen
9.5 Kolben wieder einbauen 9.5 How to reassemble the piston Achtung! Please note: Kolben vorsichtig in den Glaszylinder einstecken, Carefully insert piston into the glass cylinder so that da sonst die Dichtlippe beschädigt werden könnte. sealing lips will not be damaged. A damaged sealing Dies hätte eine Undichtigkeit des Systems zur Folge! lip will cause leakage problems! Achtung! -
Página 40: Gerät Zusammenbauen
9.6 Ansaug-/Ausstoß- und Rückführventil festdrehen 9.6 How to secure suction, discharge and recirculation valve - 38 - - Mutter auf der Ventilwelle im Uhrzeiger- - Secure nut on valve shaft clockwise by - Mutter auf der Ventilwelle im Uhrzeig- - Secure nut on valve shaft clockwise by sinn von Hand anziehen. -
Página 41: Ventile Auswechseln
Undichte oder beschädigte Ansaug-, Ausstoß- und Leaking or damaged suction, discharge and recircu 10. Ventile auswechseln 10. How to exchange valves Rückführventile sind sofort auszuwechseln (siehe lation valves must be exchanged immediately (refer Zubehör und Ersatzteile Punkt 15). to accessories and replacement parts in section 15). Undichte oder beschädigte Ansaug-, Ausstoß- und Leaking or damaged suction, discharge and recirculation Rückführventile sind sofort auszuwechseln (siehe... - Página 42 10.1 Ansaugventil auswechseln 10.1 How to exchange the suction valve - 40 - - Kugel einsetzen und neues Insert ball and install new suction - Kugel einsetzen und neues - Insert ball and install new suction Ansaugventil einschrauben und mit valve.
-
Página 43: Ausstoßventil Auswechseln
10.2 How to exchange discharge valve 10.2 Ausstoßventil auswechseln 10.2 Ausstoßventil auswechseln 10.2 How to Exchange Discharge Valve - Reinigung durchführen (siehe Punkt 8). - Clean burette (refer to section 8). - Reinigung durchführen (siehe Punkt 8). - Ausstoßeinheit abschrauben (siehe - Disconnect discharge tube (refer to - Ausstoßeinheit abschrauben (siehe - Clean burette (refer to section 8). -
Página 44: Rückführventil Auswechseln
10.3 Rückführventil auswechseln 10.3 How to exchange the recirculation valve - Rückführventil mit Montageschlüssel herausschrauben - Unscrew recirculation valve with wrench and remove. und entfernen. - Screw in new recirculation valve and tighten with - Neues Rückführventil einschrauben und mit wrench. - Página 45 11. Reparatur beim Hersteller 11. Repairs at the manufacturer - Ungereinigte Geräte gehen unrepariert an den - Without proper proof of decontamination, devices will Absender zurück. be considered contaminated. They may be serviced at higher costs or returned unserviced. - Aufgetretene Störung genau beschreiben. - The malfunctioning of the device should be described in detail.
-
Página 46: Volumenprüfung
12. Volumenprüfung 12. How to test the correct volume Die unter Punkt 14 angegebenen Parameter für The parameters listed under section 14 for accuracy Richtigkeit (R%) und Variationskoeffizient (CV%) (R%) and coefficient of variation (CV%) of a device eines Gerätes können wie folgt geprüft werden: can be tested as follows: 1. - Página 47 12. Volumenprüfung 12. How to test the correct volume 3. Berechnung von Richtigkeit und Variationskoeffizient 3. Computation of accuracy and coefficient of variation - Die Richtigkeit (R%) und der Variationskoeffizient - Accuracy (R%) and the coefficient of variation (CV%) des Gerätes sind nach den Formeln der (CV%) of the device must be computed according statistischen Qualitätskontrolle zu berechnen.
-
Página 48: Problemlösungen
13. Problemlösungen Problem Möglicher Grund Lösungen - Ventile locker oder beschädigt - Ventile mit Montageschlüssel festziehen. Aus Spalten zwischen An- Achtung: nach Sterilisation (s. Punkt 9) saug- bzw. Ausstoßventil und Ventilblock tritt Flüssigkeit aus müssen Ansaug- und Anstoßventil mit Montageschlüssel festgezogen werden. Zwischen Ausstoßventil und - Ausstoßeinheit locker oder - Original-Ausstoßeinheit richtig montieren... - Página 49 13. Problemlösungen Zwischen Rückführventil und - Ventilwelle locker - Mutter auf Ventilwelle festziehen Ventilblock (Deckel abge-nom- men) tritt Flüssigkeit aus Dosiervolumen fehlerhaft - Ausstoßeinheit locker oder - Original-Ausstoßeinheit richtig beschädigt montieren (siehe Punkt 6.4). Nur Original-Ausstoßeinheit - Ansaugschlauch locker oder - Ansaugschlauch festdrehen beschädigt (siehe Punkt 6.2).
-
Página 50: Trouble-Shooting
13. Trouble-shooting Possible cause Solution Symptom - Valve loose or damaged - Tighten valves with the wrench or Fluid leaks at the gap be- tween the valve block and the replace if necessary (see section 10) valves Note: After sterilization (see section 9), suction/discharge/recirculation valves need to be tightened. - Página 51 13. Trouble-shooting - Tighten recirculation valve with the Fluid leaks at the gap - Recirculation valve loose or between the valve damaged wrench or replace if necessary block and the recirculation (see section 10) valve - Tighten nut on stopcock shaft Fluid leaks between - Stopcock shaft loose stopcock shaft and...
-
Página 52: Technische Daten / Materialien
14. Technische Daten / Materialien 14. Technical data / materials Digital burette Digitalbürette volume Volumen 10 ml * 0.3 * 0.1 10 ml * 0,3 * 0,1 20 ml * 0.2 * 0.1 20 ml * 0,2 * 0,1 50 ml * 0.2 * 0.1 50 ml... - Página 53 14. Technische Daten / Materialien 14. Technical data / materials Die Digitalbürette ist konformitätsbescheinigt nach The digital burette has a test certificate, which certifies the den Vorschriften der Eichordnung (Anlage 12). conformity with the German weights and measures regulations (attachment 12). Arbeitstemperaturbereich für Gerät und Ambient temperature range for proper operation of Flüssigkeit zwischen +4 °C und +50 °C.
- Página 54 Material Materials Kolben Zylinder Ventil- Ventil- Ventil- Ventil- Ventil- Schläuche Dichtungs- block gehäuse kugel sitz feder ringe piston cylinder valve valve valve valve valve tubes sealing block mantle ball seat spring rings Digital- PTFE Borosilikat- Halar Halar hochreine hochreine Hastelloy FEP PTFE bürette Compound...
- Página 55 Germany Phone +49.551.308.0 Fax +49.551.308.3289 The status of the information, specifications, and illustrations in this manual are subject to change. Sartorius reserves the right to make changes to the technology, features, specifications, and design of the equipment www.sartorius.com without notice.
- Página 56 Sommaire Indice de contenidos Page Página Normas de seguridad ..............4 Avertissements et règles de sécurité ..........4 Componentes .................. 8 Composants individuels ..............8 Principio de funcionamiento ............9 Principe de fonctionnement ............9 Limitaciones de uso ..............10 Applications interdites ..............
- Página 57 Sommaire Indice de contenidos Page Página Stérilisation ................... 33 Esterilización .................. 33 9.1 Préparation ..................33 9.1 Preparación ................... 33 9.2 Démontage ..................33 9.2 Desmontaje ................... 34 9.3 Desserrage des valves d‘aspiration/ distribution-retour ..... 33 9.3 Aflojar de la válvula de aspiración, expulsión y el tubo ....34 9.4 Stérilisation ..................
-
Página 58: Avertissements Et Règles De Sécurité
1. Avertissements et règles de sécurité 1. Normas de seguridad Avertissement : ¡Atención! Lire attentivement le manuel d‘utilisation et les Antes de su utilización, por favor lea las instrucciones règles de sécurité. Chaque personne travaillant de seguridad y obsérvelas cuidadosamente. An- dans le laboratoire doit se familiariser avec les tes de su utilización, todo el personal debe estar règles de sécurité... - Página 59 1. Avertissements et règles de sécurité 1. Normas de seguridad - Les instructions délivrées par le fabricant de réactif - Tener presentes las recomendaciones y reglamentos doivent être suivies en permanence. del fabricante de los productos químicos. - Cet appareil est uniquement prévu pour les liquides - El aparato tan solo puede ser utilizado para la de titrage.
- Página 60 1. Avertissements et règles de sécurité 1. Normas de seguridad Utiliser le récipient approprié. Titrer toujours vers la Haga la titulación dirigiéndose hacia la pared interior paroi interne du récipient et non sur son contenu del recipiente y no hacia la base de este, o tampoco ou sur le fond du récipient.
- Página 61 1. Avertissements et règles de sécurité 1. Normas de seguridad - fuite - Existen partes que no son impermeables - pièce cassée - Algún componente se encuentra roto. - flexibles - Tubos flexibles - bagues d‘étanchéité - Juntas de obturación arrêter immédiatement le fonctionnement de la burette.
-
Página 62: Composants Individuels
- 8 - 2.Einzelteile 2. Composants individuels 1. Tube de distribution complet 1. Ausstoßeinheit komplett 2. Valve de recirculation 2. Rückführventil 3. Valve d‘aspiration 3. Ansaugventil 4. Valve de distribution 4. Ausstoßventil 5. Valve d‘arrêt avec commande de volve de 5. -
Página 63: Principe De Fonctionnement
3. Principe de fonctionnement 3. Principio de funcionamiento - Cet appareil est une burette pour dessus de bouteille - El aparato es un titrador manual con adaptador de bo- actionnée manuellement avec affichage numérique tella con pantalla digital para la titulación de líquidos. El pour le titrage de liquides. -
Página 64: Applications Interdites
3. Principe de fonctionnement 3. Principio de funcionamiento - Lorsque la burette a été remplie, tenir les molettes - En el caso de que el volante de mano después de haber entre le pouce et l‘index, déplacer le pouce vers le bas sido llenado se abra giranda hacia el cuerpo, se abre en tournant les molettes vers le corps;... -
Página 65: Limites D'utilisation
5. Limites d‘utilisation 5. Precauciones de uso - Acides, bases et solutions salines fortement concentrés, - con ácidos sumamente concentrados, lejías y soluciones de sal, HF. - La burette est conçue pour fonctionner à des - la bureta digital debe ser utilizada bajo una températures comprises entre +4°C et +50°C. -
Página 66: Préparation De L'appareil
6. Préparation de l‘appareil 6. Preparación del aparato Attention, noter avant l‘assemblage! Un fonctionne- ¡Atención! Antes de empezar a ensamblar: el fun- ment correct et en toute sécurité est garanti cionamiento adecuado y seguro del aparato tan uniquement si les pièces d‘origines fournies sont solo es posible si se utilizan exclusivamente las utilisées. -
Página 67: Connexion Du Tube D'aspiration
verwenden. 6.1 Befestigung Ansaugschlauch 6.2 Connexion du tube d‘aspiration 6.1 How to Connect the Suction Tube 6.2 Fijación del tubo flexible de aspiración - Ansaugschlauch neben Vorratsflasche - Maintenir le tube d‘aspiration à côté de - poner el tubo de aspiración a lado de la - Hold suction tube next to supply bottle stellen, dabei zeigt das Schlauchende la bouteille de réactif avec la bague de... -
Página 68: Connexion Du Tube De Recirculation
- 14 - 6.2 Befestigung 6.3 Connexion du tube de recirculation 6.3 Fijación del tubo flexible de retorno Rückführschlauch 6.2 How to Connect the Recirculation Tube - 14 - - Appuyer fermement le tube de recirculation - Meter fijamente el tubo de retorno en - Rückführschlauch in Rückführöffnung 6.2 Befestigung dans la sortie de recirculation prévue du... - Página 69 6.4 Connexion du tube de distribution 6.4 Fijación de la unidad de expulsión - Ausstoßeinheit bis zum Anschlag auf- - Fixer correctement le tube de distribution. - Introducir la unidad de expulsión hasta - Ausstoßeinheit bis zum Anschlag auf- - Attach discharge tube securely. stecken.
-
Página 70: Fixation Correcte De L'appareil Sur La Bouteille
6.5 Fixation correcte de l‘appareil sur la bouteille 6.5 Enroscar el aparato en la botella - 16 - - Visser l‘appareil avec ou sans adaptateur - Enroscar el aparato en la botella de reserva 6.4 Gerät auf Flasche aufschrauben 6.4 Secure Device on Bottle sur la bouteille de réactif. -
Página 71: Mise En Place De La Pile
6.7 Mise en place de la pile 6.7 Insertar pila Avant de pouvoir utiliser l‘appareil, vous Antes de poder utilizar el aparato, debe devez insérer la pile (type 3V au lithium, insertar la pila (tipo litio 3V, CR-2032) en CR-2032) dans son logement au dos de el compartimiento de pilas en la parte l‘appareil. -
Página 72: Titrage
7. Titrage 7. Titrar 7. Titrieren 7. Titrating Avertissement : ¡Atención! Achtung! Please note: - Toujours respecter les règles de sécurité (voir - ¡Observe las instrucciones de seguridad! (véase - Sicherheitsvorschriften (siehe Punkt 1) einhalten - Always follow safety instructions (refer to section chapitre 1) ainsi que les limites et interdictions punto 1) Observe las normas y las limitaciones de - Einsatzverbote und Einsatzbeschränkungen... -
Página 73: Désaération De L'appareil
7.1 Retrait du capuchon de fermenture 7.1 Quitar la capa de cierre - 18 - - 18 - - Verschlusskappe entsprechend der Ab- - Press closure cap back on as shown. - Remettre le capuchon de fermeture en - Empujar la capa de cierre hacia atrás, - 18 - - Verschlusskappe entsprechend der Ab- - Press closure cap back on as shown. -
Página 74: Remplissage De La Burette Numérique
unteren Anschlagpunkt gebracht wird. times briefly in both directions. Make unteren Anschlagpunkt gebracht wird. times briefly in both directions. Make unteren Anschlagpunkt gebracht wird. times briefly in both directions. Make 7.2 Amorçage de l‘appareil 7.2 Purga de aire del aparato Sind keine Luftblasen mehr im Schauglas sure that the piston is moved completely Sind keine Luftblasen mehr im Schauglas... -
Página 75: Titrage
- 20 - 7.3 Remplissage de la burette numérique 7.3 Llenar la bureta digital befüllt. Dies kann entweder bis zum Gesamt- wheels away from the body. The burette may either l‘index, déplacer les pouces vers le haut en tournant Esto se puede hacer hasta llegar al volumen total volumen ( 20 ml bzw. -
Página 76: Modification De L'affichage
7.4 Titration 7.4 Titulación de démarrer le vrai titrage. Pour démarrer la procédure a “0“, empezar con la titulación. Después de llegar al punto de titrage, remettre la valeur affichée sur zéro. Lorsque le de titulación se puede leer el valor de la indicación. titragé... -
Página 77: Calibración Específica Del Cliente Quick-Cal
eigentlichen Titration einige Tropfen Medium in ein dispensing the first few drops of the titrant into a Abfallgefäß abzugeben und nach Zurücksetzen des waste container prior to the actual titration. To begin 7.6 Étalonnage spécifique à l‘utilisateur 7.6 Calibración específica del cliente Quick-Cal Anzeigewertes auf Null mit der Titration zu begin- the titration process reset the display value to zero. -
Página 78: Étalonnage Spécifique À 'Utilisateur Quick-Cal
7.6 Étalonnage spécifique à l‘utilisateur Quick-Cal 7.6 Calibración específica del cliente Quick-Cal Appuyer sur la touche de droite pour modifier la posi- Cada posición decimal parpadea con una luz. El número tion actuelle clignotante du point décimal. Appuyer sur puede cambiarse oprimiendo la tecla derecho. Oprimiendo la tecla izquierda, se puede cambiar a la siguiente posi- la touche de gauche pour passer à... -
Página 79: Nettoyage
Pour passer de l‘étalonnage spécifique à l‘utilisateur („cal“ apparaissant sur l‘afficheur) à l‘étalonnage par défaut („cal“ absent de l‘afficheur}, appuyer sur la touche de gauche pendant 4 secondes. 8. Nettoyage 8. Limpieza Pour assurer une bonne durée de vie de cette burette Para asegurar una vida larga a su bureta digital, debe ser numérique, l‘appareil doit être nettoyé... -
Página 80: Maintenance / Nettoyage
8. Nettoyage 8. Limpieza Please note: Achtung! ¡Atención! Avertissement : - Avant d‘essayer de nettoyer la burette, mettre des - Before the attempt is made to clean the device, - Antes de iniciar la limpieza, - Vor Reinigungsbeginn Schutzkleidung, Schutzbrille vêtements, des lunettes et des gants de protection. - Página 81 - 26 - 8.1 Maintenance / nettoyage 8.1 Mantenimiento / limpieza - Gerät mittels geeignetem Handschutz - Unscrew and remove device from - Dévisser et retirer la burette de la bouteille - Utilizado la protección de las manos de réactif après avoir passé des gants de adecuada, desatornillar el aparato y sacarlo von Vorratsflasche abschrauben und reservoir bottle wearing suitable hand...
- Página 82 8.1 Maintenance / nettoyage 8.1 Mantenimiento / limpieza - Durch mehrmaliges hin und her drehen - Completely empty the device by rota- - Vider entièrement la burette en - Haciendo girar en toda dirección varias der Handräder das Gerät vollständig ting the hand wheel back and forth tournant la molette plusieurs fois d‘avant veces, el volante de mano, vaciar por...
- Página 83 8.1 Maintenance / nettoyage 8.1 Mantenimiento / limpieza - 28 - - Retirer les pièces suivantes de la burette - Las partes siguientes deben ser puestas - Nachfolgende Teile in eine geeignete - Remove the following parts from the comme décrit ci-dessous et les placer en un medio de limpieza adecuado.
-
Página 84: Nettoyage Approfondi
8.2 Intensivreinigung 8.2 Thorough Cleaning 8.2 Nettoyage approfondi 8.2 Limpieza intensiva - Zuerst Reinigung gemäß 8.1 durch- - First perform cleaning as described in section 8.1 führen. above. - Effectuer d‘abord un nettoyage sommaire comme décrit - Primero llevar a cabo la limpieza, según descrita en el - Ventilblock, Zylinder und Dosierkolben au paragraphe 8.1 ci-dessus. - Página 85 - 30 - 8.2 Nettoyage approfondi 8.2 Limpieza intensiva Hinweis! Please note: Gegebenenfalls kann der Kolben durch If necessary, piston and toothed rack Avertissement : ¡Atencion! seitliches Schieben von der Zahnstange can be separated by sliding the piston Si nécessaire, séparer le piston et la entfernt werden.
- Página 86 8.2 Nettoyage approfondi 8.2 Limpieza intensiva - Placer la partie supérieure de l‘appareil - Meter la parte superior del aparato con el - Geräteoberteil auf Ventilblock mit with the left edge of the marking on sur le siège des valves avec le cylindre. bloque de válvula y el cilindro.
-
Página 87: Stérilisation
9. Stérilisation 9. Esterilización Toutes les pièces de la burette numérique entrant en Las partes de la bureta digital que conducen los medios, contact avec le liquide peuvent être autoclavées jusqu‘à pueden ser esterilizadas a una temperatura de hasta 121 °C / 2 bars et supportent un temps de stérilisation de 121 °C /2 bar con un tiempo bajo la regla de DIN te de 20 min conformément aux normes DIN. -
Página 88: Démontage
9.2 Demontage 9.2 Disassembly 9.2 Démontage 9.2 Desmontaje - Neben den in Punkt 8.1 aufgeführten Teilen wer- - In addition to the parts listed under 8.1 all other - En plus des pièces énumérées en 8.1, toutes les autres - Aparte de las partes conductoras de medios descritas den die anderen medienführenden Teile der parts of the burette which come in contact with pièces de la burette en contact avec le liquide doivent... - Página 89 9.3 Desserrage des valves d‘aspiration, distribution et retour 9.3 Aflojar la válvula de aspiración, expulsión y el tubo flexible de retorno - 34 - - Desserrer la valve de distribution en la - Aflojar la válvula de expulsión con una - Ausstoßventil mit Montageschlüssel - Loosen discharge valve by turning it tournant de 180 degrés dans le sens...
-
Página 90: Stérilisation
9.4 Stérilisation 9.4 Proceso de esterilización 9.4 Sterilisation durchführen 9.4 How to Perform a Sterilization Stériliser à la vapeur toutes les pièces en contact Llevar a cabo la esterilización de todas partes avec le liquide ( jusqu‘à 121 °C/2 bars, temps de que conducen los medios a una temperatura Dampfsterilisation aller Medienführen- Perform steam-sterilization of all parts,... - Página 91 9.5 Remontage du piston 9.5 Fijar nuevamente el pistón - 36 - - Pour le remontage, aligner la crémaillère - Para montarlo, poner la cremallera de tal manera, que Zum Einbau die Zahnstange so ausrichten, dass For assembly, align the toothed rack in such a de façon à...
-
Página 92: Fijar La Válvula De Expulsión, Aspiración Y
9.5 Remontage du piston 9.5 Fijar nuevamente el pistón Avertissement : ¡Atención! Insérer délicatement le piston dans le cylindre en El pistón debe ser introducido en el cilindro de verre pour ne pas endommager les lèvres vidrio con mucho cuidado, ya que los labios de d‘étanchéité. -
Página 93: Assemblage De L'appareil
9.6 Fixation des valves d‘aspiration, distribution et recirculation 9.6 Fijar la válvula de expulsión, aspiración y el tubo flexible de retorno - 38 - - Fixer à la main l‘écrou sur la tige de - Abra la tuerca de con una llave de - Mutter auf der Ventilwelle im Uhrzeig- - Secure nut on valve shaft clockwise by la valve dans le sens horaire. -
Página 94: Remplacement Des Valves
10. Ventile auswechseln 10. How to Exchange Valves Undichte oder beschädigte Ansaug-, Ausstoß- und 10. Remplacement des valves 10. Cambiar la válvula Leaking or damaged suction, discharge and recircu Rückführventile sind sofort auszuwechseln (siehe lation valves must be exchanged immediately (refer Remplacer immédiatement des valves d‘aspiration, de Válvulas de expulsión, aspiración y del tubo flexible de distribution et de recirculation endommagées ou présen-... -
Página 95: Cambiar La Válvula De Expulsión
- 40 - 10.1 Remplacement de la valve d‘aspiration 10.1 Cambiar la válvula de expulsión - Kugel einsetzen und neues - Réajuster correctement le tube - Poner la válvula de expulsión hasta el - Insert ball and install new suction d‘aspiration. -
Página 96: Remplacement De La Valve De Distribution
10.2 Remplacement de la valve de distribution 10.2 Cambiar la válvula de aspiración 10.2 Ausstoßventil auswechseln 10.2 How to Exchange Discharge - Nettoyer la burette (voir chapitre 8). - Llevar cabo la limpieza (véase punto 8). - Déconnecter le tube de distribution Valve - Desenroscar la válvula de aspiración. -
Página 97: Remplacement De La Valve De Recirculation
10.3 Remplacement de la valve de recirculation 10.3 Cambiar el tubo flexible de retorno - Dévisser la valve de recirculation avec la clé de - Desenroscar la válvula del tubo flexible de retorno con montage et la retirer. una llave de montaje. - Visser une nouvelle valve de recirculation et serrer avec - Montar nueva vólvulo del tubo flexible de retorno y la clé... - Página 98 11. Réparations en usine 11. Devolución para su reparación - Sans preuve valable de décontamination, les appa- - Unidades que no han sido propiamente limpiadas, serán reils seront considérés comme contaminés. Ils seront devueltas a su remitente sin proceder a su reparación. renvoyés non réparés.
-
Página 99: Vérification De L'exactitude Du Volume
12. Vérification de l‘exactitude du volume 12. Control de volumen Les paramètres énumérés dans le chapitre 14 concernant Los parámetros para la precisión de medida de un aparato la précision (R%) et le coefficient de variation (CV%) (R%) señalados en el punto 14 y el coeficiente de varia- d‘un appareil peuvent être testés de la façon suivante : ción (CV%) de un aparato, pueden ser comprobados de la manera siguiente:... - Página 100 12. Vérification de l‘exactitude du volume 12. Control de volumen 2. Pesées répétitives 2. Repetición del peso - Répéter au moins cinq fois la procédure de pesée - Para comprobar la precisión y la exactitud del coeficien- décrite ci-dessus pour obtenir des résultats fiables de te de variación de un aparato es necesario repetir el test de précision ainsi qu‘un coefficient de variation de proceso descrito bajo el punto 1, por lo menos 5 veces.
-
Página 101: Détection Des Pannes
13. Détection des pannes Problème Cause possible Remèdes - Valves desserrées ou endom- - Serrer les valves avec la clé de montage ou Fuite de liquide à la jonction magées remplacer si nécessaire (voir point 10). entre le siège des valves et les valves Note : après stérilisation (voir point 9), les valves d‘aspiration/distribution/recirculation... - Página 102 13. Détection des pannes Fuite de liquide entre la tige - Tige de la valve d‘arrêt - Serre l‘écrou sur la tige de la valve d‘arrêt. de la valve d‘arrêt et le siège desserrée des valves (uniquement per- ceptible lorsque le couvercle est retiré) Volume distribué...
-
Página 103: Problemas Y Soluciones
13. Problemas y soluciones Problema Causa posible Soluciones De uno grietas entre las vál- - La válvula está flojo o dañado - Apretar la válvula con llave de montaje vulas de aspiración, expulsión, o de ser necesario (véase punto 1O). ¡Atención! Después de la esterilización tubo de retorno y el bloque de (véase punto 9) as válvulas de aspi-... - Página 104 13. Problemas y soluciones En la válvula del tubo de retor- - Tubo de retorno flojo o dañado - Apretar el tubo de retorno con la llave de montaje o en su caso reemplazarla no (parte trasera del aparato) (véase punto 10). gotea líquido Entre la válvula de transmisión - Válvula de transmisión floja...
-
Página 105: Caractéristiques Techniques / Matériaux
14. Caractéristiques techniques / Matériaux 14. Datos técnicos / Material Bureta digital Burette numérique Volumen Volume 10 ml * 0,3 * 0,1 10 ml * 0,3 * 0,1 20 ml * 0,2 * 0,1 20 ml * 0,2 * 0,1 50 ml * 0,2 * 0,1... - Página 106 14. Caractéristiques techniques / Matériaux 14. Datos técnicos / Material La burette numérique possède un certificat de test EI burete digital cumple con los requisitos vigentes de con- certifiant la conformité aux normes allemandes des poids formidad según las normas alemanas de pesos y medidas et mesures (voir document joint 12).
- Página 107 Matérial Material Piston Cylindre Bloc de Manteau de Bille de Siège de Ressort de Flexibles Bagues soupape soupape soupape soupape soupape d‘étanchéité Embolo Cilindro Bloque de Válvula Bola de Asiento de Muelle de Tubos Juntas de la vàlvula embalaje la válvula la válvula la válvula flexibles obturación Burette PTFE...