Tabla de contenido
Publicidad
Idiomas disponibles
Idiomas disponibles
Enlaces rápidos
Publicidad
Tabla de contenido

Manuales relacionados para Babyauto MORE LENNOX 01


Resumen de contenidos para Babyauto MORE LENNOX 01
- Página 1 0-18 kg MANUAL DE INSTALACIÓN INSTALLATION MANUAL...
- Página 2 IMPORTANTE: Conservar para futuras consultas. Procure que las instrucciones puedan conservarse en el sistema de retención infantil durante su ciclo vital. NO INSTALAR LA SILLA EN EL ASIENTO DELANTERO EN SENTIDO CONTRARIO A LA MARCHA SI LOS AIRBAGS WARNING: DELANTEROS ESTÁN ACTIVOS. Keep for future reference.
- Página 3 Español P. 4 — MANUAL DE INSTALACIÓN - Sistema de retención infantil Grupo 0+/1. De 0 a 18 kg (de 0 a 3 años aprox.) English P. 16 — INSTALLATION MANUAL - Child safety seat Group 0+/1. From 0 to 18 kg (from 0 to 3 years approx.)
- Página 4 • Vista general • Overview...
- Página 5 • Puestos de instalación en el vehículo • Positions in the vehicle • Uso de la silla • Car seat usage 3.1.1 3.1.2 3.2.1 3.2.2 CLICK...
- Página 6 3.3.1 3.3.2 3.3.3 3.3.4 3.4.1 3.4.2 3.4.3 3.5.1 3.5.2 3.6.1 3.6.2 CLICK 5 4 3 2 1...
- Página 7 • Instalación de la silla • Installing the child seat • Instalación del niño en la silla • Fastening the child to the seat G. 0+ (0-13 kg) G. 1 (9-18 kg)
- Página 8 5. El grupo de peso y la clase de tamaño ISOFIX para los que está destinado el dispositivo son: Lea detenidamente estas instrucciones. Grupo 0+, para niños de 0 a 13 kg. Grupo 1, para Guárdelas siempre a mano en el bolsillo niños de 9 a 18 kg.
- Página 9 13. Verifique que ninguna parte de la silla infantil 20. Las ilustraciones de las instrucciones son está atrapada en la puerta del vehículo o en meramente informativas. El sistema de retención un asiento reclinable. Además revise que la infantil puede presentar pequeñas diferencias silla de seguridad está...
-
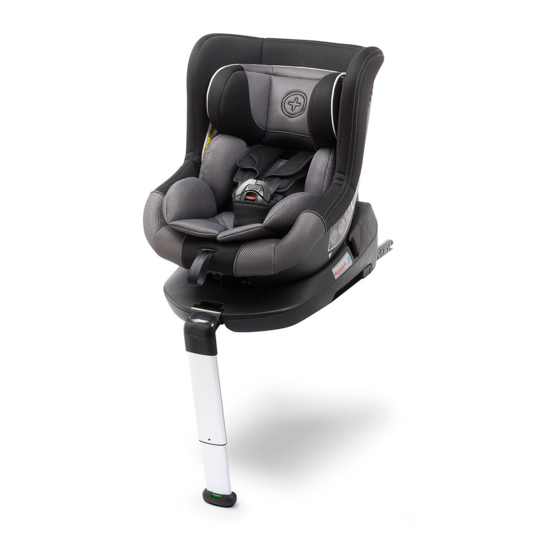
Página 10: Características Generales De La Silla
CARACTERÍSTICAS GENERALES DE LA SILLA 1. VISTA GENERAL • Esta silla tiene la capacidad de girar 360º sobre su base A. Reposacabezas. lo que facilita el acesso y hace más cómoda la instalación B. Protectores de hombro. del niño en la silla. C. Cintas del arnés. • Su reducido peso ofrece mayor facilidad de manejo y transporte. -
Página 11: Puestos De Instalación En El Vehículo
2. PUESTOS DE INSTALACIÓN EN EL VEHÍCULO DÓNDE: En los asientos traseros del vehículo NO instalar en los asientos delanteros salvo en estos casos concretos: 1. Cuando el vehículo no disponga de asientos traseros. 2. Cuando todos los asientos traseros estén ya ocupados por menores de edad de estatura igual o inferior a 135 centímetros. -
Página 12: Uso General De Las Partes De La Silla
3. USO GENERAL DE LAS PARTES DE LA tensión y el ajuste adecuado al cuerpo del niño (fig. SILLA 3.2.2). 3. Cuando el niño este instalado en la silla, asegúrese 3.1. Uso de la hebilla del arnés el arnés queda bien ceñido al cuerpo pero sin 1. -
Página 13: Ajuste De La Altura De La Pata De Apoyo
3. Compruebe que la altura seleccionada es la 2. Pulse el botón (fig. 3.5.1) y sin dejar de hacerlo, correspondiente la altura del niño. Si no lo es, tire o empuje el asiento hacia abajo o hacia arriba reajuste la altura del reposacabezas. para seleccionar la posición reclinado que desee (fig. -
Página 14: Instalación De La Silla
3. Deberá oir un “click” que indica que el asiento ayuda hasta que se agarren en las guías Isofix del vehículo y se cierren haciendo “click” (fig. 4.3). El queda correctamente encajado en la nueva indicador de cierre seguro del sistema Isofix de la posición. -
Página 15: Limpieza Y Mantenimiento
5. INSTALACIÓN DEL NIÑO EN LA SILLA. 6. LIMPIEZA Y MANTENIMIENTO GRUPO 0+/1 1. Para el lavado de las cintas y partes de plástico enjabonar con detergente neutro y agua Solamente para uso de Grupo 0+/1. De templada. 0 a 4 años aproximadamente. (0-18 Kg) 2. -
Página 16: Garantía
7. GARANTÍA Please read the following instructions 1. Quedan excluidos los defectos o averías producidas carefully before installing the product. por uso inadecuado, o el incumplimiento de las normas de seguridad de instalación y mantenimiento descritas en las hojas de instrucciones que acompañan 1 . - Página 17 6. Under no circumstances should the safety seat be 14. Do not disassemble, modify, or add any piece to installed in the front seat of the car opposite the the child seat or harness, as this would seriously direction of travel if the car is equipped with an affect its basic functioning and the safety that the active airbag.
- Página 18 CAR SEAT GENERAL FEATURES 1. OVERVIEW • The biggest feature of this car seat is a 360° A. Headrest. rotation of the child restraint system, wich greatly B. Shoulde rpads. reduces the difficulty of installing the child. C. Harness straps. • The light weight of the product makes it more convenient for parents to install and carry.
- Página 19 2. VEHICLE INSTALLATION POINTS WHERE: In the vehicle rear seats. Please, do NOT install the safety seat in forward seats except for the following cases: 1. Whenever the vehicle does not count with rear seats. 2. When all rear seats are already occupied by children exceeding 135 cm height. 3. When it is not possible to install all child restraints systems in the rear seats. *Note: According to Spanish legislation for child restraint systems (Royal Decree 667/2015). HOW: GROUP 0+ / Install rearward facing.
- Página 20 3. CAR SEAT PARTS USAGE adjusted as tightly as possible without causing discomfort to the child (fig. 3.2.2). 3.1. Usage of buckle 3. Remember that in order to guarantee the child’s safety, harness must be well-tightened . 1. Open the harness buckle by pressing the red button on the buckle and put the the harness on 3.3.
-
Página 21: Adjusting The Recline Position
3.4. Adjusting the length of support leg Reclining the seat. Group 0+ 1. Once the seat is rearward facing, automatically is 1. Turn out the support leg located in the base of placed in the corresponding recline position for the seat (fig. 3.4.1) this group Important: You will hear a click that means the support leg is in the right angle. - Página 22 4. CAR SEAT INSTALLATION release the child seat. The green indicator will turn red showing the Isofix arms are opened (fig. 4.5). 1. Clip the insertion guides onto the Isofix anchorage points in the vehicle (fig. 4.1). 5. FASTENIG THE CHILD TO THE SEAT. 2.
-
Página 23: Cleaning And Maintenance
6. CLEANING AND MAINTENANCE 7. GUARANTEE 1. To wash belts and plastic parts, use neutral 1. The warranty does not cover defects or failures caused by inappropriate use or non-compliance with detergent and warm water. the installation and maintenance safety standards 2. - Página 24 Parque Empresarial Zuatzu Edificio Donosti, 2ª planta Oficina 3 20018 San Sebastián (Gipuzkoa), SPAIN T. +34 943 833 013 / F. +34 943 833 004 www.more-babyauto.eu...