Tabla de contenido
Publicidad
Idiomas disponibles
Idiomas disponibles
Enlaces rápidos
Publicidad
Capítulos
Tabla de contenido

Manuales relacionados para Mettler Toledo Rainin AutoRep S


Resumen de contenidos para Mettler Toledo Rainin AutoRep S
- Página 1 AutoRep S User Manual...
-
Página 3: Tabla De Contenido
Table of Contents Page Safety Instructions Function and Limitations of Use Operating and Control Elements Inserting the Encode Syringe Setting the Volume Filling the Encode Syringe Repetitive Dispensing Ejecting the Encode Syringe Checking the Volume Accuracy Table Servicing and Cleaning Ordering Information ·... -
Página 5: Safety Instructions
9. Before use, check the instrument for visible damages. If there is a sign of a potential malfunction, immediately stop dispensing. Consult the 'Troubleshooting' section of this manual (see page 18), and contact Rainin or METTLER TOLEDO if needed. -
Página 6: Function And Limitations Of Use
Function and Limitations of Use The AutoRep ™ S is a repetitive pipette for quick and simple repetitive dis- pensing of liquids. Volumes from 2 µL to 5 mL can be dispensed with the highest precision and accuracy through combinations of the syringe size used and adjustment of the stroke setting on the stroke-setting wheel. -
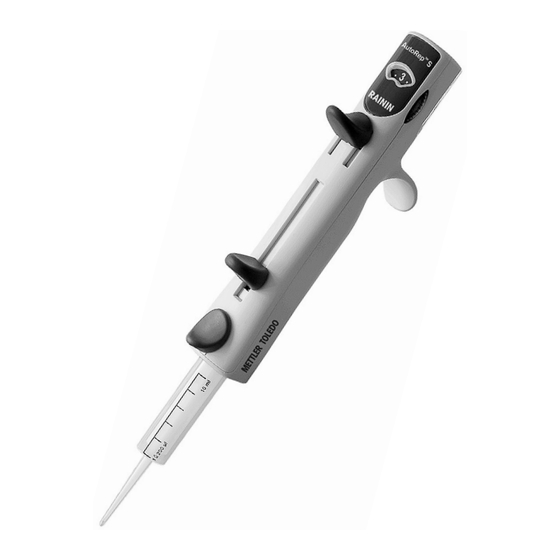
Página 7: Operating And Control Elements
Operating and Control Elements Volume table Back of instrument, Stroke indicator under transparent clip (Number = mm per stroke) Stroke setting wheel Dispensing lever (Start position) Finger rest Handle Locking/filling lever • Lock/decouple piston • Aspirate • Empty completely The volume table is printed on both sides. -
Página 8: Inserting The Encode Syringe
Inserting the Encode Syringe Use of the 25 mL and 50 mL Encode syringes requires the reusable adapter supplied. This is coupled to the syringes with a bayonet lock, and can be detached after use. Push the Swing out the locking/filling locking/filling lever to the... -
Página 9: Setting The Volume
Setting the Volume ™ The possible dispensing volumes of the AutoRep S are listed in tables. These are found beneath the transparent clip on the back of the instrument. There are 9 stroke setting positions, from 1 to 5. Look for the desired dispensing volume (Volume) in the table. Use the stroke setting wheel to set to the proper stroke number (Setting) for the volume that corresponds to the syringe size. -
Página 10: Filling The Encode Syringe
Filling the Encode Syringe Aspirating Liquid Push the locking/filling lever to the lower stop. Immerse the orifice of the Encode syringe vertically into the liquid to a depth of 3–10 mm. Raise the locking/filling lever slowly to the upper stop to avoid the formation of air bubbles. -
Página 11: Repetitive Dispensing
Repetitive Dispensing Dispensing Operation Check the volume setting once again (compare with the settings in the volume table). Wipe off any liquid adhering to the outside of the Encode syringe orifice with a lint-free tissue. Place the orifice of the syringe against the wall of the vessel. -
Página 12: Ejecting The Encode Syringe
Ejecting the Encode syringe Operation Hold the AutoRep ™ S over a vessel. Empty the syringe by pushing the lock- ing/filling lever to its lower stop. Swing out the locking/filling lever (the piston will then be decoupled). ™ Hold the AutoRep S over the waste container. -
Página 13: Checking The Volume
Checking the Volume Depending on use, we recommend that gravimetric testing of the instrument be carried out every 3-12 months. This time frame should be adjusted to individual requirements. Gravimetric volume testing according to DIN EN ISO 8655-5 is performed as follows: Preparation of the instrument Fitting tip. - Página 14 Checking the Volume Calculation (for nominal volume) = Weighing results Z = Correction factor n = Number of weighings (e.g., 1.0029 µL/mg at 20°C, 1013 hPa) Σ x Mean value x = Mean volume V = x · Z Accuracy* Coefficient of Variation* V –...
-
Página 15: Accuracy Table
Accuracy Table Technical Data AutoRep ™ S with Encode syringes, 20°C 'Ex' Nominal Volume ± % < < – – volume range (µl) Stroke setting ≈ % Stroke setting ≈ % Encode of nominal volume of nominal volume syringe 1 ≈ 2% 3 ≈... -
Página 16: Servicing And Cleaning
If this happens, return instrument to an authorized service center. In the event that an instrument must be returned for servicing, please contact Rainin or METTLER TOLEDO for more information. The shelf mount is provided with an adhesive strip for mounting. -
Página 17: Ordering Information · Accessories
Ordering Information · Accessories AutoRep ™ 1 shelf mount, 1 volume table, 3 Encode syringes (0.1 mL, 1 mL, 10 mL). Pack of Cat. No. MT Ordering No. AutoRep ™ AR-S 17013008 Spare Parts: Pack of Cat. No. MT Ordering No. Shelf mount SM-ARS 17013009... -
Página 18: Troubleshooting
Troubleshooting Problem Possible cause Corrective action Syringe piston cannot Locking/filling lever First press the ejection be locked after the is not pushed down key and remove the Encode syringe completely and is not Syringe, then push the has been inserted. swung out. -
Página 19: Repairs, Calibration Service
Repairs, Calibration Service If a problem with the instrument's function cannot be fixed in your labora- tory, please contact Rainin: tech.support@rainin.com. For safety reasons, instruments returned for checks and repairs must be clean and decontaminated! Return for repair a) Clean and decontaminate the instrument carefully. b) Complete the "Declaration on Absence of Health Hazards"... -
Página 20: Warranty Information
Warranty Rainin Instrument, LLC shall not be liable for the consequences of improper handling, use, servicing, operating or unauthorized repairs of the instrument or the consequences of normal wear and tear especially of wearing parts such as pistons, seals, valves and the breakage of glass as well as the fail- ure to follow the instructions of the operating manual. - Página 21 Inhaltsverzeichnis Seite Sicherheitsbestimmungen Funktion und Einsatzgrenzen Funktions- und Bedienelemente Encode tip einsetzen Volumen einstellen Encode tip füllen Repetitives Dosieren Encode tip abwerfen Volumen kontrollieren Genauigkeitstabelle Wartung und Reinigung Bestelldaten · Zubehör Störung – was tun? Reparatur, Kalibrierservice Mängelhaftung Entsorgung...
-
Página 23: Sicherheitsbestimmungen
9. Vor Verwendung stets den ordnungsgemäßen Zustand des Gerätes prüfen. Sollten sich Störungen des Gerätes ankündigen, sofort aufhören zu dosieren und das Kapitel 'Störung – was tun' befolgen (s. Seite 36). Ggf. an Rainin oder METTLER TOLEDO wenden. -
Página 24: Funktion Und Einsatzgrenzen
Funktion und Einsatzgrenzen Beim AutoRep ™ S handelt es sich um einen Mehrfachdispenser zum schnellen und einfachen repetitiven Dosieren von Flüssigkeiten. Durch die Kombination der verwendeten Spitzen-Größe und der am Hubeinstellrad eingestellten Hubeinstellung können Volumina zwischen 2 µl und 5 ml mit höchster Präzision und Richtigkeit dosiert werden. -
Página 25: Funktions- Und Bedienelemente
Funktions- und Bedienelemente Volumentabelle Geräterückseite, Hubanzeige unter Klarsichtclip (Zahl = mm pro Hub) Hubeinstellrad Dosierhebel (Startposition) Fingerbügel Griffteil Arretier-/Füllhebel • Kolben arretieren/ entkoppeln • Aufsaugen • Restentleerung Die Tabelle ist doppelseitig bedruckt. Abwurftaste Zum Wechseln, Clip einfach hochschieben, Zylinder freigeben Tabelle umdrehen und (Encode tip abwerfen) Klarsichtclip wieder zurückschieben. -
Página 26: Encode Tip Einsetzen
Encode tip einsetzen Zum Einsatz der 25 ml und 50 ml Encode tips wird der mitgelieferte wie- derverwendbare Adapter benötigt. Dieser wird über einen Bajonettverschluss an die Encode tips gekoppelt und kann nach der Verwendung wieder gelöst werden. Arretier-/ Arretier-/Füll- Füllhebel bis hebel nach zum unteren vorne heraus-... -
Página 27: Volumen Einstellen
Volumen einstellen Die möglichen Dosiervolumina des AutoRep ™ S sind in Tabellen aufgeführt. Diese befinden sich unter dem Klarsichtclip auf der Geräterückseite. Die Hubeinstellung hat 9 Positionen von 1 bis 5. Das gewünschte Dosiervolumen (Volume) in der Tabelle suchen. Zur verwendeten Encode tip (Syringe size) die zum Volumen gehörige Hubzahl (Setting) mit dem Hubeinstellrad einstellen. -
Página 28: Encode Tip Füllen
Encode tip füllen Flüssigkeit aufsaugen Arretier-/Füllhebel bis zum unteren Anschlag schieben. Encode tip Spitze 3 - 10 mm tief senk- recht in die Flüssigkeit eintauchen. Arretier-/Füllhebel bis zum oberen Anschlag langsam hochziehen, um das Entstehen von Luftblasen zu ver- meiden. Hinweis: Kleine Luftblasen im Bereich des Kolbens können vernachlässigt werden, da die Resthubsperre verhindert, dass das nach dem letzten kompletten Dosierschritt... -
Página 29: Repetitives Dosieren
Repetitives Dosieren Dosiervorgang Volumeneinstellung nochmals überprü- fen (Einstellungen mit der Volumenta- belle vergleichen!). Außen anhaftende Flüssigkeit an der Encode tip Spitze mit faserfreiem Zellstoff abwischen. Spitze der Encode tip an die Gefäß- wand anlegen. Flüssigkeit jeweils durch vollständiges Herunterdrücken des Dosierhebels abgeben und diesen ganz nach oben zurückgleiten lassen. -
Página 30: Encode Tip Abwerfen
Encode tip abwerfen Handhabung AutoRep ™ S über ein Gefäß halten. Encode tip durch Schieben des Arretier-/Füllhebels bis zum unteren Anschlag entleeren. Arretier-/Füllhebel nach vorne heraus- schwenken (der Kolben wird dadurch entkoppelt). ™ AutoRep S über Abfallbehälter halten. Abwurftaste nach unten drücken (hiermit wird der Zylinder freigegeben). -
Página 31: Volumen Kontrollieren
Volumen kontrollieren Wir empfehlen, je nach Einsatz, alle 3-12 Monate eine gravimetrische Volumenprüfung des Gerätes durchzuführen. Dieser Zyklus sollte den indivi- duellen Anforderungen angepasst werden. Die gravimetrische Volumenprü- fung nach DIN EN ISO 8655-5 erfolgt in folgenden Schritten: Gerät vorbereiten Spitze aufstecken. Diese Prüfung kann mit jeder Encode tip Größe durchgeführt werden. - Página 32 Volumen kontrollieren Berechnung (für Nennvolumen) = Wäge-Ergebnisse Z = Korrekturfaktor n = Anzahl der Wägungen (z. B. 1,0029 µl/mg bei 20 °C, 1013 hPa) Σ x Mittelwert x = Mittleres Volumen V = x · Z Richtigkeit* Variationskoeffizient* V – V 100 s R% = ·...
-
Página 33: Genauigkeitstabelle
Genauigkeitstabelle Technische Daten AutoRep ™ S mit Encode tip, 20 °C 'Ex' Nennvolumen Volumen- ± % VK* < < – – Encode tip bereich Hubeinstellung ≈ % vom Hubeinstellung ≈ % vom (µl) Nennvolumen Nennvolumen 1 ≈ 2% 3 ≈ 6% 5 ≈ 10% 1 ≈ 2% 3 ≈ 6% 5 ≈ 10% 0,1 ml 0,5 ml 10 - 1,33... -
Página 34: Wartung Und Reinigung
Geräteinnere gelangt! Falls dies doch passiert, schicken Sie das Instrument an ein autorisiertes Servicestelle. Muss ein Instrument zum Kundendienst gegeben werden, wenden Sie sich bitte an Rainin oder METTLER TOLEDO, um weitere Informationen zu erhalten. Der Regalhalter ist zur Montage mit einem Klebestreifen ausgestattet. -
Página 35: Bestelldaten · Zubehör
Bestelldaten · Zubehör AutoRep ™ 1 Regalhalter, 1 Volumentabelle, 3 Encode tips (0,1 ml, 1 ml, 10 ml). Verp.-Einh. Best.-Nr. MT Best.-Nr. AutoRep ™ AR-S 17013008 Ersatzteile: Verp.-Einh. Best.-Nr. MT Best.-Nr. Regalhalter SM-ARS 17013009 Volumentabelle VT-ARS 17013010 Encode tips Größe Verp.- unsteril steril** Einheit Best.-Nr. Best.-Nr. Best.-Nr. -
Página 36: Störung - Was Tun
Störung – was tun? Störung Mögliche Ursache Was tun? Encode tip Kolben Arretier-/Füllhebel ist Erst Abwurftaste betätigen lässt sich nicht nicht ganz nach unten und Encode tip entfernen, arretieren nachdem geschoben und nicht dann Arretier-/Füllhebel Encode tip eingesetzt nach vorne geschwenkt. ganz nach unten schie- wurde. -
Página 37: Reparatur, Kalibrierservice
(Vordrucke können beim Händler oder Hersteller angefordert werden). c) Ausgefülltes Formular gemeinsam mit dem Gerät an Rainin oder METTLER TOLEDO senden mit genauer Beschreibung der Art der Störung und der verwendeten Medien. Der Rücktransport geschieht auf Gefahr und Kosten des Einsenders. -
Página 38: Mängelhaftung
Mängelhaftung Rainin Instrument, LLC haftet nicht für Folgen unsachgemäßer Behandlung, Verwendung, Wartung, Bedienung oder nicht autorisierter Reparatur des Gerätes oder für Folgen normaler Abnutzung, insbesondere von Ver- schleißteilen wie z.B. Kolben, Dichtungen, Ventilen sowie bei Glasbruch. Gleiches gilt für die Nichtbeachtung der Gebrauchsanleitung. Insbesondere übernimmt Rainin keine Haftung für entstandene Schäden, wenn das Gerät weiter zerlegt wurde als in der Gebrauchsanleitung beschrieben oder wenn fremde Zubehör- bzw. - Página 39 Table des matières Page Règles de sécurité Fonction et limites d'emploi Eléments de fonction et de commande Emboîter l'Encode seringue Réglage du volume Remplissage de l'Encode seringue Distribution répétitive Ejection de l'Encode seringue Contrôle du volume Table de précision Entretien et nettoyage Données de commande ·...
-
Página 41: Règles De Sécurité
8. Ne pas effectuer de modifications techniques. Ne pas démonter l’appareil. 9. Avant l'utilisation vérifier l'état correct de l'instrument. Si des dérange- ments se manifestent, arrêter immédiatement la distribution et consulter le chapitre 'Dérangement, que faire?' (voir page 54). Si besoin est, contacter Rainin ou METTLER TOLEDO. -
Página 42: Fonction Et Limites D'emploi
Fonction et limites d'emploi L' AutoRep ™ S est un distributeur à répétition pour une distribution répétitive facile de milieux de façon rapide et simple. Grâce à la combinaison de la taille d'Encode seringue utilisée et du réglage sur la roue de réglage de la course, des volumes de 2 µl à... -
Página 43: Eléments De Fonction Et De Commande
Eléments de fonction et de commande Tableau des volumes Au dos sous Indication de la course clip transparent (Nombre = mm par course) Roue de réglage de la course Levier de distribution (Position de démarrage) Anse de maintien Poignée Levier de blocage/ remplissage •... -
Página 44: Emboîter L'encode Seringue
Emboîter l'Encode seringue Pour l'utilisation des Encode seringues 25 ml et 50 ml, il faut l'adaptateur réutilisable fourni avec les seringues. Ce dernier est rattaché aux Encode seringues au moyen d'une fermeture à baïonnette et peut être desserré après l'utilisation. Pousser Tourner le levier de... -
Página 45: Réglage Du Volume
Réglage du volume Les volumes de distribution possibles du AutoRep ™ S sont indiqués dans des tableaux. Ils se trouvent sous le clip transparent sur le dos de l'appareil. Le réglage de la course compte 9 positions de 1 à 5. Rechercher le volume de distribution souhaité... -
Página 46: Remplissage De L'encode Seringue
Remplissage de l'Encode seringue Aspiration de milieu Pousser le levier de blocage/remplis- sage jusqu'à la butée inférieure. Plonger l’orifice de l'Encode seringue verticalement 3 - 10 mm dans le liquide. Tirer lentement le levier de blocage/ remplissage vers la butée supérieure afin d'éviter la formation de bulles d'air. -
Página 47: Distribution Répétitive
Distribution répétitif Opération de distribution Vérifier encore une fois le réglage du volume (comparer les réglages avec le tableau de volumes!). Essuyer le liquide attaché à l'extérieur de l'Encode seringue avec de la cellu- lose sans fibres. Appuyer l’orifice de l'Encode seringue contre la paroi intérieure du récipient. -
Página 48: Ejection De L'encode Seringue
Ejection de l'Encode seringue Manipulation Tenir l'AutoRep ™ S au-dessus d’un récipient. Vider l'Encode seringue en poussant le levier de blocage/remplissage jusqu’à la butée inférieure. Tourner le levier de blocage/remplis- sage vers l'avant (le piston est alors découplé). Tenir l'AutoRep ™... -
Página 49: Contrôle Du Volume
Contrôle du volume Selon l'utilisation, nous recommandons l'exécution d'un contrôle gravi- métrique du volume de l'appareil tous les 3-12 mois. Ce cycle doit être adapté en fonction des exigences individuelles. Le contrôle gravimétrique du volume selon DIN EN ISO 8655-5 se déroule selon les étapes suivantes: Préparation de l'appareil Pose de la pointe. -
Página 50: Contrôle De Volume
Contrôle de volume Calcul (volume nominal) = résultats des pesages Z = facteur de correction n = nombre de pesages (par ex. 1,0029 µl/mg à 20 °C, 1013 hPa) Σ x Valeur moyenne x = Volume moyen V = x · Z Exactitude* Coefficient de variation* V –... -
Página 51: Table De Précision
Table de précision Données techniques AutoRep ™ S avec Encode seringue, 20 °C 'Ex' Volume Gamme ± % < < – – nominal de volume Course ajustée ≈ % Course ajustée ≈ % Encode (µl) de volume nominal de volume nominal seringue 1 ≈... -
Página 52: Entretien Et Nettoyage
à un centre de services. Dans le cas où un instrument doit être retourné pour des travaux d'entretien, veuillez contacter Rainin ou METTLER TOLEDO pour plus d'informations. Le support pour étagère est équipé d'un ruban adhésif pour le montage. -
Página 53: Données De Commande · Accessoires
Données de commande · Accessoires AutoRep ™ S, 1 support pour étagère, 1 tableau de volumes, 3 Encode seringues (0,1 ml, 1 ml, 10 ml). Emb. stand. Réf. MT Réf. AutoRep ™ AR-S 17013008 Pièces de rechange Emb. stand. Réf. MT Réf. -
Página 54: Dérangement - Que Faire
Dérangement – que faire? Dérangement Cause possible Que faire? Après la mise en place Le levier de blocage/ En premier actionner la de l'Encode seringue, remplissage n'est pas touche d'éjection et enlever le piston de l'Encode complètement en bas l'Encode seringue, ensuite seringue ne peut pas et n'est pas tourné... -
Página 55: Réparation, Service De Calibration
être demandés auprès du distributeur ou du fabricant). c) Envoyer l’appareil accompagné du formulaire dûment complété au Rainin ou au METTLER TOLEDO avec une description précise du type de panne et des fluides utilisés. Le renvoi est effectué aux dépends et risques de l’expéditeur. Le client est responsable de l'ensemble des coûts de transport et porte la responsabilité... -
Página 56: Garantie
Garantie Rainin Instrument, LLC déclinons toute responsabilité en cas de consé- quences d'un traitement, d'une utilisation, d'un entretien et d'une manipu- lation incorrecte ou d'une réparation non-autorisée de l'appareil ou d'une usure normale, notamment des pièces d'usure, telles que les pistons, les joints d'étanchéité, les soupapes et de rupture de pièces en verre. - Página 57 Contenido Página Normas de seguridad Función y limitaciones de empleo Elementos funcionales y operativos Colocación de la jeringuilla Encode Ajuste de volumen Llenado de la jeringuilla Encode Dosificación repetitiva Expulsar la jeringuilla Encode Controlar el volumen Tabla de precisión Mantenimiento y limpieza Referencias · Accesorios ¿Qué hacer en caso de avería? Reparación, Servicio de calibración Garantía Eliminación...
-
Página 59: Normas De Seguridad
9. Antes de cada uso, comprobar el estado correcto de aparato. En el caso de que se produzcan averías en el aparato, inmediatamente dejar de dosificar y seguir las instrucciones del capítulo '¿Qué hacer en caso de avería?' (véase pág. 72). En caso necesario dirigirse al Rainin o METTLER TOLEDO. -
Página 60: Función Y Limitaciones De Empleo
Función y limitaciones de empleo El AutoRep ™ S es un dispensador manual para fácil dosificación repeti- tiva de muestras de manera rápida y sencilla. Mediante la combinación del tamaño de la jeringuilla Encode utilizada y el ajuste de la carrera en la rueda de ajuste, es posible dosificar volúmenes entre 2 µl y 5 ml con máxima precisión y exactitud. -
Página 61: Elementos Funcionales Y Operativos
Elementos funcionales y operativos Tabla de volúmenes Parte posterior debajo del clip transparente Indicación de la carrera (Cifra = mm por carrera) Rueda de ajuste de carrera Palanca de dosificación (Posición inicial) Estribo para dedo Empuñadura Palanca de bloqueo/ llenado • Bloquear/desacoplar émbolo •... -
Página 62: Colocación De La Jeringuilla Encode
Colocación de la jeringuilla Encode Para utilizar las jeringuillas Encode de 25 y 50 ml se requiere el adap- tador reutilizable suministrado junto con las puntas. Este se acopla a las jeringuillas Encode mediante un cierre bayoneta y después del uso puede retirar nuevamente. Desplazar la Girar la palanca de... -
Página 63: Ajuste De Volumen
Ajuste de volumen Los volúmenes de dosificación posibles con el AutoRep ™ S están indicados en la tabla. Estos se encuentran debajo del clip transparente en la parte posterior del aparato. El ajuste de la carrera tiene 9 posiciones, de 1 a 5. Buscar en la tabla el volumen a dosificar deseado (Volume). -
Página 64: Llenado De La Jeringuilla Encode
Llenado de la jeringuilla Encode Aspiración de muestra Desplazar la palanca de bloqueo/ llenado hasta el tope inferior. Introducir el orificio de la jeringuilla Encode 3 a 10 mm verticalmente dentro del líquido. Para evitar la formación de burbujas de aire, levantar la palanca de blo- queo/llenado lentamente hasta el tope superior. -
Página 65: Dosificación Repetitiva
Dosificación repetitiva Proceso de dosificación Verificar nuevamente el ajuste de volu- men (comparar los ajustes con la tabla de volúmenes). Limpiar el líquido adherido exte- riormente al orificio de la jeringuilla Encode con un paño suave exento de pelusas. Colocar el orificio de la jeringuilla Encode tocando la pared interior del recipiente. -
Página 66: Expulsar La Jeringuilla Encode
Expulsar la jeringuilla Encode Manejo Mantener el AutoRep ™ S sobre un recipiente. Vaciar la jeringuilla Encode despla- zando la palanca de bloqueo/llenado hasta el tope inferior. Girar la palanca de bloqueo/llenado hacia adelante (esto producirá el desacople del émbolo). Mantener el AutoRep ™... -
Página 67: Controlar El Volumen
Controlar el volumen Dependiendo de la aplicación, recomendamos realizar un control gravi- métrico de volumen del aparato cada 3 a 12 meses. La periodicidad debe adaptarse a los requisitos individuales. El control gravimétrico de volumen según DIN EN ISO 8655-5 se realiza en tres pasos: Preparación del aparato Este control se puede realizar con una jeringuilla Encode de cualquier capacidad, habitualmente se utiliza la jeringuilla Encode de 5 ml. - Página 68 Controlar el volumen Cálculo (para el volumen nominal) = resultados de las pesadas Z = factor de corrección n = número de pesadas (por ej. 1,0029 µl/mg a una tempe- ratura de 20 °C, 1013 hPa) Σ x Valor medio x = Volumen medio V = x · Z Exactitud Coeficiente de variación V –...
-
Página 69: Tabla De Precisión
Tabla de precisión Datos técnicos AutoRep ™ S con jeringuillas Encode, 20 °C 'Ex' Volumen Gama de ± % CV* < < – – nominal ajuste (µl) Carrera ajustada ≈ % Carrera ajustada ≈ % jeringuilla de volumen nominal de volumen nominal Encode 1 ≈ 2% 3 ≈ 6% 5 ≈ 10% 1 ≈ 2% 3 ≈ 6% 5 ≈ 10%... -
Página 70: Mantenimiento Y Limpieza
En el caso de que un instru- mento deba devolverse para efectuar un servicio, por favor póngase en contacto con Rainin o METTLER TOLEDO para más informaciones. El soporte de estante está provisto de una tira adhesiva para su montaje. -
Página 71: Referencias · Accesorios
Referencias · Accesorios AutoRep ™ S, 1 soporte de estante, 1 tabla de volúmenes, 3 jeringuillas Encode (0,1 ml, 1 ml, 10 ml). un. p. emb. Ref. MT Ref. ™ AutoRep AR-S 17013008 Recambios: un. p. emb. Ref. MT Ref. Soporte de estante SM-ARS 17013009 Tabla de volúmenes VT-ARS 17013010 Jeringuillas Encode Capacidad... -
Página 72: ¿Qué Hacer En Caso De Avería
¿Qué hacer en caso de avería? Avería Causa probable ¿Qué hacer? No se puede blo- La palanca de bloqueo/ En primer lugar accionar la quear el émbolo de llenado no está total- tecla de expulsión y retirar la la jeringuilla Encode mente deslizada hacia jeringuilla Encode, después después de haber abajo ni tampoco girada empujar la palanca de blo-... -
Página 73: Reparación, Servicio De Calibración
(podrá solicitar los formularios al comerciante o fabricante). c) Enviar el formulario cumplimentado junto con el aparato al Rainin o METTLER TOLEDO, adjuntando una descripción detallada del tipo de avería y de los medios utilizados. El remitente será quien corra con la responsabilidad y los costes del envío de vuelta. -
Página 74: Garantía
Garantía Rainin Instrument, LLC seremos responsables de las consecuencias deriva- das del trato, manejo, mantenimiento, uso incorrecto o reparación no auto- rizada del aparato, ni de las consecuencias derivadas del desgaste normal, en especial de partes susceptibles de abrasión, tales como émbolos, juntas hermeticas, valvulas, ni de la rotura de partes de vidrio o del incumplimien- to de las instrucciones de manejo. - Página 75 Indice Pagina Norme di sicurezza Funzioni e limitazioni all'uso Elementi funzionali e di comando Inserimento del Encode tip Regolazione del volume Riempimento del Encode tip Dosaggio ripetitivo Espulsione del Encode tip Controllo del volume Tabella di precisione Manutenzione e pulizia Ordinazioni · Accessori Individuazione e risoluzione dei problemi Riparazioni · Servizio calibrazione Garanzia Smaltimento...
-
Página 77: Norme Di Sicurezza
9. Prima dell’uso controllare sempre che lo stato dello strumento sia rego- lare. In caso di anomalie dello strumento, interrompere immediatamente il dosaggio e vedere il capitolo 'Individuazione e soluzione dei problemi' (pagina 90). Eventualmente rivolgersi al Rainin o METTLER TOLEDO. -
Página 78: Funzioni E Limiti All'uso
Funzioni e limiti all'uso AutoRep ™ S è una pipetta automatica a dosaggio ripetitivo per eseguire in modo veloce e facile il dosaggio ripetitivo di liquidi. Grazie alla combi- nazione della misura del Encode tip usato e alla regolazione della corsa mediante l’apposita rotella, si possono dosare volumi da 2 µl a 5 ml con grande precisione e accuratezza. -
Página 79: Elementi Funzionali E Di Comando
Elementi funzionali e di comando Tabella volumi Parte posteriore dietro il Indicatore corsa fermaglio trasparente (Numero = mm per corsa) Rotella di regolazione corsa Levetta di dosaggio Posizione iniziale Manico dell'impugnatura Impugnatura Levetta di arresto/ riempimento • Arretramento/sgancio pistone • Aspirazione • Scarico residui La tabella è... -
Página 80: Inserimento Del Encode Tip
Inserimento del Encode tip Per l'uso dei Encode tip da 25 ml e da 50 ml, usare l'adattatore riuti- lizzabile fornito con Encode tips. Questo viene accoppiato ai Encode tip mediante un innesto a baionetta e può essere rimosso dopo l'uso. Spingere Far ruotare la levetta la levetta di di arresto/... -
Página 81: Regolazione Del Volume
Regolazione del volume desiderato I possibili volumi di dosaggio di AutoRep ™ S sono riportati nelle tabelle. Esse si trovano sotto il fermaglio trasparente sulla parte posteriore dello strumento. Ci sono 9 posizioni di regolazione della corsa, da 1 a 5. Cercare il volume di dosaggio desiderato (Volume) nella tabella. Impostare il numero di corsa (Setting), tramite la rotella di regolazione, in funzione del volume da dosare e del Encode tip (Tip size) da utilizzare. -
Página 82: Riempimento Del Encode Tip
Riempimento del Encode tip Aspirazione del liquido Spingere la levetta di arresto/riempi- mento fino al fermo inferiore. Immergere la puntale del Encode tip in verticale nel liquido per 3-10 mm. Tirare lentamente, per impedire la for- mazione di bolle, verso l’alto la levetta di arresto/riempimento fino al fermo superiore. -
Página 83: Dosaggio Ripetitivo
Dosaggio ripetitivo Dosaggio Verificare ancora un volta la regola- zione del volume (confrontare le impo- stazioni con la tabella dei volumi!). Asciugare il liquido rimasto all’esterno del puntale Encode tip con un panno di cellulosa privo di peli. Appoggiare la punta del Encode tip solla parete del recipiente. -
Página 84: Espulsione Del Encode Tip
Espulsione del Encode tip Tenere l'AutoRep ™ S sopra un conteni- tore. Svuotare l'Encode tip spingendo la levetta di arresto/riempimento fino al fermo inferiore. Far ruotare la levetta di arresto/riem- pimento in avanti (in questo modo si sgancia il pistone). Tenere AutoRep ™ S sopra un contenitore per i rifiuti. -
Página 85: Controllo Del Volume
Controllo del volume Si consiglia, in base al tipo di impiego, una verifica gravimetrica del volume dello strumento ogni 3-12 mesi. L’intervallo va calcolato in funzione della frequenza di utilizzo. La verifica gravimetrica del volume va eseguita secon- do la norma DIN EN ISO 8655-5, secondo la seguente procedura: Preparare lo strumento Inserire il puntale. - Página 86 Controllo del volume Calcolo (per il volume nominale) = risultati della pesata Z = fattore di correzione n = numero di pesate (ad es. 1,0029 µl/mg a 20 °C, 1013 hPa) Σ x Valore medio x = Valore medio V = x · Z Accuratezza* Coefficiente di variazione* V –...
-
Página 87: Tabella Di Precisione
Tabella della precisione Caratteristiche tecniche AutoRep ™ S con Encode tips, 20 °C 'Ex' Volume Volume range ± % CV* < < – – nominale (µl) Posizione selettore ≈ % Posizione selettore ≈ % Encode tip del volume nominale del volume nominale 1 ≈ 2% 3 ≈ 6% 5 ≈ 10% 1 ≈ 2% 3 ≈ 6% 5 ≈ 10% 0,1 ml... -
Página 88: Manutenzione E Pulizia
Manutenzione e pulizia AutoRep ™ S è tarato di fabbrica e non richiede alcuna manutenzione. Non smontare lo strumento! In caso di imbrattamento esterno consigliamo di pulire lo strumento con un panno e acqua o isopropanolo. Non immergere in acqua. Importante! Evitare che il liquido penetri all’inter- no dello strumento! Se ciò... - Página 89 Dati per l'ordinazione · Accessori AutoRep ™ 1 supporto da parete, 1 tabella volumi, 3 Encode tips (0,1 ml, 1 ml, 10 ml). Confezione Codice MT Codice AutoRep ™ AR-S 17013008 Parti d. ricambio Confezione Codice MT Codice Supporto da parete 1 SM-ARS 17013009 Tabella volumi VT-ARS 17013010 Encode tips Capacità...
-
Página 90: Individuazione E Risoluzione Dei Problemi
Individuazione e risoluzione dei problemi Difetto Causa possibile Rimedio Dopo aver inserito La levetta di arresto/riem- Premere prima il tasto l'Encode tip non si pimento non è stata spinta di espulsione e rimuo- riesce a bloccare il completamente verso il vere l'Encode tip, quindi relativo pistone. basso e fatta ruotare in spingere a fondo verso avanti. -
Página 91: Riparazioni, Servizio Calibrazione
Riparazioni, Servizio calibrazione Qualora non fosse possibile correggere un eventuale malfunzionamento nel proprio laboratorio, si prega di contattare Rainin: tech.support@rainin.com. Ricordare che, per ragioni di sicurezza, verranno esaminate e riparate solo le pipette pulite e decontaminate! Invio al servizio riparazioni a) Pulire e decontaminare con cura lo strumento. b) Compilare il modulo "Dichiarazione di assenza di rischi per la salute" (da richiedersi al distributore o al produttore). -
Página 92: Garanzia
Garanzia Rainin Instrument, LLC non ci assumiamo alcuna responsabilità per le conseguenze di manipolazione, uso, manutenzione e impiego non corretti, o per riparazioni non autorizzate dello strumento o per le conseguenze del normale consumo, in particolare dei componenti soggetti ad usura, come ad esempio pistoni, guarnizioni e valvole, e in caso di rottura del vetro. - Página 93 目录 页面 安全说明 功能与使用限制 操作与控制元件 安装分液管 设置分液量 分液管吸液 连续分液 退出分液管 检查体积 技术参数表 维修与清洁 订购信息 — 配件 故障排查 维修、校准服务 保修声明 报废...
-
Página 95: 安全说明
安全说明 请仔细阅读以下内容! 该仪器有时可能用来处理危险物质、执行危险操作,以及与危险设备一 起使用。本手册并未列出与此类应用相关的所有潜在安全风险。该移液 器用户有责任在使用前咨询相关人士,确立相关的安全和健康规程,并 确定受限于哪些法规。 1. 每个用户在操作前必须阅读并理解本操作手册,并且在使用过程中遵 守这些说明。 2. 遵守有关危险防护的一般说明和安全说明,例如,穿着防护服、戴护 目镜和手套。 在使用传染性或其他危险样品时,必须遵守所有适当的规定并采取相 应的防范措施。 3. 遵守试剂制造商的相关信息。 4. 仅移取符合本仪器“使用与规范操作”规定的液体。请遵循“禁止操 作”说明(参阅第 96 页)。 5. 使用仪器时应确保不会伤及使用人及其他人员。防止溅出。只能使用 适当的容器。 6. 在处理危险样品时,避免接触分配器前端。 7. 使用仪器时请勿用力过大! 8. 切勿尝试进行任何技术改动。请勿拆卸仪器。 9. 使用前,检查仪器是否存在可观察到的损坏情况。如果有潜在的故障 迹象,请立即停止分液操作。参阅本手册的“故障排查”一节 (第 108 页),如有必要请与 Rainin 或梅特勒-托利多联系。... -
Página 96: 功能与使用限制
功能与使用限制 AutoRep ™ 是可以快速、简单地连续分液的移液器。使用不同量程的 µL 分液管配合不同的档位设定,可实现 至 最高精确度和准确性的 分液。 工作条件 该仪器用于分配样品,请遵循以下限制要求: – 5 9°F 至 104°F(15°C 至 40°C) (仪器和试剂 – 按需规定其他温度) – 蒸气压力最高为 500 mbar – 粘度: 50 mL 分液管为 20 mPa 5 mL 分液管为 260 mPa 1 mL 分液管为 977 mPa 禁止操作 AutoRep ™ 在正确的操作过程中,所分配的样品只能与分液管而非 接触。 用户必须确保仪器能执行目标应用。若使用非原配分液器,用户在使用 前必须检查其兼容性,并进行功能和量程测试。 仪器不可用于分配可腐蚀聚丙烯(例如:分液管圆筒)、聚乙烯(分液 管活塞)、LCP(0.1 mL 分液管)或者 PC/PBT 以及聚碳酸酯。 注: 仪器和分液管不可高压灭菌(有关预消毒分液管详情,请参见第 页) 。分液管是一次性消耗品。进行仪器消毒时,可使用市面上买得到的溶 液,但前提是对 PC/PBT 和 PC 不具腐蚀性。... -
Página 97: 操作与控制元件
操作与控制元件 量程表 仪器背面, 档位显示 透明夹下面 (次数 = mm/冲程) 档位设定 移液杆 (开始位置) 指钩 手柄 锁定/吸液杆 • 锁定/解锁活塞 • 吸液 • 完全清空 仪器背面的量程选择 退分液管键 表为双面的。要更改 表格,只需向上推动 释放活塞 夹子,换面,再次将 (退出分液管) 夹子转回并向下移动 即可。 分液管 正面:档位设置 背侧:量程表... -
Página 98: 安装分液管
安装分液管 使用 25 mL 和 50 mL 分液管时需要配合附赠的可重复使用的适配器。 分液管与适配器通过一个旋扣连接,使用后可打开。 将锁定/吸 向下扳开锁 液杆推至较 定/吸液杆。 低的停止位 置。 从下方垂直 将锁定/吸液 向上安装分液 杆扳上锁住 管。 分液管。 适配器... -
Página 99: 设置分液量
设置分液量 AutoRep ™ S 的分配量如表所示。这些数据可在仪器背面的透明夹下找到。 从 1 到 5 档,有 9 个半整数的档位设定。 从表内查找所需分配量(量程)。 使用档位设定拨至对应分液管量程。 分配步骤:取决于分液管的量程 (mL),相同的单次分液体积可以 分不同的次数(参见以下示例)。分液次数越少,对应的分液量越 准确。 示例: 每步所需的分液量:200 µL 所用的分液器规格: 2.5 mL = 档位设定 4 = 最多 11 次分液 5 mL = 档位设定 2 = 最多 24 次分液 10 mL = 档位设定 1 = 最多 49 次分液 表中列出的量程是唯一可用选项。由于第一次分液必须 重要说明! 舍弃,因此表中给出的分液次数始终会少一次。... -
Página 100: 分液管吸液
分液管吸液 吸液 将锁定/吸液杆推至较低的停止位置。 将分液管垂直浸入液体 3–10 mm 深 处的位置。 缓慢将锁定/吸液杆抬至上方停止位置 以免形成气泡。 注: 靠近活塞的气泡可以忽略,因为在最后 一步分液后有锁定装置可防止残余体积 被意外排出。... -
Página 101: 连续分液
连续分液 分液操作 再次检查体积设置(与量程表进行 比较)。 使用无尘纸擦掉分液管外部附着的 液体。 将分液管吸嘴靠在容器壁处。 完全按下移液杆进行液体分配,然后 任其滑回原位。 注意要平滑、均匀地分配。 重要说明! 第一次的分液需要舍弃!... -
Página 102: 退出分液管
退出分液管 操作 握住 AutoRep ™ S,置于容器上方。 将锁定/吸液杆推至较低的停止位置, 清空分液管。 向下扳开锁定/吸液杆 (活塞即被松开)。 握住 AutoRep ™ S。向下按退分液管 键,释放活塞。这样可退出分液器。 警告! 分液管上可能会有液体残留。退出分液 管 时 , 不 得 对 使 用 者 或 其 他 人 员 造 成 威胁。 注: 连续分配高粘度介质时无法保证分液管 的密封性。... - Página 103 检查体积 根据实际使用,我们建议每 3-12 个月对仪器进行一次重量分析测试。可 根据用户的特定需求对此周期进行调整。依照 DIN EN ISO 8655-5 进行以 下重量分析测试: 准备仪器 安装分液管。可用任意规格的分液管进行该测试。不过,通常使用 5 mL 的分液管。 进行测试 a) 将 AutoRep™ S 的档位数设置调整为第 5(标称体积的 10%)。 b) 将分液管垂直浸入测试液体中进行吸液。 c) 舍弃第一次分液量;该步骤仅用于调整内部装置。 d) 将称量容器(装有少量去离子水)放在天平上,调零。 e) 将第二次分液量分配至称量容器内。为此,以稳定的速度向下推至 停止位置并保持。然后,将分液管吸嘴在容器壁上滑动约 10 mm 左右,将粘附的液体排入容器。 f) 在测试记录上记录称量值。 g) 重复步骤 D 至 F 10 次。 (对于第 10 次测试,5ml 的分液管配合档数为 5 的设置,需要再 吸液一次 — 步骤 A-C。) h) 在档位数 3(标称体积的 6%)和 1(标称分液量的 2%)重复相 同的测试。 i) 从而获得所需的测量值总计达到 30 个。...
-
Página 104: 检查体积
检查体积 计算(标称体积) = 称量结果 Z = 校正因子 n = 称量次数 (例如:在 20°C、1013 hPa 时为 1.0029 µl/mg) Σ x 平均体积 V = x · Z 平均值 x = 精确度* 重复性* V – V 100 秒 A% = · 100 CV% = = 标称体积 标准偏差 Σ (x – x) s = Z · n – 1 ) = 准确性 (A%) 和重复性 (CV%) 计算: 根据统计公式计算 A% 和 CV% 统计... -
Página 105: 技术参数表
技术参数表 技术参数 ™ AutoRep S 分液管 标称体积 ± % CV* 量程范围 (µl) < < – – 分液管 档位设置 ≈ 档位设置 ≈ 标称体积 % 标称体积 % 1 ≈ 2% 3 ≈ 6% 5 ≈ 10% 1 ≈ 2% 3 ≈ 6% 5 ≈ 10% 0.1 mL 2 –10 0.5 mL 10 –50 1.33 0.73 1.0 mL 20 –100 1.33 0.38 1.25 mL 25 –125 1.33 0.38 2.5 mL 50 –250... -
Página 106: 维修与清洁
维修与清洁 AutoRep ™ S 出厂前均经校准通过并无需特殊保养。 本仪器不可拆卸! 如果存在外部污染,我们建议用沾水或异丙醇擦拭的方式清洁仪器。 切勿将仪器浸入水中。 重要说明! 避 免 液 体 进 入 仪 器 内 部 。 如 果 进 入 液 体 , 则 需 将 仪 器 返 回 至 授 权 的 服 务 中 心。若必须返回仪器进行维修,请联系... -
Página 107: 订购信息 - 配件
订购信息 — 配件 AutoRep ™ 1 个挂钩,1 个量程表,3 支分液管(0.1 mL、1 mL、10 mL)。 MT 订货号 包装规格 型号 AutoRep ™ AR-S 17013008 MT 订货号 配件: 包装规格 型号 SM-ARS 17013009 挂钩 VT-ARS 17013010 量程表 分液管 量程范围 包装规格 普通 预消毒** 型号 订货号 型号 订货号 0.1 mL 100 ENC-100 17007399 ENC-100S 17007400 0.5 mL 100 ENC-500 17001871 ENC-500S 17001872 1 mL 100... -
Página 108: 故障排查
故障排查 问题 可能原因 应对措施 在安装分液管后无 首先按下退分液管键并 锁定/吸液杆未压至底 法锁定活塞。 取下分液管,然后将锁 部并且没有扳开。 定/吸液杆按到底并完全 扳开。 未指定分液量 档位未调至正确位置。 确保档位正确进入 档位。 分液管活塞下方的 分液管泄漏 更换分液管 气泡变大。 分液管泄漏 更换分液管 准确度 A 和/或偏差 系数 CV 超出容差 分液管很难移动。 更换分液管 范围。 移液杆未完全并均匀地 均匀地将移液杆按至 按下。 底部。 未舍弃第一次分液。 舍弃第一次分液。 无法在完全清空后 分液管插入不正确。 按下退分液管键,完全 退出分液管。 按下锁定/吸液杆,并将 其扳开。... -
Página 109: 维修、校准服务
维修、校准服务 如果仪器的功能性问题无法在您的实验室解决,请联系 Rainin: tech.support@rainin.com。 出于安全考虑,必须对返回待检查和维修的仪器进行清洁与消毒! 返修 a) 仔细清洁和消毒仪器。 b) 填写“无健康危害”表格(请向您的供应商或制造商索取)。 c) 将填写完毕的表格与仪器一起发送至 Rainin 或梅特勒-托利多,并需 提供有关故障类型及所用介质的确切说明。 仪器返回途中的风险和成本由寄送者承担。客户负责全部运费并承担运 输过程中的全部损失或破坏。 校准服务 ISO 9001 和 GLP 指南要求定期检查容量仪器。我们建议每 3–12 个月检 查一次分液量。 间隔大小取决于仪器的特定要求。对于经常使用腐蚀性液体的仪器而 言,间隔应当更短。 Rainin 校准服务部门可对您的仪器进行校准。... -
Página 110: 保修声明
保修声明 对于因下述原因而导致的仪器问题,Rainin Instrument, LLC 概不负责:仪 器处置、使用、维护不当;未经授权修理仪器;仪器部件正常磨损,尤 其是磨损件的正常磨损,如活塞、密封垫片、阀门;玻璃破裂;不按操 作手册操作。如因执行本操作手册中所述操作以外的其它操作而导致仪 器损坏,或因使用非原厂部件而导致仪器损坏,Rainin 也不负责。 报废 废弃仪器及分液管时,应遵守当地相关的法规。 如有技术更改,恕不另行通知。可能有错误。... - Página 111 目次 ページ 安全上のご注意 機能と使用方法の制限事項 各部分の説明 エンコードシリンジの装着 容量設定 サンプルの吸引 連続分注 エンコードシリンジの外し方 容量点検 精度表 メンテナンス 注文情報 · アクセサリ トラブルシ ューティ ング 修理、 校正サービス 保証情報 廃棄について...
-
Página 113: 安全上のご注意
安全上のご注意 必ず以下をよく お読みく ださい ! 本製品で危険物質を扱う場合、 危険な条件下で使用する場合などこの取扱説明書 では、 そのような用途に伴って発生する可能性のある全ての安全性上の問題を取 り扱うことはできません。 ユーザーは、 安全性と健康に関わる規則を遵守し、 使用 前に適切な制限を規定する責任を有します。 1. 全てのユーザーは、 使用前にこの取扱説明書を読み、 使用中は必ず指示を遵 守してください。 危険防止のための一般的な指示と安全上の指示 (保護服、 保護ゴーグル、 保護 手袋の着用など) に従ってください。 感染性または危険性の高いサンプルを扱う際は、 該当するすべての規則と注 意事項に従わなければなりません。 試薬メーカーの指示を遵守してください。 本製品は、 用途と操作上の制限に記載された仕様に適合する液体の分 114 注のみに使用してください。 使用禁止規定を遵守してください ( ペー ジ参照) 。 疑問点は、 メーカーまたはサプライヤにお問い合わせください。 必ずユーザーや他の人々に危険が無いように本製品を使用してください。... -
Página 114: 機能と使用方法の制限事項
機能と使用方法の制限事項 AutoRep ™ この は、 液体の連続分注を迅速かつ簡単に行える連続分注器です。 使 用するシリンジの組み合わせ、 ストローク設定ホイールによるストローク設定で、 μl 5 ml から の容量で最高の精度で分注可能です。 用途の限界 本製品は下記の限界範囲内での分注に適しています : – 1 5°C ~ 40°C まで – (装置と試薬 他の温度については別途お問い合わせください) – 500 蒸気圧 ミリバールまで – 50 ml 20 mPa 粘度 : シリンジの場合 5 ml 260 mPa シリンジの場合 1 ml 977 mPa シリンジの場合... -
Página 115: 各部分の説明
各部分の説明 容量表 容 本体裏面、 ストロークインジケータ 透明クリップの下 (数 ストロークあたり ) ストローク設定ホイール 分注レバー (開始位置) フィンガーレスト ハンドル ロック 充填レバー • ピストンのロック 分離 • 吸引 • 残留液の排出 イジェクションキー 容量表は両面に印刷され ています。 交換時は、 クリ シリンダーの解放 ップを上に押し上げ、 表 (シリンジを外す) を裏返して、 透明クリップ を再び押し戻します。 エンコードシリンジ 前面 : 裏面 : ストローク設定... -
Página 116: エンコードシリンジの装着
エンコードシリンジの装着 25 ml 50 ml と のエンコードシリンジを使用する場合、 付属のアダプタを使用して ください。 バイヨネッ トロックで本体に取り付け、 使用後は外せます。 ロック 充填レ ロック 充填レ バーを限界ま バーを前方に で下に押す 出して下 方 に 向かせる エンコードシリ ロック 充填レ ン ジ を 真っ 直 バーを再び元 ぐ垂 直 に 下 か に戻す ら取り付ける アダプタ... -
Página 117: 容量設定
容量設定 AutoRep ™ で対応可能な分注容量は表に記載されています。 表は本体裏面の透 明クリップの下にあります。 ストローク設定は、 ~ までの つで可能です。 (Volume) 表で、 必要な分注容量 を探します。 ストローク設定ホイールでシリンジのサイズに対応する容量に適したストロー ク数 (Setting) に設定します。 (ml) 分注のステップ : シリンジの容量 に応じて ステップ当たりの分注量は 同じにし、 異なる回数分注を行います (下の例を参照) 。 ステップ数が少ないほ ど、 分注容量の正確性が高い必要があります。 200 µL 例 : 分注ステップ毎の希望の分注容量 : 使用するシリンジのサイズ : 2.5 ml = 4 = ストローク設定... -
Página 118: サンプルの吸引
サンプルの吸引 液体を吸引する ロック 充填レバーを限界まで下に押す 3 – 10 mm エンコードシリンジの先端を の深さで垂直に液体に浸す ロック 充填レバーを止まるところまで上方 へ、 気泡の発生を防ぐためにゆっく りと引 き上げる 注意 : 前回終了した分注ステップの残留容量が間違 えて分注されることを残留排出ロックが防い でいるため、 ピストン付近での小さな気泡は 無視することができます。... -
Página 119: 連続分注
連続分注 分注操作 容量設定をもう一度点検する (設定を容量 表と比較する) けば立たないティッシュ (キムワイプなど) でエンコードシリンジの先端から外部に 付着した液体をふき取る 容器の壁にシリンジの先端をあてがう 分注レバーを完全に下に押し切ることによ って液体を放出し、 レバーを完全に上まで 滑り戻らせる スムーズかつ均等に分注するよう注意する 重要 ! 一番初めのステップ分のサンプルを排出して く ださい !... -
Página 120: エンコードシリンジの外し方
エンコードシリンジの外し方 操作 AutoRep ™ を容器の上に持っていく ロック 充填レバーを限界まで下方に押し て、 シリンジを空にする ロック 充填レバーを前方に出して下方に 向かせる (そのあとピストンが切り離され ます) AutoRep ™ を廃棄容器の上に持っていき イジェクションキーを下に押すとシリンダー が解放され、 シリンジが外れます 警告 ! 媒体の残留物がシリンジ開口部に付着してい ることがあります。 シリンジは、 ユーザーや他の 人々に危険が無いように外してください。 注意 : 粘度の高い媒体を複数回分注すると、 シリン ジの密閉度が損なわれます。... -
Página 121: 容量点検
容量点検 3-12 弊社では用途に応じて ヶ月ごとに本製品の重量分析容量テストを行うこと DIN EN を推奨します。 この周期は個々の要求レベルに応じて調整してください。 ISO 8655-5 規格に即した重量分析容量テストは、 次のようなステップで行われます : 準備する チップを取り付けます。 このテストはどのサイズのエンコードシリンジでも行 5 ml えます。 ただし、 通常は サイズを使用します。 テストを実行する AutoRep™ S ストローク設定 (公称容量の ) を で設定します。 エンコードシリンジを充填し、 エンコードシリンジを その際垂直にテスト用 液体に浸します。 最初の分注ステップは破棄します。 このステップは、 「 あそび」 を補正します。 計量容器に少量の脱イオン水を充填してはかりの上に載せ、 風袋重量を計 ります。 二番目の分注ステップを計量容器に注入します。 その際、 分注レバーを均一 10 mm な速度で止まるまで下に押し、... - Página 122 容量点検 計算 = Z = 重量測定値 補正係数 n = 1.0029 µl/mg 重量測定回数 例、 20°C 1013 hPa) 、 Σ x V = x · Z x = 平均容量 平均値 精度 変動係数 V – V 100 s A% = · 100 CV% = = 容量設定 標準偏差値 Σ (x – x) s = Z · n – 1 ) = (A%) (CV%) 精度 と変動係数...
-
Página 123: 精度表
精度表 技術データ ™ AutoRep エンコードシリンジ使用 ± % CV* (µl) < < エンコード 容量範囲 – – ≈% ≈% シリンジ ストローク設定 ストローク設定 設定容量 設定容量 1 ≈ 2% 3 ≈ 6% 5 ≈ 10% 1 ≈ 2% 3 ≈ 6% 5 ≈ 10% 0.1 ml 2 –10 0.5 ml 10 –50 1.33 0.73 1.0 ml 20 –100 1.33 0.38 1.25 ml 25 –125 1.33 0.38 2.5 ml 50 –250... -
Página 124: メンテナンス
メンテナンス AutoRep ™ は工場出荷前に校正されておりメンテナンスフリーです。 本体を分解しないでください ! 外部の汚れは、 水またはイソプロピルアルコールを含ませた布で 清掃してください。 水に浸さないでください。 重要 ! 液体が本体内部に入らないようご注意くださ い。 液体が入ってしまった場合は、 本体を弊社 までお送りください。 保守のため本体を送る 場合は、 弊社までご連絡ください。 壁取付けホルダーには、 粘着テープ がついています... -
Página 125: 注文情報 アクセサリ
· 注文情報 アクセサリ AutoRep ™ ×1 ×1 (0.1 ml 1 ml 10 ml) 壁取付けホルダー 、 容量表 、 エンコードシリンジ 、 、 各 入数 製品名 品番 AutoRep ™ AR-S 17013008 アクセサリ 入数 製品名 品番 SM-ARS 17013009 壁取付けホルダー VT-ARS 17013010 容量表 エンコードシリンジ 容量 入数 未滅菌 品番 滅菌済... -
Página 126: トラブルシ ューティ ング
トラブルシ ューティ ング 問題点 考えられる原因 対処法 エンコードシリンジを ロック 充填レバーが完全 最初にイジェクションキー 挿入した後、 シリンジ に下まで押されていない、 を押し、 シリンジを取り外し ピストンがロックでき 前方に出されて下げられ た後、 ロック 充填レバーを ない ていない 完全に下まで押し、 前方に 出して下げる 未定義の分注容量 ストローク設定ホイール ストローク設定ホイールが がきちんと止まっていない 所定の位置で止まっている ことを確認する シリンジピストン下部 シリンジが密封されてい シリンジを交換する の気泡が大きくなる ない および または 公 シリンジが密封されてい シリンジを交換する... -
Página 127: 修理、 校正サービス
修理、 校正サービス 本製品の機能に問題が生じ、 お客様のラボで問題解決できない場合は、 弊社まで ご連絡ださい。 安全上の理由から、 点検 ・ 修理等で本製品を送る場合は、 必ず丁寧に洗浄し除染し てく ださい。 修理品を送る場合 本体を丁寧に洗浄し除染してください。 b) 『健康上有害な物質を含有しないことに関する宣誓書』 を記入してください (指定書式はサプライヤまたはメーカーにご請求ください) 。 c) 記入した書式と共に本製品を弊社へご送付ください。 不具合の種類および使 用した媒体の詳しい説明も添えてください。 本製品の返送に関わるリスクと費用は、 お客様の負担となります。 すべての送料費 用、 輸送中における商品の紛失 ・ 損傷は、 お客様の負担となります。 校正サービス ISO 9001 GLP 、 のガイドラインでは、 容量計測機器の定期的な検査が必要とされ 3–12 ています。 ヶ月ごとに容量検査を行うことを推奨します。... -
Página 128: 保証情報
保証情報 弊社は、 不適当なハンドリング、 使用、 保守、 操作の結果、 または装置の認可されて いない修理の結果、 あるいは通常範囲の磨耗の結果、 特にピストン、 シーリング、 バ ルブなどの磨耗部分、 ガラスの破損の際に対する損害賠償責任を負いません。 弊 社は、 取扱説明書を遵守しなかった場合、 または当社製品以外の部品が取り付け られた場合は、 損害賠償責任を負いません。 廃棄について 本体とエンコードシリンジの廃棄については、 該当する各国の廃棄 規則に従って ください。 予告なく技術的に変更することがあります... - Página 130 For more information Rainin Instrument LLC 7500 Edgewater Drive Oakland, CA 94621 Subject to technical changes ©7/2011 Rainin and METTLER TOLEDO Printed in Germany. 9920-407 Rev A a METTLER TOLEDO Company...