
Manuales relacionados para Schlage LM9200 Serie


Resumen de contenidos para Schlage LM9200 Serie
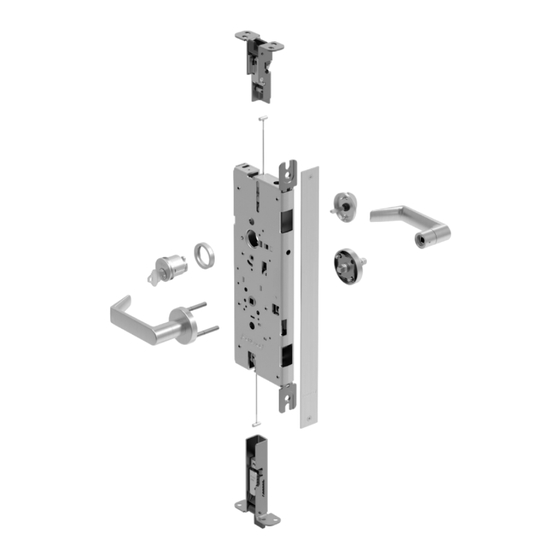
- Página 1 LM9200-Series *P516-955* P516-955 Lever by lever mortise lock for wood and hollow metal doors Installation instructions Tools B\cx" For fire-rated wood door application For two point latch application...
-
Página 2: Tabla De Contenido
For Android: QR Barcode Scanner Complete top strike installation .........17 Door preparation Check door preparation dimensions. If door preparation dimensions do not match, go to www.schlage.com for door preparation instructions or refer to the enclosed template. OUTSIDE Functions A D E Ø... -
Página 3: Fire Barrier Installation (Fire-Rated Wood Door Only)
Check top strike cutout. IMPORTANT: THE CUTOUT FOR THE TOP STRIKE MUST BE ON THE STOP SIDE OF THE DOOR. If the cutout is not on the stop side of the Top strike cutout door, contact the door distributor. 1³⁄₁₆" ⁵⁄₈"... - Página 4 With fire barrier in correct orientation, slide barrier into Remove knockouts from fire barrier. door pocket. Remove knockouts per door handing and function. Exterior Remove knockout Function Trim LM9210, LM9225, Rose LM9290EL/EU, Escutcheon ● RH, LR door shown with top notch LM9291EL/EU cutout (door stop side) facing down.
-
Página 5: Install Latch(Es)
Install latch(es) Connect cable end fitting(s) to latch(es). Top latch: Pull cable link down. Slide cable end into cable link. IMPORTANT! Check lock handing before installation. Bottom latch: Bend cable slightly to access cable link, then install. LM9210 does not use a lock handing screw. Top latch Bottom latch For 2-point latch only... -
Página 6: Check Cable Spool(S) Position
Feed the cable(s) through the door. Perform cable binding check at the mortise pocket. The ends of the cables will rest in the mortise pocket. Insert the top latch into the door. Pulling on bottom cable should retract the bottom latch (2-point latch only). -
Página 7: Install Mortise Chassis
Install mortise chassis FOR ELECTRIFIED LOCKS ONLY: Route the wire harness and wiring into the prepared channel before proceeding with installation. Attach cable end(s) to spool(s). Feed the cable through the spool. Cable end Fit the cable end into the cable hole. Cable end Check that the cable is properly Top spool... -
Página 8: Important
IMPORTANT LM9225 ONLY: Install inside mounting plate. If clicking noises are heard during clockwise adjustment, unwind the cable with one -half turn counter-clockwise. Then, continue clockwise adjustment. If clicking persists, check that cable is not caught on an edge or jammed at spool covers. Check latch operation –... -
Página 9: Check Latch Operation - Bottom Latch
Check latch operation – bottom latch Put top latch in locked position. The tilting link indicates a 2-point system is properly adjusted. Locked With latches released as described at step 6e, check the center slot on the front edge of the mortise case. The tilting link should be visible extending slightly at the opening as shown below. -
Página 10: Lock The Latch(Es)
Lock the latch(es) Turn the top cable spool screw counter-clockwise one Lock (extend) the top latch by hand. If applicable, the bottom latch additional turn. should also lock. Pull the top latch as shown to lock. The tilting link should now be visible extending slightly at the center slot opening. -
Página 11: Secure The Mortise
Secure the mortise Strikes and fire pin Secure the mortise to the door with two mounting Prepare door frame for top strike. screws. If using a door seal or gasket, install first. If necessary, drill pilot holes With door nearly closed, use straight edge to transfer location of for mounting screws. - Página 12 Prepare floor for bottom strike (2-point latch only). Mark the bottom center point of each slot (e) and prepare door frame as shown. Latch DO NOT DRILL THIRD HOLE AT THIS TIME. Chisel out pocket Wood ¹⁄₂" deep 1¹⁄₄" 1" Z\,"...
-
Página 13: Install Levers And Cylinders (If Applicable)
Install fire pin (fire door one-point application only). ROSE TRIM ONLY: Install cylinder(s) (if applicable). With key halfway into cylinder, Follow the instructions included with the fire pin kit. insert cylinder, compression Rotate key and cylinder ring and cylinder spring. clockwise. -
Página 14: Install Armor Front Plate
ESCUTCHEON TRIM ONLY: Install armor front plate Install cylinder(s) (if applicable). With key halfway into cylinder, If necessary, use the armor front as a template to mark insert cylinder and cylinder Rotate key and cylinder for drilling, and prepare the door. spring. -
Página 15: Install Interior Lever Assembly
Install interior lever assembly Fire-rated wood door only: Peel adhesive backing from intumescent. Apply intumescent to armor front plate. Tighten screws on the interior mounting plate assembly. CAUTION Intumescent must be properly aligned before adhesive contacts the armor plate. Adhesive is permanent and not repositionable. Interior Install the interior lever assembly. -
Página 16: Check Latch Position(S)
THUMBTURN FUNCTIONS ONLY: Install thumbturn ALL FUNCTIONS: Tighten the interior lever bushing assembly. with spanner wrench. Make sure the lock is unlocked. Insert the thumbturn with the turn vertical. Escutcheon trim Turn vertical Check latch position(s) Remove tape from bottom latch (2-point latch only). Rose trim Turn vertical... -
Página 17: Complete Top Strike Installation
Rotate the lever to release the latch(es). Check that the top latch (and bottom latch, if applicable) is in the released position. If necessary, adjust the latch(es). For 1-point latch refer to steps 6d and 6e on page 9. For 2-point latch refer to step 7 on page 9 and page 10. Complete top strike installation Adjust top strike as necessary, then install the third strike screw to fix the strike position. - Página 18 LM9200-Series Cerradura de mortaja, manija por manija, LM9200 para puertas de madera y huecas de metal Instrucciones de instalación Serrure levier / levier à mortaise pour portes en bois et en métal creux LM9200 Instructions d'installation Herramientas Outils (4 mm) B\cx"...
- Página 19 Destinado para usar en aplicaciones de puertas dobles donde las dos hojas deben estar activas. • Basado en la cerradura de mortaja Schlage L y disponible con la mayoría de las manijas, molduras y opciones de Schlage L. • Requiere que la puerta se prepare específicamente para el modelo Schlage LM9200.
-
Página 20: Preparación De La Puerta
Compruebe las dimensiones de preparación de puerta. Vérifier les dimensions de préparation de porte. Si las dimensiones de preparación de la puerta no coinciden, visite www.schlage.com para ver instrucciones sobre la preparación de la puerta o consulte la plantilla incluida. -
Página 21: Instalación De La Barrera Contra Incendios
Instalación de la barrera contra incendios (Solo aplicación para puertas de madera con clasificación contra incendios) Installation sur barre coupe-feu (Pour les portes en bois cotées pour leur résistance au feu uniquement) Instale el intumescente. Installez l'intumescent. Los componentes para incendios deben instalarse para mantener la clasificación para incendios de la abertura. Observe el lado de la puerta en el intumescente. - Página 22 Retire los orificios troquelados de la barrera contra Con la barrera en la orientación correcta, deslice la incendios. barrera en el bolsillo de la puerta. Positionnez la barre coupe-feu dans le bon sens et Retirez les bouchons de la barre coupe-feu. faites-la glisser dans le logement de la porte.
-
Página 23: Instale El (Los) Pasador(Es)
Instale el (los) pasador(es) Confirme que la cerradura superior esté marcada con LM9200 LOCK ONLY (SOLO PARA CERRADURA Installez le(s) loquet(s)) LM9200), luego retire la etiqueta. Vérifiez que le loquet supérieur possède une étiquette SERRURE LM9200 UNIQUEMENT, puis retirez-la. ¡IMPORTANTE! Compruebe que el lado de la cerradura sea el correcto antes de la instalación. - Página 24 Inserte el pasador inferior en la puerta (solo para pasadores de dos puntos). Coloque la puerta sobre caballetes con el recorte de la muesca Insérez le loquet inférieur dans la porte (pour loquet à deux superior (lado del tope de la puerta) hacia abajo. points uniquement).
-
Página 25: Compruebe La Posición Del Carrete De Cable
Realice la verificación del plegado del cable en el Compruebe la posición del carrete de cable. bolsillo de la mortaja. Vérifiez la position de la bobine de câble. Vérifiez le pliage du câble dans la pochette de la mortaise. Revise el (los) carrete(s) para asegurarse de que no estén plegados (hacia arriba y abajo del chasis de mortaja). - Página 26 Conecte el (los) extremo(s) de los cables al (a los) carrete(s). Reliez la/les extrémité(s) du câble à la/aux bobine(s). Inserte el cable por el carrete. Se muestra el carrete Extremo del cable Extremo del cable superior Ajuste el extremo del cable Extrémité...
- Página 27 Instale las cubiertas superior e inferior del carrete en el chasis de la mortaja. Installez les couvercles supérieurs et inférieurs de bobine sur le bâti de la mortaise. Compruebe que el cable Las cubiertas del carrete deben instalarse esté correctamente colocado para proteger la cerradura contra los desechos.
-
Página 28: Importante
IMPORTANTE IMPORTANT Si se escucha un chasquido durante el ajuste en sentido horario, desenrolle el cable con media vuelta en sentido Coloque el ensamblaje de la manija exterior y el husillo y antihorario. Luego, continúe el ajuste en sentido horario. Si accione sobre la puerta. - Página 29 Gire el tornillo de ajuste del cable superior en sentido Si le levier s'affaisse ou ne revient pas dans sa position horario. initiale, vérifiez que la cage du ressort est adéquatement orientée (voir l'illustration de l'étape 6a). Tournez la vis de réglage du câble supérieur dans le sens horaire.
-
Página 30: Compruebe El Funcionamiento Del Pasador - Pasador Inferior
Compruebe el funcionamiento del pasador – pasador inferior Gire el tornillo del carrete del cable inferior en sentido antihorario 3 vueltas. Vérifiez le fonctionnement du loquet – loquet El enlace de inclinación debe estar visible extendiéndose inférieur levemente hacia la ranura central (vea la ilustración en el paso de arriba). -
Página 31: Bloquee El (Los) Pasador(Es)
Bloquee el (los) pasador(es) Compruebe la rotación de la manija. Vérifiez la rotation du levier. Verrouillez le(s) loquet(s) Bloquee (extienda) el pasador superior a mano. Si corresponde, el pasador inferior también debe bloquear. Verrouillez (libérez) le loquet supérieur à la main. Le cas échéant, le loquet inférieur doit également être verrouiller. -
Página 32: Asegure La Mortaja
Gire la manija para libere el pasador superior. Mientras gira la manija, encinte el perno del pasador inferior a la puerta al ras con la parte inferior de la puerta. Tournez le levier de sorte à relâchez le loquet Lorsque vous tournez le levier, appliquez du ruban adhésif sur le supérieur. -
Página 33: Cerraduras Y Clavija Para Incendios
Cerraduras y clavija para incendios Con el extremo plano de la cerradura contra el tope, centre la cerradura con las marcas del marco (c). Gâches et axe coupe-feu Use un lápiz para trazar el contorno de dos orificios ranurados (d). En plaçant l'extrémité... - Página 34 Instale la cerradura inferior (solo pasadores de Instale la cerradura superior. dos puntos) Installez la gâche supérieure. Installez la gâche inférieure (loquet à deux points Instale dos (2) tornillos de la cerradura superior usando la ranura uniquement). en la cerradura. Limpie los desechos de los orificios, luego inserte los anclajes (a) Installez deux (2) vis pour la gâche supérieure à...
-
Página 35: Instale Manijas Y Cilindros (Si Corresponde)
Instale la clavija para incendios (Solo aplicación de un Instale el husillo interior, el resorte, la caja del resorte punto en puerta para incendios). y la placa de montaje con dos tornillos. Installez l'axe coupe-feu (Utilisation sur porte Installez l'axe intérieur, le ressort, le boîtier à ressort et coupe-feu à... - Página 36 SOLO MOLDURA DE LA EMBELLECEDOR: SOLO MOLDURA DE LA PLACA DE SEGURIDAD: Instale el (los) cilindro(s) si corresponde. Instale el (los) cilindro(s) si corresponde. GARNITURE DE ROSETTE UNIQUEMENT : GARNITURE D'ENTRÉE INTÉRIEURE Installez le (les) cylindres le cas échéant. UNIQUEMENT: Installez le(s) cylindre(s) le cas échéant.
-
Página 37: Instale La Placa De Protección Delantera
Solo aplicación para puertas de madera con Instale la placa de protección delantera clasificación contra incendios: Installez la plaque avant de l'armure Pour utilisation sur les portes en bois cotées pour leur résistance au feu uniquement : De ser necesario, use el frente de la protección como plantilla para marcar la perforación y prepare la puerta. -
Página 38: Instale El Ensamblaje De La Manija Interior
Instale la placa delantera de protección. Instale el ensamblaje de la manija interior. Installez la plaque avant de l'armure. Installez l'ensemble du levier intérieur. Enrosque manualmente el casquillo en la placa de montaje. Vissez à la main uniquement la bague sur la plaque de montage. Moldura de la embellecedor Garniture de rosette Casquillo... -
Página 39: Compruebe La(S) Posición(Es) Del Pasador
SOLO FUNCIONES DE PESTILLO GIRATORIO: TODAS LAS MOLDURAS: Ajuste el casquillo de la Instale el conjunto del pestillo giratorio. manija interior con una llave expansora. FONCTIONS DE BARRETTE TOURNANTE TOUTES LES GARNITURES : Serrez la bague du UNIQUEMENT : Installez l'ensemble de la barrette levier intérieur à... -
Página 40: Complete La Instalación De La Cerradura Superior
Compruebe el funcionamiento del pasador inferior Complete la instalación de la cerradura superior (solo pasadores de dos puntos). Effectuez l'installation de la gâche supérieure Vérifiez le fonctionnement du loquet inférieur (loquet à deux points uniquement). Ajuste la cerradura superior de ser necesario, luego instale el tercer tornillo de la cerradura para fijar la posición de la cerradura.